
Katie's 3VZE head gasket job!
 Apr 20, 2007 | 06:42 PM
#221

Thread Starter
Registered User
Joined: Dec 2006
Posts: 611
Likes: 1
From: Virginina Beach
Here todays progress:
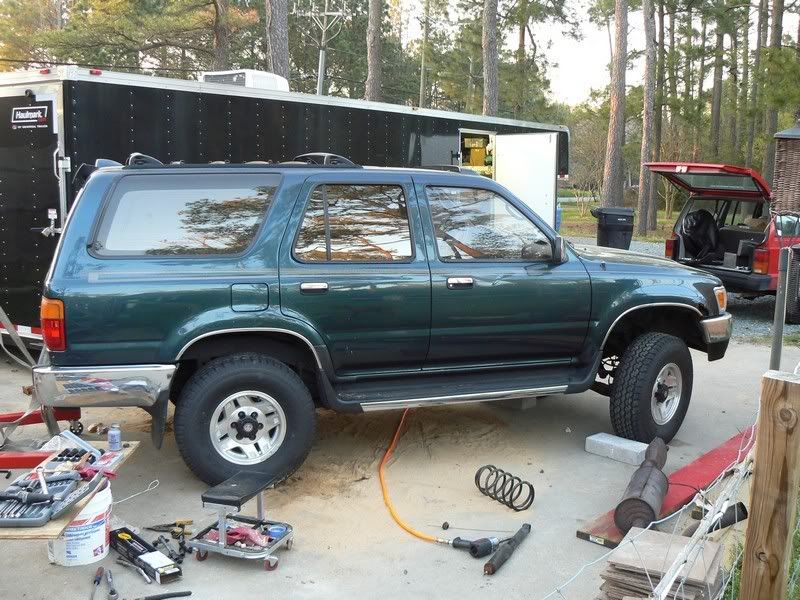
I got the rear coils changed out, the fuel filter installed, all 4 shocks replaced, and the stock exhaust is all the way out now.
Here is a pictorial - OF THE TOYOTA!~~
Step 1 - Lift rear of truck

Step 2 - Compress spring

Step 3 - Compare springs (the new ones are shorter, they are by MOOG)

Step 4 - Compress springs again

Step 5 - Use 2 hands and 2 ratchets for "nascar-like" speed

Step 6 - Add shocks and feel content

Step 7 - After shot of 4runner with no saggy ass - I forgot to measure SO hopefully i don't have a saggy ass anymore - hard to tell still without a drive train to weigh down the front
Tip 1 - AntiSeize on all components - I also antiseized the spring compressors!

I also ripped the stock exhaust out since it was in my way - well, visually anyways!

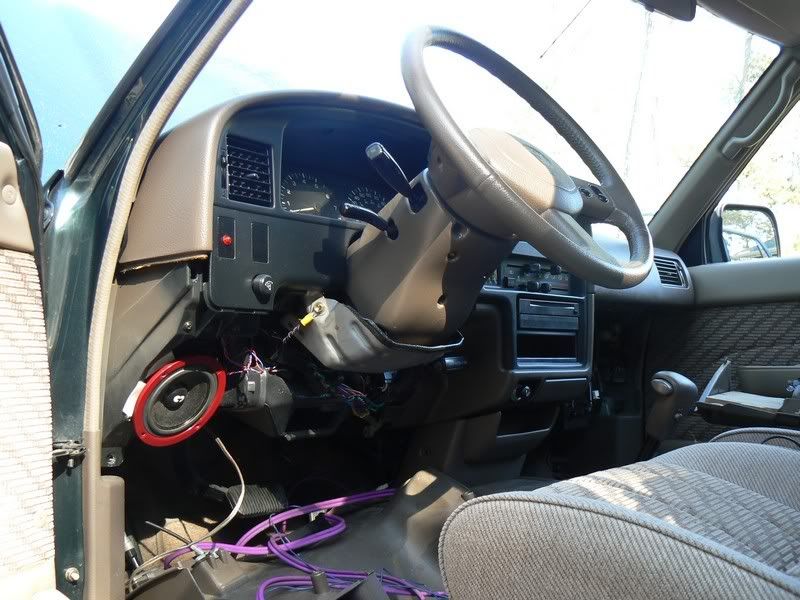
Well, I am about ready for my motor, I will install the deck tomorrow and put my dash back together. That reminds me, I need to send my speaker to BUMPIN for a custom glass job
Other than some touch ups, I think that I am ready for my engine. I have some woodworking projects to work on this weekend and packing my house to leave.
Kat
I got the rear coils changed out, the fuel filter installed, all 4 shocks replaced, and the stock exhaust is all the way out now.
Here is a pictorial - OF THE TOYOTA!~~
Step 1 - Lift rear of truck
Step 2 - Compress spring
Step 3 - Compare springs (the new ones are shorter, they are by MOOG)
Step 4 - Compress springs again
Step 5 - Use 2 hands and 2 ratchets for "nascar-like" speed
Step 6 - Add shocks and feel content
Step 7 - After shot of 4runner with no saggy ass - I forgot to measure SO hopefully i don't have a saggy ass anymore - hard to tell still without a drive train to weigh down the front
Tip 1 - AntiSeize on all components - I also antiseized the spring compressors!
I also ripped the stock exhaust out since it was in my way - well, visually anyways!
Well, I am about ready for my motor, I will install the deck tomorrow and put my dash back together. That reminds me, I need to send my speaker to BUMPIN for a custom glass job
Other than some touch ups, I think that I am ready for my engine. I have some woodworking projects to work on this weekend and packing my house to leave.
Kat
Apr 20, 2007 | 07:17 PM
#223
Registered User
Joined: Mar 2007
Posts: 157
Likes: 0
From: Hudson Valley, NY
Hello Kat...Nice job on your rig..FYI... I found some good prices on original toyota parts from www.toyotapartsales.com. If you need anything else. They are located in Dallas,TX. I KNOW YOU ALREADY PURCHASED THESE ITEMS but here are a few examples of their prices. Knock sensor=$114.15. KS wire=$7.63..Good luck in finishing your ride.
Last edited by mike92runnerSR5; Apr 22, 2007 at 10:36 AM.
Apr 20, 2007 | 07:26 PM
#224
Contributing Member
Joined: Apr 2006
Posts: 4,787
Likes: 36
From: TENN Native Languishing in Virginia
Hello Kat...Nice job on your rig..FYI... I found some good prices on original toyota parts from www.toyotapartsales.com. If you need anything else. They are located in Dallas,TX. Knock sensor=$114.15. KS wire=$7.63..
Apr 21, 2007 | 04:10 AM
#227
Contributing Member
Joined: Nov 2002
Posts: 10,666
Likes: 5
From: Oklahoma State
 Apr 22, 2007 | 03:58 PM
#228
Thread Starter
Registered User
Joined: Dec 2006
Posts: 611
Likes: 1
From: Virginina Beach
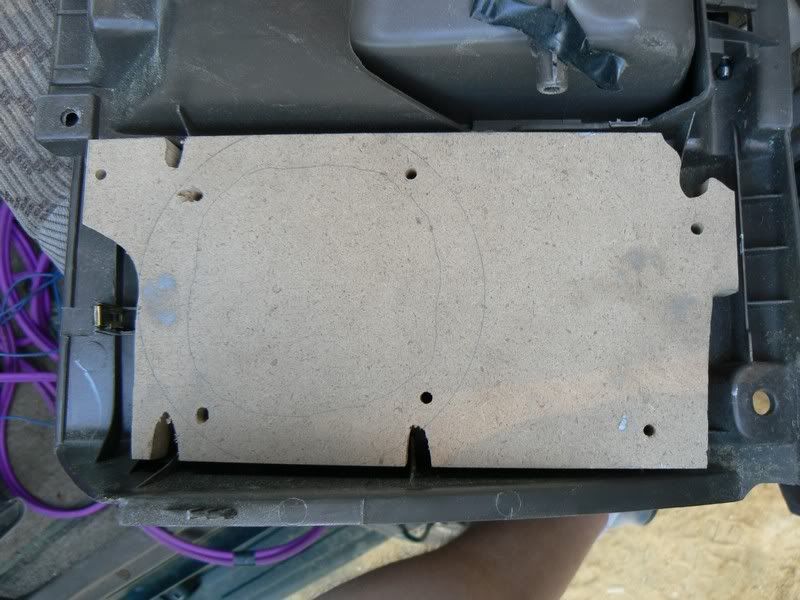
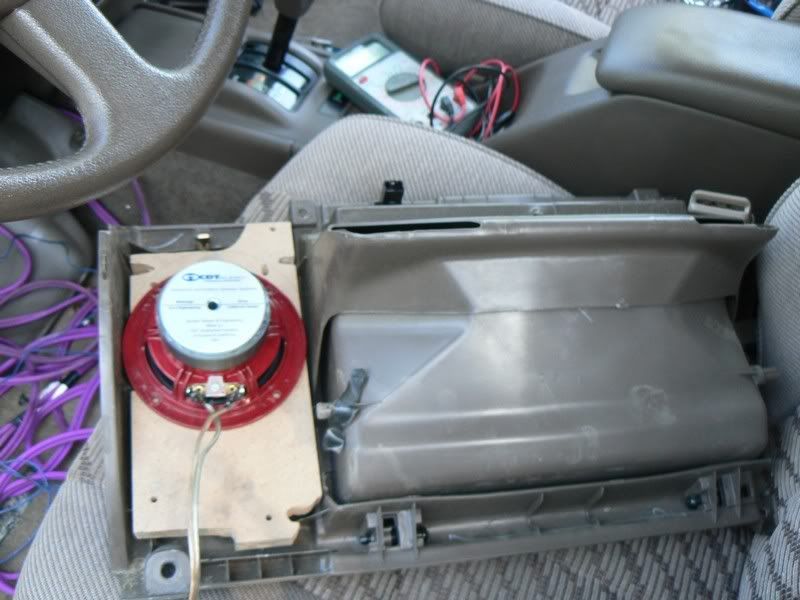
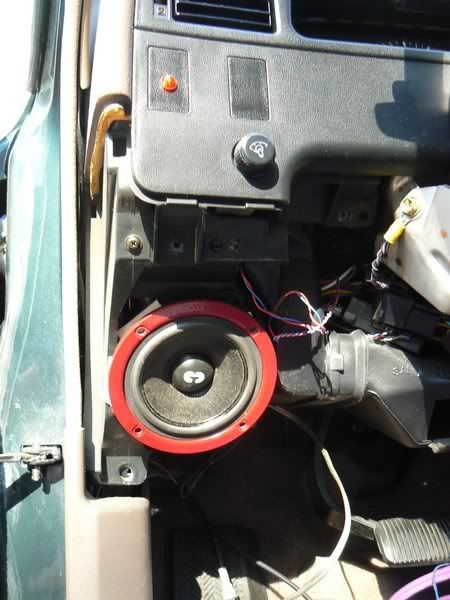
Worked on getting the interior together for a while today. I got the deck installed and I worked on fabricating some mounts for the 5 1/4" speakers I want to run in the stock dash location. The set I have is spec'd to have a 4" midrange, however mine measures 5 1/4" . No big deal. I wanted to beef up the factory location anyways.
I did not want to cut the doors(I will for the tweets). So I am having Bumpin' build some kicks for my Midbass 6 3/4's. I am sure he will build em plenty strong to handle some 200 watts.
I will let the pictures do the rest of the talking... There is huge room in there once you get those little "boxes" out of the way. Props to toyota for the effort.
I have to route my hole for the driver this week sometime - My router was at the rental house or I would have hooked it up. The driver one took a lot of work to get it flush.
Throw up any questions if you have any.
Kat
Apr 22, 2007 | 04:29 PM
#229
Registered User
Joined: Feb 2007
Posts: 171
Likes: 0
hey that is a great idea for your components, great way to keep a factory interior. i am afraid it may not sound great though; i tried doing something similar, but ended up building out the doors with some mdf. the farther you separate the components, the worse they sound; especially with the midrange pointing at your feet. i would be happy to take some pictures of my doors if you care to take a look; i think something similar would be great with your midbass in the kick, and keep a very good sound image.
Apr 22, 2007 | 04:55 PM
#230
Thread Starter
Registered User
Joined: Dec 2006
Posts: 611
Likes: 1
From: Virginina Beach
Why dont you go ahead and post your pictures -- idea's are always welcome!
I am not competing in SQ or anything, so I hope they will perform well enough for me -- If not, like you said, I can change something else and nothing is lost.
Thanks!
Kat
I am not competing in SQ or anything, so I hope they will perform well enough for me -- If not, like you said, I can change something else and nothing is lost.
Thanks!
Kat
Apr 22, 2007 | 05:11 PM
#231
Contributing Member
Joined: Apr 2006
Posts: 4,787
Likes: 36
From: TENN Native Languishing in Virginia
That is a sick-@$$ radio! I love it!
By the way; the pics look like you cut the BACK off your speaker enclosures?? If so, that will ruin your sound...they are sealed for a reason.
Great thread, Katie. I look forward to seeing what you've done each day. Pics are the bomb!
By the way; the pics look like you cut the BACK off your speaker enclosures?? If so, that will ruin your sound...they are sealed for a reason.
Great thread, Katie. I look forward to seeing what you've done each day. Pics are the bomb!
Apr 22, 2007 | 05:24 PM
#232
Thread Starter
Registered User
Joined: Dec 2006
Posts: 611
Likes: 1
From: Virginina Beach
well the way I see it, those boxes were sealed in order to gain midbass response from the drivers. I have a separate midbass driver going in the kicks and am only pulling midrange from these guys. I would not be able to mount these without cutting/replacing them. I only cut the driver's side one in order to keep it easy to mount. The passenger one is replaced with MDF.
Apr 22, 2007 | 06:04 PM
#234
Contributing Member
Joined: Apr 2006
Posts: 4,787
Likes: 36
From: TENN Native Languishing in Virginia
well the way I see it, those boxes were sealed in order to gain midbass response from the drivers. I have a separate midbass driver going in the kicks and am only pulling midrange from these guys. I would not be able to mount these without cutting/replacing them. I only cut the driver's side one in order to keep it easy to mount. The passenger one is replaced with MDF.
 Apr 23, 2007 | 09:39 AM
#238
Thread Starter
Registered User
Joined: Dec 2006
Posts: 611
Likes: 1
From: Virginina Beach
Toypower- How did you attach them to the panel? I assume you cut as small of a hole as you could in the door/door panel to make it work?
Did you dampen your doors at all?
I am looking at the braxial mount to put my tweeter on the midbass driver on the kick - I am thinking maybe if all of my sound image is low that I can use the head unit to raise it up?
Did you dampen your doors at all?
I am looking at the braxial mount to put my tweeter on the midbass driver on the kick - I am thinking maybe if all of my sound image is low that I can use the head unit to raise it up?
Apr 23, 2007 | 10:01 AM
#239
Contributing Member
Joined: Apr 2006
Posts: 4,787
Likes: 36
From: TENN Native Languishing in Virginia
Toypower- How did you attach them to the panel? I assume you cut as small of a hole as you could in the door/door panel to make it work?
Did you dampen your doors at all?
I am looking at the braxial mount to put my tweeter on the midbass driver on the kick - I am thinking maybe if all of my sound image is low that I can use the head unit to raise it up?
Did you dampen your doors at all?
I am looking at the braxial mount to put my tweeter on the midbass driver on the kick - I am thinking maybe if all of my sound image is low that I can use the head unit to raise it up?
Apr 23, 2007 | 10:30 AM
#240
Registered User
Joined: Feb 2007
Posts: 171
Likes: 0
The speakers are attached to the piece of mdf. i positioned the midrange driver so that i did not have to cut up any of the door frame. the door panel, on the other hand, was cutout behind the midrange driver, and holes for wires were drilled behind the tweet and crossover. just to clarify- are you using just a component set (tweets and midrange) or are you adding a midbass driver in the kick also? i am confused by mounting the tweet on the driver in the kick. basically, i think that if you don't want to build out the door, or just want to keep the inside factory, finish your speaker in dash plans. however, there will be no way around the poor acoustics resulting from the midrange pointing at your feet, and a midbass in the kick kind of eliminates a factory appearing interior, and with both a midbass driver and tweet angled directly at you, the midrange speaker will really suffer. i really hope i could offer some useful help.


