
Just finished 3VZE V6 head gasket replacement - How it went...
 Apr 18, 2007 | 03:23 PM
#1

Thread Starter
Registered User
Joined: Apr 2007
Posts: 13
Likes: 0
Hi all,
I just finished replacing the head gaskets on my 94 4runner 3VZE V6. After taking multiple weekends to slowly tear the motor down according to the FSM and bagging/tagging all fasteners, connectors, etc., I'd say it went pretty well for a do-it-yourself job. I recently discovered Yotatech and think it's an outstanding forum - I wish I would've knew about it earlier before I started this job. Doing a head gasket job on these motors is not for the faint of heart - it IS a big job, since the heads are buried beneath the air intake and other items. I've seen posts from other folks on Yotatech doing the 3VZE HG replacement which were excellent, so I thought I put down my experience as well. Here's my experience and and opinions on this task:
1. If you're going to do this head gasket job, try and plan on replacing other parts that you'll never be able to get at to again without the motor apart. My 'runner has 177,000 miles on it and I bought it for $1200 bucks with a the blown head gasket. So I knew up front that I wouldn't have any problems putting two grand into it in parts to basically make the 3VZE as renewed and trouble free as possible. My philosophy is that you could buy a $4000 'runner that wouldn't have as many new parts on it as this motor now does, even if my 'runner with purchase price of the vehicle + parts equals $4000. I am a do-it-yourselfer though so this might not make sense if you have to pay a shop to do it. Here's what I replaced other than just this gaskets (remember I have no history with this vehicle since I bought it with a bad HG, so I don't know what else is really "wrong" with it, so I when in doubt I replaced it):
1. Toyota Overhaul Gasket Kit (bought most of my parts thorugh www.toyotadiscountparts.com - great prices and free shipping over 100 bucks).
2. Knock sensor and pigtail wire (my wire was broken)
3. All water bypass sensors (they located at the back of the motor and are almost impossible to get at without removing the air plenum). These sensors include water temp switch, temp guage sensor, cold start sensor, VVT (which I broke when unscrewing the Fuel Pulsation Dampner), and another sensor which I can't remember.
4. EGR valve
5. PCV valve
6. Fuel Injectors cleaned and test (by www.cruizinperformance.com, they were excellent).
7. Starter (a GOOD time to replace this when the heads are off, if not it is practically captured).
8. Alternator
9. Oil pressure sensor
10. Timing Belt, p/s belt, alt belt, a/c belt
11. Both timing belt idler pulleys
12. Timing belt tensioner
13. ALL coolant hoses (yes, even the mass of small ones by the firewall)
14. Water pump
15. Thermostat
17. Plugs, rotor, cap, wires
18. Plan on replacing these gaskets, bar none: Valve covers (mine were hard as a rock and leaked), Cam and crank seals (lube the inside of the seal liberally before installing), silicone cam caps and rear thrust caps, plenum gasket, intake gaskets, water bypass gasket, idler pulley with water housing gasket, oil cooler o-ring (mine leaked), and of course head gaskets.
19. Multiple vacuum hoses that were cracked and brittle on the pass. side of the air plenum
My head gasket failed on the left side of the motor at cylinder #6. The two water passage head gasket holes near the firewall failed - from what I've read, seems to be common on these motors as there is not much metal in that area, and with the exhaust crossover connecting in this area, it's subject to much more heat. I called Toyota and had them run the VIN and this vehicle already had the head gaskets replaced under warranty in 1998. Don't feel if your truck has had the HG replaced that it is immune from blowing another one. I know Toyota improved the HG since then - actually the new HG I installed had left more "meat" around these coolant passages by using a small hole in the gasket to let coolant through rather than totally conform to the edges of the block passageway as in the blown one I pulled off. I will post a pic of the blown gasket when I get a chance.
The left head at number 6 was cracked imbetween the intake and exhaust valve where there's very little aluminum. I opted not to bring my old heads to a machinist - instead, got a set of rebuilt heads from Clearwater Cylinder head in Florida which had the best price (www.cylinder-heads.com). They came quick and didn't charge me a core giving I return them within 30 days, they already paid the return postage. I cleaned the block head surface with a razor blade, brakeclean, and some fine scotchbrite by hand (stay away from roloc whizzer wheels as you may put "divots" in your block).
Disassembly and reassembly was done with the FSM. Don't waste your money on a crappy Haynes manual for this job - spend the bucks and order a FSM from Toyota or get one online from some of the sites posting it. I followed it pretty religiously to do the job. Follow the head gasket torquing procedure TO THE "T" as outlined in the FSM! Bag and tag everything... it will make reassembly much easier.
One thing you'll probably find is the air plenum carboned up pretty bad from the PCV and EGR valve. I actually took the throttle body off of mine and bead blasted it to try and knock out the carbon. You could try spraying throttle body cleaner or brakeclean down the air plenum as well.
I've had a few issues since starting the reassembled motor this past weekend. Expect to have a few - if you don't, you're very lucky! My motor started up fine, but proceeded to overheat after a few minutes, freaking me out. What had happened is something I've read about but never had to deal with before - the coolant "air bubble". I noticed I was getting zero coolant to the heater - the heater kept blowing cold but the temp gauge would easily climb to overheat. After each time I started up then let it cool, I noticed the upper radiator hose would "suck in" from a vacuum. When I'd pop the radiator cap, air would rush in and would suck more coolant in... and sometimes air would rush out, too. After refilling the coolant multiple times, running the motor each time and then shutting it down to cool I was able to "burp" the system and eliminate the air, thereby filling the cooling system and stopping the overheating problem.
Another thing which freaked me out was all the white smoke pouring out of the exhaust after initially starting. This was moisture and some residual oil in the combustion chambers - after it few minutes it went away, burning clean.
So finally, I have one more post issue (MAYBE two). The motor is "knocking" when I rev it. Totally fine at idle (has the normal fuel injection ticking). But when I rev it up, I'm getting what I'd call a detonation sounding knock. My ignition timing is dead on (10 degrees BTDC with E1-TE1 jumpered at idle). I'm worried that maybe the milled head has increased compression, therefore creating the knock. I have a new knock sensor and pigtail wire, so I don't think this is the problem. I also have a fresh full tank of middle grade 87 octane gas, not cheap regular unleaded. Any thoughts on this? Maybe I should just try retarding the ignition timing? I thought maybe valve timing could be off, but I had both cam pulleys and crank pulley on the dots before putting the timing belt on. I'm puzzled............... let me know your thoughts.
OK, last thing. I didn't find anywhere in the FSM that Toyota used TTY head bolts. So yeah, you guessed it, I reused the old head bolts. I've read a few posts on Yotatech saying they are TTY bolts and should be replaced..........................
IS this true!!!????? I heard from two other sources before I did the job that they were not TTY bolts and didn't need to be replaced. So you can see my frustration if I need to pull the motor apart again. Let me know what you think....
Hope this thread helps if decided to do this HG on your 3VZE - thanks.
Gregg
rtchrg440
Apr 18, 2007 | 03:38 PM
#2
Registered User
Joined: Jan 2005
Posts: 1,600
Likes: 1
From: Leadville Colorado
They are TTY bolts and shouldn't be reused. Although I've heard of people reusing them with no issues. I bought new ones from Toyota when I replaced my head gaskets. You could be right the increased compression created by the new heads you put on there could very well be causing the knocking.
Apr 18, 2007 | 03:55 PM
#3
Contributing Member
Joined: Apr 2006
Posts: 4,787
Likes: 36
From: TENN Native Languishing in Virginia
Switch to super unleaded & see if that helps. A simple check would be to do a compression test to see what you're running at.
TTY bolts shouldn't be reused but several have done so without issues. Ted @ engnbldr.com said he was reusing them and they'd start popping heads off. When you get ready to re-torque & check valve clearances, take a good look to make sure none of the head bolt heads have popped. I wouldn't pull the heads just yet.
Great write-up; thanks!
Apr 18, 2007 | 04:49 PM
#4
Registered User
Joined: Oct 2005
Posts: 282
Likes: 0
From: Rochester, NH
I have found an EASY way to fill the coolant without the "air bubble" problem.
I take the top rad. hose off the rad. Loosen the block end and turn it up. fill the block with coolant untill it sits at the bend in the hose. Pour it SLOWWWWWWWWW. let it sit a few mins as it might burp. once I got all I can in that way I reconnect the hose and fill the rad.
I have had NO PROBLEM at all doing it this way. I've done mine 3 times and done several others this way.
WORKS GREAT.
Last edited by gonzo; Apr 18, 2007 at 04:51 PM.
Apr 18, 2007 | 05:02 PM
#5
Registered User
Joined: Jan 2005
Posts: 1,600
Likes: 1
From: Leadville Colorado
I just filled up my radiator and then turned the engine on with the heater at full blast and let it run with the radiator cap off. I waited till it burped a few times then shut it off. Fill it if necessary and cap it off.
Apr 18, 2007 | 06:08 PM
#7
Thread Starter
Registered User
Joined: Apr 2007
Posts: 13
Likes: 0
TNRabbit - do you think I have the proper torque on the head gasket since I reused the bolts (ie. correct compression on the head gasket)? It sounds like maybe I would? I can tell you when I was torquing the bolts and doing the 45 degree at time torques, a few of the bolts gave me that feeling that the bolt head was going to break (sorta got "easy to torque" all the sudden) - but maybe that's just me. I'll do a compression check on some of the "easy" to get to cylinders, like 2-4-6. Maybe super will cure it with higher compression?
Gonzo and Pruney81 - great advice on the air bubble. I will definitely try filling the block first to see what happens.
thook - When I put the cams back in the heads, I made sure the pin on the front of the cams was pointing up. I also took a picture of the heads with the valve covers off during my disassemble when I had all timing marks lined up (crank at TDC, and both cam marks aligned with marks on the steel shields in back of the cam pulleys). I then used this picture for reference when putting the cams back in. Do you think maybe I had the cam at the exhaust stroke? Would it run if I did? Anything you know of that I could do an easy check?
Thanks again - great info
Trending Topics
Apr 18, 2007 | 06:13 PM
#8
Contributing Member
Joined: Apr 2006
Posts: 4,787
Likes: 36
From: TENN Native Languishing in Virginia
If you felt a bolt "give way" all of the sudden, I guarantee you've stretched them. You'll be lucky to get them off without snapping the heads off. I did the exact same thing with my valve cover bolts. I'm sorry to say I think you need to pull them & order new bolts from Ted at www.engnbldr.com. He has non-TTY 10.9 grade bolts. His customer service is the best around, and will be happy to give you advice on this.
I would definitely do a compression test also, just for comparison purposes after you get the new HGs on.
I would definitely do a compression test also, just for comparison purposes after you get the new HGs on.
Apr 21, 2007 | 09:03 AM
#9

Registered User
Joined: Aug 2004
Posts: 104
Likes: 3
From: oregon
Hi all,
So finally, I have one more post issue (MAYBE two). The motor is "knocking" when I rev it. Totally fine at idle (has the normal fuel injection ticking). But when I rev it up, I'm getting what I'd call a detonation sounding knock. My ignition timing is dead on (10 degrees BTDC with E1-TE1 jumpered at idle). I'm worried that maybe the milled head has increased compression, therefore creating the knock. I have a new knock sensor and pigtail wire, so I don't think this is the problem. I also have a fresh full tank of middle grade 87 octane gas, not cheap regular unleaded. Any thoughts on this? Maybe I should just try retarding the ignition timing? I thought maybe valve timing could be off, but I had both cam pulleys and crank pulley on the dots before putting the timing belt on. I'm puzzled............... let me know your thoughts.
OK, last thing. I didn't find anywhere in the FSM that Toyota used TTY head bolts. So yeah, you guessed it, I reused the old head bolts. I've read a few posts on Yotatech saying they are TTY bolts and should be replaced..........................
IS this true!!!????? I heard from two other sources before I did the job that they were not TTY bolts and didn't need to be replaced. So you can see my frustration if I need to pull the motor apart again. Let me know what you think....
Hope this thread helps if decided to do this HG on your 3VZE - thanks.
Gregg
rtchrg440
On the head bolts, I wouldn't panic. We early on reused them quite often, I just had two personal experiences that changed my mind.
One was a head of a bolt I found on the floor, snooping as to where it came from I discovered a long block one of my crew had built the night before...missing the head of one bolt!
Then a couple of weeks later I was sitting at my computer in the office and heard a "ping!" and the head of another bolt on another long block bounced across the floor at me.
Since then we have never reused the head bolts, but those two engines were built by my friend Greg for us and he has arms like trash cans so who knows?
It's just that one failure is maybe an accident but two gets me to looking at stuff.
So I teamed up with two other compaies and we had new bolts made since Toyota makes theirs out of gold plated platinum..*LOL**.. Nice pieces, the bad news is my production run is in...well...production and my tiny company is WAY down the pecking order. Yep, sold out for at least another 15-30 days.
One tip! Topline has the exact same part, (about $40-50/set if you shop around a bit) but in your case I wouldn't worry. If one was going to fail, you would know about it by now....*EB
Apr 21, 2007 | 11:05 AM
#10
Registered User
Joined: Sep 2005
Posts: 8,656
Likes: 16
From: NW Ark on wooded ten acres...Ozarks at large!
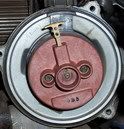
thook - When I put the cams back in the heads, I made sure the pin on the front of the cams was pointing up. I also took a picture of the heads with the valve covers off during my disassemble when I had all timing marks lined up (crank at TDC, and both cam marks aligned with marks on the steel shields in back of the cam pulleys). I then used this picture for reference when putting the cams back in. Do you think maybe I had the cam at the exhaust stroke? Would it run if I did? Anything you know of that I could do an easy check?
Thanks again - great info
This is about how the rotor should look. It may vary slightly one vehicle from another.
 Apr 21, 2007 | 11:19 AM
#11
Registered User
Joined: Sep 2005
Posts: 8,656
Likes: 16
From: NW Ark on wooded ten acres...Ozarks at large!
Apr 23, 2007 | 08:17 AM
#12
Thread Starter
Registered User
Joined: Apr 2007
Posts: 13
Likes: 0
Yep, my rotor is lining up in that same spot when the crank is set at TDC. I tried backing the timing down a few degrees from 10 to 8 degrees BTDC but no dice, still make the same noise. It only makes the knock/ping sound when I rev it quickly when the engine is warm - it won't make it when it's cold (sounds perfect). Could this be valve adjustment? When I rev it quickly (goose the throttle) it will make the noise, but if I hold the throttle open a few seconds at like 3000 rpm, no noise. It's only on quick revs. Slow revs seem to be OK too and no noise at idle. BTW - I'm reving the engine with the hood open manually working the throttle control on the throttle body. This heads are new "rebuilds" from Clearwater Cylinder head so one would think they set the right valves shims in the head.
Apr 24, 2007 | 04:28 AM
#13
Contributing Member
Joined: Apr 2006
Posts: 4,787
Likes: 36
From: TENN Native Languishing in Virginia
If it doesn't make the noise when it's cold, it leads me to believe it might be a lean fuel issue after warm up. Perhaps the VAFM isn't catching up quickly enough on the short throttle blips? I don't know for sure; just a thought. Sometimes they rust. Open yours up & see what the plate/door looks like...hit it with some WD-40 along the hinge.
Last edited by TNRabbit; Apr 24, 2007 at 04:31 AM.

Thread
Thread Starter
Forum
Replies
Last Post
Brodetski
86-95 Trucks & 4Runners (Build-Up Section)
0
Sep 30, 2015 11:50 PM
3vze, bolts, burping, change, cleaning, cylinder, disassembly, engine, gasket, head, headgaskets, non, overheating, replace, replacement, toyota, tty


