
Its baaack - 7mge VAFM swap for the 3vze!

 Jul 13, 2010 | 12:32 PM
#42

Registered User
Joined: Jul 2010
Posts: 8
Likes: 0
The swap works! :)
Hi Everyone,
Just wanted to thank all that posted this thread( I know it is an old one, but it is good one!). The info was very helpful in successfully making this mod work. I used the 7mge AFM from a 90 Cressida and it worked like a champ. The intake I use was the universal kit from spectre to which I bought an additional 45 Degree elbow to make it work. I also bought a spectre 4" diameter air filter and eliminated the airbox as well. I used a 3" PVC pipe cap and cut out the back to match up to the rectangular intake hole on the AFM.
One more thing, I had to get into the AFM's internals and adjust the rich/lean cog as well as the idle mixture screw in order to get it to run right. Initially the engine was getting more air than fuel and bogged when I stepped on it. Richening up the mixture and opening the idle air screw made a big difference in performance. Still playing around with the timing. I have advanced it a little but I can probably see advancing it more maybe as I do more testing.
If anyone is interested I will post pics of the mod....
Jul 14, 2010 | 10:31 AM
#44
Registered User
Joined: Jul 2010
Posts: 8
Likes: 0
AFM Swap stock 3vze to 7mge AFM
1st and foremost all the info is accessible here in this post on how to do it. However, the info is scattered through several posts so I will try and simplify. My 3vze engine has about 280,000 miles on it with new heads and knock sensor.
It is totally stock with no other modifications than the intake.
1st there are no wiring changes at all the 7mge AFM plugs into the stock 3vze wiring harness with no modifications as described in previous posts.

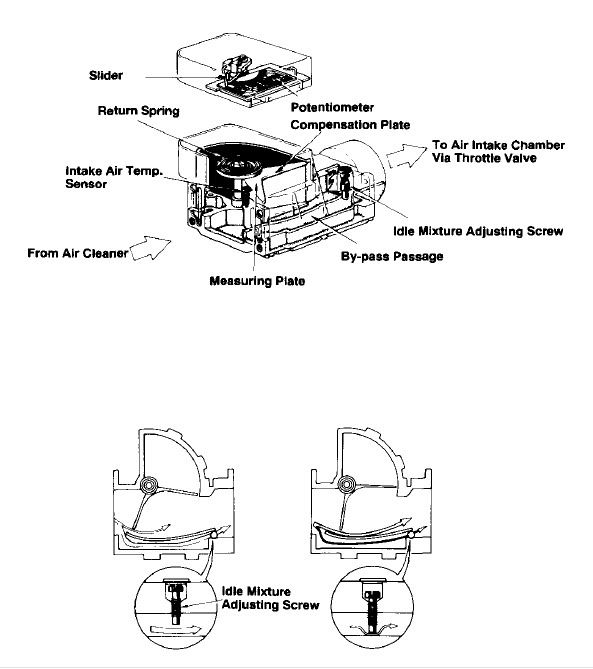
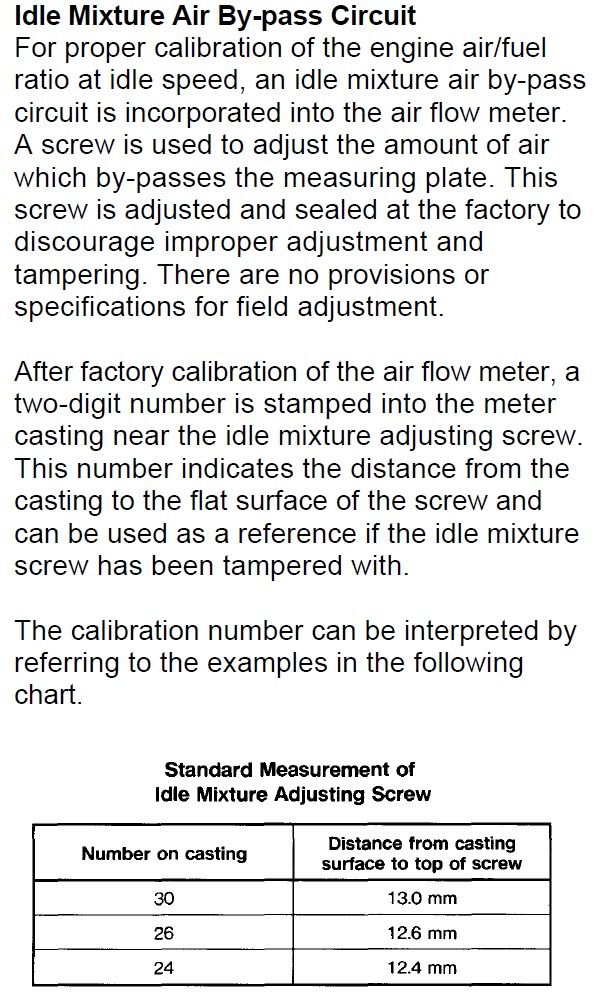
2nd and this is the key to getting this mod to work is you have to remove the covers from the internals of the AFM and the Idle Bypass screw so that the mixture can be adjusted. The factory adjustment for mixture and idle bypass are set very lean and mated to the original engine it came from - the 7mge. So in short the AFM has to be tuned to the 3vze. Again the removal of the cover is easy simply cut the silicone glue loose from the AFM casting with a razor knife. Make sure to hug closely to metal so that the cover does not get cut. if done correctly you should be able to put it back in and have it stay in place with the glue cut.

As described in previous posts the Cog adjusts the overall mixture and the Idle Bypass adjusts Idle mixture.
On my cog I made a mark with a sharpie so that I could have a reference as to where the stock location was so could go back if necessary. You'll have to advance the timing as well in order to make up for the larger mass of air flowing through. If you find that your engine is pinging or knocking than the mixture is to lean.
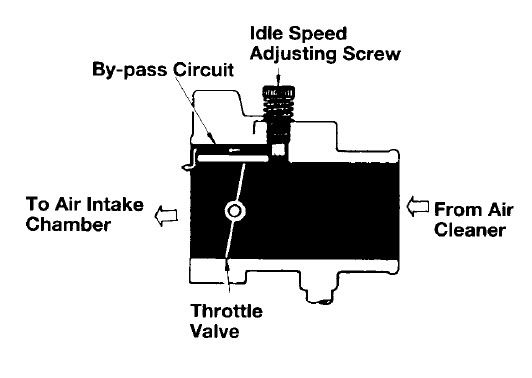
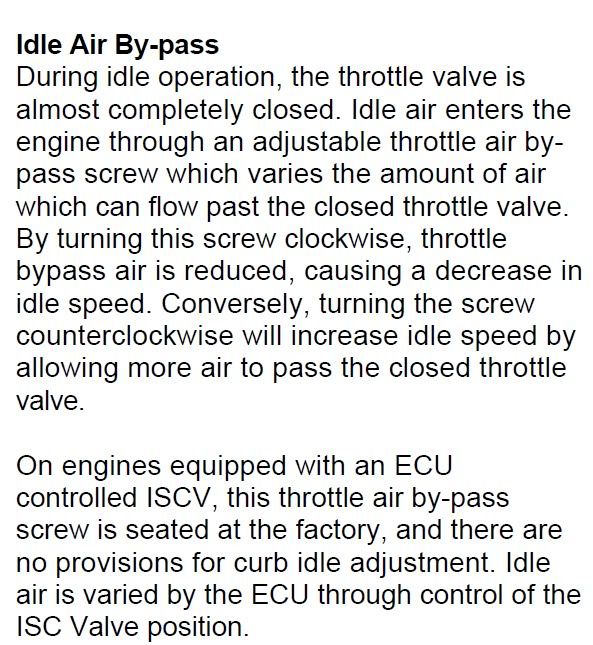
To remove the idle bypass plug carefully drill it out with a 5/16 drill bit. Making sure to not go to deep and hit the top of the screw. An 1/8 pilot hole would be helpful to start. If you are having trouble getting your engine to idle this is where you'll have to start with the adjusting. Idle speed is controlled by the screw on the side of the throttle body
As for the air intake I used readily availible Spectre intake kit parts: 2 45 degree elbows and the 4" straight that includes the plug holes for the emissions you'll have to plug into it. These kits can be found at your local Autozone, NAPA, or O'Reilly auto parts stores.
In my setup I opted to remove the airbox entirely and disconnect the AS tube and baffle. To disable the AS system remove the vacuum line that controls the actuator and plug it off at the VSV valve. On mine I removed the line feeding the VSV and plugged it at the intake manifold.
The air cleaner is a Spectre reuseable 4" air cleaner to get it mounted on the 7MGE AFM I used a 3" PCV plumbing cap and used a saber saw and die grinder to cut the rectangular hole in the back that matched up with the rectangular outlet on the AFM. In order to mount it to AFM I had to drill two new holes through the AFM Flange for the 5/16" bolts that hold the modified 3" PCV cap that is to be used as the air cleaner mount.
One more thing that will have to be fabricated is a mounting bracket to mount the AFM to the wheel well.
The performance gain is actually worth the effort. Once you have your timing and the mixture set properly the improvement in top-end performance is far better than stock. Plus the low-end response is improved as well providing that timing is properly advanced. Remember the factory settings are very conservative and useless once you have done this mod.
Enjoy!
It is totally stock with no other modifications than the intake.
1st there are no wiring changes at all the 7mge AFM plugs into the stock 3vze wiring harness with no modifications as described in previous posts.
2nd and this is the key to getting this mod to work is you have to remove the covers from the internals of the AFM and the Idle Bypass screw so that the mixture can be adjusted. The factory adjustment for mixture and idle bypass are set very lean and mated to the original engine it came from - the 7mge. So in short the AFM has to be tuned to the 3vze. Again the removal of the cover is easy simply cut the silicone glue loose from the AFM casting with a razor knife. Make sure to hug closely to metal so that the cover does not get cut. if done correctly you should be able to put it back in and have it stay in place with the glue cut.
As described in previous posts the Cog adjusts the overall mixture and the Idle Bypass adjusts Idle mixture.
On my cog I made a mark with a sharpie so that I could have a reference as to where the stock location was so could go back if necessary. You'll have to advance the timing as well in order to make up for the larger mass of air flowing through. If you find that your engine is pinging or knocking than the mixture is to lean.
To remove the idle bypass plug carefully drill it out with a 5/16 drill bit. Making sure to not go to deep and hit the top of the screw. An 1/8 pilot hole would be helpful to start. If you are having trouble getting your engine to idle this is where you'll have to start with the adjusting. Idle speed is controlled by the screw on the side of the throttle body
As for the air intake I used readily availible Spectre intake kit parts: 2 45 degree elbows and the 4" straight that includes the plug holes for the emissions you'll have to plug into it. These kits can be found at your local Autozone, NAPA, or O'Reilly auto parts stores.
In my setup I opted to remove the airbox entirely and disconnect the AS tube and baffle. To disable the AS system remove the vacuum line that controls the actuator and plug it off at the VSV valve. On mine I removed the line feeding the VSV and plugged it at the intake manifold.
The air cleaner is a Spectre reuseable 4" air cleaner to get it mounted on the 7MGE AFM I used a 3" PCV plumbing cap and used a saber saw and die grinder to cut the rectangular hole in the back that matched up with the rectangular outlet on the AFM. In order to mount it to AFM I had to drill two new holes through the AFM Flange for the 5/16" bolts that hold the modified 3" PCV cap that is to be used as the air cleaner mount.
One more thing that will have to be fabricated is a mounting bracket to mount the AFM to the wheel well.
The performance gain is actually worth the effort. Once you have your timing and the mixture set properly the improvement in top-end performance is far better than stock. Plus the low-end response is improved as well providing that timing is properly advanced. Remember the factory settings are very conservative and useless once you have done this mod.
Enjoy!
Last edited by v6spider; Jul 14, 2010 at 10:53 AM.

 Dec 29, 2010 | 04:24 PM
#47
Registered User
Joined: Jul 2010
Posts: 8
Likes: 0
For the afm mixture I made a reference mark at the center of the cog and housing. And advanced it from the mark I made(see photo from my previous post). As for idle fire it up and see how it idles you may have to open that a turn or more. Advance timing to 12deg. Drive it if it still bogs advancetiming more and or cog on afm. Your just going to have to eperiment a little. But this should get you started.
Feb 13, 2011 | 06:11 PM
#49

Registered User
Joined: Feb 2010
Posts: 37
Likes: 0
Just finished this mod. Went with a similar mixture to the one pictured in a previous post, a little leaner though. Thanks for all the info, made this quick and easy. When moving the idle bypass I can't really tell any difference in my idle as I adjust, I even bottomed it out, no apparent difference while looking at my dwell tach. Any suggestions where I should put it?
Feb 14, 2011 | 09:54 AM
#50
Registered User
Joined: Jul 2010
Posts: 8
Likes: 0
Mad Hauser - Make sure you don't have any air leaks in the intake tube that will mess with your idle for sure. On the throttle body there is an idle air adjustment screw if that is screwed way out it will cause the Idle mixture on the AFM to be ineffective. On my 4runner it is at almost one turn I believe the Idle Mixture on the AFm is screwed out to 2.5 turns(BTW this is just a guess..). The ECU will compensate for those issues.. is it idling ok? Were you able to bump up the timing?
If done correctly you should have way more top end than before...
Rob
If done correctly you should have way more top end than before...
Rob
 Mar 16, 2011 | 08:13 PM
#52
Registered User
Joined: Jul 2010
Posts: 8
Likes: 0
Once you get it close the computer will compensate for the rest. I did notice that there would be occasional puffs of black smoke when you get on it after the intial final settings. But that went away after driving it a while and the computer adjusted. Just remember Toyota designed the engine for economy not performance. After this mod, I would put this up against a 22re with similar mods. I think it has more power... I have owned both the 22re 4runner and now the 3.0 v6 version and I definately like the 3.0 for power.. reliability so far so good. It has almost 300,000 miles on it but the heads were replaced at 200,000 by the previous owner.. I have heard gripes from other 22re lovers about the 3.0 v6 I think it is a diferent animal and needs to be treat differently. However, I have found that the engine responds well when you use the right ideology.. the faster you can get air in and out of the engine will equate to more power.
 Mar 24, 2011 | 12:52 PM
#53
Registered User
Joined: Oct 2009
Posts: 318
Likes: 2
From: Knoxville, TN
This is an interesting thread and it sounds like v6spider got it dialed in pretty well.
v6spider - the pictures where you reference your cog adjustment appear to be dead... would you mind refreshing those links so I can get a visual on your process?
Thanks, and congrats on your success.
v6spider - the pictures where you reference your cog adjustment appear to be dead... would you mind refreshing those links so I can get a visual on your process?
Thanks, and congrats on your success.
Last edited by Wrenchinjoe; Mar 24, 2011 at 12:54 PM.
Mar 24, 2011 | 01:11 PM
#54
Registered User
Joined: Jul 2010
Posts: 8
Likes: 0
This is an interesting thread and it sounds like v6spider got it dialed in pretty well.
v6spider - the pictures where you reference your cog adjustment appear to be dead... would you mind refreshing those links so I can get a visual on your process?
Thanks, and congrats on your success.
v6spider - the pictures where you reference your cog adjustment appear to be dead... would you mind refreshing those links so I can get a visual on your process?
Thanks, and congrats on your success.
Once I got the concept it was an easy mod. I have been doing performance mods on cars for a while now. I have a 1972 Fiat spider I am putting a 300+ horsepower 4.3 Chevy v6 into. I had a 74 spider that i originally installed the engine into. So I am basically swapping the running gear from the 74 over to the 72. I know this is not a fiat or Chevy forum, but I felt I should give a little history to my experience... I have been an avid Yota enthusiast for quite some time. This 1st Gen 4Runner is my second 1st Gen 4Runner... I gotta say i love the little 4by... they just go and go... and I have had mine everywhere...

Last edited by v6spider; Mar 24, 2011 at 01:12 PM.
Jul 6, 2011 | 04:30 AM
#55
Registered User

Joined: Jan 2010
Posts: 3,795
Likes: 33
From: Bloodymore
Thanks for the great info. I know this thread is quite a few months old, but i have a few questions.
I just completed this mod, but i need to tune her more accurately. I have an AFR meter on the way, and hope to dial this thing in.
Does anyone know if i can adjust the cog or unmetered air valve(screw under the cap that gets drilled out) on the AFM while the truck is running? Do i need to pull the EFI fuse to reset the computer?
I read the whole thread, and do not recall seeing this information, but i have read many threads and missed stuff.
thanks
Jul 6, 2011 | 10:40 AM
#57
Registered User
Joined: Jan 2010
Posts: 3,795
Likes: 33
From: Bloodymore
Rob, thanks for the info.
Can you shine a little light on what i should be looking for when i adjust the screw. Any adjustment i did to it didn't seem to make a difference. And to be clear i am referring to the screw on the AFM.
thanks
Can you shine a little light on what i should be looking for when i adjust the screw. Any adjustment i did to it didn't seem to make a difference. And to be clear i am referring to the screw on the AFM.
thanks
Jul 6, 2011 | 04:22 PM
#59
Registered User
Joined: Jan 2007
Posts: 6,106
Likes: 27
Just finished this mod. Went with a similar mixture to the one pictured in a previous post, a little leaner though. Thanks for all the info, made this quick and easy. When moving the idle bypass I can't really tell any difference in my idle as I adjust, I even bottomed it out, no apparent difference while looking at my dwell tach. Any suggestions where I should put it?
On the throttle body there is an idle air adjustment screw if that is screwed way out it will cause the Idle mixture on the AFM to be ineffective. On my 4runner it is at almost one turn I believe the Idle Mixture on the AFm is screwed out to 2.5 turns(BTW this is just a guess..). The ECU will compensate for those issues.
- Wrong. The screw on the throttle body is called the idle speed ajusting screw. It adjusts idle speed, not idle mixture.
- No it won't. That's why both are mechanically calibrated/there are screws you can adjust to set them. As in idle speed AND idle mixture.

- The idle mixture adjustment is a tricky procedure, even for those that know how and why they're doing it. I'm not sure you're aware of the why part.

- Same goes for your ignition timing theory. Which is MASSIVELY flawed too BTW.
- Search around through my posts on how that all really works.
- Also re-read this thread front to back.
Last edited by MudHippy; Jul 6, 2011 at 04:44 PM.


