When you click on links to various merchants on this site and make a purchase, this can result in this site earning a commission. Affiliate programs and affiliations include, but are not limited to, the eBay Partner Network.
I know, not a new concept. But I've never seen a really good description (with a diagram) of what's happening here. Davez offroad sells a pretty neat little kit for installing a manual valve. But all it is, is a $40 summit-racing valve, with about a foot worth of brake line, some metric fittings, and a tie-down. For $80. You could buy that valve, a rubber extension line for the rear, and a flaring tool for less. And then you'd have the valve in a safer place, longer rear softline for any lift you might want, and a flaring tool for future projects.
So, since my gas tank, driveshafts, and exhaust are not in yet, and the rest of my project is waiting for some more cash. I decided to spend 20 minutes crawling around and tracing the lines to see what goes where.
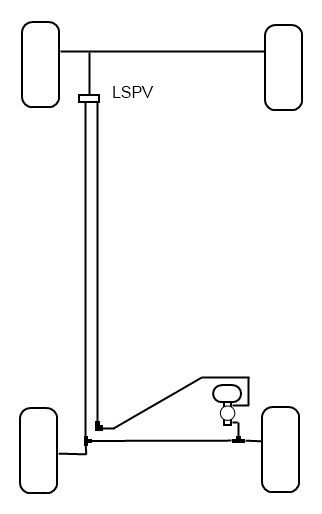
Alright, got it......so I drew up a little diagram of how it works:
There are 2 separate systems leaving the MC, and they are re-joined at the LSPV. My understanding is that if there is no pressure from the front system to the LSPV, it will allow 100% pressure to the rears.
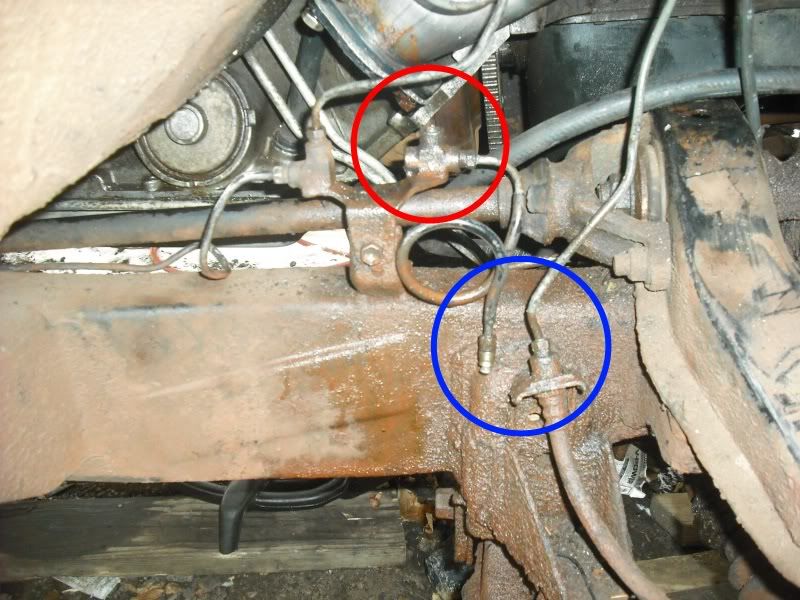
Bypassing it was very simple. Since all the brake lines have the same thread fittings. I wanted to remove the extra chunk of line running the length of the truck, and re-isolate the 2 parts of the system. So the first step was to disconnect the line going from the T up by the MC, and connect it directly to the LF caliper. After that T fitting, there's a small piece of hardline, and then it connects to a soft line that goes to the caliper. I simply bypassed the T, and connected the line from the MC and RF caliper directly to the soft line at the LF.
Circled in red, you can see the T fitting. And in blue, how I connected the new lines. I had to carefully unravel the loop in the brake line to get it to reach, but even with my 2" body lift, it made it just fine.
Then to the LSPV. At the LSPV, the 2 lines coming from the front of the truck are on one side of the valve. The top one is for the rear system (you want to keep this one), and the bottom is for the front (no longer used).
First, I disconnected where the hardline meets the softline after the LSPV. Then I disconnected the top hardline from the vavle, and connected it to the softline going down to the axle. Now, I replaced both of these brake lines a few years ago (with pre-bent lines from the dealer), and didn't clamp them down....at all. So it was pretty easy to give it a gentle tug, and get some of the bends to straighten out and get some extra length. If this isn't an option for you, you may want to grab another one of the male-female soft lines (NAPA part # is in the FAQ) so it will reach.
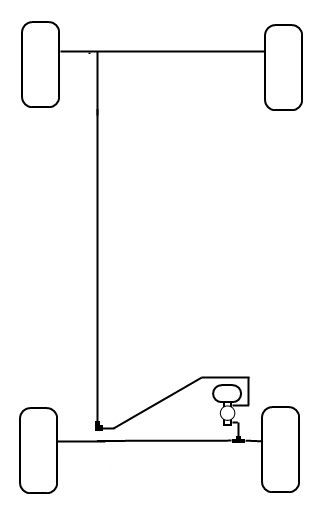
Now, my brake system works like this:
All that's left, is to plumb a manual valve inline between the MC and the rear axle. I plan on just cutting the line up near the MC, and flaring some standard fittings on there for the new valve. That way it's up out of the road grime, and much easier to reach for adjustments.
The factory valve automatically adjusts the pressure to the rear brakes according to weight/load in the bed of the truck. Using a manual valve, you would have to at least adjust the manual valve using brake pressure gauges to figure out where to set the manual valve on a loaded and unloaded truck.
The factory valve automatically adjusts the pressure to the rear brakes according to weight/load in the bed of the truck. Using a manual valve, you would have to at least adjust the manual valve using brake pressure gauges to figure out where to set the manual valve on a loaded and unloaded truck.
So what would happen if you didnt use one? You just wouldn't be able to fine tune it? Or it just wouldn't work at all?
I have seen a few people say if you have anything over 31" tires you wont even feel a difference? I'm guessing the risk is having your back tires lock up when hard braking?
Most the the Toyota RV conversions we got had the rear suspension altered to handle the weight and not sag. Add a leafs, air bags, helper springs, different shocks, etc. So essentially eliminating the load sensing ability of the proportioning valve.
Whenever we inspected the brakes on these RVs the rear shoes looked virtually untouched, but the front pads would need replacing on a much more frequent schedule than a average Toyota Truck.
if you never carry a load I guess you can defeat the system, but otherwise I’m not sure it’s a great idea. Granted, the front brakes do most of the work, but you do want the rear to contribute something to keep control of the vehicle. Especially in wet weather or if driving on less-than-great tires.
But just my .02
Most the the Toyota RV conversions we got had the rear suspension altered to handle the weight and not sag. Add a leafs, air bags, helper springs, different shocks, etc. So essentially eliminating the load sensing ability of the proportioning valve.
Whenever we inspected the brakes on these RVs the rear shoes looked virtually untouched, but the front pads would need replacing on a much more frequent schedule than a average Toyota Truck.
if you never carry a load I guess you can defeat the system, but otherwise I�m not sure it�s a great idea. Granted, the front brakes do most of the work, but you do want the rear to contribute something to keep control of the vehicle. Especially in wet weather or if driving on less-than-great tires.
But just my .02
That makes sense. I guess replacing front pads all the time would definitely be one downside! I think just to be safer I would just out one in anyway but I might have to wait a few weeks for it to arrive and just want to make sure it will not be to unsafe for me to drive for a bit without it.
Honestly, it would be simpler and safer to just buy a new factory valve especially if you haul lots of stuff like I do. Mine was leaking about three years ago, and I bought the Toyota valve, and it has been working fine ever since.
The reason the valve failed on my truck was because the valve rubber boot was full of water, and the valve was just sitting there rusting away. I did not buy a new boot. I installed the new valve without the rubber boot.
I just got this LSPV boot kit(04477-60010)yesterday from Amayama. I ordered three ujoints from them(04371-60070), so I was able to add this to the order with a very slight change to shipping costs. The boot kit has way more stuff than I expected. The u-joints were $25 each and the boot kit was $36
I just got this LSPV boot kit(04477-60010)yesterday from Amayama. I ordered three ujoints from them(04371-60070), so I was able to add this to the order with a very slight change to shipping costs. The boot kit has way more stuff than I expected. The u-joints were $25 each and the boot kit was $36
I should have bought the boot kit when I replaced my valve to do the job right, but the valve cost broke me at the time.
Since time isn't a big issue I order from the cheapest source I can and if I wait a bit longer no problem. The wild thing is this order from Amayama came from UAE, not Japan. It took them a week to get the order ready for shipment, but once they did they sent me tracking info, saying I should receive by May 21st. I got yesterday which means it took about 3 days to get here via DHL. And their packaging is amazing. the best I've seen, bar none.
Here's a picture of my manual proportioning valve:
" target="_blank">
My truck is still set up like this (I will admit, it gets driven VERY little). I love it, so much that I'm doing almost the exact same thing in my Econoline van (deleting an antiquated and leaking ABS pump in favor of a manual prop valve).
I had to open the manual valve up as much as it would go to get the rears to bite as hard as I'd like, but I still wouldn't go without.

 Apr 16, 2011 | 09:32 AM