
Head Gasket Replacement 95 4runner SR5 3VZE
 Nov 16, 2011 | 09:42 AM
#22
Thread Starter
Registered User
Joined: Aug 2011
Posts: 77
Likes: 0
From: Indio California
These are copied from the factory manual
TORQUE SPECIFICATIONS TABLE
Application ....................................Ft. Lbs. (N.m)
Air Intake Chamber Bolt/Nut ...................... 13 (18)
Alternator Bracket-To-Cylinder Head Bolt ......... 27 (37)
Camshaft Bearing Cap Bolt (1) .................... 12 (16)
Camshaft Sprocket Bolt .......................... 80 (109)
Cold Start Injector Fuel Pipe Union Bolt ......... 11 (15)
Connecting Rod Nut (2)
Step 1 ......................................... 18 (24)
Step 2 ........................... Additional 90 Degrees
Coolant By-Pass Outlet Bolt ...................... 13 (18)
Coolant Inlet Nut ................................ 15 (20)
Coolant Outlet Nut ............................... 11 (15)
Crankshaft Pulley Bolt ......................... 181 (245)
Crossover Pipe Nut ............................... 29 (39)
Cylinder Head Bolt (3)
12-Point Bolt
Step 1 ........................................ 33 (45)
Step 2 .......................... Additional 90 Degrees
Step 3 .......................... Additional 90 Degrees
6-Point Bolt ................................... 30 (41)
Distributor Hold-Down Bolt ....................... 13 (18)
Drive Axle-To-Side Gear Flange Nut ............... 61 (83)
Drive Shaft Flange Bolt .......................... 55 (75)
EGR Valve Bolt ...................................... (4)
Engine Mount-To-Frame Bolt ....................... 27 (37)
Exhaust Manifold Nut ............................. 29 (39)
Fan Bracket Bolt/Nut ............................. 30 (41)
Flywheel/Drive Plate Bolt
A/T ............................................ 61 (83)
M/T ............................................ 65 (88)
Front Differential Crossmember Bolt ............. 93 (126)
Front Differential Mount Bolts
Differential Cover Mount Bolt ................ 108 (146)
Left & Right Mount Bolt ...................... 123 (167)
Front Exhaust Pipe-To-Catalytic Converter Bolt ... 29 (39)
Front Exhaust Pipe-To-Exhaust Manifold Nut ....... 46 (62)
Fuel Pipe Bolt
No. 2 & No. 3 Fuel Pipes ....................... 25 (34)
Idler Pulley Bolt
No. 1 Pulley ................................... 25 (34)
No. 2 Pulley ................................... 13 (18)
Intake Manifold Bolt/Nut ......................... 13 (18)
Main Bearing Cap Bolt (5)
Step 1 ......................................... 45 (61)
Step 2 ........................... Additional 90 Degrees
Oil Cooler Center Bolt ........................... 43 (58)
Oil Cooler-To-Cylinder Block Bolt ................ 29 (39)
Oil Filter Union Bolt ............................ 18 (24)
Oil Pump Bolt .................................... 15 (20)
Oil Pump Relief Valve Plug ....................... 27 (37)
PAIR Valve-To-Cylinder Head Bolt ................. 27 (37)
PAIR Valve-To-Exhaust Manifold Bolt .............. 22 (30)
Spark Plug ....................................... 13 (18)
Stabilizer Bar-To-Frame Mount Bolt ............... 21 (29)
Stabilizer Bar-To-Lower Control Arm Bolt ......... 19 (26)
Thermostat Housing Bolt .......................... 15 (20)
Timing Belt Tensioner Bolt ....................... 20 (27)
Transmission Crossmember-To-Frame Bolt ........... 70 (95)
Water Pump Bolt ...................................... (6)
INCH Lbs. (N.m)
Camshaft Housing Rear Cover Bolt ................ 43 (4.9)
Coolant By-Pass Pipe
Bolt .......................................... 43 (4.9)
Nut ........................................... 61 (6.9)
Delivery Pipe Nut ............................. 115 (13.0)
Fan Retaining Nut ............................... 48 (5.4)
No. 3 Timing Belt Cover Bolt .................. 73 (8.3)
No. 4 Timing Belt Cover Bolt .................. 73 (8.3)
Oil Pan Bolt/Nut ................................ 52 (5.9)
Oil Pump Body Cover Screw ...................... 89 (10.0)
Oil Strainer Bolt/Nut ........................... 61 (6.9)
Crankshaft Rear Oil Seal Retainer Bolt .......... 69 (7.8)
Rear Plate-To-Cylinder Block Bolt ............... 65 (7.4)
Valve Cover Bolt (7) ............................ 48 (5.4)
(1) - Tighten bolts to specification in sequence.
See Fig. 19.
(2) - Replace nut if it does not run freely on bolt threads
or accept torque. Replace bolt, with nut, if deformed
or stretched.
(3) - Tighten 12-point cylinder head bolts to specification
first, using proper sequence. See Fig. 10. Install
and tighten 6-point cylinder head bolt after all
12-point cylinder head bolts are tightened.
(4) - Tighten bolts as indicated. See Fig. 11.
(5) - Tighten bolts to specification in sequence.
See Fig. 28.
(6) - Tighten bolts as indicated. See Fig. 22.
(7) - Tighten bolts to specification in sequence.
Nov 16, 2011 | 10:43 AM
#23
Registered User
Joined: Aug 2006
Posts: 245
Likes: 2
From: merritt island, Fl
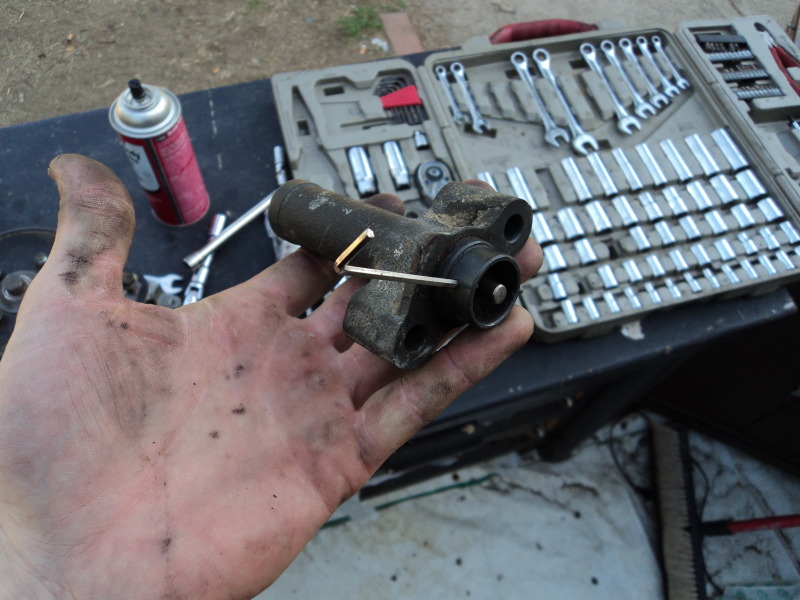
i remember when i did my head gasket job (the 2nd one) the first one i did not know about the dam multi layer steel gasket  but def put that one on the second time! and the biggest problem i had was to make sure u take the timing belt tension off, compress it and put a pin through it then align ur timing marks on cam and crank that is after replacing ur water pump! then when it is all lined up put ur tensioner on then pull the pin... other wise it will through ur belt off every time!
but def put that one on the second time! and the biggest problem i had was to make sure u take the timing belt tension off, compress it and put a pin through it then align ur timing marks on cam and crank that is after replacing ur water pump! then when it is all lined up put ur tensioner on then pull the pin... other wise it will through ur belt off every time!
Nov 16, 2011 | 05:47 PM
#24
Registered User


Joined: Jan 2011
Posts: 695
Likes: 103
From: exo-reality -wave if you see me; Front Range, CO
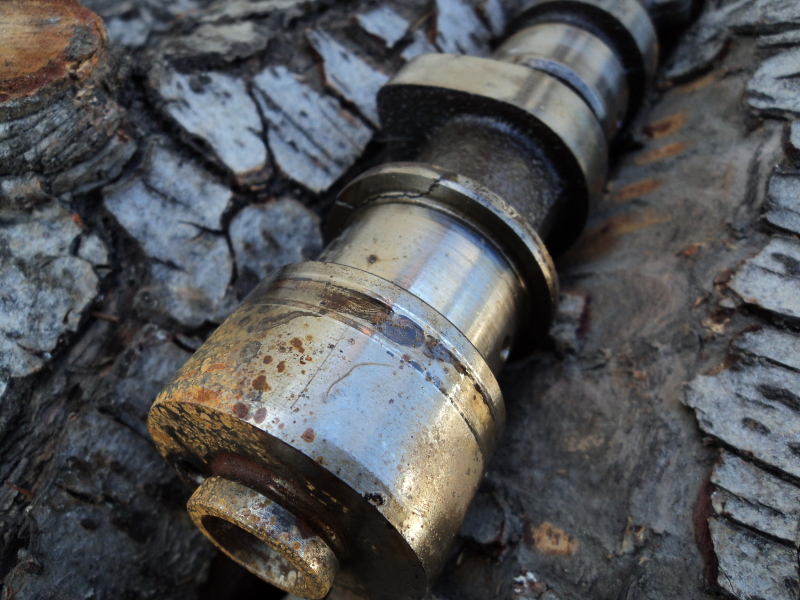
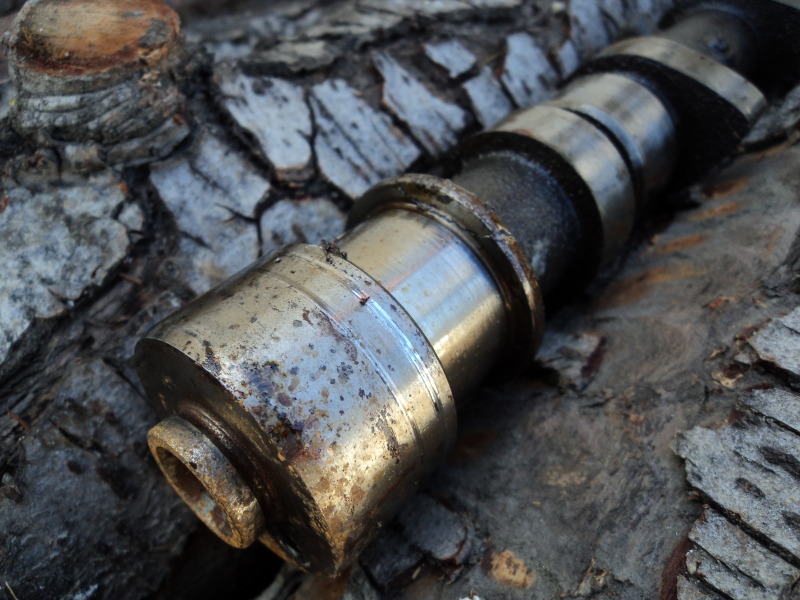
cracked cam shaft collar
"The old cam was cracked on both sides"
Yep, I ran into this earlier. One cam looked exactly like that.
So Snow, you decided not to re-ring while you were there?
Yep, I ran into this earlier. One cam looked exactly like that.
So Snow, you decided not to re-ring while you were there?
Nov 16, 2011 | 06:04 PM
#25
Contributing Member
Joined: Nov 2010
Posts: 5,125
Likes: 4
From: Columbia River Gorge, Oregon...east side
The camshaft thrust collar will typically crack when the bearing cap bolts are not loosened evenly and in the order specified in the FSM, see page EG2-60 step 35:
http://www.ncttora.com/fsm/1990-1995...e/cylinder.pdf
Several 5vz-fe FSM's state:
REMOVE CAMSHAFTS NOTICE:
Since the thrust clearance of the camshaft is small, the camshaft must be kept level while it is being removed. If the camshaft is not kept level, the portion of the cylinder head receiving the shaft thrust may crack or be damaged, causing the camshaft to seize or break.
Last edited by rworegon; Nov 16, 2011 at 06:16 PM.
Nov 17, 2011 | 12:57 AM
#26
Thread Starter
Registered User
Joined: Aug 2011
Posts: 77
Likes: 0
From: Indio California
i remember when i did my head gasket job (the 2nd one) the first one i did not know about the dam multi layer steel gasket but def put that one on the second time! and the biggest problem i had was to make sure u take the timing belt tension off, compress it and put a pin through it then align ur timing marks on cam and crank that is after replacing ur water pump! then when it is all lined up put ur tensioner on then pull the pin... other wise it will through ur belt off every time!
but def put that one on the second time! and the biggest problem i had was to make sure u take the timing belt tension off, compress it and put a pin through it then align ur timing marks on cam and crank that is after replacing ur water pump! then when it is all lined up put ur tensioner on then pull the pin... other wise it will through ur belt off every time!Yeah I wish I knew about the MLS gaskets before I ordered mine. They do require perfect surfaces so they would be excellent for new heads and blocks...or newly resurfaced
 Nov 17, 2011 | 12:59 AM
#27
Thread Starter
Registered User
Joined: Aug 2011
Posts: 77
Likes: 0
From: Indio California
 Nov 17, 2011 | 01:11 AM
#28
Thread Starter
Registered User
Joined: Aug 2011
Posts: 77
Likes: 0
From: Indio California
The camshaft thrust collar will typically crack when the bearing cap bolts are not loosened evenly and in the order specified in the FSM, see page EG2-60 step 35:
http://www.ncttora.com/fsm/1990-1995...e/cylinder.pdf
Several 5vz-fe FSM's state:
REMOVE CAMSHAFTS NOTICE:
Since the thrust clearance of the camshaft is small, the camshaft must be kept level while it is being removed. If the camshaft is not kept level, the portion of the cylinder head receiving the shaft thrust may crack or be damaged, causing the camshaft to seize or break.
http://www.ncttora.com/fsm/1990-1995...e/cylinder.pdf
Several 5vz-fe FSM's state:
REMOVE CAMSHAFTS NOTICE:
Since the thrust clearance of the camshaft is small, the camshaft must be kept level while it is being removed. If the camshaft is not kept level, the portion of the cylinder head receiving the shaft thrust may crack or be damaged, causing the camshaft to seize or break.
I was extremely cautious before removing and installing the cams...I was able to visually inspect the cams before I started removal of the bearing caps in sequence and noticed the cracks
 I did the same at pick a part so I'm curious what would cause this....maybe head warpage or motion or...?
Nov 17, 2011 | 07:15 AM
I did the same at pick a part so I'm curious what would cause this....maybe head warpage or motion or...?
Nov 17, 2011 | 07:15 AM
#29
Registered User
Joined: Aug 2006
Posts: 245
Likes: 2
From: merritt island, Fl
it is a gas charged tensioner and i think it says to replace it in the manual but if u do not pin it in and then do every thing and u just try to bolt it on with no pin in it it will turn the cam closet to it and throw it off it happen to me the first time i did it and i could not figure out why it kept throwing the timing just one tooth off and that is why!
Nov 17, 2011 | 07:30 PM
#30
Thread Starter
Registered User
Joined: Aug 2011
Posts: 77
Likes: 0
From: Indio California
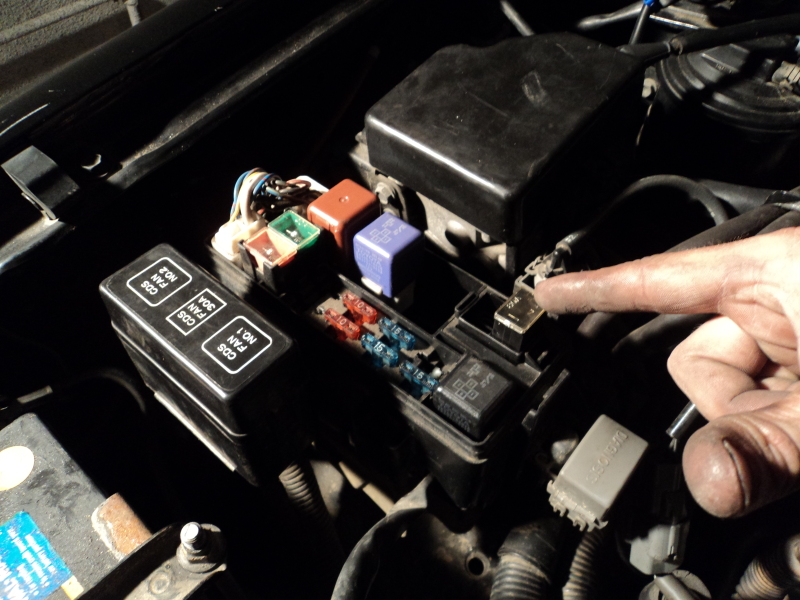
Well the engine is complete once again...poured in the oil, coolant, gas, and go to turn the key...nothin AHHH!! well I knew it wouldnt start, theres a blown fuse...its easy to see the Alt Fuse is blown, but how do you get it out?? Hope its not too expensive. Here are some photos from today.
Engine is complete.
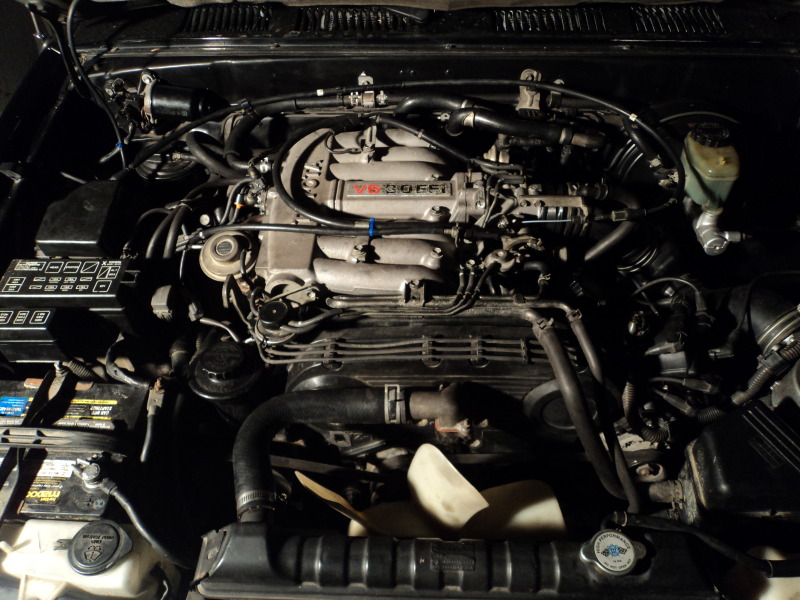
How do I get this fuse out? or how do you replace it? Whats happening is when I turn the key to on the radio, dash/interior/rear lights dont come one. The two front dome lights work and the lights on the front doors work though... When the battery was installed it was backwards...I'm embarrassed to admit it but it's true I heard a fuse or two blow and replace the 15amp and noticed the ALT fuse was blown as well...I've never messed with these kinds of fuses before so I could use some advice. I was hoping to start her up tonight but No way in hell until I figure out the electrical situation now D:
Engine is complete.
How do I get this fuse out? or how do you replace it? Whats happening is when I turn the key to on the radio, dash/interior/rear lights dont come one. The two front dome lights work and the lights on the front doors work though... When the battery was installed it was backwards...I'm embarrassed to admit it but it's true
I heard a fuse or two blow and replace the 15amp and noticed the ALT fuse was blown as well...I've never messed with these kinds of fuses before so I could use some advice. I was hoping to start her up tonight but No way in hell until I figure out the electrical situation now D:
Last edited by SnowDrive215; Nov 17, 2011 at 07:42 PM.
 Nov 18, 2011 | 02:13 PM
#32
Contributing Member
Joined: Nov 2010
Posts: 5,125
Likes: 4
From: Columbia River Gorge, Oregon...east side
You may be past the fuse issue, but it's bolted in from the bottom. To remove, you need to split the fuse box apart to get at the screws/bolts holding the fuse in place. You can pick up that fuse at any auto parts store.
How's it running?
How's it running?
Nov 18, 2011 | 05:56 PM
#33
Thread Starter
Registered User
Joined: Aug 2011
Posts: 77
Likes: 0
From: Indio California
It's running great! It took almost two hours of idling for the smoke to burn away but its not smoking at all now. I checked all the fluids and the new gaskets sealed great. Everything went smooth thanks to Yotatech.
....do I get a sticker now or something? lol
....do I get a sticker now or something? lol
Last edited by SnowDrive215; Jan 2, 2012 at 05:44 PM.

 Nov 19, 2011 | 06:20 AM
#37

Contributing Member
Joined: Sep 2006
Posts: 211
Likes: 0
From: Tacoma
Great write up, I learned something new about how those cams can get messed up. Congrats on getting the rig back on the road. It's these kind of victories that make being a gearhead worth it. Just think of all the money you've saved too!
Nov 19, 2011 | 09:36 AM
#38
Thread Starter
Registered User
Joined: Aug 2011
Posts: 77
Likes: 0
From: Indio California
My advice to anyone looking to do this themselves...use Yota Tech! lol
Jan 2, 2012 | 12:14 AM
#39
Registered User
Joined: Sep 2011
Posts: 32
Likes: 0
From: San Diego
Did you end up bolting the passengerside head down first? With the crossover pipe? I removed both heads as one and i'm almost ready to put them back together and i've been wondering how to do it. thanks
Jan 2, 2012 | 05:45 PM
#40
Thread Starter
Registered User
Joined: Aug 2011
Posts: 77
Likes: 0
From: Indio California
I took both off at the same time but installed the passenger side first with the crossover attached. Then the driver side head, make sure you get the exhaust bolts in (finger tight, dont torque) before torquing the head bolts in sequence then torque the exhaust down. Clean the hell out of the exhaust connections before installing the donut gasket...mine has a small leak D: I didnt pay too much attention to that...
What kind of gaskets are you using? I would recommend Multi Layer Steel gaskets over graphite.
What kind of gaskets are you using? I would recommend Multi Layer Steel gaskets over graphite.


