
Getting Ready For My Close-Up, Mr. Demille! No 56k!
 Aug 8, 2007 | 08:07 PM
#1
Thread Starter
Contributing Member
Joined: Jan 2006
Posts: 899
Likes: 0
From: Summit County, Colorado
Getting Ready For My Close-Up, Mr. Demille! No 56k!
So, I have been driving with a funky hole in my hood for long enough.

I had to cut this hole to get basic clearance for the intake plenum of the 3.4. It wasn't perfect, but it did the trick to keep me running for the last few months.
I had originally been planning to graft in a 4Runner hood scoop, but I had absolutely no luck in tracking one down, that wasn't going to cost a small fortune. While searching eBay a while back, I ran across a listing for a JDM Toyota Starlet hood, with a scoop. I contacted the seller to get some measurements. After mulling over the possibility for a couple of days, I went ahead and got it. I had to have the seller cut off the outside edges of the hood, to make it small enough to ship UPS, rather than having a freight bill, too. I cut the scoop out of the remaining hood, using the windshield washer jets to establish a straight line, and keep things reasonably square.

I used the same trick to make a baseline on the hood of the truck, and then started to do a basic test position of the scoop, eying where the bump would fall in relation to the intake plenum.

I then marked the location with a carpenter's pencil, and taped the area off, intentionally making the tape marks just a little bit inside of the pencil marks.

I then put one tarp under the hood, and another along the back edge, and over the windshield, to protect things while I cut the panel out of the hood.

First cut made - guess I'm committed, now!

All long cuts made.

Cut panel removed.

The forward part of the scoop actually insets to the hood, so I had to remove the forward support metal, too.

First real test fit of the scoop.

I then very slowly widened the hole, so that the scoop would just fit.


Cleaned the paint off the edges, in preparation of welding.

I used welding magnets to hold the scoop in position, and keep it level with the surrounding sheet metal of the hood.

A series of tack welds to hold the scoop in place.

A couple of quick looks with the scoop insert in place.


About an hour and a half later, all stitched together. I was being very careful to make sure that I didn't overheat any area, so it is just a series of tack welds all the way around. I think I must have made aboout 25 or 30 laps around the scoop!

That was about as far as I got, a couple of weeks ago. The weather had gone to monsoon season, and I didn't have a chance to do anything else, until today.
I removed the hood to start back welding the seams (or, at least, as much of it as I could). I also took the opportunity to tie in the support metal as much as seemed reasonable.

I also cleaned up a couple of my previous cuts from the conversion, and ground off the stickers that had the 3.0 information on them (won't be needing those, anymore!) I smoothed the seams as much as I could, but I'm not too concerned about the bottom looking all that great. I'm far more interested in making sure that the top comes out smooth!

All raw metal shot with primer, to keep from rusting.

So that's where I stand, right now. I'll keep updating, as progress is made.
I had to cut this hole to get basic clearance for the intake plenum of the 3.4. It wasn't perfect, but it did the trick to keep me running for the last few months.
I had originally been planning to graft in a 4Runner hood scoop, but I had absolutely no luck in tracking one down, that wasn't going to cost a small fortune. While searching eBay a while back, I ran across a listing for a JDM Toyota Starlet hood, with a scoop. I contacted the seller to get some measurements. After mulling over the possibility for a couple of days, I went ahead and got it. I had to have the seller cut off the outside edges of the hood, to make it small enough to ship UPS, rather than having a freight bill, too. I cut the scoop out of the remaining hood, using the windshield washer jets to establish a straight line, and keep things reasonably square.
I used the same trick to make a baseline on the hood of the truck, and then started to do a basic test position of the scoop, eying where the bump would fall in relation to the intake plenum.
I then marked the location with a carpenter's pencil, and taped the area off, intentionally making the tape marks just a little bit inside of the pencil marks.
I then put one tarp under the hood, and another along the back edge, and over the windshield, to protect things while I cut the panel out of the hood.
First cut made - guess I'm committed, now!
All long cuts made.
Cut panel removed.
The forward part of the scoop actually insets to the hood, so I had to remove the forward support metal, too.
First real test fit of the scoop.
I then very slowly widened the hole, so that the scoop would just fit.
Cleaned the paint off the edges, in preparation of welding.
I used welding magnets to hold the scoop in position, and keep it level with the surrounding sheet metal of the hood.
A series of tack welds to hold the scoop in place.
A couple of quick looks with the scoop insert in place.
About an hour and a half later, all stitched together. I was being very careful to make sure that I didn't overheat any area, so it is just a series of tack welds all the way around. I think I must have made aboout 25 or 30 laps around the scoop!
That was about as far as I got, a couple of weeks ago. The weather had gone to monsoon season, and I didn't have a chance to do anything else, until today.
I removed the hood to start back welding the seams (or, at least, as much of it as I could). I also took the opportunity to tie in the support metal as much as seemed reasonable.
I also cleaned up a couple of my previous cuts from the conversion, and ground off the stickers that had the 3.0 information on them (won't be needing those, anymore!) I smoothed the seams as much as I could, but I'm not too concerned about the bottom looking all that great. I'm far more interested in making sure that the top comes out smooth!
All raw metal shot with primer, to keep from rusting.
So that's where I stand, right now. I'll keep updating, as progress is made.
Last edited by breknraj; Aug 8, 2007 at 08:47 PM.
 Aug 9, 2007 | 06:16 PM
#7
Thread Starter
Contributing Member
Joined: Jan 2006
Posts: 899
Likes: 0
From: Summit County, Colorado
I only had a little time this afternoon to do anything. I did a fair amount of grinding on the top stiching seams. I still have a ways to go, before I can start in with filler and such.

I have to take the truck to Denver this weekend, so I shot the bare metal with primer.

I wish the seam were actually as smooth as the picure might lead you to believe!
I put the hood back on, and bolted in the scoop insert (temporarily, of course). Ready to head out of town!

Hopefully, I'll have more to show, next week!
I have to take the truck to Denver this weekend, so I shot the bare metal with primer.
I wish the seam were actually as smooth as the picure might lead you to believe!
I put the hood back on, and bolted in the scoop insert (temporarily, of course). Ready to head out of town!
Hopefully, I'll have more to show, next week!
Trending Topics
 Aug 9, 2007 | 07:35 PM
#12
Thread Starter
Contributing Member
Joined: Jan 2006
Posts: 899
Likes: 0
From: Summit County, Colorado
I'm still planning to yank the e-locker and associated hardware, re-gear it, and put it in my truck, too.
Aug 9, 2007 | 08:06 PM
#13
Registered User
Joined: Nov 2004
Posts: 483
Likes: 0
From: Hoffman Estates, IL
Right on! Glad to see you come to the dark side... Haha... I had been wondering if you ever got that hood taken care of. You going to have it open to be functional? I opened mine up and it does vent alot of heat.
Aug 10, 2007 | 05:18 AM
#14
Thread Starter
Contributing Member
Joined: Jan 2006
Posts: 899
Likes: 0
From: Summit County, Colorado
Thanks, Steve!
After not being able to come up with a 4Runner scoop, I saw this, and figured it would be a nice variation on the theme. The clearance, especially over the throttle body, is still pretty close, but it is an improvement over the stock hood.
The 4Runner scoop would be a better choice, since it is wider, but this will have a nice look when it's done, and it's still all Toyota!
Aug 10, 2007 | 08:32 PM
#15
Registered User
Joined: Nov 2004
Posts: 483
Likes: 0
From: Hoffman Estates, IL
Just one thing to watch for, especially since it is narrower than the 4runner scoop, is the clearance to the intake manifold on the driverside, towards the front of the vehicle. Although it may clear when your truck is sitting in the driveway, when the truck is flexed out and the engine is torqueing, it may not clear. I found out the hard way, I was out messing around in the local hills, and found a steep cement ledge, so I went up at an angle and lifted the rear tire (E-locked rear), and when I got home noticed a little dimple in the scoop. I have learned to live with it, but it still sucks!
Aug 10, 2007 | 08:43 PM
#16
Thread Starter
Contributing Member
Joined: Jan 2006
Posts: 899
Likes: 0
From: Summit County, Colorado
Sounds like I might just end up with the same thing, eventually - Cest la vie!
BTW, the scoop will be open, as it was actually an induction scoop on the Starlet. I'll probably put some mesh in along the back side of it, though.
It looks as though you and I will end up with the truck version of the old Dan Fogelberg / Tim Wiseburg album - Twin Sons Of Different Mothers!
BTW, the scoop will be open, as it was actually an induction scoop on the Starlet. I'll probably put some mesh in along the back side of it, though.
It looks as though you and I will end up with the truck version of the old Dan Fogelberg / Tim Wiseburg album - Twin Sons Of Different Mothers!
Aug 10, 2007 | 10:15 PM
#17
Registered User
Joined: Nov 2004
Posts: 483
Likes: 0
From: Hoffman Estates, IL
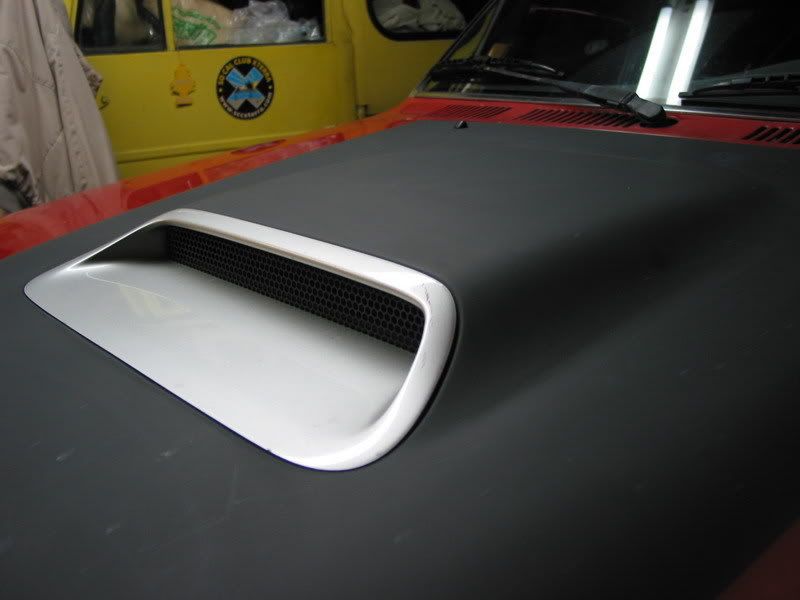
Yeah I went to Lowes and got a mesh screen/filter for the range hoods (vent on the stove), and cut a piece to fit. It works well, lets air get through but keeps mud and water for the most part out.
Here is a pic of mine after the paintjob, muddy out on the trail...
Here is a pic of mine after the paintjob, muddy out on the trail...
Aug 11, 2007 | 11:34 AM
#20
Registered User
Joined: Nov 2004
Posts: 483
Likes: 0
From: Hoffman Estates, IL

Just in comparison... Here are some pics of mine before the paintjob... Notice the dimple...
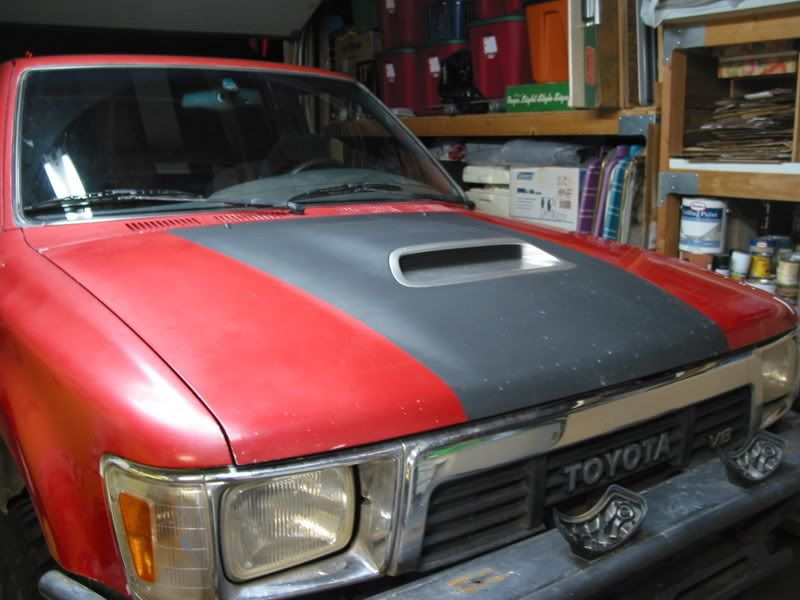
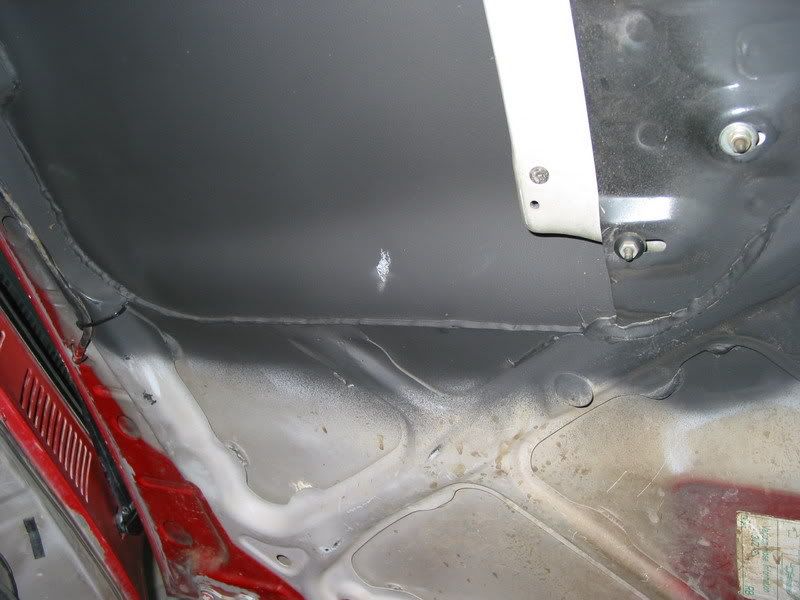
And Breknraj... Make sure you close in the bracing under there as well... If you dont brace it properly it will allow for flex and may end up making the seam show up later on... I give mad props to my buddy who did mine, he braced it in really nice.
Last edited by MorphiasX; Aug 11, 2007 at 11:44 AM.


