
Fusable Link Replacement
 Jan 24, 2011 | 01:39 PM
#1


Fusable Link Replacement
This is one of those "hardly ever happens to these trucks" thread. If you have it happen and don't realize the issue, it can drive you buggers!
First indicaiton will be NO POWER to ANYTHING! You check the obvious and still nothing. I would then recommend checking your "fusable link". This will be identified in the FSM as the "Main" fuse. coming from the battery to your engine main fuse box. In this case it is nothing more then a specialty wire designed to save your truck from a short circuit which can very likely result in an engine fire.

Here is a step by step replacement of your "Main" or fusible link.
 NOTE:
NOTE:
Disclaimer: As with all repairs and modifications, this write up is for educational purposes only. Any use or application of this procedure is done so at the risk of the installer/owner. The author and YotaTech are not responsible for any repairs or modifications done to any vehicle using these or any other related procedures contained in this write up. Descriptions and photographs are the sole property and copyright of the author and may not be copied or distributed without written consent. Links to this article may be allowed but are protected by all US and foreign copyrights. Use of specific products is not an endosrsement of these products or company by the author or Yotatech. Any photographs or images of such items or products remain the copyrighted property of the copyright holder.
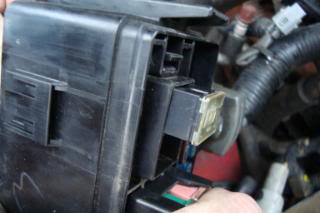
This is the fusible link
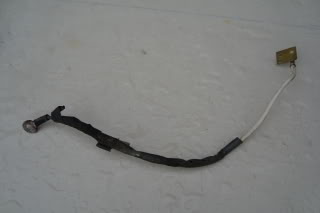
I can not stress this point enough, you MUST use the designed fusible link for your 4runner. If you use other then designed fusible link, you can start a fire. These are not just pieces of insulated wire, they are specifically designed to MELT at a predetermined current loading. They are also covered in a special type of insulation designed to work with these wires. They help to contain the melting wire without igniting from the heat generated from the melting of this designed wire. If you use normal wiring of the same gauge (which is smaller the the connecting wire on either end of the fusible link) an overload will cause the wire to melt but at a temperature higher then the fusible link which can result in damage to the components of our trucks as well as the high probability of an engine fire. DO NOT cut corners on this wire. It is the same thing as replacing one of the normal fuses in our fuse panels with a higher rated fuse, you will fry something and in this case is could very well be your truck!
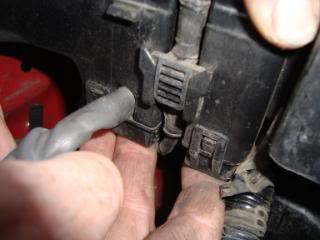
First item to do is to remove the battery.
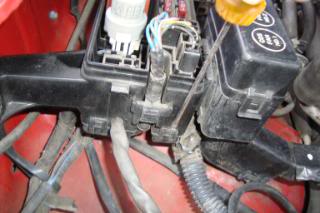
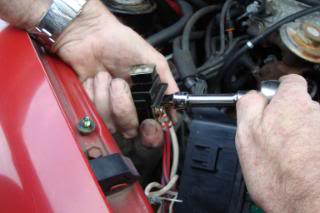
If you have not previously done so, remove the fuse panel cover. Then remove two 10 mm screws securing the fuse panel to the right fender well.
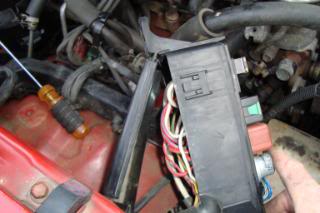
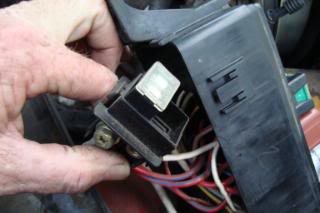
Pull the fuse panel free of the fender. The forward mount also has a small locating tab so be gentle when you try to pull it free.
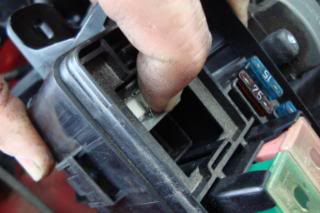
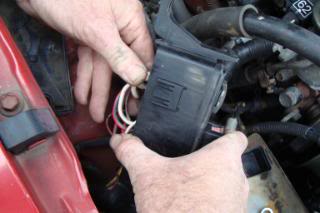
You will note two small clips on the front base of the fuse panel. These are the lockdowns for the lower cover. Using a small flat blade screw driver, gently lift these up while at the same time moving the bottom cover downward. Once both clips have been removed the bottom cover will be free from the front side. The rear of the cover is hooked over the bottom latch at the rear of the panel
Swing the cover clear and unlatch it from the back location. This may be difficult due to the wire bundles near the rear of the fuse panel.
Remove the bottom cover exposing the underside of the panel.
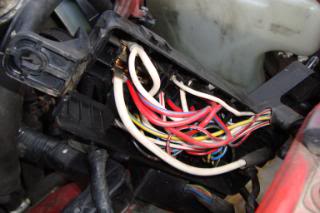
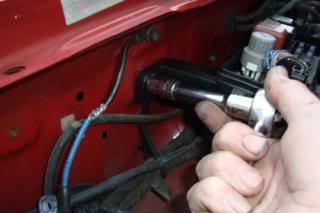
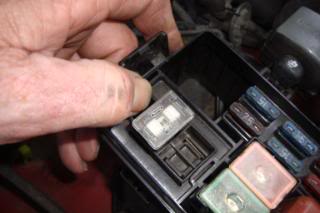
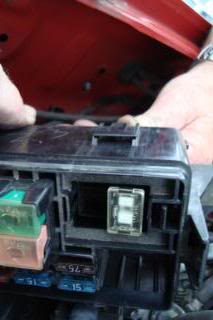
Removal of the fusible link wire from the 80 amp fuse requires removal of the fuse. This fuse is held in place by a locking block. near the rear of the mounting location you will note what looks like a clip.
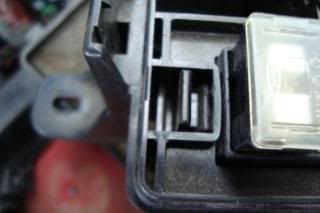
Push the clip towards the edge of the panel while pushing the 80 amp fuse downward.
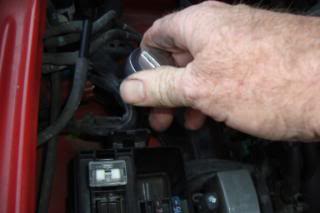
Fully pull the assembly from the bottom of the panel.
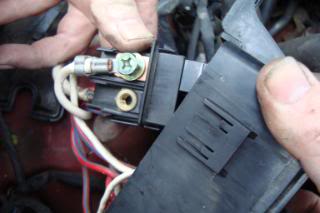
One side will have two small phillips/hex screws. This is the pair of screws that hold the fusible link to the fuse and are 8 mm. I recommend using either a wrench or socket to loosen and removal of those screws. If you are only replacing the fusible link then skip the next step as removal of the single 10 mm screw is not necessary.
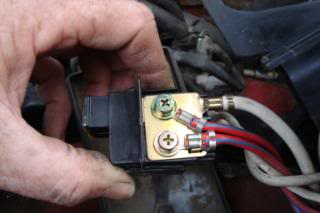
If you are going to replace the 80 amp fuse then remove the single 10 mm screw on the opposite side in the same fashion.

The fusible link is now removable from the system. Attach the new fusible link in the correct location on the fuse with the other two red wires using the 8mm screws removed previously.
If you replaced the 80 amp fuse, finish up the replacement by installing the other white wires on the opposite side and secure. Insert the assembly into the same location from the bottom of the fuse panel.
Continue pushing from the bottom until it is fully seated. You should hear a slight audible 'click'.
Position the fusible link wire under the panel towards the front cutout. Fit it into the cutout and then attach the bottom cover and snap into place. This will secure the fusible link in the panel.
Remount the fuse panel with the two 10 mm screws, attach the loop end of the fusible link to the POSITIVE (+) terminal battery cable and secure it firmly to the connector.
Reinstall the battery ensuring that the NEGATIVE (-) terminal post is closest to the right side fender, the POSITIVE (+) terminal post is towards the engine. Connect the negative terminal first and hand tighten. Attach the positive terminal and hand tighten. You have now completed your fusible link installation.

First indicaiton will be NO POWER to ANYTHING! You check the obvious and still nothing. I would then recommend checking your "fusable link". This will be identified in the FSM as the "Main" fuse. coming from the battery to your engine main fuse box. In this case it is nothing more then a specialty wire designed to save your truck from a short circuit which can very likely result in an engine fire.
Here is a step by step replacement of your "Main" or fusible link.
NOTE: Disclaimer: As with all repairs and modifications, this write up is for educational purposes only. Any use or application of this procedure is done so at the risk of the installer/owner. The author and YotaTech are not responsible for any repairs or modifications done to any vehicle using these or any other related procedures contained in this write up. Descriptions and photographs are the sole property and copyright of the author and may not be copied or distributed without written consent. Links to this article may be allowed but are protected by all US and foreign copyrights. Use of specific products is not an endosrsement of these products or company by the author or Yotatech. Any photographs or images of such items or products remain the copyrighted property of the copyright holder.
This is the fusible link
I can not stress this point enough, you MUST use the designed fusible link for your 4runner. If you use other then designed fusible link, you can start a fire. These are not just pieces of insulated wire, they are specifically designed to MELT at a predetermined current loading. They are also covered in a special type of insulation designed to work with these wires. They help to contain the melting wire without igniting from the heat generated from the melting of this designed wire. If you use normal wiring of the same gauge (which is smaller the the connecting wire on either end of the fusible link) an overload will cause the wire to melt but at a temperature higher then the fusible link which can result in damage to the components of our trucks as well as the high probability of an engine fire. DO NOT cut corners on this wire. It is the same thing as replacing one of the normal fuses in our fuse panels with a higher rated fuse, you will fry something and in this case is could very well be your truck!First item to do is to remove the battery.
If you have not previously done so, remove the fuse panel cover. Then remove two 10 mm screws securing the fuse panel to the right fender well.
Pull the fuse panel free of the fender. The forward mount also has a small locating tab so be gentle when you try to pull it free.
You will note two small clips on the front base of the fuse panel. These are the lockdowns for the lower cover. Using a small flat blade screw driver, gently lift these up while at the same time moving the bottom cover downward. Once both clips have been removed the bottom cover will be free from the front side. The rear of the cover is hooked over the bottom latch at the rear of the panel
Swing the cover clear and unlatch it from the back location. This may be difficult due to the wire bundles near the rear of the fuse panel.
Remove the bottom cover exposing the underside of the panel.
Removal of the fusible link wire from the 80 amp fuse requires removal of the fuse. This fuse is held in place by a locking block. near the rear of the mounting location you will note what looks like a clip.
Push the clip towards the edge of the panel while pushing the 80 amp fuse downward.
Fully pull the assembly from the bottom of the panel.
One side will have two small phillips/hex screws. This is the pair of screws that hold the fusible link to the fuse and are 8 mm. I recommend using either a wrench or socket to loosen and removal of those screws. If you are only replacing the fusible link then skip the next step as removal of the single 10 mm screw is not necessary.
If you are going to replace the 80 amp fuse then remove the single 10 mm screw on the opposite side in the same fashion.
The fusible link is now removable from the system. Attach the new fusible link in the correct location on the fuse with the other two red wires using the 8mm screws removed previously.
If you replaced the 80 amp fuse, finish up the replacement by installing the other white wires on the opposite side and secure. Insert the assembly into the same location from the bottom of the fuse panel.
Continue pushing from the bottom until it is fully seated. You should hear a slight audible 'click'.
Position the fusible link wire under the panel towards the front cutout. Fit it into the cutout and then attach the bottom cover and snap into place. This will secure the fusible link in the panel.
Remount the fuse panel with the two 10 mm screws, attach the loop end of the fusible link to the POSITIVE (+) terminal battery cable and secure it firmly to the connector.
Reinstall the battery ensuring that the NEGATIVE (-) terminal post is closest to the right side fender, the POSITIVE (+) terminal post is towards the engine. Connect the negative terminal first and hand tighten. Attach the positive terminal and hand tighten. You have now completed your fusible link installation.
Jan 24, 2011 | 11:51 PM
#2
Registered User
Joined: Oct 2006
Posts: 4,166
Likes: 11
From: GrangeVille, Idaho
I replaced that wire on my 86 4Runner with a piece of 4 gauge wire, that fusable link is a joke and in my opinion is not needed because you have the 80 amp fuse there. The fusable link is a weak link in the charging system because all of the power from the alternator has to pass through it to charge the battery and to power the electrical system. If anything the wire should be upgraded to at least 6 gauge.
Jan 25, 2011 | 02:02 PM
#3
Registered User
Joined: Jan 2011
Posts: 22
Likes: 0
From: Nebraska
Are there any signs to this wire going bad? Such as windows take long to role up, lights are dim, rear defrost doesnt work so great, etc... ?
Jan 25, 2011 | 02:57 PM
#4
Registered User
Joined: Oct 2006
Posts: 4,166
Likes: 11
From: GrangeVille, Idaho
All of these can be a sign of this wire being bad, but in my opinion its just a bad design. The 80 amp fuse it the main power fuse for the whole vehicle, but still they put this little wire between the battery and fuse box to carry the load from the alternator to the battery, makes no sense to me. A i said above, i replaced the wire with a piece of 4 gauge wire, because ats all i had at the time. 6 gauge would also be a good choice.
Jan 25, 2011 | 04:23 PM
#5
I wrote most of this article when I had to help my son with this truck. He initially had some issues with his windows not wanting to roll up as quickly as they would normally do. He told me he had heard a popping sound and then his amp meter went a bit snakey! The next morning he came out to start the truck to go to work and it did nothing! No click, no lights no radio no windows no nothing! Call Dad! LOL. This is when I found the fusible link had parted and the one installed was NOT the OEM link. It was a piece of stranded wire that someone prior to my ownership had REPLACED without knowing what they were doing. The wire melted through for what ever reason and also melted through the insulation. It had turned black, he was very close to starting a fire in the engine compartment of the truck. There is a reason the desing engineers put this in line with the battery. There is a reason it is referred to in FSM as the "MAIN" fuse. Just sticking a piece of what ever size wire to replace it is not the best move, so unless you have an electrical degree in engineering ... I would replace it with what Toyota installed when it left the factory. I did not write this article to start a discussion on why Toyota did this. I only supplied this write up to show you how you can replace it with OEM/designated replacement fusible link. You can also use most of this procedure to REPLACE the 80 amp fuse that myyota keeps referring to. The fuse has a designed function which is different then the main fuse. Something to think about, if the fusible link is not needed, then why do all cars have a fusible link? Hmmmm, maybe those engineers do know something more about this then myyota?
Last edited by Ritzy4Runner; Jan 26, 2011 at 02:07 PM.
Jan 25, 2011 | 05:05 PM
#6
Registered User
Joined: Oct 2006
Posts: 4,166
Likes: 11
From: GrangeVille, Idaho
 What ever dude
 Jan 25, 2011 | 05:51 PM
#7
Registered User
Joined: Aug 2009
Posts: 13,574
Likes: 72
From: Wilkes-Barre, PA, USA
I wrote most of this article when I had to help my son with this truck. He isitially had some issues with his windows not wanting to roll up as quickly as they would normally do. He told me he had heard a popping sound and then his amp meter went a bit snakey! The next morning he came out to strat the truck to go to work and it did nothing! no click, no lights no radio no windows no nothing! Call Dad! LOL. This is when I found the fusible link had parted and the one installed was NOT the OEM link it was a piece of wire that someone prior to my ownership had REPLACED without knowing what they were doing. the wire melted through for what ever reason and also through the insulation. It had turned black, he was very close to starting a fire in the engine compartment of the truck. There is a reason the desing engineers put this in line with the battery. There is a reason it si referred to in FSM as the "MAIN" fuse. Just sticking a piece of what ever size wire to replace it is not the best move, so unless you have an electrical degree in engineering ... I would replace it with what Toyota installed when it left the factory. I did not write this article to start a discussion on why Toyota did this. I only supplied this write up to show you how you can replace it with OEM/designated replacement fusible link. You can also use most of this procedure to REPLACE the 80 amp fuse that myyota keeps referring to. The fuse has a designed function which is different then the main fuse. Something to think about, if the fusible link is not needed, then why do all cars have a fusible link? Hmmmm, maybe those engineers do know something more about this then myyota?
So what length was the wire? What gauge was the wire? Stranded or Solid? What what the temp rating on the wire? 105C, 95C, 60C? You probably don't know and should not be making that kind of statement.
There is so many references to amperage capacity of wire on the net, you don't need to be an electrical engineer to figure it out. The problem is that there is so many different ratings on the same wire it's not funny.
the12volt.com has some good guides and is used by alot of audio installers. They are recommending 8ga wire for a 100amp load.
http://www.the12volt.com/wiring/recwirsz.asp
Trending Topics
Jan 25, 2011 | 08:35 PM
#8
Registered User
Joined: Jan 2011
Posts: 22
Likes: 0
From: Nebraska
Where did you find the fusible link wire? Is it available in the aftermarket part stores? Do I need to go to the dealership?
Jan 25, 2011 | 09:21 PM
#9
Contributing Member
Joined: Dec 2002
Posts: 389
Likes: 0
From: Helena, Mt.
NAPA has them
Jan 26, 2011 | 07:03 AM
#10
 Jan 26, 2011 | 07:23 AM
#11
Registered User
Joined: Aug 2009
Posts: 13,574
Likes: 72
From: Wilkes-Barre, PA, USA
FYI not all cars have fusible links anymore most manufactures got rid of the standard link wire and went to fuse. Toyota just happened to use both. All a fusible link is is a slow blow fuse designed to protect a wire that is 2-4 sizes bigger than what it is. SO say you have a 12ga fusible link wire, if you replace that with a 6ga wire and a fuse that the link wire was rated at say 100amp it protects just as well. The only disadvantage to this is that the fuse will actually blow sooner than the fusible link wire will, because a fuse cannot handle a large short spikes in voltage like a link can because the link actually just heats up and melts. I don't see it as a disadvantage though. If the link doesn't heat up enough it wont melt which is allowing the voltage spikes. To me I would rather keep blowing fuses then have the vehicle keep making voltage spikes and deal with the real problem because the link is actually masking it. Voltage spike in certain electronics is not good, Toyota knew this and it why there is also a fuse there as well. And is also why most manufactures are now just using fuses.
An example of this, accidentally touching the two battery cables together. A fusible link wont blow, but a fuse will. I do not know off hand what the amperage the fusible link is rated at on these trucks, but can't be much higher or lower than the 80amp fuse that is already in there. I'd be willing to bet though you would blow that fuse that is INLINE with the link wire before the link wire heated up enough to melt and break the connection.
Most vehicles have either or, a main fuse or a link wire but not usually both. Toyota felt at the time 20 or some odd years ago it was safer to do both as most vehicles at that time were only using link wires. Guess what happened to those running only link wires and accidentally touched the two battery cables together? An electrical nightmare. Because guess what the link wire didn't blow but ECU's, voltage regulators etc etc did. So how safe is that link wire? Not as safe as a fuse IMO.
I am not saying your guide is wrong or right, but making the statement of replacing that link wire with a 4 or 6 gauge wire will eventually cause a fire is just plain wrong.
It's a good guide though for a noob that thinks that main fuse is just removable like every other fuse in there and dont realize the thing is actually screwed in.
Last edited by xxxtreme22r; Jan 26, 2011 at 07:44 AM.
Jan 26, 2011 | 12:39 PM
#12
Well I just got off the phone with Toyota ... we are not talking about most other cars... I'm talking about replacement of the fusible link on 2nd gen 4runners. What forum is this? It's for 2nd gen 4runners! So if you want to by pass this safety feature that was engineered by more then just one guy in a rubber room in Tokyo then by all means go ahead. You do so at your own risk. As was explained to me by a Toyota representative, the main purpose of the fusable link is prevent overloading the main circuit to the main fuse box in the engine bay. If it fails to perform that function, you can have a situtation that could result in an engine compartment fire, I am not saying it will, but that is what the fusilbe link is designed to prevent. Toyota does not recommend that you replace that fusilbe link with a standard piece of wire of any type. The Toyota factory replacement procedures direct replacement of a blown fusible link with a specific part ... another Toyota engineered fusible link, not a piece of wire of any gage.
So there you have it. What I said about replacing the fusible link with a piece of wire of 4 or 6 gage is not recommended as you defeat the purpose of the fusible link. What I said was NOT wrong, Toyota technical support will tell you the same thing. If you replace that fusible llink with anything besides the listed part you run the risk of an engine fire, hey I didn't make up the laws of physics and I'm sure the engineers at Toyota don't make this stuff up for no reason. But xxxtreme22r, if you want to support replacement of the fusible link with a piece of wire, then please by all means do so but start your own thread. This thread is show how to replace the fusible link in a gen 2 4runner. Not as simple as pulling a fuse under the dash and that 80 amp fuse in the fuse box, by the way if you ever have to replace that 80 amp fuse, you are gonna have to do the same thing and that is not covered in the owners manual.
So there you have it. What I said about replacing the fusible link with a piece of wire of 4 or 6 gage is not recommended as you defeat the purpose of the fusible link. What I said was NOT wrong, Toyota technical support will tell you the same thing. If you replace that fusible llink with anything besides the listed part you run the risk of an engine fire, hey I didn't make up the laws of physics and I'm sure the engineers at Toyota don't make this stuff up for no reason. But xxxtreme22r, if you want to support replacement of the fusible link with a piece of wire, then please by all means do so but start your own thread. This thread is show how to replace the fusible link in a gen 2 4runner. Not as simple as pulling a fuse under the dash and that 80 amp fuse in the fuse box, by the way if you ever have to replace that 80 amp fuse, you are gonna have to do the same thing and that is not covered in the owners manual.
Last edited by Ritzy4Runner; Jan 26, 2011 at 12:58 PM.
Jan 26, 2011 | 12:44 PM
#13
Registered User
Joined: Aug 2009
Posts: 13,574
Likes: 72
From: Wilkes-Barre, PA, USA
how many guys on this forum have done the big 3 and/or replaced that fusible link with the wire? How many have had engine bay fires related to that? Thank you.
Jan 26, 2011 | 02:29 PM
#14
You have missed the point totally, this is not about replacing the fusible link with a piece of wire as you so seem determined to tout this was for replacing the fusible link wich is not a very simple procedure. If you want to replace it with wire the by all means write it up on your own friggin thread and post it as stay the freak out of mine. All you are doing is arguing about what I did and that telling everyone that they MAY have a problem for a potential engine bay fire that I'm wrong when TOYOTA says that it very well could happen. Please DO NOT bother posting anything further to this post for you have NOTHING constructive to add.
Jan 26, 2011 | 03:08 PM
#15
Registered User
Joined: Aug 2009
Posts: 13,574
Likes: 72
From: Wilkes-Barre, PA, USA
If there was a issue of NOT using a fusible link wire and just a fuse then explain why TOYOTA stopped using it in the Tacomas and just use a fuse (which the pre-tacomas already have)
If there was a issue wouldn't you think that out of how many people have replaced this link wire with a proper sized and type of wire, that 1 of use would have had an engine bay fire? But NONE of us has had an issue including the ones pushing the limits of the factory alternator in the way of winches, lights, stereo equipment etc etc.
Weather you like it or not, replacing that with a regular wire IS relative to this thread. Just because you don't like the idea of it does not make it not relative.
My evidence is how many people run it and have had 0 issues. Your evidence is 1 person (yourself) that has had an issue but cannot state what type, size etc etc that wire was when you had the issue.
For all we know it was speaker wire that was used to replace the link wire.
In the automotive world 1 person with an issue does not constitute a safety concern and is usually chalked up to user error not a design problem.
Let me ask you something, was your 98 4runner designed for a Taurus fan or was it designed with a fan clutch? What is more reliable a mechanical fan or an electrical fan? Looks to me like a pot and a kettle to me. Who are you to say how something was designed by TOYOTA yet you have changed you very reliable mechanical fan with an electric one that if it quits it quits and when a fan clutch goes out the fan still turns.
I think you need to let other people have their own opinion especially when they have proof of why it works or don't work.
Jan 26, 2011 | 04:58 PM
#16
Registered User
Joined: Jan 2007
Posts: 6,106
Likes: 27
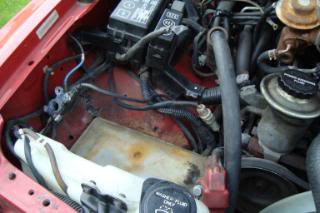
See the wires connected to the plate?

The fusible link is a protective device for those circuits. What are they? The headlight control relay circuit for one. That's an intended function of the fusible link right there. It's essentially the fuse for the head light control relay circuit, among other things. To bypass it with a larger/less resistive than specified wire, leaves the headlight control relay circuit without any circuit overload protection.
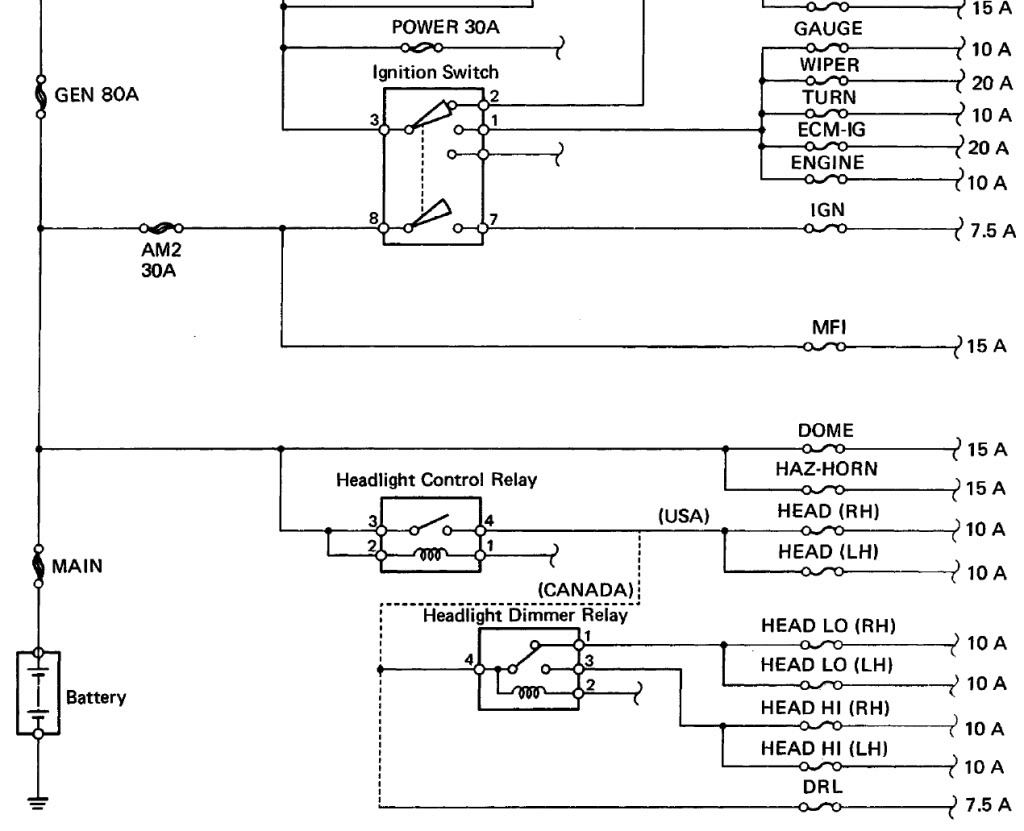
What does that mean? Not much. Why? Both headlights have individual fuses for each of them. What are the chances of the relay itself short circuiting? Almost non-existent. Unless you were to sink the front end of the truck in a lake or stream, let the relay fill up with water, then try and turn the headlights on before letting it drain thoroughly.
So who's right here? Everybody. Use a fusible link if you feel like it(but carry a spare at all times). Or replace it with a 4 or 6 gauge(or larger)wire if you don't(and carry a spare HCR if you plan on submerging the vehicle).
I used a 6 gauge wire, and haven't had any troubles with it in the 3+ years since. Someone had already replaced it with a 10 gauge wire before I purchased my truck. It worked fine too. I only changed it because I wanted to be sure it wouldn't melt on me somewhere deep in the jungle and leave me stranded there.
Hint: High strand count wire is best for automotive applications. Solid wire should be strictly avoided.
The fusible link is a protective device for those circuits. What are they? The headlight control relay circuit for one. That's an intended function of the fusible link right there. It's essentially the fuse for the head light control relay circuit, among other things. To bypass it with a larger/less resistive than specified wire, leaves the headlight control relay circuit without any circuit overload protection.
What does that mean? Not much. Why? Both headlights have individual fuses for each of them. What are the chances of the relay itself short circuiting? Almost non-existent. Unless you were to sink the front end of the truck in a lake or stream, let the relay fill up with water, then try and turn the headlights on before letting it drain thoroughly.
So who's right here? Everybody. Use a fusible link if you feel like it(but carry a spare at all times). Or replace it with a 4 or 6 gauge(or larger)wire if you don't(and carry a spare HCR if you plan on submerging the vehicle).
I used a 6 gauge wire, and haven't had any troubles with it in the 3+ years since. Someone had already replaced it with a 10 gauge wire before I purchased my truck. It worked fine too. I only changed it because I wanted to be sure it wouldn't melt on me somewhere deep in the jungle and leave me stranded there.
Hint: High strand count wire is best for automotive applications. Solid wire should be strictly avoided.
Jan 26, 2011 | 05:09 PM
#17
Registered User
Joined: Oct 2006
Posts: 4,166
Likes: 11
From: GrangeVille, Idaho
I just knew i wasn`t the only here that has replaced the fusable link with something heavier.
Jan 26, 2011 | 05:21 PM
#18
Registered User
Joined: Aug 2009
Posts: 13,574
Likes: 72
From: Wilkes-Barre, PA, USA
Thanks MudHippy. If that's the case then the FL means nothing to me then, since I have upgraded the headlight wiring harness as well with runs off it's own relay directly to the battery using 10ga wire. Does not use a FL, it has a 30 and 40 amp fuse for the low/hi as well as a 30 and 40 amp relay.
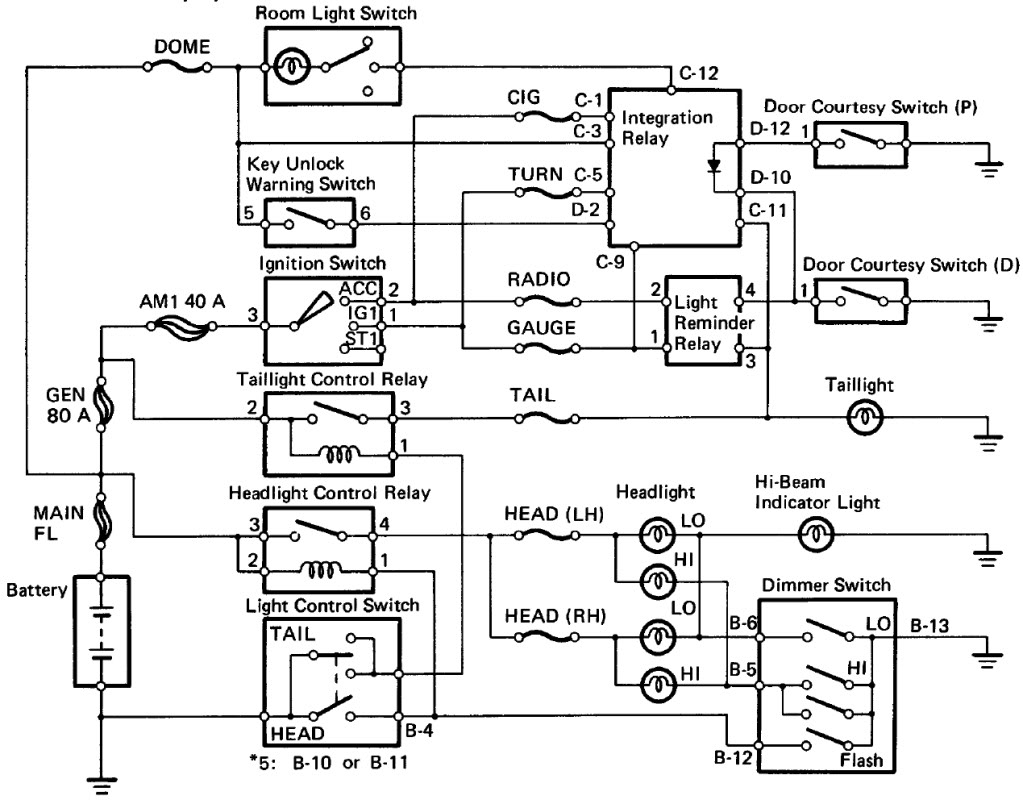
I guess the only thing it's protecting in mine by the look of those diagrams is my dome light which only works on my passenger side door right now. or if I turn it on manually. God forbid should I send 80 amps though the dome light and burn my truck down all because I couldn't see in the truck. Oh wait the dome light also has a fuse on it too.
No power locks so no Unlock Warning switch and my idiot buzzer doesn't work either probably because my courtesy switch doesn't work on the drivers side..
So what that mean to me at least? My FL isn't protecting
Jan 26, 2011 | 08:33 PM
#19
Registered User
Joined: Jul 2006
Posts: 479
Likes: 5
From: Anchorage
The only thing the fusible link is protecting is the wire from the battery to the fuse block. Everything else is protected by individual fuses in their circuits and the alternator is protected by the 80 amp fuse. If you replace the fusible link with a large standard wire and protect it with corrugated tubing then you won't have a fire. Fire is a hazard if the wire chafes on something metal and grounds. Prevent that from happening and you are safe.
If you want to worry about a fire--think about the battery-to-starter cable: an unfused wire carrying huge amperage. That one I keep well protected.
Take care and have a great day.
Bugs
If you want to worry about a fire--think about the battery-to-starter cable: an unfused wire carrying huge amperage. That one I keep well protected.
Take care and have a great day.
Bugs
Jan 26, 2011 | 08:49 PM
#20
Registered User
Joined: Oct 2006
Posts: 4,166
Likes: 11
From: GrangeVille, Idaho
The only thing the fusible link is protecting is the wire from the battery to the fuse block. Everything else is protected by individual fuses in their circuits and the alternator is protected by the 80 amp fuse. If you replace the fusible link with a large standard wire and protect it with corrugated tubing then you won't have a fire. Fire is a hazard if the wire chafes on something metal and grounds. Prevent that from happening and you are safe.
If you want to worry about a fire--think about the battery-to-starter cable: an unfused wire carrying huge amperage. That one I keep well protected.
Take care and have a great day.
Bugs
If you want to worry about a fire--think about the battery-to-starter cable: an unfused wire carrying huge amperage. That one I keep well protected.
Take care and have a great day.
Bugs

Thread
Thread Starter
Forum
Replies
Last Post
sandyota
84-85 Trucks & 4Runners
18
Feb 4, 2021 11:16 AM
TURBOrunnerNM
86-95 Trucks & 4Runners
4
Jul 22, 2015 11:01 AM


