
Fan shroud clearance
 Jul 5, 2006 | 05:45 PM
#1


Fan shroud clearance
Well I can't get anyone to help me  so I am going to just go ahead and do the install of the fan. Issue I have now is about using the taurus fan shroud. Should I be concerned that the bottom 2 inches is not covered by the shroud? Should I use insulation foam tape along the bottom of the taurus shroud against the radiator fins and just have the opening at the base? Thanks for any suggestions and YES I have read almost every thread on the install I just want to be sure I am doing this right and those that have actually done this would be the best ones to ask and I mean like recent not 2003. Everyone has different experiences and some things are improved on so I just would like some new take on the install. Enjoy
so I am going to just go ahead and do the install of the fan. Issue I have now is about using the taurus fan shroud. Should I be concerned that the bottom 2 inches is not covered by the shroud? Should I use insulation foam tape along the bottom of the taurus shroud against the radiator fins and just have the opening at the base? Thanks for any suggestions and YES I have read almost every thread on the install I just want to be sure I am doing this right and those that have actually done this would be the best ones to ask and I mean like recent not 2003. Everyone has different experiences and some things are improved on so I just would like some new take on the install. Enjoy
Jul 5, 2006 | 10:23 PM
#3
Registered User
Joined: Jun 2006
Posts: 228
Likes: 0
From: Tulsa, OK
can anyone on this thread go into detail on the thermostat part. i am still unsure of how to do this part and i dont want to do a simple on off switch. that is the main part holding me back on this mod. ritzy keep us posted on your install
Jul 6, 2006 | 06:59 AM
#4
Thanks to NC for his response to me concerning the current issue, NC, your Aces Dude!
PoleValuter, not sure if you are addressing putting in a new thermostat or if you are talking about setting the thermostat for the new fan, if for the new fan, I could use some more detailed discussion as well.
I would like to hear about optimum placement of the temperature sensor for the controller. The instructions for the controller I bought talks about mounting the sensor in between the fins of the radiator, pretty straight forward, but not sure if locating this sensor at the top or bottom is optimum and if it needs to be near either the inlet or outlet as well. Ok guys, sound off. I want the opinions of those who have done this mod, give me your inputs!
As for the latest on my install got started yesterday afternoon after getting NC's encouragment. Began by pulling the battery terminal. Safety first! So with my 14 YO in tow, the mod has begun. He is becoming a bit of a wrench turner so he's helping. My 87 4Runner is going to be his first vehicle in about 6 months. He is already wanting to get registered on this website but he can't register yet as the site won't accept his hotmail account ... I digress ...
We pulled the clutch fan off and the OEM shroud. Really simple, 4-10mm nuts and it was off. I would recommend as barchem has about the position of the fan. I checked the position of the 4 hold down nuts and they were lined up top to bottom so I had two on the left, two on the right. No need to turn the engine to get to all of the nuts, so just disconnected the battery. Couple of turns of the wrench and I just spun them right off. Had to pull the upper radiator hose to remove the fan and shroud, but heck I'm gonna replace both hoses now before the trip just to be sure I know their status. Collected the antifreeze in a couple of jars for reuse and to aid the environment.
I was a still a bit concerned about the edges of the taurus/Lincoln fan rubbing the radiator fins so I bought some A/C install foam tape from Lowe's just in case. Didn't realize that it didn't have any self-stick till I got it home and peeled the backing off to attach it. I ended up just used some spray adhesive. That stuff is gr8! Used single washer to reattach the pulley one the fan was removed. When I got the fan off the pulley tried to pop off under the belt tension but the studs kept it some what lined up so all I had to do was put the washer and nuts back on.
Here is a question for those who have done this mod, should I use a split lock washer or what about replacing the OEM nuts with nylocks? This thing is spining and I sure don't want this to ever work loose. Saftey tip: For those of you that are still runnin the clutch fan, when I went to take the fan off, two of the nuts where loose so maybe a good idea to check your clutch fan attachment nuts once in a while. Another issue is it necessary to put 3 washers back to simulate the thickness of the fan?
I have decided to do this mod with the radiator installed. So I had to pull the grill. that was interesting seeing that I didn't have an OEM manual yet to figure out how to get it off! Discovered I needed to pull the side marker/turn signal lamps FIRST then I could get the grill off! NIce thing was I didn't have to locate any screws but finding those plastic clips! I hate breakin darn little plastic clips!
GEtting the new fan into the space was a bit of a tight fit but after several different angles of attack, got it in. Was able to use one of the OEM shroud attachment bolts just like I have read about in a few posts on the upper drivers side. Was then able to install the passenger upper bolt but it won't torque down but is great for helping to hold the new fan in place until I can install those fancy round hold down ties.
Here is a quesiton as I don't know the in's and out's yet but I got a pack of 4 when I bought the fan controller. They have only 4 little rubber pads. Do I need a pad on each side of the tie to protect the fins or does the pad go on the lock disk side only? I may just use a piece of foam from the A/C weatherstrip.
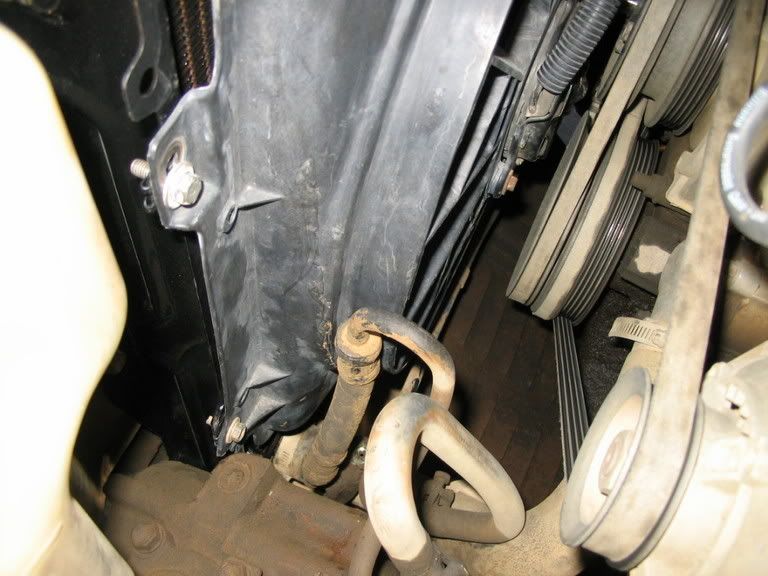
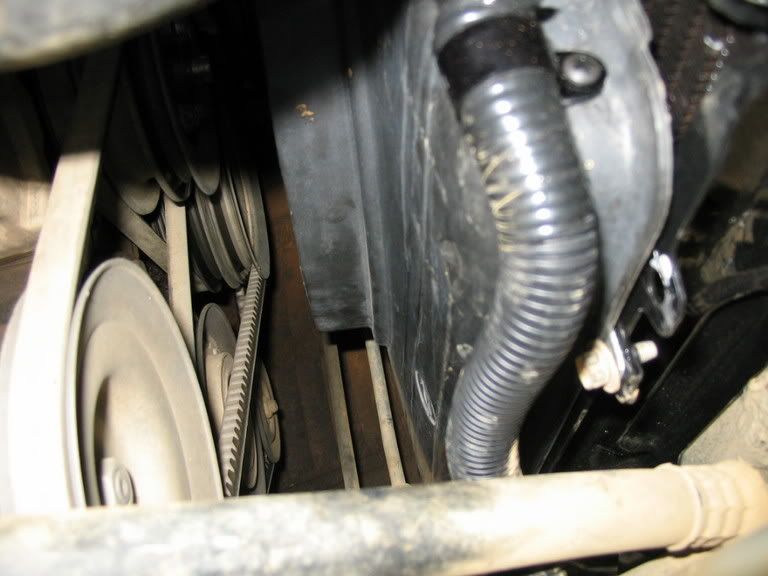
Once I got the fan in position I noted there is about a 2" strip along the bottom of the fan. Will this be an issue? There is that notch at the bottom of the taurus fan shroud that is about 3" long, will that be enough to allow some air movement along the lower most edge of the radiator?
I noted in some posts and installs that the clearance of the fan/pulley studs was an issue. I have about 1/2" clearance between the old fan mount studs and the rear of the electric fan housing. If I get the attachment zips up snug I don't thing this will be an issue.
I noted that the passenger side OEM shroud mounting holes are almost completely visable. I'm thinking if I can make some sort of washer to slip in next to the new shroud I could use the OEM bolts to help hold down the passenger side of the new fan. As for the lower driver side attachment bolt there is a flange on the shroud that overlaps the attachment flange but not the hole that has the nut. Would have to drill the shroud flange with the hole that is already there on the radiator and then use a bolt and lockwasher for that location. With the radiator installed this will be too difficult so will just use the round mounting tie downs.
Anyway thats where we stopped last nite, just too dark out in the yard to try to do anymore. More tomorrow!
PoleValuter, not sure if you are addressing putting in a new thermostat or if you are talking about setting the thermostat for the new fan, if for the new fan, I could use some more detailed discussion as well.
I would like to hear about optimum placement of the temperature sensor for the controller. The instructions for the controller I bought talks about mounting the sensor in between the fins of the radiator, pretty straight forward, but not sure if locating this sensor at the top or bottom is optimum and if it needs to be near either the inlet or outlet as well. Ok guys, sound off. I want the opinions of those who have done this mod, give me your inputs!
As for the latest on my install got started yesterday afternoon after getting NC's encouragment. Began by pulling the battery terminal. Safety first! So with my 14 YO in tow, the mod has begun. He is becoming a bit of a wrench turner so he's helping. My 87 4Runner is going to be his first vehicle in about 6 months. He is already wanting to get registered on this website but he can't register yet as the site won't accept his hotmail account ... I digress ...
We pulled the clutch fan off and the OEM shroud. Really simple, 4-10mm nuts and it was off. I would recommend as barchem has about the position of the fan. I checked the position of the 4 hold down nuts and they were lined up top to bottom so I had two on the left, two on the right. No need to turn the engine to get to all of the nuts, so just disconnected the battery. Couple of turns of the wrench and I just spun them right off. Had to pull the upper radiator hose to remove the fan and shroud, but heck I'm gonna replace both hoses now before the trip just to be sure I know their status. Collected the antifreeze in a couple of jars for reuse and to aid the environment.
I was a still a bit concerned about the edges of the taurus/Lincoln fan rubbing the radiator fins so I bought some A/C install foam tape from Lowe's just in case. Didn't realize that it didn't have any self-stick till I got it home and peeled the backing off to attach it. I ended up just used some spray adhesive. That stuff is gr8! Used single washer to reattach the pulley one the fan was removed. When I got the fan off the pulley tried to pop off under the belt tension but the studs kept it some what lined up so all I had to do was put the washer and nuts back on.
Here is a question for those who have done this mod, should I use a split lock washer or what about replacing the OEM nuts with nylocks? This thing is spining and I sure don't want this to ever work loose. Saftey tip: For those of you that are still runnin the clutch fan, when I went to take the fan off, two of the nuts where loose so maybe a good idea to check your clutch fan attachment nuts once in a while. Another issue is it necessary to put 3 washers back to simulate the thickness of the fan?
I have decided to do this mod with the radiator installed. So I had to pull the grill. that was interesting seeing that I didn't have an OEM manual yet to figure out how to get it off! Discovered I needed to pull the side marker/turn signal lamps FIRST then I could get the grill off! NIce thing was I didn't have to locate any screws but finding those plastic clips! I hate breakin darn little plastic clips!
GEtting the new fan into the space was a bit of a tight fit but after several different angles of attack, got it in. Was able to use one of the OEM shroud attachment bolts just like I have read about in a few posts on the upper drivers side. Was then able to install the passenger upper bolt but it won't torque down but is great for helping to hold the new fan in place until I can install those fancy round hold down ties.
Here is a quesiton as I don't know the in's and out's yet but I got a pack of 4 when I bought the fan controller. They have only 4 little rubber pads. Do I need a pad on each side of the tie to protect the fins or does the pad go on the lock disk side only? I may just use a piece of foam from the A/C weatherstrip.
Once I got the fan in position I noted there is about a 2" strip along the bottom of the fan. Will this be an issue? There is that notch at the bottom of the taurus fan shroud that is about 3" long, will that be enough to allow some air movement along the lower most edge of the radiator?
I noted in some posts and installs that the clearance of the fan/pulley studs was an issue. I have about 1/2" clearance between the old fan mount studs and the rear of the electric fan housing. If I get the attachment zips up snug I don't thing this will be an issue.
I noted that the passenger side OEM shroud mounting holes are almost completely visable. I'm thinking if I can make some sort of washer to slip in next to the new shroud I could use the OEM bolts to help hold down the passenger side of the new fan. As for the lower driver side attachment bolt there is a flange on the shroud that overlaps the attachment flange but not the hole that has the nut. Would have to drill the shroud flange with the hole that is already there on the radiator and then use a bolt and lockwasher for that location. With the radiator installed this will be too difficult so will just use the round mounting tie downs.
Anyway thats where we stopped last nite, just too dark out in the yard to try to do anymore. More tomorrow!
Jul 6, 2006 | 08:10 AM
#6
Contributing Member
Joined: Nov 2002
Posts: 10,666
Likes: 5
From: Oklahoma State
Originally Posted by Ritzy4Runner
Here is a question for those who have done this mod, should I use a split lock washer or what about replacing the OEM nuts with nylocks?
I didn't see what controller you bought, that will make a difference as to where to put the probe.
I don't like the idea of an incomplete shroud either, but I guess if your cooling system is ideal in every other respect you'll be fine. Here are some pics of the shroud I made to fit a Taurus fan:


Last edited by mt_goat; Jan 31, 2007 at 04:54 PM.
Jul 6, 2006 | 09:35 AM
#7
Contributing Member
Joined: Dec 2003
Posts: 2,893
Likes: 2
From: Fort Worth, TX
I have that small gap at the bottom too, not a problem, as long as you have a set up like mine anyway. A thing to take into account is that I ended up having to upgrade my electrical system to keep up with the fan, but it seems that most people don't have to.
See: https://www.yotatech.com/forums/f2/taurus-fan-mod-snowball-effects-realized-63753/
The most important thing to note is that this fan seems to be insufficient for a 3.0 with an automatic, but works well with a manual tranny... The auto tranny makes too much heat for the fan to keep up with at full speed I guess...
See this thread: https://www.yotatech.com/forums/f116/electric-fan-woes-again-88465/
As for a controller, you have three options:
1) 30A relay for low speed, 40A (min) relay for Hi speed, and a 3-way switch from Radio Shack to control them. Works fine, have run the fan like this for extended periods of time before. Usually works okay with just the low speed on, and might need hi speed if off roading in the heat with AC on. Total cost, about $40-$50 with wiring, relays and misc.
2) On/Off controller with the relay set up from 1 above (I guess, or maybe just hi speed). Not a very good option in my opinion... Total cost not sure, maybe $40-$65.
3) Variable controller that continuously varies the fan speed. I have this controller from DC Controls, as well as bamachem (got the idea from him.) Total Cost, about $120. This is the best option, and is what I am running right now. Works great
Variable Controller Writeup: https://www.yotatech.com/forums/f2/electric-fan-variable-speed-controller-installed-61008/
Variable Controller Supplier: www.dccontrol.com
[EDIT] If you get the DC Controls controller, get the "Linear Indicator" too, it shows how fast the fan is going at any one time, definitely worth it IMO.[/EDIT]
I would say go with option 1 or 3, with an emphasis on 3. Don't use an on/off controller whatever you do though... Just remember, this only works with a manual transmission.
Last edited by mastacox; Jul 6, 2006 at 09:43 AM.
Trending Topics
Jul 6, 2006 | 09:39 AM
#8
MT, gr8 idea on the shroud mod. You got me thinking another mod! Now is that the stock shroud? I noted you did a 3.4 swap so you must have had the 3.0? Did you use the 3.0 radiator or did you use one from the 3.4 donor? If you used the OEM radiator from your gen 2 truck, I would like to see the complete process of the shroud mod. I like the idea of a complete cover but it seems most of what I have read it won't really be necessary but then again engineers usually do things for a reason.
I posted earlier trying to get some help before on this and listed everything but here it is again so this way you konw what controller I used. Availability was the prime consideration for the choice. Here is part of my post in the Newbie section:
"Went to the local parts store (NAPA was across the street from the yard) asked about the Hayden controller but they didn't have it so stopped in AutoZone where I have a good friend who works there so asked them for the best controller but also with a reasonable cost. They recommended the TorqFlo model #733647. Also picked up the install kit with the round tie wraps. Cost for the parts less 10% for military discount came to just under $40. Fan cost at the wrecking yard $35.
The TorqFlo has an adjustable temperature control with a range of 150-240 degrees (factory set for 160). Unit comes with a 40 amp relay and is wired to allow for dual speed control. Control of power uses wire for attachment to 12vdc ignition source or direct to the battery but they warn about running your battery down. I know a little about current draw, the control unit has an inline fuse holder for the hot lead to the battery and contains a 30 amp fuse. The relay has the following information stamped on the top of the relay '12V 30/40A'. Is this information related to the current capacity of the relay for the corresponding speeds slow/fast? "
Not too sure how to replace the studs but if the clearance is there I will leave it as is. I used the OEM nuts from the fan which appear to be the ribbed surface of the flange, I guess these are "lock" nuts? Not sure what the torque is supposed to be so anyone with a Gen 2 FSM of the engine if you know the torque spec for replacing the clutch fan, I would appreciate the info. Thanks for the encouragment!
Jul 6, 2006 | 09:41 AM
#9
Registered User
Joined: Jan 2006
Posts: 255
Likes: 0
From: Alabama
I replaced the studs in my pulley with bolts I agree with mt goat on not doing washers.
I mounted my temp sensor across the back side of my rad without sticking it in between the fins about an inch 1/2 from the bottom on the pass side.
As for mounting my fan I made 2 small brackets that are screwed into the side of the fan so I could just bolt the shroud on the stock mounting tabs.
I will try to get a better shot of the pass side mounts
Jul 6, 2006 | 09:45 AM
#10
Brian, thanks for the info! At $120+ that is bit out of my budget right now. I will go with option #1 you mentioned above. Yes I have the 3.0 with 5 sp manual so I will just hook up the controller to the slow speed and then figure out the procedure for seeting the trip point for the fan to activate. My issue will be to determine when the coolant thermostat acutally is operating. This is the temp I really need the fan to begin operating. I don't want this to overheat! I didi some checking through Toyota about the issue with overheating of the 3.0 and head gasket issue and using my VIN they stated that my engine was not part of the problem but was from later production and the issue (they claim) was resolved so I should not have any issues with my head gasket .... yeah right, so going to SoCal in July through the central valley, I don't want this baby to overheat. I will look seriously into the varible speed controller as that does sound like the way to go. More to follow and THANKS guys!
Jul 6, 2006 | 09:49 AM
#11
Registered User
Joined: Jan 2006
Posts: 255
Likes: 0
From: Alabama
Originally Posted by mastacox
1) 30A relay for low speed, 40A (min) relay for Hi speed
Jul 6, 2006 | 09:53 AM
#12
NC, you sly dog you! I could really use the info on how you made those brackets as I am a big believer in using whats there! If I don't have to push things through the radator I feel much better. Tell me about the stud replacement. What did you have to do to replace the studs? Using a shorter one without having to grind or cut is a good idea and I am going to see about picking up 4 nylocks unless you think the OEM fan nuts are sufficient. Thanks for the pics! Let me see them brackets!!
Jul 6, 2006 | 10:32 AM
#14

Registered User
Joined: Aug 2005
Posts: 213
Likes: 0
From: Arlington, TX
from my experience, its best to nest whatever fan your using into the stock shroud, just like bamachem did. i cannot comment on the tauras fan, but im using a volvo s60 fan, and i honestly dont believe its ever run at 100%, even with ac in the summer. i do have a manual tranny, but i dont think the auto would add that much stress=heat. i would have to say then that the volvo fan is a better unit. anyhow, im using the dc current controller just like bamachem, but i think temp probe placement will be the same for almost all controllers, here's why. when you are on the highway, you dont need a fan. the airflow flowing through the radiator is enough to keep it cool. the only way for a controller to know this, is if it measures the temp at or near the radiator outlet(bottom right when looking at a 2nd from the front) anyways, this allow the controller to monitor temp after it has gone through the radiator, and if it is not cool enough, the fan ramps up speed until it is. when on the highway, the coolant stays cool enough from forced airflow through the rad that the controller never needs to turn the fan on. if you put it at the top, the fan would literally run all the time once the engine was up to temp, if it could stay up to temp with over-cooling. i do honestly believe you really need to stick the probe between the fins, i know others have not, but it gives the probe the faster response time, and it doesn't do any damage, so just do it! here's a link to my writeup, ill get the pics back up asap. brad
https://www.yotatech.com/forums/show...455#post937455
https://www.yotatech.com/forums/show...455#post937455
Jul 6, 2006 | 11:22 AM
#15
Contributing Member
Joined: Dec 2003
Posts: 2,893
Likes: 2
From: Fort Worth, TX
Originally Posted by NC-B17A
I have one 30 amp fuse that my controller for the low speed setting hooked to & I have a 30amp Bosh relay for the high speed & its hooked to the same fuse I have turned on the high setting just for the heck of it & never blew the fuse so the high side is less then 30 amps
I now have the variable controller, but left the relays and wiring in there as a backup electrical system, so if the controller has problems, I can still go back to manual relays... If I was ambitious, I could make the switch control whether the fan was on auto or manual mode, but I don't have any deep water crossings or anything so I haven't bothered.
Also: on/off controllers are bad news for your engine because of thermal cycling. Long story short, your engine gets hot, then the fan kicks on and cools it and then turns off, the the engine gets hot, the cycle repeats. This will tend to cause components to fail more quickly on your engine due to fatigue. To minimize thermal cycling, you can have a fan that is on all of the time like the stock mechanical, or something that actively controls the temperature of your engine such as a relay that is on all of the time, or a variable controller.
Last edited by mastacox; Jul 6, 2006 at 11:30 AM.
Jul 6, 2006 | 11:57 AM
#16
Contributing Member
Joined: Nov 2002
Posts: 10,666
Likes: 5
From: Oklahoma State
Originally Posted by Ritzy4Runner
MT, gr8 idea on the shroud mod. You got me thinking another mod! Now is that the stock shroud? I noted you did a 3.4 swap so you must have had the 3.0? Did you use the 3.0 radiator or did you use one from the 3.4 donor?
Originally Posted by Ritzy4Runner
The TorqFlo has an adjustable temperature control with a range of 150-240 degrees (factory set for 160).
The yellow spot in this pic shows about where my probe is:http://community.webshots.com/photo/...42310107PIDTBU
Last edited by mt_goat; Jul 6, 2006 at 12:18 PM.
Jul 6, 2006 | 02:59 PM
#17
Seems the temp setting is variable but for some reason they factory set it to 160. I have been reading that the 3.0 thermostat is set for 192 degrees? I called Toyota to ask about replacement thermostats and the parts guy said that the factory OEM thermo is set for 82c which calculated out to 179.8f (180) so which is it? I was thinkin of putting a new lower thermo with a 180 setting and trying to set the controller for 185. So which one is it? And how do you know if you are actually at 185. Geez the stuff I come up with sometimes LOL
Jul 6, 2006 | 03:54 PM
#18
Contributing Member
Joined: Nov 2002
Posts: 10,666
Likes: 5
From: Oklahoma State
Originally Posted by Ritzy4Runner
Seems the temp setting is variable but for some reason they factory set it to 160. I have been reading that the 3.0 thermostat is set for 192 degrees? I called Toyota to ask about replacement thermostats and the parts guy said that the factory OEM thermo is set for 82c which calculated out to 179.8f (180) so which is it? I was thinkin of putting a new lower thermo with a 180 setting and trying to set the controller for 185. So which one is it? And how do you know if you are actually at 185. Geez the stuff I come up with sometimes LOL
Jul 6, 2006 | 05:23 PM
#19
Registered User
Joined: Jan 2006
Posts: 255
Likes: 0
From: Alabama
mastacox do you happen to remember what brand of relay you had melt on you?
I will make a point to hook up my high speed relay to a switch & run it for longer then a burp.
Also any car that came with a factory electric fan will turn on & off as the temp goes up & down so. Do you happen to have a link to some info on thermal cycling in regards to what your talking about? I did a quick search & didn't really find anything that was useful.
So the controler your using just speeds the fan up & down instead of turning it on & off?
Jul 7, 2006 | 05:58 AM
#20
Well had to stay for overtime last nite so didn't get to work on the truck, but after chatting with NC-B17a I think I may just pull the radiator and install the brackets he mentioned so that I can use the stock bolts and mounting holes. Will be a better fit. I am going to use the controller I bought and set the fan to come on at about 185. How do you check the temp for the thermostat coming open without disassembly and putting it in a pan of water with say a candy thermometer? Not sure how to monitor the temp gauge due to the delay in the dash gauge and the time the thermo opens. Any tips or tricks here would be gr8. Will update to nite or tomorrow with my progress report. Thanks guys and keep the info coming


