
Electric fan wiring
 May 24, 2009 | 12:43 AM
#1
Thread Starter
Contributing Member
Joined: Feb 2008
Posts: 12,248
Likes: 33
From: Lake City, Fl
In the process of my motor rebuild in progress, I'm going to do something that I've wanted to do for a LONG time... ditch the mechanical driven fan and put on an electric fan.
I've got a question though. How have some of you guys wired you'rs up?
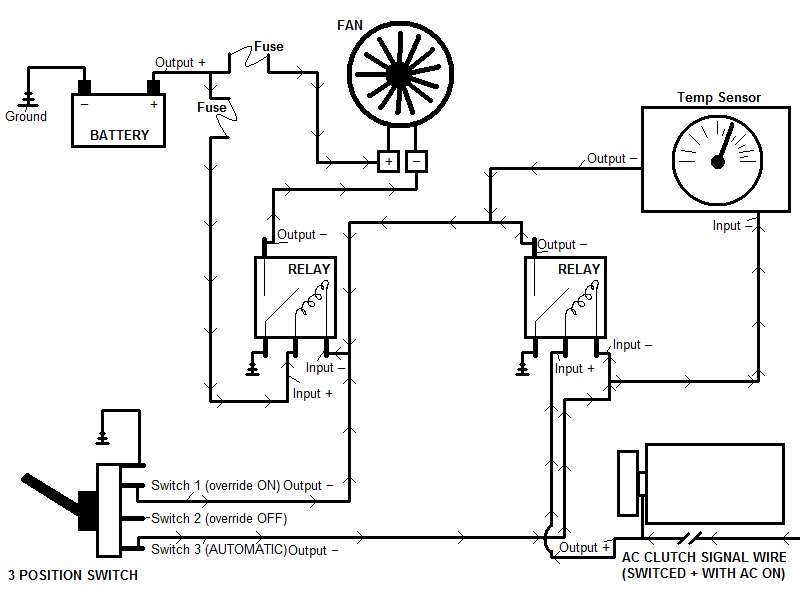
See here's what I plan. I want to wire it in a way so that it'll kick on in 3 different ways:
A) temp sencor (once the engine gets to a predetermined temp, the fan kicks on)
B) AC on (comes on with I turn on my AC, to pull air through the condencor)
C) manual override (I can opt to turn it on manually)
Here's what I was thinking; tell me if you think it's a good idea and will work.
Use a 3 position switch (on, off, on) in the cab to handle all of the controls. Up will be manual override on; direct kick-on to the fan relay. Middle will be manual override off; for those water crossings. Down will be fully automatic; will kick on with the AC or temp sencor.
I'm not a nuB in wiring by any means, but I'm no schematic scholar either
But does this quick schematic scetch I made look right? What makes this setup a little complicated is that it uses 2 different relays... it's the only way I can think up to isolate each trigger so that it works. The hole system is also a ground interrupt, turning on and off the ground to the fan, not the 12+
I've got a question though. How have some of you guys wired you'rs up?
See here's what I plan. I want to wire it in a way so that it'll kick on in 3 different ways:
A) temp sencor (once the engine gets to a predetermined temp, the fan kicks on)
B) AC on (comes on with I turn on my AC, to pull air through the condencor)
C) manual override (I can opt to turn it on manually)
Here's what I was thinking; tell me if you think it's a good idea and will work.
Use a 3 position switch (on, off, on) in the cab to handle all of the controls. Up will be manual override on; direct kick-on to the fan relay. Middle will be manual override off; for those water crossings. Down will be fully automatic; will kick on with the AC or temp sencor.
I'm not a nuB in wiring by any means, but I'm no schematic scholar either
But does this quick schematic scetch I made look right? What makes this setup a little complicated is that it uses 2 different relays... it's the only way I can think up to isolate each trigger so that it works. The hole system is also a ground interrupt, turning on and off the ground to the fan, not the 12+
Last edited by iamsuperbleeder; May 24, 2009 at 12:45 AM.
May 24, 2009 | 05:16 AM
#2
Registered User
Joined: Nov 2007
Posts: 383
Likes: 0
From: north ridgeville ohio
go by the flex a lite " varible speed control "
it does all that, cost about 80 bucks, and is plug and play.
it also starts the fan at about 60% and increases as temp goes up
which is a nice for those of us using the taurus fan which pulls lots of amps at start up
it does all that, cost about 80 bucks, and is plug and play.
it also starts the fan at about 60% and increases as temp goes up
which is a nice for those of us using the taurus fan which pulls lots of amps at start up
May 24, 2009 | 07:44 AM
#3


I think you can do it without two relays. I've been running a Flex-a-lite fan for years now and have ran it with TWO different controls. The origianal control that came with my fan was mechanical and not very good. In the end it shorted out and fried itself... I picked up a fully digital, full temp adjustable control unit with A/C kick on from Advance auto(I think Napa sells the same kit) and it was like $60? I think. Any ways, the only mod I had to do was seal the ONE relay that plugs into the unit with some silicon to keep the water out. It has worked flawlessly for me. I would sugest you go this route BUT if you come up with your own control, rock on!!!
  Maybe you can run just the one relay and tie both inputs in? Maybe put some diodes to prevent backfeed. Also, the ground on your switch is for it to be lighted right?
**ALSO, I must warn you now: depending on what fan you use(not sure if you bought one yet) you may risk breaking the fan with your A/C unit!!! For instance, my Black Magic 165 fan will get damage under hi torque with the A/C unit from motor roll!!!! The only way to prevent this is to limit the drivers motor mount!!!!! Either with a 4crawler special or a new motor mount like ones from Rockstomper. I got REALLY good at rebuilding my fan blades after buying a couple till I figured out what the deal was($35 from Summit).
I picked up a fully digital, full temp adjustable control unit with A/C kick on from Advance auto(I think Napa sells the same kit) and it was like $60? I think. Any ways, the only mod I had to do was seal the ONE relay that plugs into the unit with some silicon to keep the water out. It has worked flawlessly for me. I would sugest you go this route BUT if you come up with your own control, rock on!!! Maybe you can run just the one relay and tie both inputs in? Maybe put some diodes to prevent backfeed. Also, the ground on your switch is for it to be lighted right?**ALSO, I must warn you now: depending on what fan you use(not sure if you bought one yet) you may risk breaking the fan with your A/C unit!!! For instance, my Black Magic 165 fan will get damage under hi torque with the A/C unit from motor roll!!!! The only way to prevent this is to limit the drivers motor mount!!!!! Either with a 4crawler special or a new motor mount like ones from Rockstomper. I got REALLY good at rebuilding my fan blades after buying a couple till I figured out what the deal was($35 from Summit).
Last edited by BigBluePile; May 24, 2009 at 07:46 AM.
May 24, 2009 | 09:20 AM
#4
Registered User
Joined: Apr 2008
Posts: 536
Likes: 0
From: CenCal
Your schematic shows it already, but do NOT wire it to anything but the battery. Draw down to the fuse block under the dash was so bad it would actually kill the engine at idle for me. Wired it straight to the battery: barely noticeable.
May 24, 2009 | 10:19 AM
#5
Thread Starter
Contributing Member
Joined: Feb 2008
Posts: 12,248
Likes: 33
From: Lake City, Fl
ooooh, yeah, I completely had a brain lapse about the fact that there are some controllers out there that'll do all this automatically
I was just thinking up the cheaper route, and how the actual wiring would go
the only reason I had to use two relays is because if I'm not mistaken, the AC clutch engage wire is a + lead, and most temp probes are a ground interrupt, so I wouldn't be able to just tie to the two together
and the ground on the switch is actually the input power. instead of turning on + power like most switches, it would actually turn on the - power to the relay to engage it (instead of the realy being constantly grounded on one of the coil/switching leads, it would have a constant + on one of the coil/switching leads)
and yeah, I learned my lesson about needing to wire them directly from the battery with a relay, lol. back when I had my 87 Heep, whatever circut in it that controls the electric fan stoped working, so I directly wired a switch (just a switch) from the fuse box, to the switch, then right to the fan worked fine for a while, till one day the switch literelly cought on fire and melted on my way to school, lol
I was just thinking up the cheaper route, and how the actual wiring would go
the only reason I had to use two relays is because if I'm not mistaken, the AC clutch engage wire is a + lead, and most temp probes are a ground interrupt, so I wouldn't be able to just tie to the two together
and the ground on the switch is actually the input power. instead of turning on + power like most switches, it would actually turn on the - power to the relay to engage it (instead of the realy being constantly grounded on one of the coil/switching leads, it would have a constant + on one of the coil/switching leads)
and yeah, I learned my lesson about needing to wire them directly from the battery with a relay, lol. back when I had my 87 Heep, whatever circut in it that controls the electric fan stoped working, so I directly wired a switch (just a switch) from the fuse box, to the switch, then right to the fan
worked fine for a while, till one day the switch literelly cought on fire and melted on my way to school, lol
Last edited by iamsuperbleeder; May 24, 2009 at 10:28 AM.
Oct 3, 2009 | 09:44 AM
#7
BBP: I'm interested in your set up. I was running the flexalite 165 or 164 (forget number)had the control board fry once. Another time had the motor kick up and break several blades against the PS tensioner. Have solved the motor flex, I love low low and 2 wheel for fishtaling around tight corners on tight trails  Glad I packed the mechanic fan as a trail spare. If you have anymore information on the controller set I'd be interested, I'll spend sometime searching later, but if you got anything handy it would be appriciated.
Glad I packed the mechanic fan as a trail spare. If you have anymore information on the controller set I'd be interested, I'll spend sometime searching later, but if you got anything handy it would be appriciated.
Trending Topics
Oct 3, 2009 | 10:03 AM
#9
BBP: I'm interested in your set up. I was running the flexalite 165 or 164 (forget number)had the control board fry once. Another time had the motor kick up and break several blades against the PS tensioner. Have solved the motor flex, I love low low and 2 wheel for fishtaling around tight corners on tight trails Glad I packed the mechanic fan as a trail spare. If you have anymore information on the controller set I'd be interested, I'll spend sometime searching later, but if you got anything handy it would be appriciated.
Glad I packed the mechanic fan as a trail spare. If you have anymore information on the controller set I'd be interested, I'll spend sometime searching later, but if you got anything handy it would be appriciated. . Well, I went thru about 5 sets of replacement blades at $35-40 and then began rebuilding my own(I had LOTS of blades!! lol!) I've since put in a Rockstomper mount on the drivers side and eliminated the motor rock(plus a V6 trans mount). ANYWAYS, basically I know exactly what you mean! lol! I too fried that stupid circuit board after some mud. It's not very durable. I found at one of the auto parts stores a digital fan controller for idk $40? Works great and I have yet to have any major issues. Its fully adjustable for temperature control. I did seal the blade fuse into it's holder and I would DEFINITELY seal the relay to the base because water will get in there and cause the fan to intermittently go on and off. I think this is it:
http://www.autozone.com/autozone/cat...mpressor+Works

Now, I'm pretty sure there's a wire for a manual switch in the harness there. I also put in a led indicator light in the cab to see when the fan comes on. Unless the motor is off you cant hear it run over my exhaust and tires! LOL!
Last edited by BigBluePile; Oct 3, 2009 at 10:07 AM.
Oct 3, 2009 | 12:04 PM
#10
BBP: I drilled out my motor mount and placed a 3.5" length .5" dia grade 8 bolt. Makes putting the engine in like tetris. My t-case crossmember/skidplate accepts 2 mounts one on crawl box and one on t-case. When I first installed engine I left a little too much slack in the bolt but not no more will look for that kit.
will look for that kit.
Oct 3, 2009 | 01:51 PM
#13
BBP: I drilled out my motor mount and placed a 3.5" length .5" dia grade 8 bolt. Makes putting the engine in like tetris. My t-case crossmember/skidplate accepts 2 mounts one on crawl box and one on t-case. When I first installed engine I left a little too much slack in the bolt but not no more will look for that kit.
will look for that kit.

Thread
Thread Starter
Forum
Replies
Last Post
FS[SouthEast]: Mercury Villager Fan & DCC Fan Controller
coryc85
Misc Stuff (Vehicle Related)
6
Sep 9, 2015 06:24 AM
v_man
86-95 Trucks & 4Runners
14
Jul 23, 2015 04:01 PM


