
DIY headlight wiring harness upgrade for low $$

 Mar 7, 2012 | 10:51 PM
#123

Registered User
Joined: Aug 2009
Posts: 8
Likes: 0
Original plug has: low beam, high beam, always-hot common...
Thanks for checking, how can any of these be grounded?
When I said cap the common terminal, I meant insulate it and not use it. I thought only the low beam gets used as the low beam relay trigger, and the same for the high beam terminal.
Do different years have switched grounds and others switched power systems?
Mar 8, 2012 | 06:31 AM
#124
Registered User
Joined: Jan 2009
Posts: 754
Likes: 0
From: Graham, WA
No you will need the other connection. When I first installed my harness I didnt use the common and it didnt work, I wasnt getting any lights at all. Once I added the common it worked perfectly.
I can just about guarantee that if you run the common to both of your relays and replace the ground it will work. If you got a good couple feet of wire you can test it out before you go adding it to your harness. Its worth a shot
I can just about guarantee that if you run the common to both of your relays and replace the ground it will work. If you got a good couple feet of wire you can test it out before you go adding it to your harness. Its worth a shot
Mar 8, 2012 | 07:43 AM
#125
Registered User
Joined: Aug 2009
Posts: 8
Likes: 0
Thnk you for the reply Drmix,
It sounds like you are saying to connect an always hot wire to what was the ground of the relay, and not actually ground the relay.
Sounds weird, the relay looks ungrounded. It follows the diagram Example of Typical Switched Power Supply diagram. I'll give it a try.
It sounds like you are saying to connect an always hot wire to what was the ground of the relay, and not actually ground the relay.
Sounds weird, the relay looks ungrounded. It follows the diagram Example of Typical Switched Power Supply diagram. I'll give it a try.
Last edited by wierdobsession; Mar 8, 2012 at 08:28 AM.
Mar 8, 2012 | 08:03 AM
#126
Registered User

Joined: Jan 2010
Posts: 3,795
Likes: 33
From: Bloodymore
Almost finished this upgrade using 4Crawler's headlight upgrade schematic, waiting on the 6054s to show up. I'll be connecting to the headlight fuse(LH-RH) under the hood, then all new 10awg(read: overkill) to headlights and battery. Headlight power will be run off the AUX battery, so in case i ever leave the lights on, it will pull from the aux battery and not the start(main).
^^^Any one see a problem with this idea?
^^^Any one see a problem with this idea?
Mar 8, 2012 | 08:32 AM
#127
Registered User
Joined: Aug 2010
Posts: 2,027
Likes: 1
From: Oregon, USA
It sounds like you are saying to connect an always hot wire to what was the ground of the relay, and not actually ground the relay.
Sounds weird, the relay looks ungrounded. It follows the diagram Example of Typical Switched Power Supply diagram. I'll give it a try.
Sounds weird, the relay looks ungrounded. It follows the diagram Example of Typical Switched Power Supply diagram. I'll give it a try.
Last edited by BMcEL; Mar 8, 2012 at 08:43 AM.
Mar 8, 2012 | 08:39 AM
#128
Registered User
Joined: Jan 2009
Posts: 754
Likes: 0
From: Graham, WA
Almost finished this upgrade using 4Crawler's headlight upgrade schematic, waiting on the 6054s to show up. I'll be connecting to the headlight fuse(LH-RH) under the hood, then all new 10awg(read: overkill) to headlights and battery. Headlight power will be run off the AUX battery, so in case i ever leave the lights on, it will pull from the aux battery and not the start(main).
^^^Any one see a problem with this idea?
^^^Any one see a problem with this idea?

 Mar 8, 2012 | 09:04 AM
#130
Registered User
Joined: Jan 2010
Posts: 3,795
Likes: 33
From: Bloodymore
Sorry if i wasn't clear...I am using H4 bulbs. And i figure bigger wire is better in most cases, as a just in case.
My batteries, as Ian said, are in the back of the truck(trunk, sunken box) i have 2awg running from the rear to the front of the truck with twin distribution blocks for easy power hook up. One is main(starter and ecu) battery, the other is auxiliary(everything else).
My concern was hooking the headlight power to the aux battery and while leaving the relay switch on the starter battery(for now).
I don't see an issue since the two batteries are both 12v. Currently i have my radio hooked to the starter battery and the amp(cuz it draws a battery down) hooked to the auxiliary battery.
Mar 8, 2012 | 09:11 AM
#132
Registered User
Joined: Jan 2010
Posts: 3,795
Likes: 33
From: Bloodymore
My truck is so grounded now, i think i have a 1/3rd more grounds using heavier gauge(4awg and 8) wire then any yota around...well, except yours, haha.
Yes the batteries are tied together with a 4awg ground(12") and then to body ground(box).
BTW, i got my SWR yesterday if you need to borrow it.
Yes the batteries are tied together with a 4awg ground(12") and then to body ground(box).
BTW, i got my SWR yesterday if you need to borrow it.
Mar 8, 2012 | 09:18 AM
#133
BTW, i got my SWR yesterday if you need to borrow it.
back on topic... ha...
i actually need to add a few more grounds, but it shouldn't be too hard with my set-up
Mar 8, 2012 | 12:25 PM
#134
Registered User
Joined: Aug 2009
Posts: 8
Likes: 0
I did it and it seems to work! I'm not absolutely sure cause it bright day. The only problem is that it only works with the old sealed beam plugged into the harness, which is essentially a resistor. I'll check it out at night.
Mar 9, 2012 | 09:16 PM
#135
Registered User
Joined: Jan 2009
Posts: 754
Likes: 0
From: Graham, WA
Mar 10, 2012 | 08:13 AM
#136
Registered User
Joined: Aug 2009
Posts: 8
Likes: 0
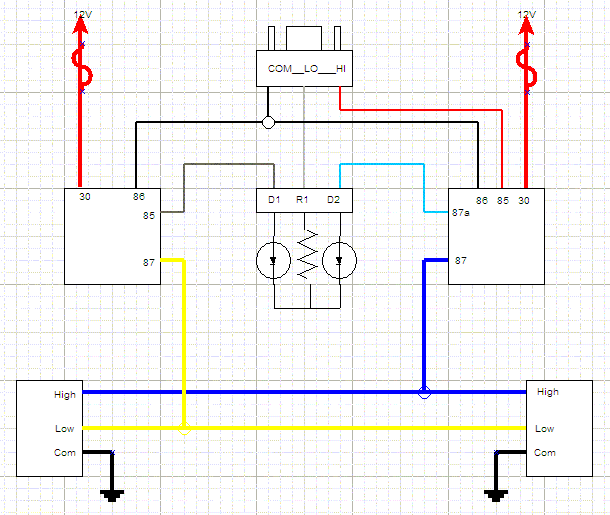
I didn't resolve my third headlight situation. I was thinking of putting a 50-100 watt 5 ohm resistor in the old headlight terminal to simulate the resistance given by the third headlight which I am assuming gave me back my high beams. It also allows my high beam indicator to show up again. I would be more positive about this solution if I heard other people had done someting similar. I'm also wondering how hot that resistor would get, and if it would melt or burn something it touched.
I welcome input or ideas.
I welcome input or ideas.
Mar 15, 2012 | 12:28 AM
#138
Registered User
Joined: Aug 2009
Posts: 8
Likes: 0
Figured it out, I had the common wire confused with low beams. Corrected it, and works but combo switch is extremely sensitive, like just bumping it forward puts it in high beams even if the lever is not in forward position, which is not that desirable. But it functions now so thanks good
 Mar 15, 2012 | 03:51 AM
#140
Registered User
Joined: Aug 2009
Posts: 13,574
Likes: 72
From: Wilkes-Barre, PA, USA
With so many people not getting this right the first time, I am confused as if MY diagram is correct or not now.
RBX it appears 4crawlers turns the low beams off when high beams comes on. With mine lows stay on with highs.
RBX it appears 4crawlers turns the low beams off when high beams comes on. With mine lows stay on with highs.


