
Beware Of Clutch Bracket Fatigue!


 Jan 14, 2013 | 01:00 PM
#103
Registered User
Joined: Aug 2011
Posts: 1,507
Likes: 2
From: Fraser Valley, British Columbia
Too late pedals are almost off. I learnt to take the brake pedal off first. When I get back from the bank I have to put some bolts back take the brake pedal off then try again.
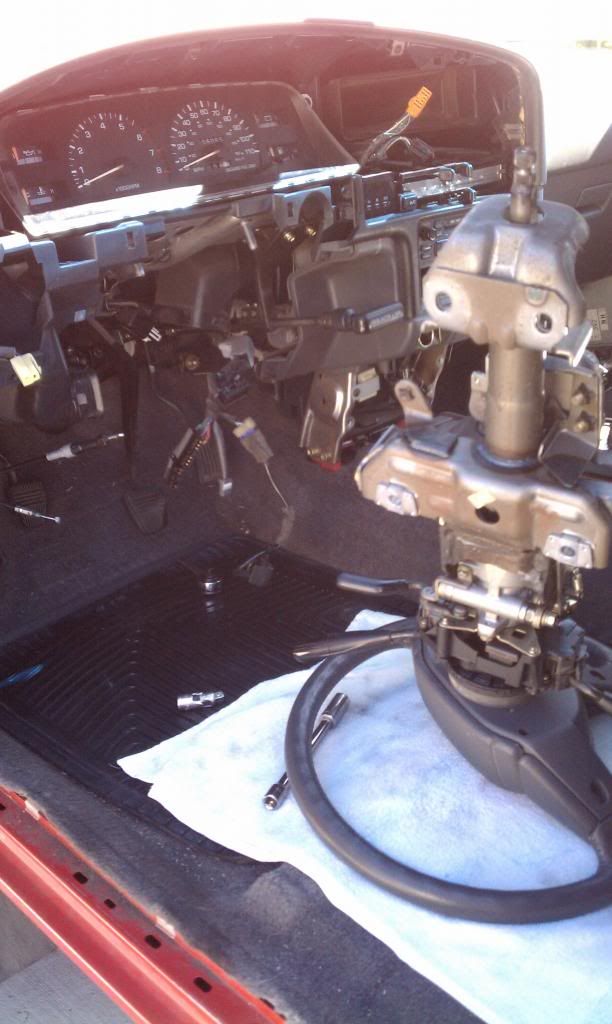
I've never had the steering column off before. Might get it off to put the plate back in.
I've never had the steering column off before. Might get it off to put the plate back in.
 Jan 14, 2013 | 01:50 PM
#106
Registered User
Joined: Feb 2009
Posts: 47
Likes: 0
From: Colorado
Yes, that sounds about right. I did this about a year ago so I don't remember exactly. The hardest part of pulling the steering column is dismantling all the dash pieces, everything else is easier than that. This plus pulling the seat out gives you plenty of room to maneuver.
I have had the dash apart a couple more times since then, two different stereos, I'm getting much quicker at it.
I have had the dash apart a couple more times since then, two different stereos, I'm getting much quicker at it.
Last edited by dsleggett; Jan 14, 2013 at 01:51 PM.
Jan 14, 2013 | 02:38 PM
#108
Registered User
Joined: Feb 2009
Posts: 47
Likes: 0
From: Colorado
That was at 230,xxx miles. I'm nearly at 270,000 now. And the engine is getting quite tired and using a bit of oil. I think I'm gonna grab a rebuilder 3VZE to build and then swap one weekend. I was hoping the engine would last until I can figure out a VW TDI swap but I think I need a new one now. I know the 3.4 swap costs about the same as rebuilding the 3.0, but I don't have the time right now, I can only spare a weekend of downtime.
Jan 14, 2013 | 02:59 PM
#109
 Mar 25, 2013 | 05:27 PM
#111
Registered User
Joined: Mar 2013
Posts: 78
Likes: 0
From: Colorado Springs, CO
Clutch Bracket
I bought my 1991 4Runner a few weeks ago and was having clutch issues, and after doing a search on the web I found info concerning the clutch bracket. Sure enough, it was not only broken, but someone had done one nasty job of trying to weld it. I drove the car shutting the engine on and off for 3 weeks so I could get it into first or reverse. I did a net search with the Toyota part number 55106-35050 and found one on www.toyotapartszone.com/ and after waiting five days and spending 164 bucks which included the shipping, I had it installed in a couple hours. Clutch works great.
Mar 26, 2013 | 07:44 PM
#112
This thread made me go out and stick my head under the dash because I couldn't wait until the morning....the bracket appears okay but I won't really know until I pull it to check it out and prob reinforce it. Gonna check the firewall tomorrow because the clutch initially works good but if I hold it down, she doesn't want to go into gear then....I was thinking a leak somewhere but the MC always has fluid in it. Hhmmmm... ..Gotta check this out. Thanks for all the great pics boys....
dsleggett, great pictures man. Nice plate too. Yea that's def. the way to do it...pull the steering column out and you've got a ton of room. I put in tilt steering in so I know the way to pulling the column. Thanks dude. I'll keep you guys posted.
..Gotta check this out. Thanks for all the great pics boys....dsleggett, great pictures man. Nice plate too. Yea that's def. the way to do it...pull the steering column out and you've got a ton of room. I put in tilt steering in so I know the way to pulling the column. Thanks dude. I'll keep you guys posted.
Apr 9, 2013 | 04:01 PM
#113

Registered User
Joined: Apr 2013
Posts: 3
Likes: 0
Just completed this job. Took out bracket from my 93, pulled my 91's out, guess what it had a slight hairline crack starting. Welded up both, finished Job with a, spare.
Shifts so Nice,BUT new the brakes super sensitive and are now sticking on fronts while I drive. Thought it was the wind or my engine but I must have screwed something up when I reinstalled the bracket and brake pedal.
Any ideas on how to release the pressure. It looked like there was only one hole to pin the brake rod to the pedal????


 Apr 20, 2013 | 08:39 PM
#115
Registered User
Joined: Nov 2012
Posts: 48
Likes: 0
From: Sacramento, CA
Glad I stumbled across this thread. Bought me 84' 8 months ago and the pedal makes all the noises you guys mentioned. Thought it maybe needed a good lubing as i've never heard about this issue even though i've owned an extra cab 85', std cab 85', 87' 2wd, 76' celica gt, 78' corrola wagon, and 85' 2wd. Went out and checked and sure enough......ayyyyyy. Guess my Sunday just got a whole lot busier. And I may want to look into Toyotas Anonymous. I may have a problem.
Apr 21, 2013 | 02:17 AM
#116
Registered User
Joined: Apr 2013
Posts: 3
Likes: 0
Just completed this job. Took out bracket from my 93, pulled my 91's out, guess what it had a slight hairline crack starting. Welded up both, finished Job with a, spare.
Shifts so Nice,BUT new the brakes super sensitive and are now sticking on fronts while I drive. Thought it was the wind or my engine but I must have screwed something up when I reinstalled the bracket and brake pedal.
Any ideas on how to release the pressure. It looked like there was only one hole to pin the brake rod to the pedal????
Shifts so Nice,BUT new the brakes super sensitive and are now sticking on fronts while I drive. Thought it was the wind or my engine but I must have screwed something up when I reinstalled the bracket and brake pedal.
Any ideas on how to release the pressure. It looked like there was only one hole to pin the brake rod to the pedal????
I have that old bracket welded in the pics and pre-welded the backup from my parts truck (neighbors love me). Nothing like instant parts!!
May 9, 2013 | 01:23 AM
#117

Registered User
Joined: May 2013
Posts: 1
Likes: 0
From: TX
If any of you saw my earlier threads about my clutch problems you will be interested to hear this.
The hard shifting I was experiancing was due to no failure of the clutch hydraulic system or the clutch itself. The large bracket that holds the clutch pedal and mounts to the firewall broke in 2 places. This caused the clutch to not fully engauge because when the pedal was depressed it actually pulled the push rod out rather than push it in creating negitive preassure in the system.
My mechanics were also supprised this was the problem. They removed the bracket and welded it back up, along with some extra support and 3 addittional bolts through the firewall. Unfourtunetly, the negitive preassure ruined the clutch master cylinder and I had them replace the slave as well at my request (it only cost $40).
Everything now works great. The only problem is the pedal feels different than it ever did before. Oh well, it will only take a week to get used to it.
Remember, if you ever hear a loud pop or a grinding noise under your dash it may be a broken clutch pedal bracket. Its hard to see all the parts of it give it a good and I mean good lookover. If you catch it soon enough, you can avoid the $100 master cylinder replacement. Just keep this in the back of your mind MT owners.
Total Cost = $350, Ouch coulda got sliderz for that, oh well, the mechanic gaurenteed his parts and work for 80,000 miles!
Lamm
May 17, 2013 | 10:57 AM
#118

Registered User
Joined: May 2013
Posts: 1
Likes: 0
I'm interested on your document
Hi
can you send me the original document? I have the same problem
can you send me the original document? I have the same problem
IMPORTANT � PLEASE READ
These repair instructions are provided to the user with no warranty expressed or implied that the repair outlined herein will restore the operation of the clutch or clutch pedal. This solution is being offered in light of the alternative costs for dealer repair, which some have reported to be several hundred dollars. Test cases for this repair were on a 1990 4Runner and a 1989 4x4 Pickup. This repair technique fully restored the function of the clutch pedal in both applications in 8/05 and 9/05 respectively. These clutch repairs are still working perfectly with the original �feel� in the pedal. E-mail me and I'll send original document with photos - I couldn't insert the photos here.
Symptoms:
The clutch will not disengage when the pedal is pressed to the floor. The clutch also feels �spongy� and shifting is difficult. In the worst cases, the vehicle must be started in gear in order to begin moving. It is impossible, or nearly so to put the vehicle in first gear.
Supplies:
1 each 3/8 inch bolt or threaded rod approximately 3 inches long
2 each large flat washers approximately 2� in diameter
2 each flat washers approximately 1-1�� in diameter
3 nuts for the 3/8 inch bolt, 4 nuts with a threaded rod
Tools:
A drill and 3/8� steel bit.
The Problem/ Root Cause:
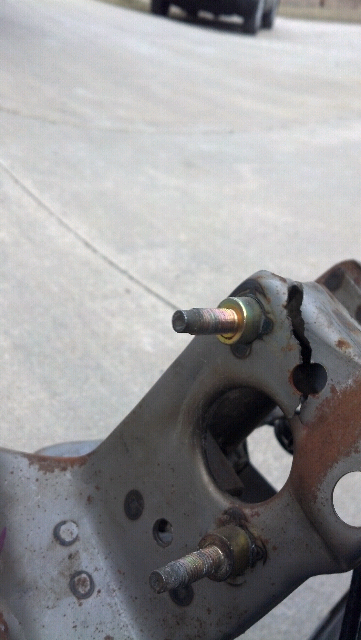
The bracket that holds the clutch and brake pedal is cracked at the base where it attaches to the firewall. Diagnose this by using a flashlight to look under the dash where the clutch master cylinder attaches to the brake pedal. Examine the clutch pedal bracket where it attaches through the firewall with the bolts that attach the master cylinder.
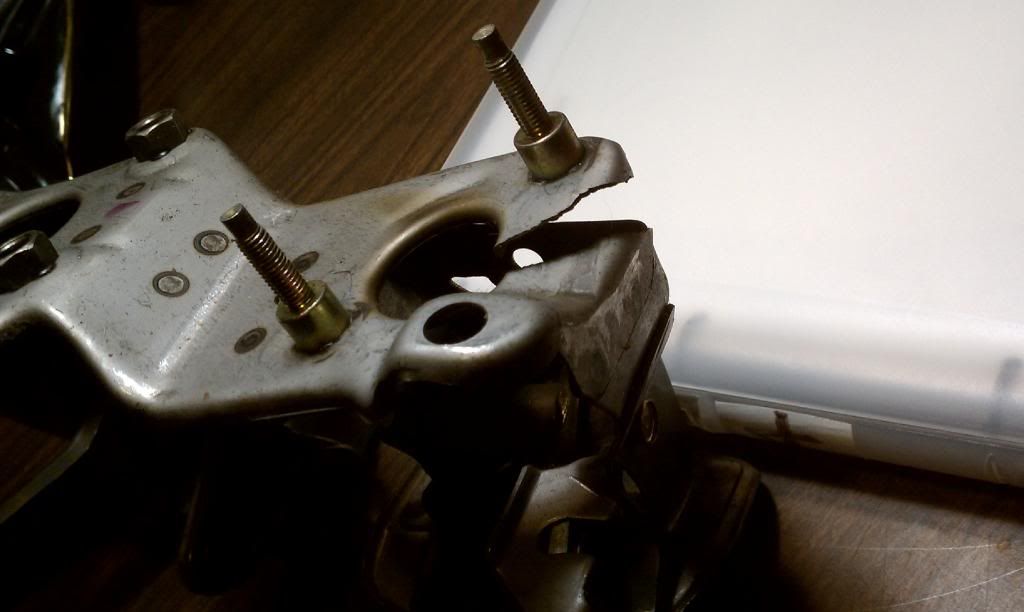
The cracks will be at the left side of the bracket and may be difficult to see while the bracket is installed. The bracket at the right has been removed and shows the large crack from the top of the base towards the bottom for several inches. This comes from years of flexing because the brace bolt under the dash has broken loose. After the brace is broken, every time the clutch pedal is pushed, it torques the bracket until it finally tears it from the upper left corner (driver�s view). The torsion on the bracket also distorts the shape of the bracket making it impossible to achieve leverage with the clutch pedal to disengage the clutch to put the vehicle in gear and/ or to shift gears � especially reverse. Reverse has no synchronizer, so there is nothing to help slow the transmission, and when the clutch does not fully disengage, the engine must be shut down before it will go into reverse.
See in the photo to the right how the clutch bracket on the left and the brake bracket on the right are no longer parallel. Also note the broken bracket attached to the top of the clutch side at the bottom left of the picture. That brace was designed to anchor the back of the bracket and keep it from flexing the base (front) where it broke. The design is workable, but the solution was under-engineered and the brace will eventually break just as it did on my vehicles. Keep these instructions, because if your 2nd Generation 4Runner doesn�t need it yet, it will eventually!
The Fix:
1. Get the bracket welded. This cost me $15 when I took it into the welding shop. Unless you are an experienced welder and have the right equipment, I recommend taking it to a professional. This is pretty light material and is easy to burn it up if you don�t know exactly what you�re doing. As you can see in the pictures, this was a good weld and penetrated completely through the base of the bracket. It should also be properly aligned; the crack must be brought together when it is welded. There may still be a slight twist in the bracket indicated by the fact that the clutch and brake sides are not yet parallel. This is not a huge problem, but with your hand you can twist it back into pretty close alignment before reinstalling it.
2. Before re-install the bracket, use a flashlight to locate the broken brace under the dash. It is aligned with the back part of the clutch pedal bracket, i.e., the left side. Remember that the brace is on the top of the clutch bracket, so it is located quite a way up into the dash area. Remove the broken brace with a pair of pliers if any is left attached. Bending it back-and-forth will break it off.
3. With that out of the way you are ready to drill a hole for the new �brace�. In preparation to drill the hole and install the bolt, remove the five (5) screws and pull the body panel by the windshield wipers off to expose the area below the wipers and behind the firewall. Take the drill and put a hole in the cowling from the bottom where the original brace used to fit.
4. Take the 3� x 3/8� bolt as pictured here and install it from the top below the left wiper arm. Insert it with only a single large flat washer from the top. The second large flat washer and another nut goes on from the bottom side. When this is tightened from the bottom, this double-washer method ensures that the bolt is a rigid brace for the clutch pedal. In the photos you notice the small hole created when the brace was broken off from the under side; this is not a problem. After tightening the nut from under the dash, slip the end of a 14mm box end wrench over the bolt end to align it with the pedal bracket. Finally, install the second nut on the bolt in preparation for installing the bracket. You will place another washer on top of the pedal bracket as you put it in place. This nut will be adjusted up or down to achieve the proper final vertical alignment for the bracket when you replace it.
5. Install the pedal bracket on the firewall and attach the new �brace� with a flat washer on top of the pedal bracket and a flat washer on the bottom of the pedal bracket. Install and tighten the final nut to secure the pedal bracket. For final up and down adjustment of the back of the bracket, adjust the nut on top of the pedal bracket. Tighten the bottom nut to lock the pedal bracket in place and install the pedals as before to complete the repair.
These repair instructions are provided to the user with no warranty expressed or implied that the repair outlined herein will restore the operation of the clutch or clutch pedal. This solution is being offered in light of the alternative costs for dealer repair, which some have reported to be several hundred dollars. Test cases for this repair were on a 1990 4Runner and a 1989 4x4 Pickup. This repair technique fully restored the function of the clutch pedal in both applications in 8/05 and 9/05 respectively. These clutch repairs are still working perfectly with the original �feel� in the pedal. E-mail me and I'll send original document with photos - I couldn't insert the photos here.
Symptoms:
The clutch will not disengage when the pedal is pressed to the floor. The clutch also feels �spongy� and shifting is difficult. In the worst cases, the vehicle must be started in gear in order to begin moving. It is impossible, or nearly so to put the vehicle in first gear.
Supplies:
1 each 3/8 inch bolt or threaded rod approximately 3 inches long
2 each large flat washers approximately 2� in diameter
2 each flat washers approximately 1-1�� in diameter
3 nuts for the 3/8 inch bolt, 4 nuts with a threaded rod
Tools:
A drill and 3/8� steel bit.
The Problem/ Root Cause:
The bracket that holds the clutch and brake pedal is cracked at the base where it attaches to the firewall. Diagnose this by using a flashlight to look under the dash where the clutch master cylinder attaches to the brake pedal. Examine the clutch pedal bracket where it attaches through the firewall with the bolts that attach the master cylinder.
The cracks will be at the left side of the bracket and may be difficult to see while the bracket is installed. The bracket at the right has been removed and shows the large crack from the top of the base towards the bottom for several inches. This comes from years of flexing because the brace bolt under the dash has broken loose. After the brace is broken, every time the clutch pedal is pushed, it torques the bracket until it finally tears it from the upper left corner (driver�s view). The torsion on the bracket also distorts the shape of the bracket making it impossible to achieve leverage with the clutch pedal to disengage the clutch to put the vehicle in gear and/ or to shift gears � especially reverse. Reverse has no synchronizer, so there is nothing to help slow the transmission, and when the clutch does not fully disengage, the engine must be shut down before it will go into reverse.
See in the photo to the right how the clutch bracket on the left and the brake bracket on the right are no longer parallel. Also note the broken bracket attached to the top of the clutch side at the bottom left of the picture. That brace was designed to anchor the back of the bracket and keep it from flexing the base (front) where it broke. The design is workable, but the solution was under-engineered and the brace will eventually break just as it did on my vehicles. Keep these instructions, because if your 2nd Generation 4Runner doesn�t need it yet, it will eventually!
The Fix:
1. Get the bracket welded. This cost me $15 when I took it into the welding shop. Unless you are an experienced welder and have the right equipment, I recommend taking it to a professional. This is pretty light material and is easy to burn it up if you don�t know exactly what you�re doing. As you can see in the pictures, this was a good weld and penetrated completely through the base of the bracket. It should also be properly aligned; the crack must be brought together when it is welded. There may still be a slight twist in the bracket indicated by the fact that the clutch and brake sides are not yet parallel. This is not a huge problem, but with your hand you can twist it back into pretty close alignment before reinstalling it.
2. Before re-install the bracket, use a flashlight to locate the broken brace under the dash. It is aligned with the back part of the clutch pedal bracket, i.e., the left side. Remember that the brace is on the top of the clutch bracket, so it is located quite a way up into the dash area. Remove the broken brace with a pair of pliers if any is left attached. Bending it back-and-forth will break it off.
3. With that out of the way you are ready to drill a hole for the new �brace�. In preparation to drill the hole and install the bolt, remove the five (5) screws and pull the body panel by the windshield wipers off to expose the area below the wipers and behind the firewall. Take the drill and put a hole in the cowling from the bottom where the original brace used to fit.
4. Take the 3� x 3/8� bolt as pictured here and install it from the top below the left wiper arm. Insert it with only a single large flat washer from the top. The second large flat washer and another nut goes on from the bottom side. When this is tightened from the bottom, this double-washer method ensures that the bolt is a rigid brace for the clutch pedal. In the photos you notice the small hole created when the brace was broken off from the under side; this is not a problem. After tightening the nut from under the dash, slip the end of a 14mm box end wrench over the bolt end to align it with the pedal bracket. Finally, install the second nut on the bolt in preparation for installing the bracket. You will place another washer on top of the pedal bracket as you put it in place. This nut will be adjusted up or down to achieve the proper final vertical alignment for the bracket when you replace it.
5. Install the pedal bracket on the firewall and attach the new �brace� with a flat washer on top of the pedal bracket and a flat washer on the bottom of the pedal bracket. Install and tighten the final nut to secure the pedal bracket. For final up and down adjustment of the back of the bracket, adjust the nut on top of the pedal bracket. Tighten the bottom nut to lock the pedal bracket in place and install the pedals as before to complete the repair.
May 27, 2013 | 08:31 AM
#120

Registered User
Joined: May 2013
Posts: 9
Likes: 0
From: Montana
I had mine go on me last week when I was about 200 miles from home! was able to use some wire to get it back so that I could drive it and picked up a bracket at the pay-n-pack for $25 just have to get a break in the weather and work to put it in. Mine had been welded also before I got the truck and it rebroke through the weld that kind of looked like a bird had been roosting on it lol.


