When you click on links to various merchants on this site and make a purchase, this can result in this site earning a commission. Affiliate programs and affiliations include, but are not limited to, the eBay Partner Network.
No thats not strange at all!!....because he eliminated the ECU to see if the clutch would engage!!....If the clutch is good, it'll engage immediately upon jumpering it!!...as long as the compressor is pumping freon, the sysytem will start to cool if the rest of the system is healthy as normal!!...But its not a repair!!.... as you would risk the head building too high a head pressure and blowing the seal on the compressor or worst!!.... Ive done this before [jumpering the compressor clutch] for short periods of time to purge air outta of a system, when we didn't have a vacuum pump to do it correctly!!.... and took a field repair chance!!...meaning NOT TOO LONG, to avoid burning up the compressor, to try and get a system to charge and go for awhile or just 1 more summer on something that we didn't care about that much about...meaning low value cars or trucks!!
don�t get me wrong, i love my pickup it�s like my third child. I�ve pretty much rebuilt everything on this truck. AC I�m not to sharp on. I�m about to the point of just running the ac and seeing how long it�ll last this way. Once it goes out I�ll replace everything. By the way from my understanding these trucks didn�t come from factory with AC. They were a dealer option so finding ac parts that work could be hard. I had that issue with an expansion valve when i first got the truck going.
I�ve researched my butt off and i can not find a high pressure switch. The low pressure switch is inside the evaporator box. To get to it I�ll have to let all the Freon out and pull the box. I was hoping not to do that but i was prepared to. Funny thing is last week everything worked fine except the idle up, which i fixed yesterday. I added an electric cooling fan, doing away with the fan clutch on the water pump. Soon as i did that the ac started acting up. It would ingage and disingage, until finally nothing. Jumping the plug that i put a picture of ingaged the compressor again. I drove it today and it worked fine and ac blew cold and engine idled up. The electric fan has to be connected to the ac somewhere so that soon as your ac is turned on the fan comes on no matter what your coolant temp is. I�m wondering by doing this i didn�t screw something up. The fan is jumped at the ac fuse currently. Thanks for the help.
Ahhh I wouldn't worry about it unless the conditions I mention after this are present!!... and don't tear into the evaporator assembly, Ive never understood why all car manufacturers, never design a evaporator enclosure housing that retains water tight sealing, that can be taken apart from the inside cab to be able to get to the evaporator enough to service it, example = cleaning the fins etc or freeing a clogged sweat/condensation evac port, short of replacement!!.... but anyway pay attention to whether the compressor clutch cycles at all!!...When you are blowing the coldest such as idling in the shade, just watch it with the hood up, and check to see if it cycles normal....if it NEVER CYCLES AT ALL, and the clutch never disengages, then you can "TECHNICALLY" build up TOO MUCH HIGH SIDE PRESSURE!!... and blow the head gasket on the compressor or a high side hose ETC, if the pressures get too high, thats the reason its supposed to cycle when needed to keep the high side within range and stop freezing up the EVAPORATOR!!.....I don't own a 4runner, but Ill take a WAG and say that the fan connector thats supposed to either keep air flowing for the radiator which is now used for blowing air threw the condenser, that when its on sends a signal to the ECU, that theres air flow "FAN ON" for the condenser and sends either VDC or ground to engage the compressor clutch!!....Glad you've got the clutch to engage, but AGAIN pay attention to the cycling, if the head pressure does get too high, the HSide pressure switch is suppose to signal the ECU to disengage the Comp clutch until the pressure drops enough for the high side switch to go back to a closed condition, so theres your failsafe if its working properly!!....Normal readings for a healthy auto A/C system is low at about 35psi Normal for high is about 200psi + the ambient temperature in F.....a HS cutoff pressure switch is generally set at around 320PSI then goes into an OPEN POSITION, until pressures drop then back to a closed position, completing the circuit once again...!!!....GOOD luck keep us advised as to how your yotas a/c system is behaving with this UNUSUAL fix effect!!
The plug with the green wire going into it. I put the green wire in because i added an electric fan. By the way with the electric fan my mpg went up 2.5 mpg. That plug has never been plugged into anything. Jumping it the ac started working again or compressor started working.
That connector appears to go to the A/C Cutoff relay. http://web.archive.org/web/201102052.../2aircondi.pdf (I don't see the relay; it is round, with a rubberized cover). It's only used on 4wd automatics. it's possible that all cooling units have the connector, but it is re-wired to "eliminate" it for non-4wd and manuals. OR an1176 somehow has a cooling unit (but not the relay) from a different vehicle. There would be four wires: L-R, R-G, B-Y, and I don't know the color of the fourth. The B-Y is switched 12v, so if the "fan" wire connects to the B-Y that could explain what is going on.
IF an1176 has a 4wd-automatic cooling unit, missing the relay, then it would only work if the switched lines were shorted together. ("jumped")
my pickup is a manual tranny. I�ll have to look at the colors of the wires. My AC has always worked, not great but worked. The idle hasn�t which I�ve resolved that issue. For some reason now the compressor won�t kick in unless that plug is jumped. It�s currently working fine.
Off the subject if anyone has plans on adding an electric fan to replace the fan clutch, a flexalite fan is a pain in the a**. I�ve had nothing but issues since I�ve added that fan.
Update...
idle up issue fixed!!! Finally something is going my way. Lol. It was the idle up bypass valve that has the idle screw. I found only one used one on eBay and none new.
Compressor not coming on. I checked fuses again and i tried jumping the pressure switch nothing. Behind the glove box i have one plug that has never been plugged into anything. No idea what it�s for. When you press the ac button it gets power. I jumped it and BAM compressor kicked on. It�s probab not what I�m supposed to do but i left jumped and i have cold air again.
There is a rubber diaphragm in that actuator that gets hard and cracks. Once it does, your idle will not idle up when the compressor kicks on and your engine idle drags down to the point that your car wants to shut off. Lucky that you found a used one as the part is discontinued 88606-35020. I replaced mine with used part from ebay and it fixed for a year until the used part went out. I am working on a fix that involves grinding the edge of the diaphragm housing carefully to separate the bottom plate of the diaphragm, buy similar part that is still available, do the same to new part just to remove rubber diaphragm. there is a spring in there too. I think I can reseal the two parts with silicone and small screws or bolts and nuts. Will see. I have some pics.
There is a rubber diaphragm in that actuator that gets hard and cracks. Once it does, your idle will not idle up when the compressor kicks on and your engine idle drags down to the point that your car wants to shut off. Lucky that you found a used one as the part is discontinued 88606-35020. I replaced mine with used part from ebay and it fixed for a year until the used part went out. I am working on a fix that involves grinding the edge of the diaphragm housing carefully to separate the bottom plate of the diaphragm, buy similar part that is still available, do the same to new part just to remove rubber diaphragm. there is a spring in there too. I think I can reseal the two parts with silicone and small screws or bolts and nuts. Will see. I have some pics.
if you find the right material to use for a diaphragm this should work. I did the same operation on a Datsun 210 vac advance can once.if you can open it without grinding the edge, bending instead, it will be easier to put back together by recrimping.
I thought at first prying apart too and I tried. Its steel and I just could not get anything under the flange with proper leverage. Did not want to bend any vacuum ports either. I was working on my original part. The ebay replacement part was on the truck (2wd '94 extracab dlx 22re, 166k, original owner). The original part lasted to about 160k. Once I got it apart by grinding the light bulb went off and it was easy to figure out how it all worked. The part in the picture is the same as mine. That is for 22re with both power steering and a/c. The bottom part with the small L-shaped vacuum port is sealed by the diaphragm. The a/c compressor comes on, the a/c VSV gets voltage and vacuum is applied to diaphragm. The vacuum pulls the diaphragm down and unseals a port inside that allows air from another line connected in front of throttle body to bypass the actuator and go directly to plenum. The idle goes up. I ordered two parts for Camry (88606891022, DIAPHRAGM SUB-ASSY, COOLER). Different part and wont fit on truck but I think the diaphragm is the same which is the only thing I care about and the fact that it appears to still be available. There must be loads of people with the same issue out there that can't fix this issue and its a big issue for truck with a/c. I have scoured the internet for the exact part for my truck and no luck. Maybe available from overseas but not dealing with those sellers. Sketchy. Waiting on the Camry part. Will let all know if this works out. I will do one and if it works I will do the other as backup. I will try to post pics for all.
I thought at first prying apart too and I tried. Its steel and I just could not get anything under the flange with proper leverage. Did not want to bend any vacuum ports either. I was working on my original part. The ebay replacement part was on the truck (2wd '94 extracab dlx 22re, 166k, original owner). The original part lasted to about 160k. Once I got it apart by grinding the light bulb went off and it was easy to figure out how it all worked. The part in the picture is the same as mine. That is for 22re with both power steering and a/c. The bottom part with the small L-shaped vacuum port is sealed by the diaphragm. The a/c compressor comes on, the a/c VSV gets voltage and vacuum is applied to diaphragm. The vacuum pulls the diaphragm down and unseals a port inside that allows air from another line connected in front of throttle body to bypass the actuator and go directly to plenum. The idle goes up. I ordered two parts for Camry (88606891022, DIAPHRAGM SUB-ASSY, COOLER). Different part and wont fit on truck but I think the diaphragm is the same which is the only thing I care about and the fact that it appears to still be available. There must be loads of people with the same issue out there that can't fix this issue and its a big issue for truck with a/c. I have scoured the internet for the exact part for my truck and no luck. Maybe available from overseas but not dealing with those sellers. Sketchy. Waiting on the Camry part. Will let all know if this works out. I will do one and if it works I will do the other as backup. I will try to post pics for all.
Well the suspense is killing me and now the Florida heat is killing me as well. Did you come up with a good solution with the Camry diaphragm???
Well the suspense is killing me and now the Florida heat is killing me as well. Did you come up with a good solution with the Camry diaphragm???
Yes, absolutely. Sorry for the suspense. It works like new now. I adjusted my engine idle without a/c on per procedure and then turned the a/c on and adjusted the idle screw on top of actuator to idle at 1000 rpm. So now the a/c kicks on and the idle goes up to 1000 now like its supposed to instead of down and making the engine almost cut off. The whole rebuild was a PITA but with patience and careful crafting I think its doable by anyone with a little skill. I ground the edge of the Camry diaphragm housing until it separated. same exact method for the one that does not work on my truck to dismantle and figure out how it worked. Turns out the rubber diaphragm inside is exactly the same as mine and that is the key component that makes it the actuator work. When I say actuator I don't mean the idle up VSV which is a solenoid. Actuator = diaphragm sub assembly. The thing that screw into plenum with all the vacuum hoses and the plastic a/c idle adjust screw on top.
The rubber diaphragm that was inside mine was dry, stiff, split/cracked so when vacuum was supplied to it from the vacuum switching valve (VSV) on top of the valve cover, the diaphragm could not hold a vacuum which would normally pull it down against a spring inside and unseal itself from a bypass inlet inside the actuator. when the a/c turns off, the vacuum switching valve (VSV) no longer receives voltage and vacuum is no longer supplied to the vacuum port on the bottom actuator diaphragm housing and the spring inside of course naturally pushes the rubber diaphragm back against the bypass inlet inside and no longer allows air from in front of throttle body to by pass into plenum. I don't know why its so overly complicated. There are two other vacuum hoses from the power steering that route through this actuator but are not really affected. The power steering pump has its own switching valve on it that re routes vacuum through the actuator to the plenum. There is no explanation or diagram that I have ever been able to find except for this one page here https://22reperformance.com/faq-diagnostic-info/ which almost has a complete explanation but is missing a step or two in the function. I would love to rewrite his explanation and add a few steps. He's almost there. In that link it's under "what the heck does that spaghetti monster in my intake do".
The Camry actuator has the same spring inside and same plastic A/C idle screw with nice new o-ring on it. So used those three parts to rebuild mine although I only really needed the rubber diaphragm inside. That is the critical component and the one that fails. Grinding the edge of the housing leaves a metal ring that I reused sort of like a big washer to provide some reinforcement to help prevent warping as I bolted the housing back together. I used four stainless steel allen head bolts and nuts, with flat washers. Its all 4-40 size. Anything bigger just would not work as the holes would be to big for what little there is left of the flange that mates the top and bottom of the housing back together and would probably ruin the diaphragm. A good solid seal is critical. File all the burrs from grinding down and make sure components mating surfaces are smooth and flat. You don't want any leaks from inside or out. I did not have to use any sealant. Could not find bolts locally so had to
order online. from Albany County Fasteners. Ordered extra for my spare actuator when I get to rebuilding that one. I took lots of pictures and will try to get those posted if I can figure out how. Never done that. I will have to post my steps for all of it including the bolt/nut/washer part numbers from Albanycountyfasteners. You will be able to see the bolt locations in the pics if I can post them. They have to be installed from bottom or the bolt ends will hit the cold injector on the plenum when you try to screw the whole actuator back into plenum and it won't screw in. Found that out through trial and error. Had to take bolts out and redo. I won't have access to computer for a few days so will post as soon as I can. So sorry for the huge delay. I know its getting hot! My truck is a 94 and first year in that model for newer R-134 refrigerant so that was nice. Hang in there. Careful on the grinding. You want to take off as little of the edge as possible just enough to separate. You need that flange area for bolting and sealing the outside edge of diaphragm. The diaphragm by the way only goes one way. There is a top and bottom. Each side is configured slightly different. One side for the spring and one side to seal against the by pass hole inside the actuator.
This is really incredible...thank you. Please post pics of this process when you get back to a computer. This part is discontinued and I think what you've done may be the only way to fix this issue. Buying used diaphragms isn't a good long term solution because they're just going to have the same issue eventually.
Would there be any way to use the Camry diaphragm directly? The only difference seems to be the power steering ports. What exactly is the diaphragm even doing for the power steering? Is the threaded portion of the Camry diaphragm the same size as our 22RE diaphragm? Will the Camry diaphragm thread into the 22RE intake plenum? If so, it seems like you could just route a filtered air line direct to the PS pump.
Here is the part number I posted previously 88606891022, DIAPHRAGM SUB-ASSY, COOLER I�ll see if I can answer some of those questions next weekend when I have access to a real computer, my truck, and the part. In the meantime you can see if local dealer has the part or find online. Get a new one . It was half the price of the few used exact parts for my truck. Buy two in case they discontinue this one also and for back up in case you mangle it the first go around. I think most if not all your questions can be answered if you have that part to compare. It�s pretty different. The only things that are the same are diaphragm housing, rubber diaphragm, spring, and idle screw. It does not have as many ports and it does not screw into plenum. It has a bracket integrated into to where I suppose it bolts somewhere on Camry engine. As far as tools I used my angle grinder and my rotozip with metal grinding or cutting wheels. A couple of files both rough and fine came in handy too. Clamp it in vice or use vice grip when grinding the edge of diaphragm housing. Don�t grind the vacuum ports! Make sure you mark the position of bottom of hosing relative to top so that small L shaped vacuum port points in the same position as it it did originally when it goes back together. You will need a couple of needle nose vice grips to clamp the parts together when drilling holes because the metal diaphragm spring will try to push everything back apart.
if you look at diagram at the link you will see two parts. The one on top is my existing one (discontinued). The one on bottom is the part I ordered. As you can see the two are quite different EXCEPT for the diaphragm housing which has all the same parts inside and of course the idle screw is the same too.
Hopefully you'll be able to upload those pics. I'm also trying to get the a/c idle up working again. But i had no idea at all about taking the idle up diaphragm apart.
OK I found a much simpler way to do this. The trick is that the extra port on our diaphragm that goes to the power steering pump is not necessary. The diaphragm does nothing special for the power steering pump except pass through the air intake line. You can use a splitter for that.
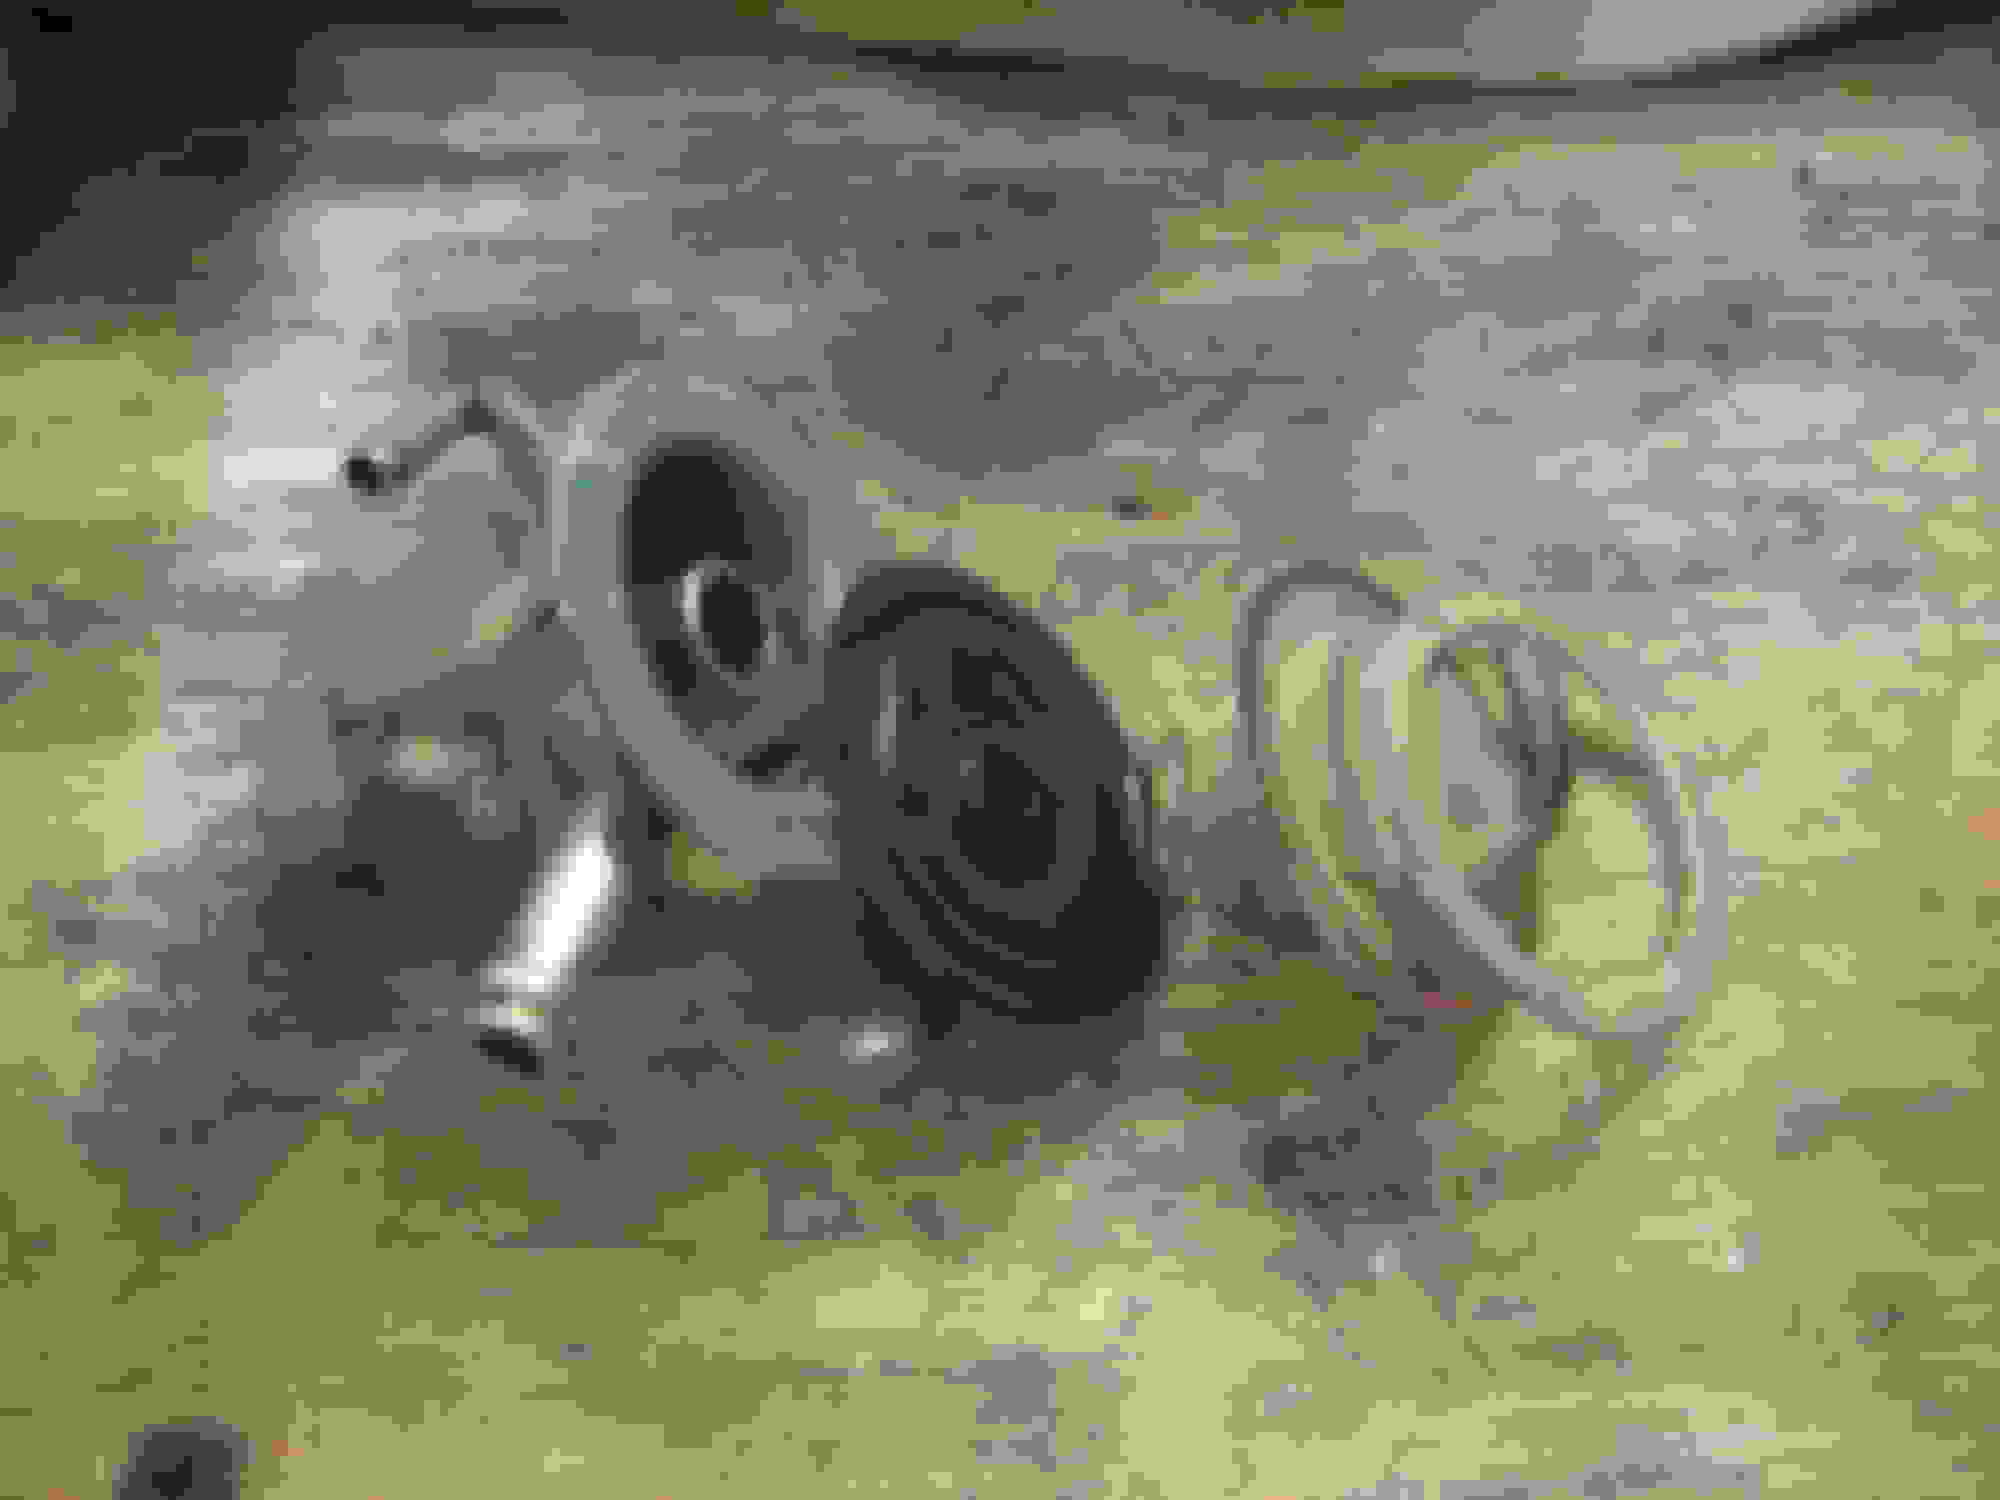
Take out the old idle up diaphragm shown here (middle left).
Screw in the new diaphragm. I got over excited and started hooking up lines before I took a picture.
Run the larger tube from the intake to the splitter. That same size tube goes to the diaphragm on the left. The smaller tubing goes to the power steering pump on the right.
Pics of the whole setup.
Works like a champ. Engine idles at 750 rpm normally and now idles at 1000 rpm when I turn on the AC. Total cost about $30 and 5 minutes to remove and replace the old one. You may need some slightly longer vacuum hoses as well.
Good input TLfromAI. Let me ask you, when you turn the steering wheel with A/C off, what rpm change do you get?
I’m not convinced mine is working correctly. I found the nipple that's threaded into the plenum carboned up and cleared it out but still didnt get a noticeable change. What is the correct operation of the power steering idle up? Is it different with A/C on?
Great Job!!!! I followed all the lines comparing to original and looks like that configuration will function with a/c and ps just as well as original (discontinued) part. Yeah! The small "L" shaped vacuum port close to where the hole thing threads into plenum is on opposite side as original part, but who cares. It does the same thing (it is the vacuum source for the Vacuum Switching Valve). The whole part is only missing the one port but that is really genius that you could combine that missing port into one with the "T" fitting. The main thing is that the idle goes up when the a/c turns on (750 to 1000 rpm). And no grinding to disassemble and reassemble parts like I did What a great community of ingenuity! All of you others better get your part before that one is discontinued too.
I will still try to post the pics of my Frankenstein part? Or at least of the parts that are inside; a rubber diaphragm and spring.
Thanks! I've learned soooooooooooo much from this community it feels good to finally contribute something!
Melrose,
I drove it around today and didn't have any power steering issues with the AC on or off.
twotwore,
I took a gamble that Toyota would use a standard thread on all these diaphragms. Luckily that turned out to be true. There are a couple other diaphragms from old Toyota models that should also work, but this one was the cheapest and had the inputs/outputs in the closest configuration to what we already have. But your way is the only way I know to have that original look!
Was having the same problem recently. A/C works good driving but shuts off when stopped unless you hold the gas pedal slightly to bump up the engine speed. A/C VSV works okay. After reading this thread, I checked the spaghetti diaphragm. The vacuum port on the bottom wouldn't hold a vacuum so I figured I'm not losing anything to grind this one apart.
I ground the edge slowly with a flap wheel on my angle grinder. Only took about two minutes to split the crimped seam.
Here's the order of parts in there.
And here's my diaphragm. Cracked all the way around in the middle and at the outer edge.
I have the 88606-89102 and some small screws on order to try to fix this one up. I'd rather have a few extra screws than have a plastic T in the vacuum lines so we'll see if it can be fixed up when the parts come in.

 Jul 6, 2018 | 10:40 PM


 I followed all the lines comparing to original and looks like that configuration will function with a/c and ps just as well as original (discontinued) part. Yeah! The small "L" shaped vacuum port close to where the hole thing threads into plenum is on opposite side as original part, but who cares. It does the same thing (it is the vacuum source for the Vacuum Switching Valve). The whole part is only missing the one port but that is really genius that you could combine that missing port into one with the "T" fitting. The main thing is that the idle goes up when the a/c turns on (750 to 1000 rpm). And no grinding to disassemble and reassemble parts like I did
  What a great community of ingenuity! All of you others better get your part before that one is discontinued too.