
22RE timing chain pictures - how bad is this?
 May 16, 2013 | 05:54 AM
#1

Thread Starter
Registered User
Joined: Oct 2009
Posts: 38
Likes: 0
From: Durango, CO
22RE timing chain pictures - how bad is this?
Hi guys. So my 1987 4runner has been sounding more and more like a diesel for a while, and the other day I finally found time to pull the valve cover to inspect the timing chain, and saw that it was quite loose. I should be receiving a front end kit from engnbldr (chain, gears, water pump, oil pump) hopefully today and will install it ASAP. I am currently not driving the truck, it seems to be not a good idea.
The picture on the right is how it looked when I first opened it up; the picture with the screwdriver in it shows how much slack I can push. That is on the driver side; the passenger side on the tensioner is good and tight.
I know this chain is obviously not right, and I am going to replace it, but judging from the amount of stretch/slack, is there anything else in there that I should examine closely while doing so, to see if any other issues have been caused? I plan on adjusting the valves after the job, so that is on the list.
Last edited by jumper_bob; May 16, 2013 at 05:56 AM.
 May 16, 2013 | 07:29 AM
#4
Registered User
iTrader: (4)
Joined: May 2010
Posts: 720
Likes: 16
From: People's Republic of California
Snobdds....isn't that the chain guide and one of the bolts right above it? I think he had the picture rotated which made it hard to identify. It also appears to be some chain marks, but maybe from a previous chain.
Shouldn't the driver side have some slack, and the passenger side should be tight because that is the tensioner side? I can't remember anymore

I'm thinking he has a metal guide (because where you see the top bolt it is very thin, whereas I believe with the plastic OSK ones it is much thicker). The noise may not be coming from there, or if the noise is coming from there, it is possibly the chain hitting the metal guide rather than the timing cover because there appears to be a groove where the rubber attached to the metal guide is eaten away.
EDIT: As I keep staring at the photo...it appears you still have plenty of rubber between the chain and metal backing of the guide. Are you sure the noise is being caused by chain slap?
Last edited by Grego92; May 16, 2013 at 07:39 AM.
May 16, 2013 | 08:21 AM
#5


chain guide looks like it's still there to me. you can definitely tell when it's missing/broken  broke mine off doing donuts in the mud and it was very apparent audibly and visibly when looking inside.
if it's sounding like a diesel you may want to check the valves and the plugs/wires to make sure you're still running on all 4 cylinders if it sounds like a diesel when you start it up and goes away, then it could be the t-chain making the sound. could even be something as simple as the valve cover was too tight and the valves are hitting it.
broke mine off doing donuts in the mud and it was very apparent audibly and visibly when looking inside.if it's sounding like a diesel you may want to check the valves and the plugs/wires to make sure you're still running on all 4 cylinders
if it sounds like a diesel when you start it up and goes away, then it could be the t-chain making the sound. could even be something as simple as the valve cover was too tight and the valves are hitting it.
May 16, 2013 | 08:58 PM
#6
Thread Starter
Registered User
Joined: Oct 2009
Posts: 38
Likes: 0
From: Durango, CO
Hi guys,
Thanks for all the responses. Just got home from a long day of work.
The pictures show me pushing the drivers side of the chain with a screwdriver; I can actually push it further than I could show while holding the screwdriver with one hand and the iPhone with the other lol.
wcasey, thanks, I will check the cover. got a replacement anyways, but looking will tell me if that was getting slapped by the chain.
and grego, thanks for that picture, it gives me a good idea of what to look for inside when I get it torn down to see what chain slap looks like.
I am not 100% certain that the "diesel" noise I am hearing is chain slap, but it sure seems to make sense. This is my first 22RE. The P.O. was a Toyota dealer tech who claimed he rebuilt it, I tend to believe him, as the truck runs great, engine is clean and tight and doesnt leak, and has decent power (for a 80's 4-cyl). As far as I can tell, it does have the metal guides, but wont know till I tear it apart in the next day or two. It -is- running on all 4 (good question tho lol), and the valve cover was not too tight and showed no sign of valve train contact.
Valves could be a possibility - it sure seems like the noise is comig from the top end and front end of the engine. I tried a small adjustment yesterday, but it was my first try with this truck, so may not be 100% great, but it still made the noise.
From reading posts and links on here, it sounds like other descriptions of chain slap (rattling on decel, starts loud but quiets down a bit when oil pressure builds up, etc).
I also seem to remember from reading a write-up recently about timing chain replacement that the driver side was supposed to be installed tightly, with any slack being taken up by the tensioner on the passenger side. Mine is def not tight, and I cant see any way to adjust without removing a bunch of stuff to get to the chain, at which point slapping in new front end kit makes sense either way.
Ok, thanks again, I'll post after the surgery if it fixed the noise or not.
May 17, 2013 | 06:21 AM
#7
Registered User
iTrader: (4)
Joined: May 2010
Posts: 720
Likes: 16
From: People's Republic of California
Since you're taking it apart anyhow, I'm going to guess the tensioner is out or bad.
https://www.yotatech.com/forums/f116...sioner-202050/
https://www.yotatech.com/forums/f116...sioner-120542/
https://www.yotatech.com/forums/f116...sioner-202050/
https://www.yotatech.com/forums/f116...sioner-120542/
.....need to be careful of the parts. You can use non-OEM tensioners if you know that they are good quality (Japanese made, for example, is one thing to look for). I figured this out the hard way, too... I just rebuilt my engine this winter and it doesn't rattle on start-up at all. Before the timing chain failure it did rattle similar to a diesel at start-up.
Trending Topics
May 18, 2013 | 08:54 AM
#8
Thread Starter
Registered User
Joined: Oct 2009
Posts: 38
Likes: 0
From: Durango, CO
Okay, here we go...
first, thanks for the suggestions!!! very helpful for a toyota noob haha!
got all my parts for the timing chain replace, about to go out and do it!
got the truck warming up now, going to do a compression check first. I decided to do it the way 4crawler says, without removing the head, for a couple of reasons:
- doing it outside under a carport, not the best place to keep dust out of the internals if I had to do the head gasket.
- cant get a OEM head gasket till Thursday at earliest.
- not sure it needs it!
I have a 268 engnbldr cam I was gonna throw in, but due to workspace, time, and lack of parts, I will wait. Also I am not sure if the valve train / rocker arm will need updating for the bigger cam, and I am not entirely sure if I want the 268 or the 261 - I should have done more research and gotten more phone time with engnbldr.
Wish me luck, I'll be back later with progress report and pics! Hopefully AFTER a test drive when it all goes back in!!!
- Scott
May 18, 2013 | 12:00 PM
#9
Thread Starter
Registered User
Joined: Oct 2009
Posts: 38
Likes: 0
From: Durango, CO
So I have so far done a compression test (see below), taken off all the accessories, opened up the front for access, and spent some time removing the A/C stuff.
A/C still worked, system held pressure, etc, but my rig in the summer has the top off and a soft top, so no need for A/C. I had a shop drain the refrigerant a couple of weeks ago in preparation for this.
Taking that all out very carefully, as someone might be interested in purchasing the whole she-bang, I will post pics later of all parts. It will be available as the complete system - compressor, all hoses, the double-radiator system up front by the grille (is that the condenser???), all brackets, screws, bolts, etc etc etc. I will have the under-hood parts out today, and will remove the plenum (sp?) from under the dash later this coming week.
Compression test results:
warmed up engine (and in the process left my radiator cap open so when I went back out to the truck 10 mins later it was peeing all over lolol, oops)
results are:
in order 1-2-3-4:
warmed up, first test:
150-150-150-145
put a teaspoon or so of fresh motor oil in each one, re-tested:
175-185-185-180
that would indicate to me that lower end needs rebuilt some point, doesnt that type of increase mean rings are going out?
makes me feel better about not doing the HG right now, this fall we will be in a place with a garage and I can save up some money for a good rebuild at that point.
Any thoughts on those compression numbers?
And the plugs looked okay, maybe a little towards the "red-brown" color side, and #4 had a *little* oil buildup. I'll post pics of that later too, if anyone can translate that for me.
- Scott
May 18, 2013 | 12:08 PM
#10
pour a table spoon of marvel mystery oil in each cylinder and let it sit while you work. Then when you're ready, crank it over to clear the oil out of the cylinders, reinstall the plugs and let her fire up.
May 19, 2013 | 06:22 AM
#11
Thread Starter
Registered User
Joined: Oct 2009
Posts: 38
Likes: 0
From: Durango, CO
Thanks Vital, I will try that. AutoZone last night only had HUGE bottles of Marvel, so I will get a small one today when I'm out getting some more parts.
I remember hearing about that stuff when I was a kid, but had forgotten about it - helps lubricate the upper cylinder and seals rings, or something like that, right??? I will dump some in overnight and see what happens and then re-test.
Ran out of daylight last night... worked till 1030 with my headlamp, but finally had to quit. *AND* the wind knocked over my oil bucket...arrrgghh.
Seems to have gone well so far; I have all the new parts in, engine re-assembled except for the cooling system, timing marks look right, I pulled the plugs and spun the engine for about 5 minutes with a ratchet on the crank bolt, to prime the new oil pump as well as to check for any mechanical interference in case I had mis-installed the timing. I *did* hear a "hissing/whooshing" sound coming from only the #2 exhaust valve while I was doing that... I will have to figure out what that is - I am guessing a worn valve, probably sticky spring and not quite opening the valve correctly???
Pics to follow later.
I did have one other issue I had not thought of - since I removed the A/C, and the cover bolts are all specific lengths, I ran into some bolt-too-long issues at 730 pm; had to run to AutoZone (only store open that might have metric bolts) and found out the bolt sizes anyways:
smaller bolts (take a 12mm socket) are M8x1.25 thread, 50 and 55 mm were the lengths of the ones I pulled out; where the A/C bracket used to be; I picked up some 35/40/45mm lengths and I think the 40s/45s were what worked with a washer or two.
bigger bolts (take a 14mm socket) were M10x1.25 thread pitch, and 55/60mm length. I couldnt find anything longer then a 50mm which was too short, so ended up having to washer out the bolts (with 8 washers!!!haha) until I can get some metric bolts of the proper length.
One annoyance was that the M8 bolts from AutoZone were the same thread pitch, but use a 13mm socket... so now I have two oddball bolts on the cover. That will get set right quickly, gonna order some "BOLT W/WASHER"s from one of the dealer sites you guys have steered me too.
Ok, I'm off to eat some breakfast, install the radiator, fill with coolant, and FIRE IT UP!!! See if anything comes flying out of my engine lolol.
All I have on hand is 50/50 green coolant, but I am planning a cooling system flush and possibly a new radiator very soon, so will replace with Toyota Red at that point.
- Scott
May 19, 2013 | 07:18 AM
#12
Registered User
iTrader: (4)
Joined: May 2010
Posts: 720
Likes: 16
From: People's Republic of California
Here's a bolt chart from LCE, their actual website has the full size: https://www.yotatech.com/forums/f116...rt-lce-259865/
Don't know if all of you are signed up to receive the LCE newsletter, but in the latest they had a pretty cool chart for the 22re timing cover bolts sizes and where they go. Something handy to have around.
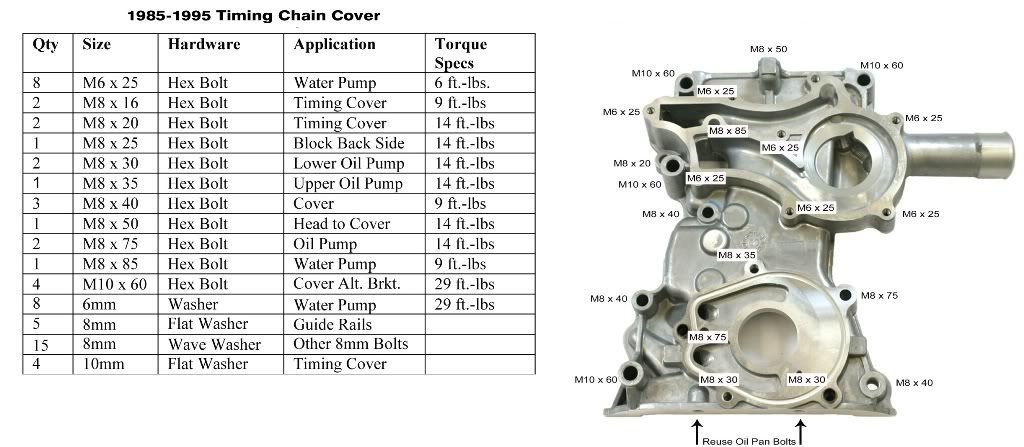
The link to the larger image is here http://www.lcengineering.com/LCNewsl...are-Kit_lg.jpg
When I first looked at the chart I noticed a couple of minor typos and let them know. Just to say thanks for looking out, they sent me a $10 GC and this autographed catalog and couple of stickers! Pretty cool of them eh?! I think the whole staff signed the cover. Bad thing is I see things I want that I wouldn't have seen on the web nothing beats a full color "hold in your hands" catalog....kinda like the Sears Wishbook when I was a kid
The link to the larger image is here http://www.lcengineering.com/LCNewsl...are-Kit_lg.jpg
When I first looked at the chart I noticed a couple of minor typos and let them know. Just to say thanks for looking out, they sent me a $10 GC and this autographed catalog and couple of stickers! Pretty cool of them eh?! I think the whole staff signed the cover. Bad thing is I see things I want that I wouldn't have seen on the web
nothing beats a full color "hold in your hands" catalog....kinda like the Sears Wishbook when I was a kid Last edited by Grego92; May 19, 2013 at 07:20 AM.
May 19, 2013 | 07:23 PM
#13
Thread Starter
Registered User
Joined: Oct 2009
Posts: 38
Likes: 0
From: Durango, CO
It's alive!!! mu-wa-hahahahaaha!!!
Finished putting all the parts back on, filled with coolant. Disconnected coil, cranked a few times to get the oil flowing; plugged in the coil, and it fired right up, first try.
Timing seemed perfect, I had taken a punch and made a mark right where the timing was, so I was able to get it close enough that I can't tell the difference. Dont have a timing light anyways. Will get that checked later.
Everything working great, took it for a drive.
Only sounds now are the P/S pump (sounds like a wore-out Ford now, has for a while, but the chain noise was louder hahaha) and what I think is some valve noise. Its running fine, but I will make an attempt later this week at a valve adjustment.
Issues I found and things I need to fix, or would have done differently:
- Problem was originally caused by what I think is improper installation of the last timing chain. I know (or think) it has been replaced; as the bright link was not in the proper place, and though the guide was broken, it was still in place, and the “railroad tracks” in the cover would not have been there unless the guide was totally gone, I think.
- Failure was probably caused also by improper tensioner torque – while removing it, I estimate it took at least 30 ft-lbs to break the bolts loose. Which caused the tensioner to fail, or not function, thereby leading to all the slack I saw on the driver side. (see pic below for tensioner wear)
- heater hose under the intake, a little 90 about 3” that goes to the back of the timing cover, was leaking and swollen, I found one at the AutoZone that was close, and cut to fit, but its not quite on the fitting like I want. So need to order the proper pre-bent hose. But its good enough to drive for now.
- Also replaced water hose above the alternator- AutoZone didnt have the same one, but gave me “Dayco 70943 Length Code B” for $14 which was the right radius curve; after cutting to fit, it fit perfectly.
- Should have gotten new bolts all the way around for the cover ahead of time.
- Engnbldr's kit was missing the studs that screw into the water pump pulley; I was under the impression they were included. Nor were any studs to install the pump. I may be totally wrong, and if so, apologies to them. Otherwise, I was very happy with the kit – it was very complete, parts looked great and fit was outstanding.
- Need to get some proper length bolts where I removed the AC bracket (hard to find those specific sizes in a small town); they are washered out WAY too far (pic below)
- very happy with AC removal; much cleaner in engine bay and in front by grille, less clutter for something I never will use.
- used a white carpet tool as a plastic prybar to remove cover without scratching the mating surfaces, or prying too hard on the head gasket. Worked great. Bought at Home Depot for $7 a while ago for a carpet project. But a VERY strong plastic prying tool, I am gonna pick up another one in a different size.
- Thanks to everyone here who has posted info, pictures, and write-ups – they have been invaluable.
- - Scott
May 19, 2013 | 07:26 PM
#14
Thread Starter
Registered User
Joined: Oct 2009
Posts: 38
Likes: 0
From: Durango, CO
Couldnt figure out how to insert photos inline with text; or how to put more than three photos up, so here are a few more, 3 at a time:
A hand air pump I used to blow out debris - its made for an air mattress, raft, etc, but with the narrow tips it works surprisingly well for around spark plugs, weird little places, etc
A hand air pump I used to blow out debris - its made for an air mattress, raft, etc, but with the narrow tips it works surprisingly well for around spark plugs, weird little places, etc
May 19, 2013 | 07:29 PM
#16
Thread Starter
Registered User
Joined: Oct 2009
Posts: 38
Likes: 0
From: Durango, CO
Bolts that were too long with the AC bracket gone, and how many washers I had to use; I will replace these ASAP with proper size. Also note the odd shiny one - its from AutoZone, and their metric bolts have different size heads than the stock toyota ones, so now instead of just 12/14 mm bolts on the cover, I have 12/13/14mm
May 19, 2013 | 07:33 PM
#17
Thread Starter
Registered User
Joined: Oct 2009
Posts: 38
Likes: 0
From: Durango, CO
See how much room I gained without the AC!!!!! YAAAYYY
And the 90-degree hose, behind the timing cover, that connects up to the intake - badly aged, and caked on to the connector, was leaking.
Many thanks again to all who have ever chimed in about the timing chain, I have read many threads and they were very helpful. And grego, thanks for the awesome links and info and the LCE timing cover bolt diagram - I am off to get some proper bolts!!!
Thanks guys, Scott
May 20, 2013 | 11:51 AM
#18

Registered User
Joined: Aug 2012
Posts: 368
Likes: 0
From: Orange County, CA
Did you know that you can convert the AC compressor to be an air compressor for onboard air? Not sure if you do much wheeling, but if you like to air down or just have compressed air for whatever reason, its a neat mod.
May 20, 2013 | 02:00 PM
#19
Thread Starter
Registered User
Joined: Oct 2009
Posts: 38
Likes: 0
From: Durango, CO
Hi Sturm, I have always wanted to do the "A/C to onboard-air mod" but I have always thought that it had to be a York compressor??? Is it possible to use the toyota compressor? That mod has been on my list for a while actually on a few different trucks, and have never gotten around to doing it - but it would be far superior to the 12v plugin compressors I have always carried around.
Time to use the search function....
Time to use the search function....
Nov 12, 2013 | 08:26 PM
#20

Registered User
Joined: Nov 2011
Posts: 4
Likes: 0
Chain slap or Valve issue?
Similar situation to the original thread.
I finally took my valve cover off to check out my timing chain guards. They seemed to be in place. However, there is wear on the driver side wall. Reason that I checked was I've been noticing some rattling coming from the engine upon the deceleration. could it still be the chain? Valves?
I finally took my valve cover off to check out my timing chain guards. They seemed to be in place. However, there is wear on the driver side wall. Reason that I checked was I've been noticing some rattling coming from the engine upon the deceleration. could it still be the chain? Valves?


