
22R Rebuild
 Oct 31, 2009 | 10:56 AM
#81

Thread Starter
Registered User
Joined: May 2009
Posts: 586
Likes: 2
From: Arizona
Ted said that area shouldn't be raised, but such a small amount shouldn't cause a problem. He offered to have Tod dig through the inventory to see if they have any better covers in stock to do an exchange, or a refund if I want.
Parts finish by all suppliers apparently isn't what it once was. The cover I got could certainly use some cleaning up inside.
He'll exchange my oil pump and get after the supplier.
I also ask him about the preferred order of installing the head and timing components when building an engine, not just when replacing the timing set without pulling the head. He likes to put the head on first:
Makes sense.
Parts finish by all suppliers apparently isn't what it once was. The cover I got could certainly use some cleaning up inside.
He'll exchange my oil pump and get after the supplier.
Originally Posted by Ted
*Well, it shouldn't be off flat actually, still, that tiny amount would not be a concern to me. We have zero reports of failing to seal. If in doubt we can send another one.
I am thinking that with all of the Chinese made items coming in, manufacturers are trying to speed up the processes to try and compete. So instead of running the milling head back up and off, they just reverse it. Instead of taking their time to deflash the gooving, they just leave that up to the installers.
Silly stuff from my point of view, in my own engine shop I always spent lots of time cleaning up each engine assembly for appearence. I would rather they just took their time like they used to and leave the prices up myself, but I don't get to control that part. We are having to do some minor cleanup on purchased castings inhouse on our own assemblies. Ours are made by Tsubakimoto which is OEM and under the same price pressures as everyone else , so we are out of places to go for anything . I suppose we could just buy the china made also, but the truth is I just plain don't want to.
I also ask him about the preferred order of installing the head and timing components when building an engine, not just when replacing the timing set without pulling the head. He likes to put the head on first:
Originally Posted by Ted
On the timing set, it the head isn't in place, there is no way to put the chain on with real accuracy and check everything like the tensioner extension, clearences, etc.
Watch out for the silly bolt hole that goes all the way through and does in everything if the wrong bolt is used there, I always peek down from the top to make sure the tensioner pad is clearing the cover and the end of that bolt.
Getting the tensioner shaft back enough to manage to get the top gear up and in place while keeping everything in time can require about three arms if the cover is on, I have found.
So I always put the head on first, set up the chain assembly in place, then work the cover up and over the dowels, last goes on the oil pan with a small bead of RTV.
Other ways work, but I do it my way because I am lazy...*LOL**..
Oct 31, 2009 | 05:40 PM
#84
Registered User
Joined: Oct 2009
Posts: 95
Likes: 0
From: Virginia Beach
I don't know if the step is bad enough to cause an issue. It is a little concerning. I've read many advocate putting the water pump gasket on dry. I'm not sure a gasket by itself will seal in this case. My pump didn't have a gasket, only orange FIPG. Any opinions? I need to decide whether I'm going to use this one ASAP. The shop is waiting for me to bring parts.
it'll probably seal okay, but eh, never know. if EB's offered something better, I'd take them up on that.
Nov 3, 2009 | 09:33 AM
#85
Thread Starter
Registered User
Joined: May 2009
Posts: 586
Likes: 2
From: Arizona
I cleaned up a few rough spots inside the timing cover and stoned the high area down flush with the rest.
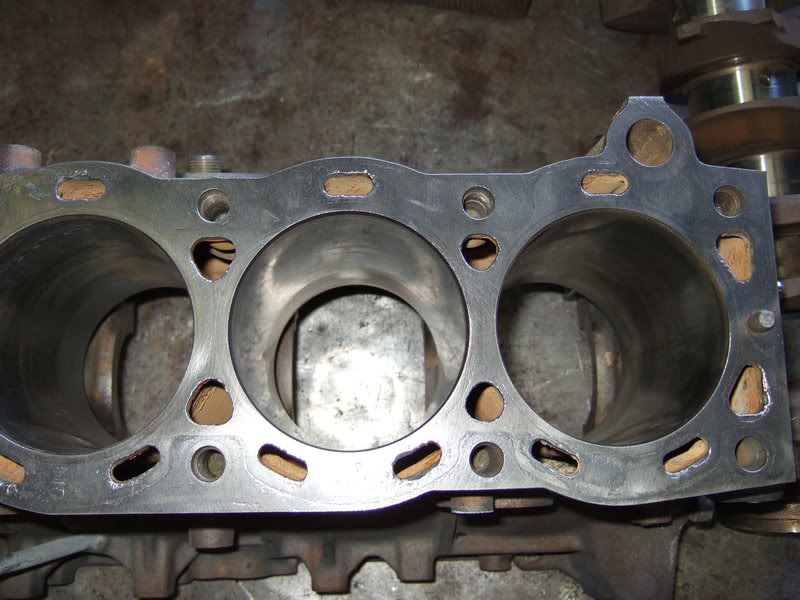
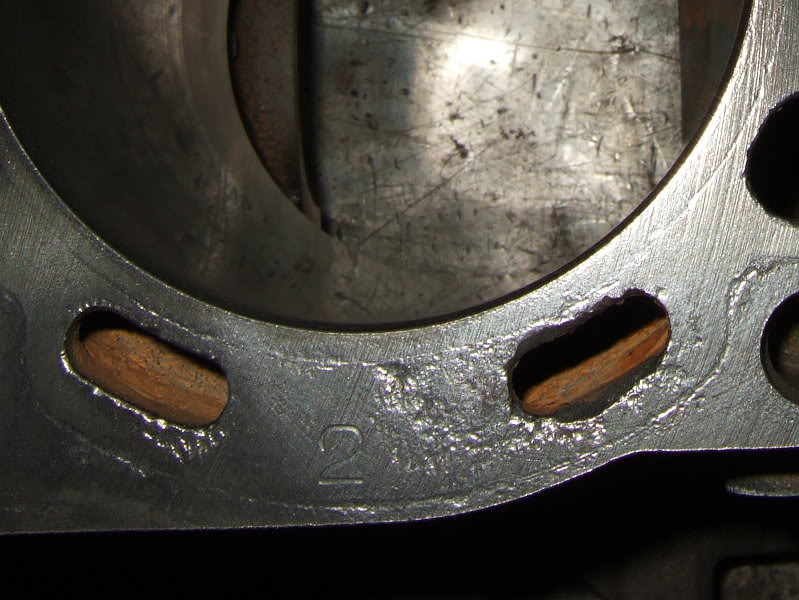
Today I took the cover, pistons, and rod bushings to the shop. I saw my cleaned block while I was there. A few of the oval water passages on the deck are quite eroded around the edges. It's bad enough to make the outside of the holes bigger. I hope that doesn't hurt anything.
Everything is supposed to be done next Wednesday. That'll make a little over 4 weeks at the shop. This is taking longer than anticipated.
Nov 3, 2009 | 01:16 PM
#86
Registered User
Joined: Oct 2009
Posts: 134
Likes: 0
From: NW Phoenix
Patience my friend, patience.
That is a while though. But that's OK, it'll be worth it.
I assume you are having the timing cover milled to the height of the block deck?
PS, DISTILLED water with your coolant if you want NO corrosion :-)
That is a while though. But that's OK, it'll be worth it.
I assume you are having the timing cover milled to the height of the block deck?
PS, DISTILLED water with your coolant if you want NO corrosion :-)
Last edited by Staceman1; Nov 3, 2009 at 01:20 PM.
Nov 3, 2009 | 02:48 PM
#87
Thread Starter
Registered User
Joined: May 2009
Posts: 586
Likes: 2
From: Arizona
After realizing I didn't tell the machinist in so many words to attach the timing cover when decking, I stopped back by after running some errands. Good thing I did. I explained why the timing cover (yes, the very one I had handed him not half an hour earlier without question), needs to be attached, which struck me as being news to him. Hard to tell, because he doesn't say much. This is Hempelman's. It was a toss up between them and H&H.
Yep, distilled water. I haven't decided which antifreeze to use. That question sent me off on a long search. Antifreeze used to be antifreeze. That's not the case these days, and a lot of misinformation is floating around.
To summarize what I determined, when using a soldered radiator, stay away from the modern so-called "long-life" coolants. They protect aluminum and iron/steel ok, but they don't protect lead solder. Look up "solder bloom."
So, for me it's either old style green or Toyota Red. Both attempt to do essentially the same thing, but they take different approaches and are not compatible. Use one or the other. I haven't decided which yet. If my radiator wasn't soldered I'd have more options.
I don't want this thread to derail into an antifreeze debate, but for those who think Toyota Red is the same as green, just a different color:
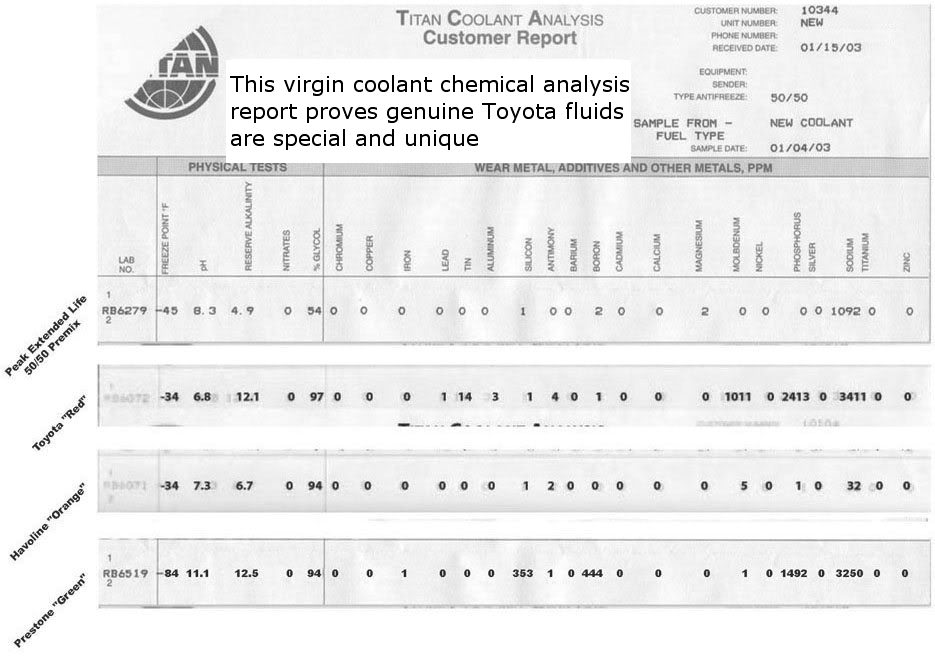
Here is a good summary of antifreeze I found later: https://www.yotatech.com/forums/f116...nt-faq-192781/ Please direct any antifreeze debates to there or any of the other existing threads on the subject.
Yep, distilled water. I haven't decided which antifreeze to use. That question sent me off on a long search. Antifreeze used to be antifreeze. That's not the case these days, and a lot of misinformation is floating around.
To summarize what I determined, when using a soldered radiator, stay away from the modern so-called "long-life" coolants. They protect aluminum and iron/steel ok, but they don't protect lead solder. Look up "solder bloom."
So, for me it's either old style green or Toyota Red. Both attempt to do essentially the same thing, but they take different approaches and are not compatible. Use one or the other. I haven't decided which yet. If my radiator wasn't soldered I'd have more options.
I don't want this thread to derail into an antifreeze debate, but for those who think Toyota Red is the same as green, just a different color:
Here is a good summary of antifreeze I found later: https://www.yotatech.com/forums/f116...nt-faq-192781/ Please direct any antifreeze debates to there or any of the other existing threads on the subject.
Last edited by flyingbrass; Nov 3, 2009 at 02:50 PM.
Nov 5, 2009 | 12:40 PM
#88
Thread Starter
Registered User
Joined: May 2009
Posts: 586
Likes: 2
From: Arizona
I realized I forgot to give the shop my freeze plugs, so I went by today. The guy says he doesn't install freeze plugs. Great. Now I'll have to figure out how to do them.
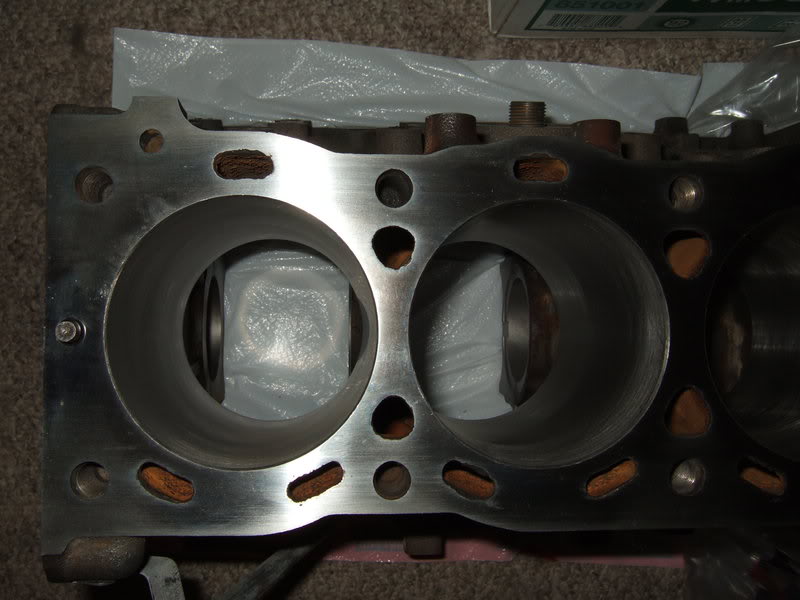
I took some pictures of my block before machining. Erosion around the water holes is pretty bad in places.
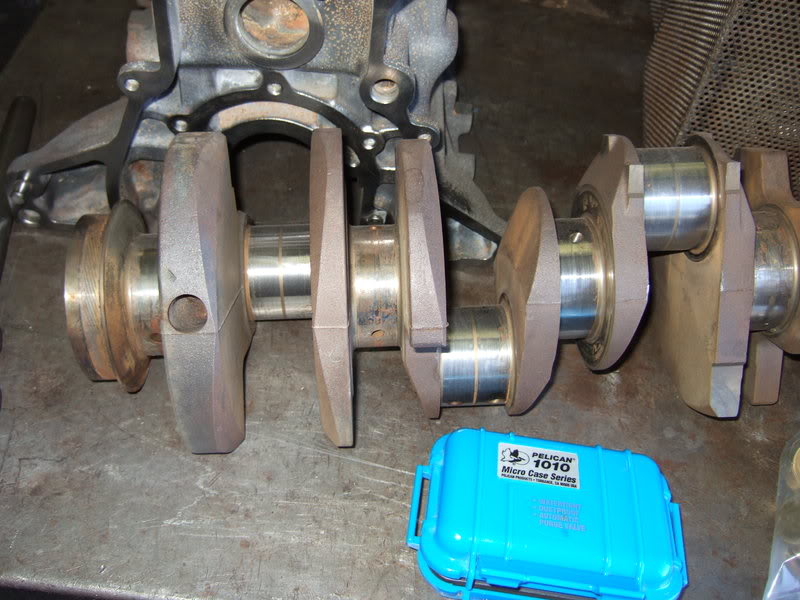
My crank sitting there, rusting.
I took some pictures of my block before machining. Erosion around the water holes is pretty bad in places.
My crank sitting there, rusting.
Last edited by flyingbrass; Nov 5, 2009 at 08:10 PM.
Nov 6, 2009 | 09:57 AM
#90
Registered User
Joined: Oct 2009
Posts: 134
Likes: 0
From: NW Phoenix
At this point, I think you are alright. You'll know for sure from the machine shop. Your head is a new piece, so, they can take up to .020" off the deck without requiring a head shim.
Also, put a fine mist of oil on that crank.
And, don't forget the deck to head alignment dowels, or, crank-balancer key at the shop.
Also, put a fine mist of oil on that crank.
And, don't forget the deck to head alignment dowels, or, crank-balancer key at the shop.
Nov 6, 2009 | 12:17 PM
#93
Thread Starter
Registered User
Joined: May 2009
Posts: 586
Likes: 2
From: Arizona
Originally Posted by Staceman1
At this point, I think you are alright. You'll know for sure from the machine shop. Your head is a new piece, so, they can take up to .020" off the deck without requiring a head shim.
Those parts are sitting on a cart at the machine shop. I have no idea why they didn't spray some rust preventive on the crank after cleaning it. It was in excellent condition when I took it in, only needing a light polish in a few places.
If it needs to be turned because of the shop's neglect, they had better do it for free and throw in some oversize bearings to match. And apologize.
Last edited by flyingbrass; Nov 7, 2009 at 03:30 AM.
Nov 14, 2009 | 05:39 PM
#98
Thread Starter
Registered User
Joined: May 2009
Posts: 586
Likes: 2
From: Arizona
I picked up my parts yesterday.
The block was decked .009". The machinist said my pistons would stick up very close to max with that taken off and that I should check to make sure enough clearance exists between pistons and valves. I reminded/informed him that aftermarket pistons are destroked by about .012". He said then I should be fine -- that stock pistons would be at max. I won't know where I'll be at quench-wise until I put it together. Ideal is 0, but up to +.006" is allowed. I'd rather have more taken off later than be too short to begin with.
The head locating dowel pins are seated deeper. I can only take ballpark measurements. One is about .21", the other .24" or so. Be sure the shop you use sets the pins in deeper after decking the block. Otherwise they will protrude more than before. If they stick up high enough to bottom out in the corresponding holes in the head, the head can't fully seat.
I'm still a little concerned about the severe erosion around several of the water passages reducing the sealing area between the passages and cylinders. The machinist said it should be ok. I still worry.
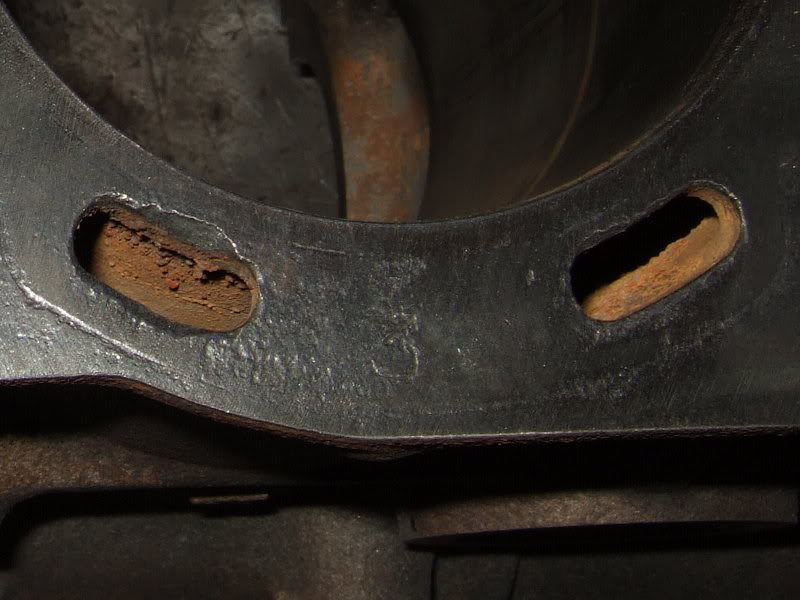
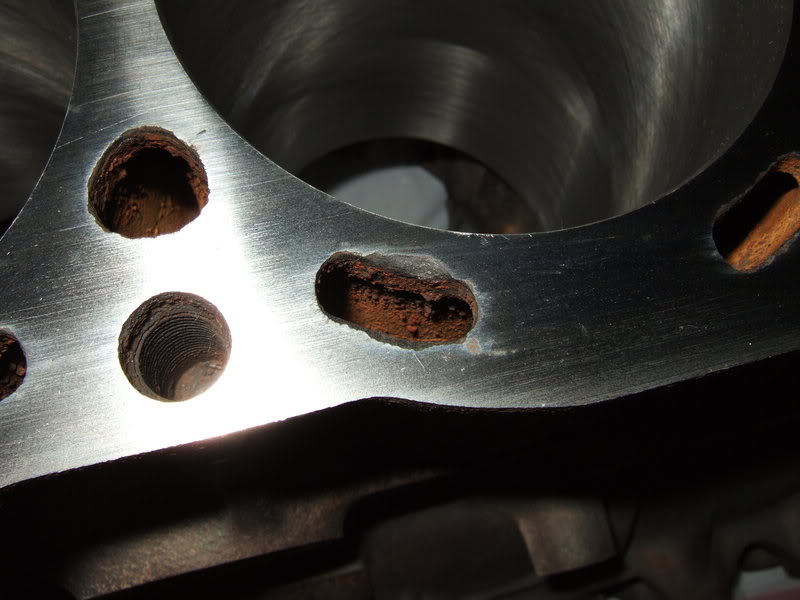
Looks like there's still a fair amount of rust inside. Is that typical?

The worst one. Note the head bolt holes need to be chased.
The machinist said the new Rock timing cover fit on cockeyed, and getting all the bolts in place required some finagling. He ended up also decking the bottom of the timing cover to provide a flat mating surface for the oil pan. Even with that, a small gap will remain at a lower corner.
He said Rock brand parts are a "value" brand. Bang for the buck, lower end stuff in general that usually works, which matches what I thought and my assessment based on my experience so far. He said he had built a racing motor using Rock parts, and it held up fine. Of course, Rock is only a label. Who actually makes the stuff varies by component. Engnbldr seems to know the intricacies of that.
Bored .020" over. Said something about making #4 ever so slightly larger to accommodate heating differences. Hmm. He had mentioned this before, so it was deliberate, not excuse making. It'll be interesting to see how the ring gaps measure.
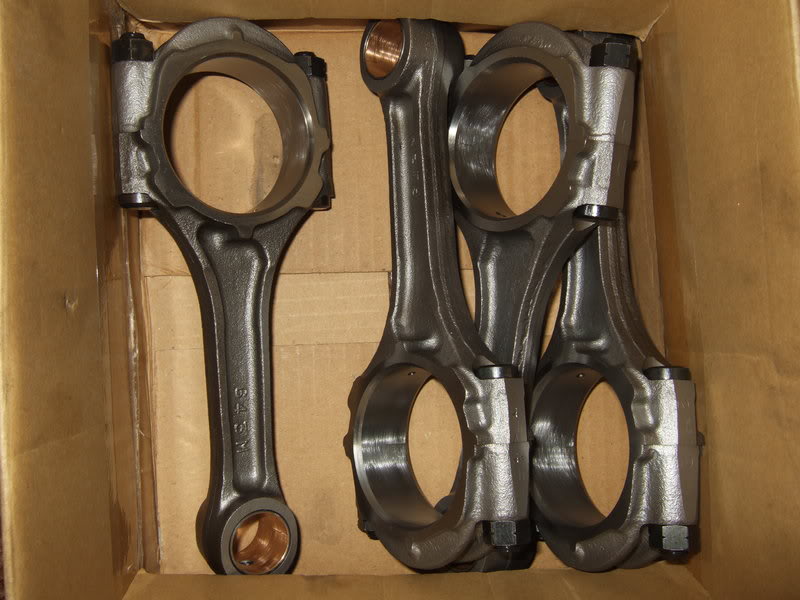
Redid 3 rod ends to make them all the same to accept standard bearings. My rods are stamped C3, C3, C3, B3. I know Toyota used slightly different sized "standard" bearings, which caused me some concern. I guess that's sorted.
Installed and fit rod bushings.
He stamped proper numbers into my rods and caps next to my poorly written, but legible, scribbles made with an engraver. He said my pistons are all the same size, so I don't have to be concerned with which I put on each rod.
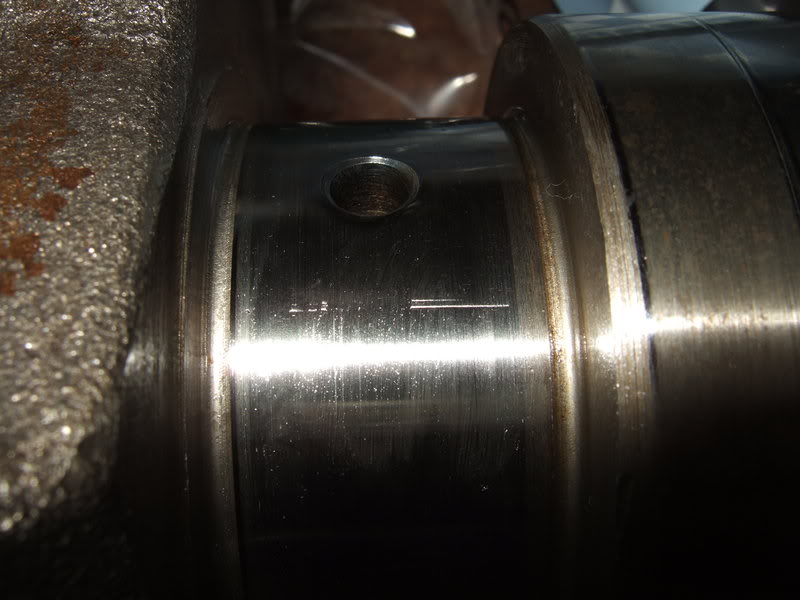
Polished the crank. He pointed out that the only flaw is a slight indentation in a main journal. It runs parallel with the axis, like where the bearing halves meet. Odd. I didn't do it. I doubt he did either. Sake + weekends = maybe my engine was assembled on a Monday morning?
I asked him whether I should remove the plugs in the crank to clean out the oil passages. I've read where some have recommended doing that. He said don't, that I'd likely have problems removing and reinstalling the plugs.
Turned the flywheel. Looks good. Kept the step. I've heard some flywheel resurfacers ignorantly eliminate the step. Marlin actually recommends increasing it a tad.
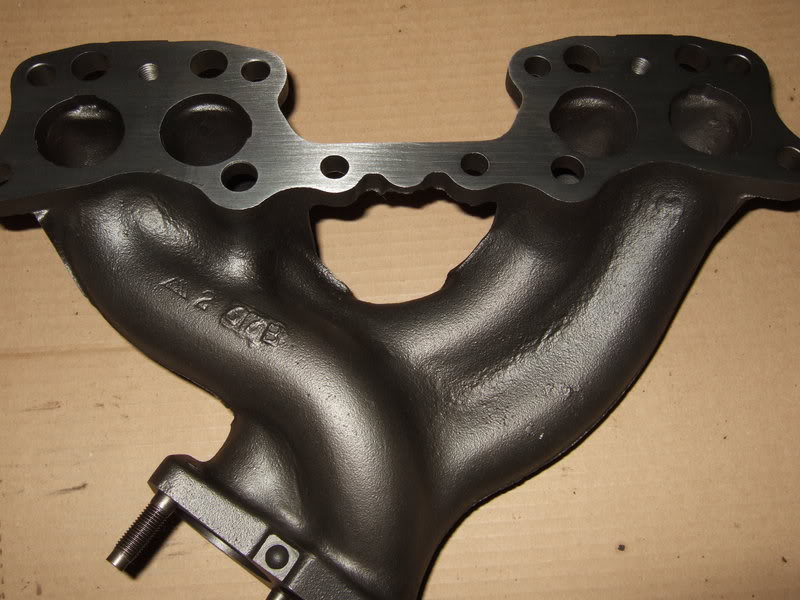
Cleaned and trued my exhaust manifold. He said the surface was out .008". IIRC, .003" or so is the most warpage the book allows. Ain't it purty?
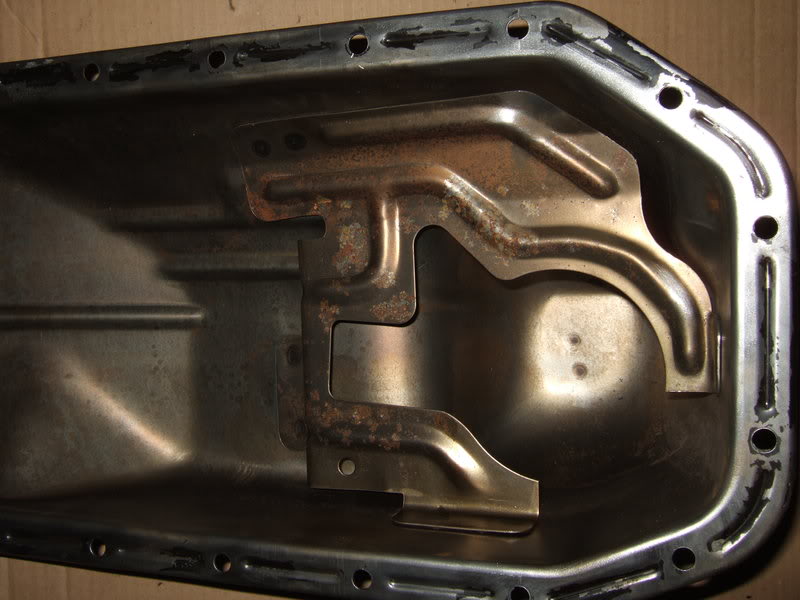
Cleaned my oil pan. I initially did what I could with Gunk and a brush, but it still had crap inside flaking off after it dried. I wanted it clean, so I let the shop deal with it. Looks good now. Nothing to flake off and clog the oil screen. He said all he did was throw it in the pressure washer for 20 minutes. I might take my valve cover over for the same treatment.
I couldn't remove the dipstick tube by pounding on the bracket at the top. I gave up. A knuckledragger at the shop attempted to get it out using vise-grips or something similar, only managing to squish in the sides. I'm not happy about that. Leave it alone or remove it, don't just mash it and give it back. I'm debating whether to replace it. Might be more trouble than it's worth. Would you?
$355 spent at the shop.
I ordered a Toyota rear main seal, which is the newer double lipped design. The ones that come in Engnbldr's kit are not. Machinist says that a double-lipped seal should work fine on this crank. I asked him about sanding down the backside, as Marlin advises, to make it sit deeper and ride on a fresh part of the crank. He said he has tried that in different applications with poor results. He recommended using the Toyota seal as is.
I've been reading about break-in lubes and oil in general. While zinc and phosphorus levels have been declining with so-called "improved" oil ratings, the newest oils in particular (SM) aren't good for older engines with flat tappets or where rockers ride directly on the cam. Seems to be a well-known issue, and it's not confined to older engines. Thrust washers, for example, suffer from lowered ZDDP. ZDDP is particularly important during the initial break-in period, though it is also beneficial afterward (sane amounts, say roughly 1200 ppm). I'm thinking I'll probably use some ZDDP additive during break-in.
I asked Engnbldr about this, and what he recommends for breaking in the cams he sells. Rather than paraphrase, here is his reply:
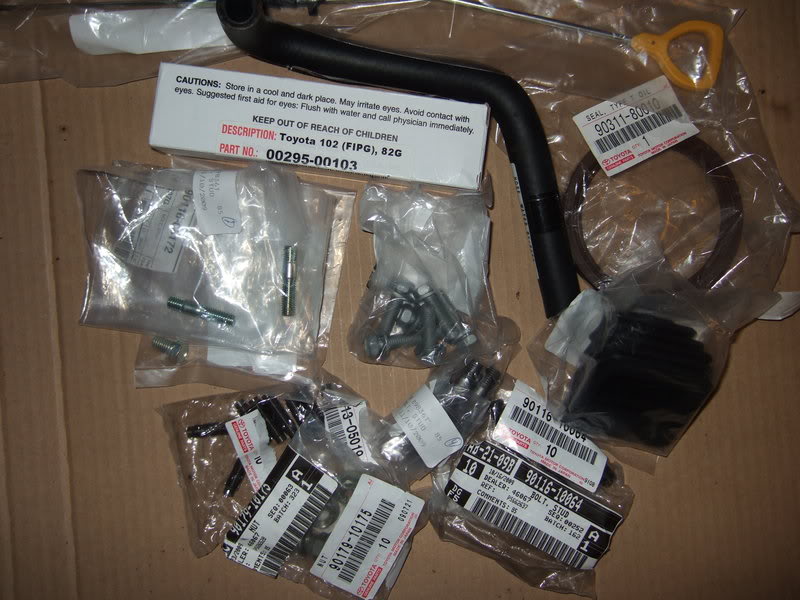
$122 worth of parts from Toyota arrived today. I ordered from 1sttoyotaparts. At first I was a little concerned because they didn't send any confirmation e-mail, and no orders showed in my account. But, later they sent a tracking number. I ordered on Tuesday and the parts arrived today (Saturday). Apparently they don't drag their heels.
Doesn't look like much. Odds and ends add up quickly.
The block was decked .009". The machinist said my pistons would stick up very close to max with that taken off and that I should check to make sure enough clearance exists between pistons and valves. I reminded/informed him that aftermarket pistons are destroked by about .012". He said then I should be fine -- that stock pistons would be at max. I won't know where I'll be at quench-wise until I put it together. Ideal is 0, but up to +.006" is allowed. I'd rather have more taken off later than be too short to begin with.
The head locating dowel pins are seated deeper. I can only take ballpark measurements. One is about .21", the other .24" or so. Be sure the shop you use sets the pins in deeper after decking the block. Otherwise they will protrude more than before. If they stick up high enough to bottom out in the corresponding holes in the head, the head can't fully seat.
I'm still a little concerned about the severe erosion around several of the water passages reducing the sealing area between the passages and cylinders. The machinist said it should be ok. I still worry.
Looks like there's still a fair amount of rust inside. Is that typical?
The worst one. Note the head bolt holes need to be chased.
The machinist said the new Rock timing cover fit on cockeyed, and getting all the bolts in place required some finagling. He ended up also decking the bottom of the timing cover to provide a flat mating surface for the oil pan. Even with that, a small gap will remain at a lower corner.
He said Rock brand parts are a "value" brand. Bang for the buck, lower end stuff in general that usually works, which matches what I thought and my assessment based on my experience so far. He said he had built a racing motor using Rock parts, and it held up fine. Of course, Rock is only a label. Who actually makes the stuff varies by component. Engnbldr seems to know the intricacies of that.
Bored .020" over. Said something about making #4 ever so slightly larger to accommodate heating differences. Hmm. He had mentioned this before, so it was deliberate, not excuse making. It'll be interesting to see how the ring gaps measure.
Redid 3 rod ends to make them all the same to accept standard bearings. My rods are stamped C3, C3, C3, B3. I know Toyota used slightly different sized "standard" bearings, which caused me some concern. I guess that's sorted.
Installed and fit rod bushings.
He stamped proper numbers into my rods and caps next to my poorly written, but legible, scribbles made with an engraver. He said my pistons are all the same size, so I don't have to be concerned with which I put on each rod.
Polished the crank. He pointed out that the only flaw is a slight indentation in a main journal. It runs parallel with the axis, like where the bearing halves meet. Odd. I didn't do it. I doubt he did either. Sake + weekends = maybe my engine was assembled on a Monday morning?
I asked him whether I should remove the plugs in the crank to clean out the oil passages. I've read where some have recommended doing that. He said don't, that I'd likely have problems removing and reinstalling the plugs.
Turned the flywheel. Looks good. Kept the step. I've heard some flywheel resurfacers ignorantly eliminate the step. Marlin actually recommends increasing it a tad.
Cleaned and trued my exhaust manifold. He said the surface was out .008". IIRC, .003" or so is the most warpage the book allows. Ain't it purty?
Cleaned my oil pan. I initially did what I could with Gunk and a brush, but it still had crap inside flaking off after it dried. I wanted it clean, so I let the shop deal with it. Looks good now. Nothing to flake off and clog the oil screen. He said all he did was throw it in the pressure washer for 20 minutes. I might take my valve cover over for the same treatment.
I couldn't remove the dipstick tube by pounding on the bracket at the top. I gave up. A knuckledragger at the shop attempted to get it out using vise-grips or something similar, only managing to squish in the sides. I'm not happy about that. Leave it alone or remove it, don't just mash it and give it back. I'm debating whether to replace it. Might be more trouble than it's worth. Would you?
$355 spent at the shop.
I ordered a Toyota rear main seal, which is the newer double lipped design. The ones that come in Engnbldr's kit are not. Machinist says that a double-lipped seal should work fine on this crank. I asked him about sanding down the backside, as Marlin advises, to make it sit deeper and ride on a fresh part of the crank. He said he has tried that in different applications with poor results. He recommended using the Toyota seal as is.
I've been reading about break-in lubes and oil in general. While zinc and phosphorus levels have been declining with so-called "improved" oil ratings, the newest oils in particular (SM) aren't good for older engines with flat tappets or where rockers ride directly on the cam. Seems to be a well-known issue, and it's not confined to older engines. Thrust washers, for example, suffer from lowered ZDDP. ZDDP is particularly important during the initial break-in period, though it is also beneficial afterward (sane amounts, say roughly 1200 ppm). I'm thinking I'll probably use some ZDDP additive during break-in.
I asked Engnbldr about this, and what he recommends for breaking in the cams he sells. Rather than paraphrase, here is his reply:
Zinc and other additives are extremely beneficial during breakin with most engine type designs. Of course, we are dealing with a tappet that rotates on a lobe designed to force it to rotate, thus the contact patch is very tiny until breakin is complete and the contact patch becomes large enough that the pressure from loading cannot break through the film strength of the lubricant.
The 20R through 22RE engine series uses a slide type follower pad, the lobe is actually wiped with oil at each rotation, thus the type of lube is much less critical in this situation. Lobe failures can result, for example a badly worn rocker can etch the cam lobe in which case failure is very rapid.
Lack of adequate oil is number one though, typically from accidentally exchanging number 2 and number three rocker tower stands, resulting in complete blockage of oil to the exhaust lobes.
The latter we have witnessed many times. Using a suitable breakin lube offers excellent extra protection and we do advise it.
On runin, we always keep the engine a bit off idle and vary that speed every few minutes. The theory is to just keep oil pressure up to assure good oil availability to any critical areas during breakin. There is no real set RPM, typically 1200 to 1500 or so.
But one time we started a NASCAR racing engine at the track, all brand new. Parts arrived Friday on a Fedex truck, the event was Friday eveing. I was installing the heads standing on the trailor as we drove into the pits. I poured oil we warmed on my truck exhaust manifolds into the engine, drove it out and made the timein laps at RPM's to 8800 with zero breakin period..
No problems at all, we used that engine for 33 events in a row from 25 laps mains to 100 lap mains on the half mile, without taking it out of the frame and it always perfromed flawlessly.
Lots of oil is the best key to success.
$122 worth of parts from Toyota arrived today. I ordered from 1sttoyotaparts. At first I was a little concerned because they didn't send any confirmation e-mail, and no orders showed in my account. But, later they sent a tracking number. I ordered on Tuesday and the parts arrived today (Saturday). Apparently they don't drag their heels.
Doesn't look like much. Odds and ends add up quickly.
Last edited by flyingbrass; Nov 15, 2009 at 03:37 PM.
 keep it up much appreciated
Nov 15, 2009 | 02:14 AM
keep it up much appreciated
Nov 15, 2009 | 02:14 AM
#100
YotaTech Milestone-Two Millionth Post
Joined: Jan 2009
Posts: 12,009
Likes: 122
From: Northeast Pennsylvania
Looking good.
What did you end up having to get from TOYOTA?
I am not doing my block, just head and timing cover etc...I am making a list of things to order from the dealer (crankshaft bolt, FIPG,short hose from water pump to block,allen bolt from under thermostat and ????). Just curious if there is anything else I should remember.


