New Weber 32/36 DGEV and de-smog, oh so niceeee!
 07-20-2009, 11:05 AM
#1
Registered User
Thread Starter
New Weber 32/36 DGEV and de-smog, oh so niceeee!
So I got my weber 32/36 last Friday, went home and tore into the package to make sure everything was there, and it was. Also, I got some high altitude jets because I live at 5,000 feet, and wheel around 7,000-8,000 feet. The 2 main jets are located in the bowl, very easy to change, just remove 6 flat-head screws from the top of the carburetor and a small e-clip from the choke linkage and the top half of the carb comes off. The stock jets are 140, I went with 130 for my altitude. The idle jet is even easier to change. It is located on the driver's side of the carb behind a brass flat-head screw with a greenish colored o-ring to seal it. There is no dis assembly of the carb to change this jet, simply remove the screw and you will see the jet connected to the screw. Pull it off and clip on the jet you need, I went from a 150 to a 145.
So easy!!!!!
For the install I decided to remove EVERY unnecessary item, charcoal cans, fuel return lines, EGR, etc. This was easy, but took a long time. I just started removing anything that would not connect to the Weber. I had to make 3 block-off plates, one for the EGR on the back of the passenger side of the head, and 2 for the exhaust manifold where the brass tube thing used to be. I just traced the old gaskets onto some 3/16" flat stock and cut them out with my angle grinder using a cut-off wheel, then drilled mounting holes with the harbor freight drill press, no biggie.
Now my 84 22r runs way better than my 89 EFI 22re, has more power, and sounds great. I recommend the 32/36 weber for anyone living at altitude, especially if your olod aisin carb is giving you trouble.
I'll get some pics tonight or tomorrow.
 07-20-2009, 11:40 AM
#2
Registered User
good to here some more great news about weber!!!!!
although i dont live at any high altitude..nor do i plan to..lol..i am still goin with the 32/36 weber..my stock carb is in need of a rebuild..and i can get one on here for $175 BRAND NEW
although i dont live at any high altitude..nor do i plan to..lol..i am still goin with the 32/36 weber..my stock carb is in need of a rebuild..and i can get one on here for $175 BRAND NEW
07-21-2009, 08:24 PM
#3
Registered User
Thread Starter
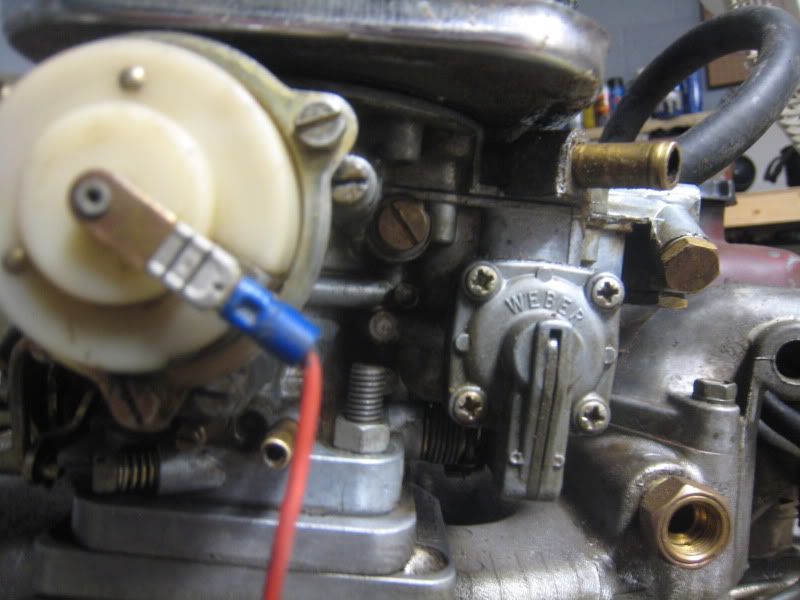
Here are some pics of the install.


EGR block-off plate

Exhaust pipe block-off plate

I had an EFI exhaust heat shield that does't have that hot air pipe thing on it so I installed that to clean up the overall look.

Fuel pressure regulator st to 3psi. I still need to mount it, but now I have lots of room on the firewall!

EGR block-off plate
Exhaust pipe block-off plate
I had an EFI exhaust heat shield that does't have that hot air pipe thing on it so I installed that to clean up the overall look.
Fuel pressure regulator st to 3psi. I still need to mount it, but now I have lots of room on the firewall!
Last edited by oldgold3vze; 07-21-2009 at 08:27 PM.
07-26-2009, 09:12 PM
#4
Registered User
Thread Starter
Got out for my first real trail run with the new weber. All I can say is that I now have no need to worry about an EFI swap, at least not anytime soon. This thing runs great, and I was able to do parts of trails that I have never done before the weber. I ran a trail that starts around 7,000 ft, and goes as high as almost 10,000 ft, and the jets seem to be spot on. I am now looking forward to pulling and rebuilding my engine knowing how easy this all goes back together.
08-02-2009, 05:02 PM
#5
Registered User
I am re-wiring my truck at the moment and had a few questions.
#1 I know this is the electric choke. Can I put it on a switch, if not how should I wire it?
#2 I am not sure what that is
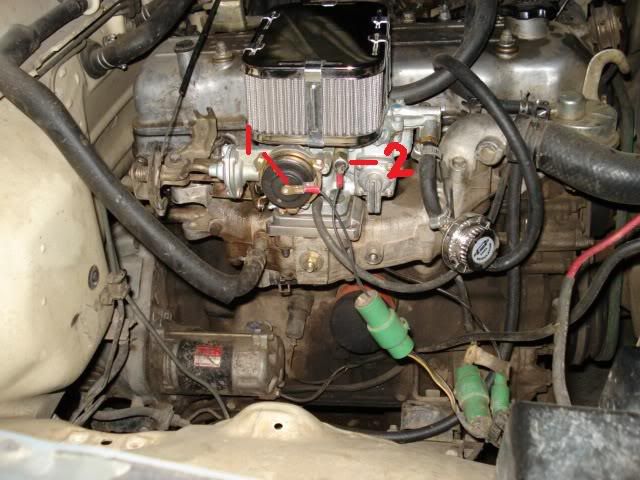
#1 I know this is the electric choke. Can I put it on a switch, if not how should I wire it?
#2 I am not sure what that is
08-02-2009, 09:56 PM
#6
Registered User
Thread Starter
Both items with red arrows pictured above require constant power when the keys are turned on. The unknown part is called the cut off solenoid, and it stops the engine from burnin off the gas in the float bowl once you turn the truck off. Just make sure both those connections have power and you'll be fine. You should be able to use wires from the stock choke wiring harness, that's what I did.
Trending Topics
08-03-2009, 06:00 AM
#8
Registered User
Thread Starter
Everywhere I've read, and everyone I've talked to has told me that the Weber needs a max of 3.5 psi, and some will even run theirs as low as 1.5 psi. I found that with the proper jets I can run smoothly at 3 psi on the street or trail. Sometimes, rarely though, I try 2.5psi on the trails if it starts to get steep to help the typical carburetor flooding issues.
08-03-2009, 05:21 PM
#12
Registered User
https://www.yotatech.com/forums/f114...arning-114938/
the 4runner...i should have started one, but was to focused on the 79 haha i haven't updated my "profile page" recent either
https://www.yotatech.com/forums/f77/...runner-160331/
one of these days i'll get on the ball

 08-05-2009, 03:03 PM
#15
Registered User
Thread Starter
Sorry, I'm really not too familiar with Weber Carbs, I just ordered mine and set it up. I would have to say yours is either a 34/34, or a 38/38. If that connector isn't thee, I wouldn't worry about it. Just set it up the best you can, and go for it.
08-13-2009, 11:22 AM
#16

my carb will be here in a few days. I have a couple questions.
What did you do with the fuel return on the pump?
Also is the PCV valve hose going to the EGR plate adapter that you have shown in the picture? It's tough to tell and it doesn't seem real clear in the installation instructions.
Lastly when you connected you vacuum advance which hose did you connect from the diaphram next to the distributor? There are two hoses there and I'm not sure which is which and I wasn't able to find a clear answer in the FSM.
08-13-2009, 09:29 PM
#17
Registered User
Thread Starter
One more thing I should add to this install thread is that if you switch the fuel inlet hose, like I did, you also need to rotate the small filter found between the 2 optional inlet ports. I just now found about this filter, and may have to replace my jets due to them clogging up. Oh well, live and learn, right...
08-17-2009, 04:11 PM
#18
I'm not quite sure which small filter you are referring to. Was it originally on the fuel inlet hose and you removed the entire hose and no small filter now, but you do need one? I'm not at my truck now so I can't really look.
08-17-2009, 08:12 PM
#19
Registered User
Thread Starter
Never mind that. I pulled the filter and it was the same on both sides, so there was no way to turn it. Must have been an older carburetor, or a slightly different design.


