
Any "How to's" on removing/installing a dashboard
 Oct 28, 2008 | 06:02 PM
#1

Thread Starter
Registered User
Joined: Sep 2007
Posts: 108
Likes: 0
From: Goodyear, AZ
Any "How to's" on removing/installing a dashboard
I have a 1985 4Runner I am doing a body swap on and would like to know if anyone knows of any threads on this topic or has any info? Preferrably with pictures. I am swapping out steering, wiring harness and the whole yards. Thanks guys.

 Oct 28, 2008 | 07:55 PM
#4
Registered User
Joined: Aug 2004
Posts: 2,077
Likes: 1
From: Vancouver, WA
Oct 28, 2008 | 10:42 PM
#6
Registered User
Joined: Apr 2007
Posts: 661
Likes: 1
From: Wackoville, California
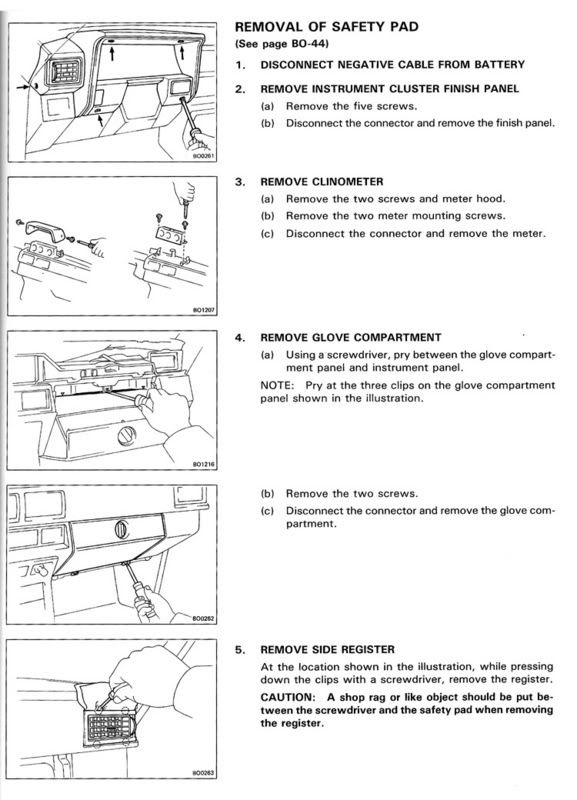
Download the factory service manual. Seriously, it has great little pictures with arrows and all sorts of crap. But I'll tell you anyway, in case you lack Adobe Acrobat.
After pulling out a few screws, you'll begin to notice a pattern. The plastics are fastened to tubular sub frames in the front of the cab using threaded phillips head screws that are kinda like short deck screws.
Metal bolted to metal parts use machine screws that are usually a phillips screw with a hex head.
The dash is self-explanatory. The "cluster cap" comes off with those phillips screws. There's only 5 or 6, just look around and don't get frustrated with the old plastic and break it.
Then comes the safety pad (remove inclinometer first, if equipped). The safety pad is the top padding with the vents inside it that runs from center all the way to the passenger A-pillar. This is the tricky one. First, there are a couple phillips screws along the front of it (4 or 5).
Then you remove the passenger side vent using a flathead screw driver. The vent is just clipped in. If you break it, don't beat yourself up about it (I broke mine but air still comes through so I'm over it).
Behind the vent is a hex head bolt. Oh, now you need to remove the glove box. I don't believe this requires tools, just open her up and use a flathead to unsnap the vinyl backing (behind the glovebox) from along the top. The glove box should come out with a little weasling, I believe it just sits inside a plastic track or somethin' or other.
There are 3 or 4 studs that are attached to the safety pad (along the back near the windshield) and "drop down" through slots in the steel "subframe" running along underneath the dash (you can't see them unless you stick your head in through the glove box opening). Hex nuts fasten these studs to the "subframe". Remove the hex nuts and take your time angling the safety pad up and away from the dash area.
The rest of the dash is pretty obvious. It looks like a plastic skeleton by now. You could disassemble the heater controls, but I found it much easier to just unhook the cables from their corresponding devices underneath the dash (one of them goes through the firewall to a hot water valve).
If you need any help, read my body swap thread. You can always PM me too, I'm on here every night.
P.S. Every electrical conenctor you "disconnect", write a number or letter of the alphabet on both the male and female connections. This will make things easier for re=assembly. You an even keep a log in a notebook to allow easier location.
Last edited by XtraSlow_XtraCab; Oct 28, 2008 at 10:50 PM.


Trending Topics
Oct 29, 2008 | 03:07 PM
#10
Registered User
Joined: Jan 2008
Posts: 11,338
Likes: 120
From: Austin, Texas
 Oct 29, 2008 | 10:59 PM
#11
Registered User
Joined: Apr 2007
Posts: 661
Likes: 1
From: Wackoville, California

Thread
Thread Starter
Forum
Replies
Last Post
PopsDad1
General Electrical & Lighting Related Topics
0
Jul 30, 2015 02:21 PM


