
1984 body swap thread...
 Jun 17, 2007 | 07:12 PM
#1
Thread Starter
Registered User
Joined: Apr 2007
Posts: 661
Likes: 1
From: Wackoville, California
1984 body swap thread...
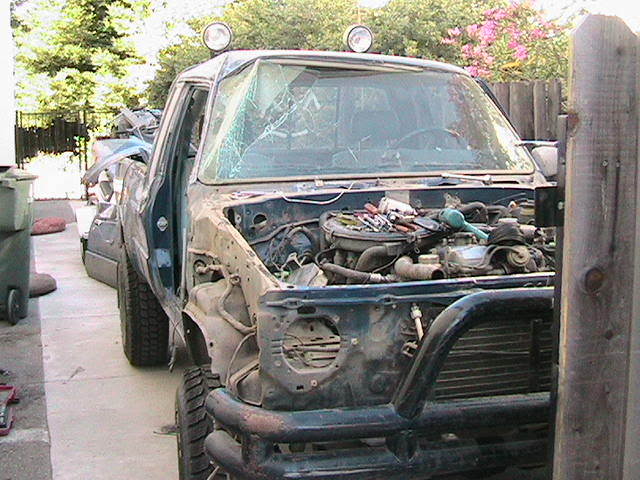
Ok, so I told you guys about me being stupid and rolling my truck. Then I went and bought a replacement cab, because it?s too cool of a truck to let go!!! And so now I record my progress, which started today (and will hopefully end soon).
The original truck is a 1984 Toyota 4WD extended cab. 5 speed, air-conditioning
The replacement cab is a 1985 Toyota 2WD extended cab. Automatic transmission, no A/C
Before I begin, I?d like to thank my dad who is helping me with the project (even today, on Father?s day). It would take 3x as long without him.
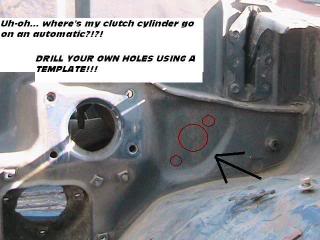
Before I begin, I must explain again that this isn?t JUST a direct swap. It requires fabrication work in ATLEAST two areas. If you?ll note, it is NOT a 5 spd/4WD cab, so holes will need to be drilled to accommodate the clutch master cylinder. The hole for the shift sticks will need to be enlarged as well, plus any mounting holes. For the A/C, two holes would need to be drilled in that immediate area, using a template from the original cab (or really good measuring). I can not tell you what awaits on the inside for AC, haven?t made it that far yet.

Other than that, everything should be bolt on. Keyword: SHOULD.
First off, we unbolted the hood from its hinges and rested somewhere safe. We then unbolted the hinges from the firewall, and bolted them straight to the NEW firewall on the replacement cab. The wiper motor was also removed and bolted to the NEW firewall. I then began to remove the passenger side door and front fender.
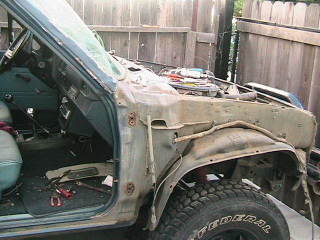

I took care in grouping all of the bolts together. The door hinges were removed and bolted to the new cab. After unbolting the plastic fender liner from along the bottom of the outer (steel) fender, I returned the screws to their rightful places along the steel fender, so I would not lose them. My father hooked up ?the gun? to the air compressor and began zipping parts from the inner fenders: voltage regulator, ignition coil, power steering reservoir, fuse block, overflow container, washer fluid container, and battery hold-down. All of these things listed were bolted onto the new cab as soon as they were removed. AS SOON AS THEY WERE REMOVED.
?Why? Why bolt all of these things onto the new cab??
Be honest now, how many bolts do you lose in a project this big? I won?t lie? TOO MANY! And before you know it, things get jerry-rigged. And since all of those parts are fairly light, why not zip them right back on the new cab? This is great for two reasons: you won?t lose things and you?ll find out early if threads are stripped.
Also, since you?re transferring all of these small, complicated items, decide what plastic clips you might need to replace. Some may be old and brittle? but if you can remove them without breaking them then use them on the new cab!!! Way to be a tight wad!!!
Ok, I?m getting tired of typing. So, I?ll sum this up. This is a body swap. Things around the engine CAN BE LEFT near the engine, so long as you have the man power to manipulate these things around the new body coming down on the frame rails. If you don?t want to lose bolts, then thread them into their new locations on the new cab. Can?t lose them that way!
I?ll update this tomorrow, after I have the dash apart and the wiring harness exposed. Late.
The original truck is a 1984 Toyota 4WD extended cab. 5 speed, air-conditioning
The replacement cab is a 1985 Toyota 2WD extended cab. Automatic transmission, no A/C
Before I begin, I?d like to thank my dad who is helping me with the project (even today, on Father?s day). It would take 3x as long without him.
Before I begin, I must explain again that this isn?t JUST a direct swap. It requires fabrication work in ATLEAST two areas. If you?ll note, it is NOT a 5 spd/4WD cab, so holes will need to be drilled to accommodate the clutch master cylinder. The hole for the shift sticks will need to be enlarged as well, plus any mounting holes. For the A/C, two holes would need to be drilled in that immediate area, using a template from the original cab (or really good measuring). I can not tell you what awaits on the inside for AC, haven?t made it that far yet.
Other than that, everything should be bolt on. Keyword: SHOULD.
First off, we unbolted the hood from its hinges and rested somewhere safe. We then unbolted the hinges from the firewall, and bolted them straight to the NEW firewall on the replacement cab. The wiper motor was also removed and bolted to the NEW firewall. I then began to remove the passenger side door and front fender.
I took care in grouping all of the bolts together. The door hinges were removed and bolted to the new cab. After unbolting the plastic fender liner from along the bottom of the outer (steel) fender, I returned the screws to their rightful places along the steel fender, so I would not lose them. My father hooked up ?the gun? to the air compressor and began zipping parts from the inner fenders: voltage regulator, ignition coil, power steering reservoir, fuse block, overflow container, washer fluid container, and battery hold-down. All of these things listed were bolted onto the new cab as soon as they were removed. AS SOON AS THEY WERE REMOVED.
?Why? Why bolt all of these things onto the new cab??
Be honest now, how many bolts do you lose in a project this big? I won?t lie? TOO MANY! And before you know it, things get jerry-rigged. And since all of those parts are fairly light, why not zip them right back on the new cab? This is great for two reasons: you won?t lose things and you?ll find out early if threads are stripped.
Also, since you?re transferring all of these small, complicated items, decide what plastic clips you might need to replace. Some may be old and brittle? but if you can remove them without breaking them then use them on the new cab!!! Way to be a tight wad!!!
Ok, I?m getting tired of typing. So, I?ll sum this up. This is a body swap. Things around the engine CAN BE LEFT near the engine, so long as you have the man power to manipulate these things around the new body coming down on the frame rails. If you don?t want to lose bolts, then thread them into their new locations on the new cab. Can?t lose them that way!
I?ll update this tomorrow, after I have the dash apart and the wiring harness exposed. Late.

 Jun 21, 2007 | 10:54 AM
#4
Thread Starter
Registered User
Joined: Apr 2007
Posts: 661
Likes: 1
From: Wackoville, California
Day 2
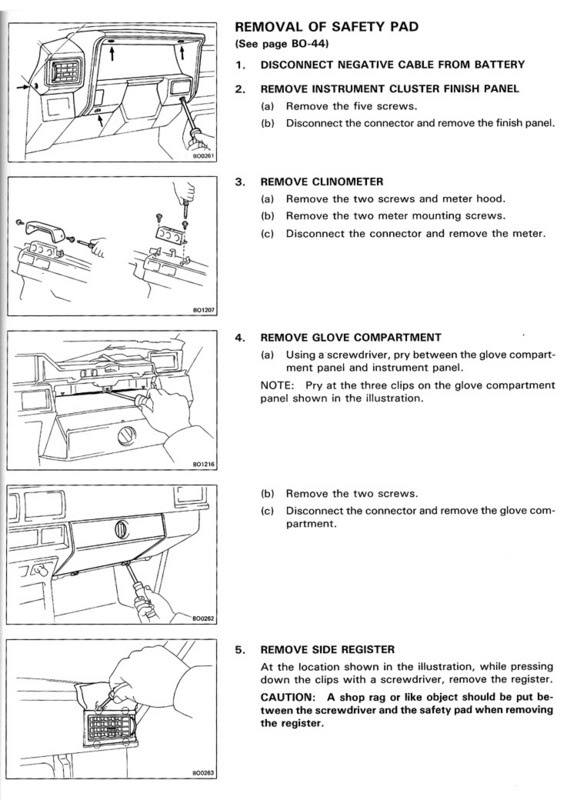
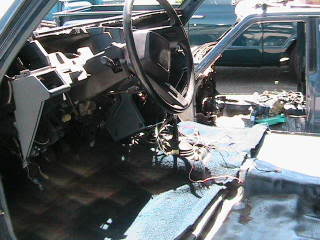
Ok, so here is an update of what I've gotten done over the last two days. I've managed to fully disassemble the dash while only breaking ONE thing... the passenger side register (the little vent thing for heater/AC). The old plastic could handle the stress of my flathead screwdriver.
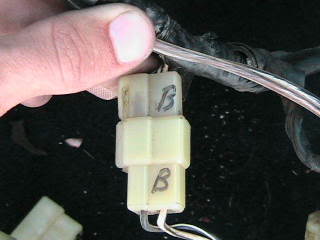
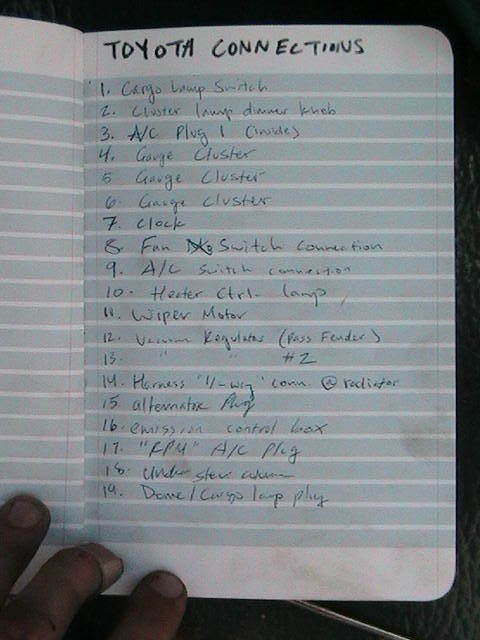
From there on, it's pretty much all electrical. I created a number system, in which both partners in a pair of connecters were tagged and logged in my notebook. This should make the reconstruction process of my electrical system go a LOT faster with less mistakes for when I put it all together.
After I could unplug everything there is too unplug from under the dash, I moved the A/C out. Ok, here is the cool part. It was SO easy to put my A/C setup in the other cab, it might as well be a sin.
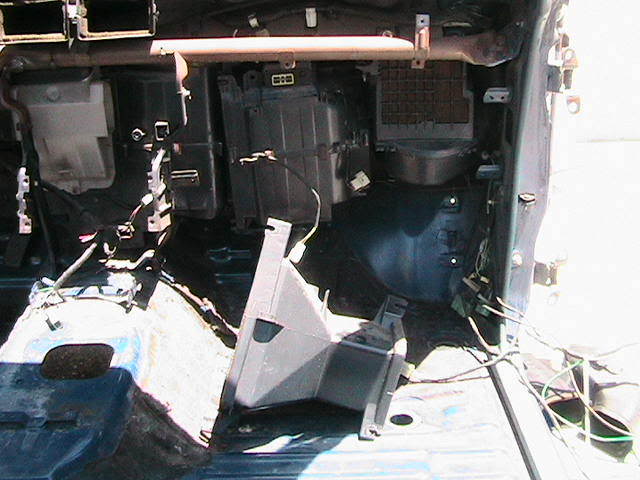
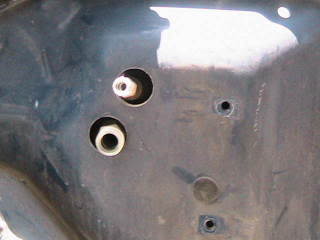
Those holes drilled in the firewall for A/C lines? All ready pre-center punched by the factory!!! I just drilled pilot holes and then got a big hole saw (which my dad later explained is for wood only ) and cut my new holes. From there on, everything bolted right up. In the next picture, the A/C is already bolted in place of that "tunnel" which was really only meant to take up space and transfer the heater air since there was no A/C.
From there on, it's pretty much all electrical. I created a number system, in which both partners in a pair of connecters were tagged and logged in my notebook. This should make the reconstruction process of my electrical system go a LOT faster with less mistakes for when I put it all together.
After I could unplug everything there is too unplug from under the dash, I moved the A/C out. Ok, here is the cool part. It was SO easy to put my A/C setup in the other cab, it might as well be a sin.
Those holes drilled in the firewall for A/C lines? All ready pre-center punched by the factory!!! I just drilled pilot holes and then got a big hole saw (which my dad later explained is for wood only
) and cut my new holes. From there on, everything bolted right up. In the next picture, the A/C is already bolted in place of that "tunnel" which was really only meant to take up space and transfer the heater air since there was no A/C.
Jun 21, 2007 | 11:02 AM
#5
Thread Starter
Registered User
Joined: Apr 2007
Posts: 661
Likes: 1
From: Wackoville, California
And yesterday, I drove to Sacramento with my buddy (who also has an old Toyota he beats to death  ) and visited damn near every Pick N Pull and dismantler's place along "recycle road". He bought himself a whole new chrome grille and parking lens setup. I, on the other hand, had to visit three different places to piece together my new windshield moulding. You see, when I first bought the truck, the bottom trim is the only piece I had. Still missing the driver side, bottom corner though...

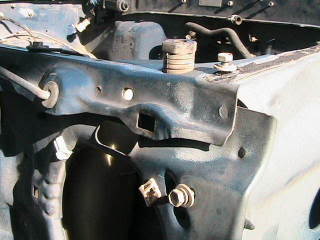
Ok, here's my BIG problem right now. Removing the wiring harness safely.
In order to remove this harness FROM my old engine bay, I need to somehow disassemble this fuse box.
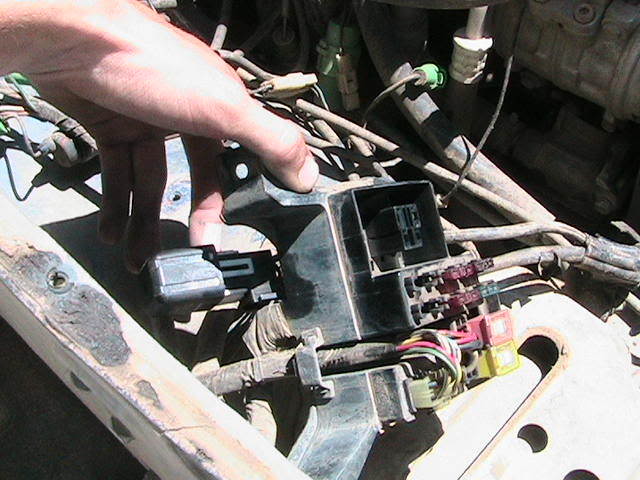
Do I HAVE to do this? Is there a "main connection" that maybe I'm mising that would fully split this harness into two pieces? Because until I find that miracle, I'm stuck removing every-single-wire from this damn fuse box. Talk to me fellas. Peace.
) and visited damn near every Pick N Pull and dismantler's place along "recycle road". He bought himself a whole new chrome grille and parking lens setup. I, on the other hand, had to visit three different places to piece together my new windshield moulding. You see, when I first bought the truck, the bottom trim is the only piece I had. Still missing the driver side, bottom corner though... Ok, here's my BIG problem right now. Removing the wiring harness safely.
In order to remove this harness FROM my old engine bay, I need to somehow disassemble this fuse box.
Do I HAVE to do this? Is there a "main connection" that maybe I'm mising that would fully split this harness into two pieces? Because until I find that miracle, I'm stuck removing every-single-wire from this damn fuse box. Talk to me fellas. Peace.
Jun 21, 2007 | 05:00 PM
#6

Registered User
Joined: Jul 2006
Posts: 32
Likes: 0
From: Alaska
I swapped an 86 cab onto my 85 so I know how much of a pain you are going through. The wiring harness is like a big circle that runs from inside the firewall behind the dash up along both fenders and across the back of the grill. it is held in place by a lot of clips in various places. I know that mine split so it all could be taken out. I believe on the driverside at the front of the engine bay is where the two sides meet and you can disconnect it in that place there. Once that is done and all the wire s have been disconnected you can thread it through the wholes near the firewall and take it out of the truck.
Jun 22, 2007 | 08:32 AM
#7
Thread Starter
Registered User
Joined: Apr 2007
Posts: 661
Likes: 1
From: Wackoville, California
Ok, I don't have time to update right now 'cause I gotta go to work. But I just wanted to say thankyou to 85TurboRunner. This guy... man he saved me a dump truck load of unecessary work.
85TurboRunner
85TurboRunner
Trending Topics
Jun 30, 2007 | 03:44 PM
#8
Thread Starter
Registered User
Joined: Apr 2007
Posts: 661
Likes: 1
From: Wackoville, California
update: June 30
Ok, so I lost the memory card to my camera for a few days! But I have the last pictures of this body swap thread now. Yes, that's right. I'm done!!!
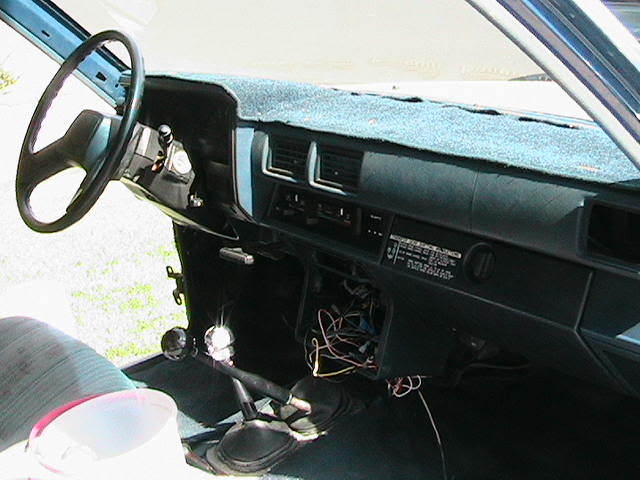
One of the last things I did before body removal, was remove the steering column. Not very hard to do. Remove the shroud (plastic area surrounding ignition) by unscrewing the philips screws underneath. Then move to the connection inside of the engine bay, right next to the firewall. I tried my best to mark with a sharpie the alignment of the steering wheel vs. everything else.
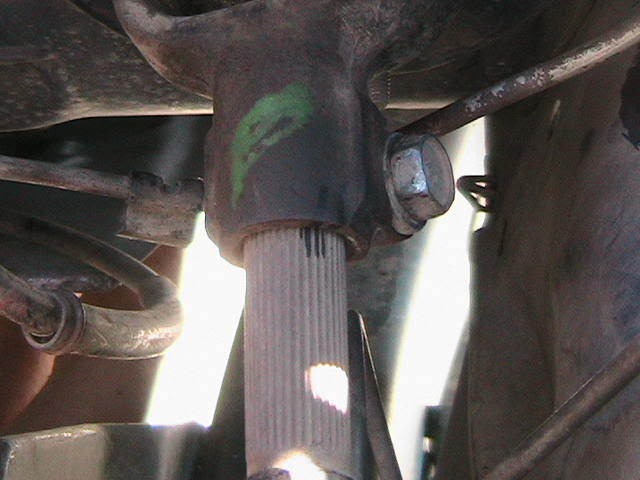
From there I unbolted the bracket at the firewall (next to the brake pedal) and where the column bolts up at the dashboard "reinforcement bar". This is the copper-colored bar that runs horizontal along the front of the cab. From there... you just pull it all out. (well ok, its not that easy. but it should come out with force)

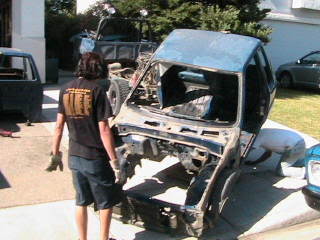
Afterwards, when EVERYTHING is cleared from the cab. And the cab is unbolted... make some friends!!!

One of the last things I did before body removal, was remove the steering column. Not very hard to do. Remove the shroud (plastic area surrounding ignition) by unscrewing the philips screws underneath. Then move to the connection inside of the engine bay, right next to the firewall. I tried my best to mark with a sharpie the alignment of the steering wheel vs. everything else.
From there I unbolted the bracket at the firewall (next to the brake pedal) and where the column bolts up at the dashboard "reinforcement bar". This is the copper-colored bar that runs horizontal along the front of the cab. From there... you just pull it all out. (well ok, its not that easy. but it should come out with force)
Afterwards, when EVERYTHING is cleared from the cab. And the cab is unbolted... make some friends!!!
Jun 30, 2007 | 03:54 PM
#9
Thread Starter
Registered User
Joined: Apr 2007
Posts: 661
Likes: 1
From: Wackoville, California
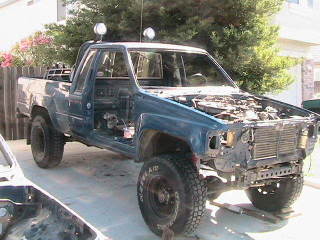
When you have the old cab off, tilt it on its side so that you can see if the rubber spacers that were supporting the body are still sticking to it. Unless you have new ones, you'll need those old ones back! In fact, keep track of which bolts and spacers were used on parts of the cab supports as they are different!!!
Hey, that's pretty cool!

Ok, so now that you've read this far, I'll just say this:
-Do everything in reverse order.
-ALWAYS double-check.
-Replace the heater core?
Ok, so I say replace the heater core for a certain reason. I used the one that came in the junkyard cab, not knowing it had a hole in it! And it only took one trip around the block to send water all over the floor of the new cab! Ok?
So replace that stuff! Before you put the dash back together! And although there are probably tons more experienced people than myself on here, please ask any questions you might have and I'll share what I have.
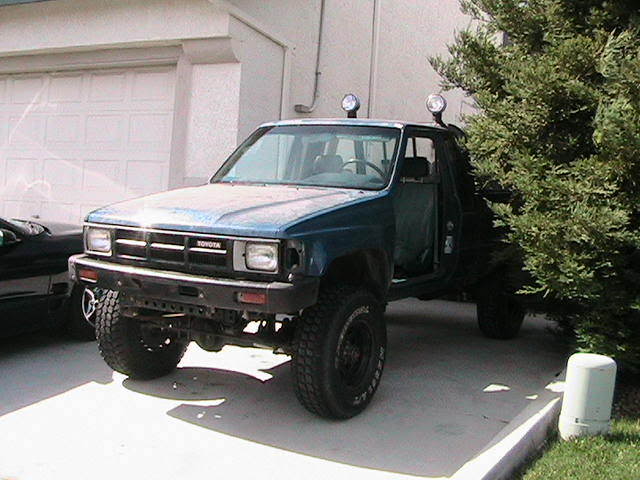
From here on, are just recent pictures... Other than that, j'ai finis.
Hey, that's pretty cool!
Ok, so now that you've read this far, I'll just say this:
-Do everything in reverse order.
-ALWAYS double-check.
-Replace the heater core?
Ok, so I say replace the heater core for a certain reason. I used the one that came in the junkyard cab, not knowing it had a hole in it! And it only took one trip around the block to send water all over the floor of the new cab! Ok?
So replace that stuff! Before you put the dash back together! And although there are probably tons more experienced people than myself on here, please ask any questions you might have and I'll share what I have.
From here on, are just recent pictures... Other than that, j'ai finis.
Jun 30, 2007 | 04:36 PM
#11
Thread Starter
Registered User
Joined: Apr 2007
Posts: 661
Likes: 1
From: Wackoville, California
Hmmm... ya know I really don't know. It only took a week to get it to running status. I'd have to say... a little less than 40 hours? Two 12 hour shifts... a couple 6ers after work... Not a lot. Pretty straight through.
 Jun 26, 2009 | 10:18 PM
#14
Registered User
Joined: Jun 2009
Posts: 44
Likes: 0
From: Oregon
Hey dude Your thread has been really helpful to me so dar I've been using your electrical lettering system. lol My truck is fuel injected so i have a few extra things to do.
But anyway I'm having problems with that fuse box on the passenger side. what did you end up doing taking the wires out one by one would take forver?
oh yeah and what did you do about your brake lines?
Thanks man
But anyway I'm having problems with that fuse box on the passenger side. what did you end up doing taking the wires out one by one would take forver?
oh yeah and what did you do about your brake lines?
Thanks man
Jun 28, 2009 | 06:25 PM
#16
Registered User
Joined: Jun 2009
Posts: 44
Likes: 0
From: Oregon
lol. yeah i just figured that out like an hour after I wrote that but thanks. Oh yeah i have another question. I knew i had some cracks around my shock hoops but once i took the cab and everything else off I discovered a bunch more very thin but some are long cracks. I did a pretty good bead with my mig over all them but i'm not sure if it will hold. I know i could get some plate and plate it but if i did that i would have to cut out my shock hoop wich will be a pain.
Jun 29, 2009 | 06:57 PM
#17
Thread Starter
Registered User
Joined: Apr 2007
Posts: 661
Likes: 1
From: Wackoville, California
Well you have a few options. I'm not much of a welder, but I'm told that if they "Float" they're no good. That is to say, if your welds splatter everywhere and look like someone wadded gum along the crack.. then don't trust 'em. BUt if the meld into the metal a bit and kinda feather into the surface... you're good. If you're worried about it that much. I'd just gusses the shock hoop... I mean screw it right? There's nothing wrong with gussets... they practically double the strenth of whatever item they're securing. Cutout a cardboard triangle and think about where you could gusses at!
BTW... brake lines... if you're keeping the frame then you can leave them atatched to the master cylinder, wheel cylinders, calipers, etc. BUT... the rear brake lines and clutch line are anchored to the firewall AND to the bottom of the cab. Undo those before ANY lifting. And just unbolt both master cylinders from the firewall. THat oughta do it.
BTW... brake lines... if you're keeping the frame then you can leave them atatched to the master cylinder, wheel cylinders, calipers, etc. BUT... the rear brake lines and clutch line are anchored to the firewall AND to the bottom of the cab. Undo those before ANY lifting. And just unbolt both master cylinders from the firewall. THat oughta do it.
Jun 29, 2009 | 06:58 PM
#18
Thread Starter
Registered User
Joined: Apr 2007
Posts: 661
Likes: 1
From: Wackoville, California
BTW... youthink a BODY SWAP is fun. I just finished a body AND frame swap and ended up with a discolored 4Runner in my driveway! Check it out when ya get bored... 'Project frankenyota'.
Jun 29, 2009 | 09:22 PM
#19
Registered User
Joined: Jun 2009
Posts: 44
Likes: 0
From: Oregon
Nice...yeah I welded it up pretty decent. and yeah i just took my shocks off of those hoops. They were dual shocks up front and the ride was so rough there might as well be no shocks.once i took them out and returned them to normal one on each side in the original shock holder it softened up a little but not much. i think i'm going to take a leaf out of the springs the ride is that rough. any other ideas how i could soften it up any more?
Jul 1, 2009 | 12:59 PM
#20
Thread Starter
Registered User
Joined: Apr 2007
Posts: 661
Likes: 1
From: Wackoville, California
Hmm... well I wish I could suggest something concrete... my truck has the same problem. I think its a solid axle Toyota thing (hence the switch to IFS, less manly but WAY more comfortable).
I've read previous posts on crappy ride quality like the both of our trucks and it seems the agreed solution has been to ditch whatever spring setup you have and order from "Old Man Emu". Are your leaf springs old? Mine are WAY old Ranchos and if I had to guess, I'd say there isn't very much "spring" left to the leaf springs.
I've read previous posts on crappy ride quality like the both of our trucks and it seems the agreed solution has been to ditch whatever spring setup you have and order from "Old Man Emu". Are your leaf springs old? Mine are WAY old Ranchos and if I had to guess, I'd say there isn't very much "spring" left to the leaf springs.


