
85 4runner to Truggy @ ORS
 Mar 5, 2008 | 01:23 PM
#1
Thread Starter
Registered User
Joined: Jun 2006
Posts: 141
Likes: 0
85 4runner to Truggy @ ORS
Well, we have in a customer's vehicle that we will be doing some huge modifications to, the goal is to make a buggy on frame and make it reliable and great for offroad!
This is what we are starting with:
1985 Toyota 4runner on stock axles, Alcan springs, dual cases among many other mods.
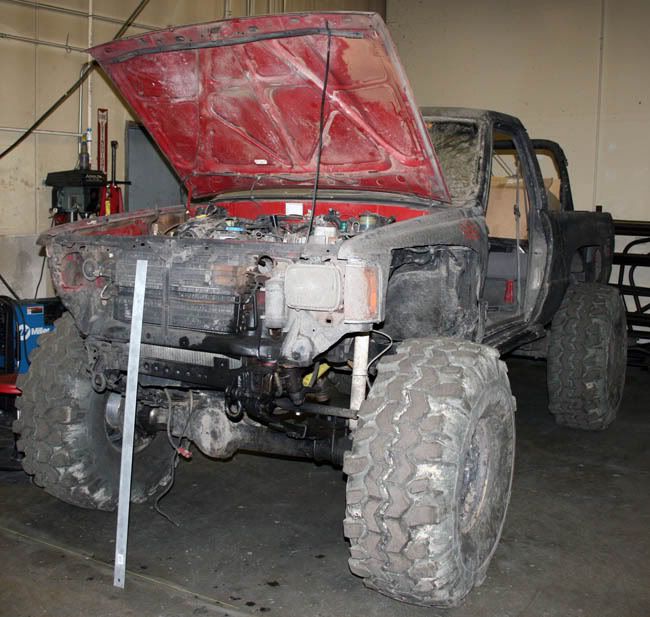


What we have to do:
Transfer everything (except the body) over to a new frame. Why you ask? Because the current frame is separated. (see pic below)
The new frame has had the body mounts removed since we will not be using a Toyota body on it. We will be cleaning this frame up more and more as the project progresses.
Build a custom body/chassis out of tube and attach it to the new frame. (which we hope to have as a product after this is fully developed).
That includes the floor and dash being custom fab'd too. Also some sweet gauge mounts.
It will be a four seater (Corbeau seats) with buckets in the front and a bench in the rear. The back won't have too much space, so a tall adult wouldn't be able to ride back there, but it will be great for kids, which is what the 4runner's owner plans to use it for.
Some new shock mounts and other custom fab work to be done too!
Keep an eye out for updates and more pictures as we get further into this project.
Busted Frame:

New Frame (which will be cleaned up heavily through the project):


This is what we are starting with:
1985 Toyota 4runner on stock axles, Alcan springs, dual cases among many other mods.
What we have to do:
Transfer everything (except the body) over to a new frame. Why you ask? Because the current frame is separated. (see pic below)
The new frame has had the body mounts removed since we will not be using a Toyota body on it. We will be cleaning this frame up more and more as the project progresses.
Build a custom body/chassis out of tube and attach it to the new frame. (which we hope to have as a product after this is fully developed).
That includes the floor and dash being custom fab'd too. Also some sweet gauge mounts.
It will be a four seater (Corbeau seats) with buckets in the front and a bench in the rear. The back won't have too much space, so a tall adult wouldn't be able to ride back there, but it will be great for kids, which is what the 4runner's owner plans to use it for.
Some new shock mounts and other custom fab work to be done too!
Keep an eye out for updates and more pictures as we get further into this project.
Busted Frame:
New Frame (which will be cleaned up heavily through the project):
Last edited by ORS; Mar 18, 2008 at 07:03 AM.
Mar 5, 2008 | 04:57 PM
#2
Registered User
Joined: May 2007
Posts: 1,441
Likes: 0
From: Summit County, Colorado
Looks like a good start Mike, I know that you have wanted to do this for a while. Keep up the good work.
Jeremiah
Jeremiah
Mar 11, 2008 | 09:27 AM
#3
Thread Starter
Registered User
Joined: Jun 2006
Posts: 141
Likes: 0
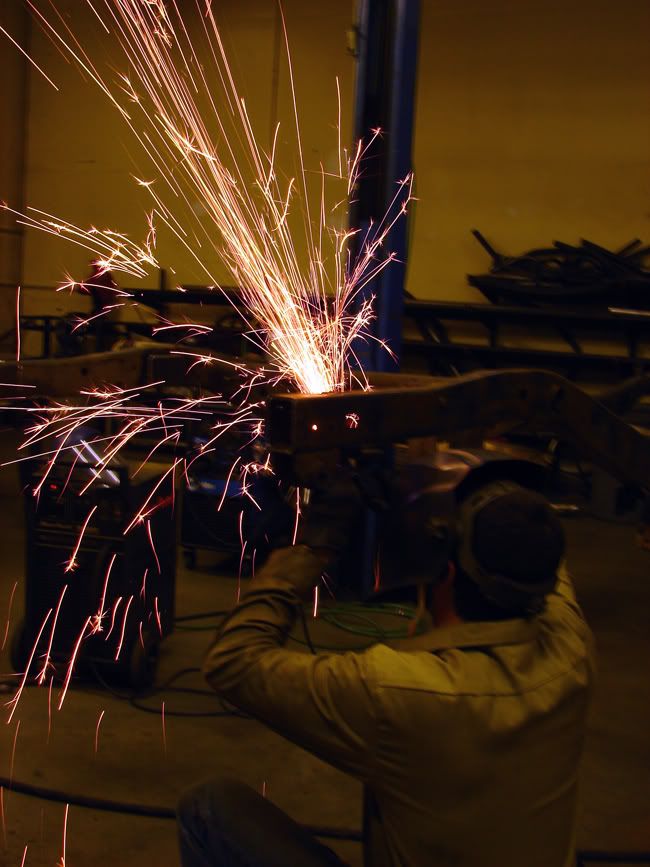
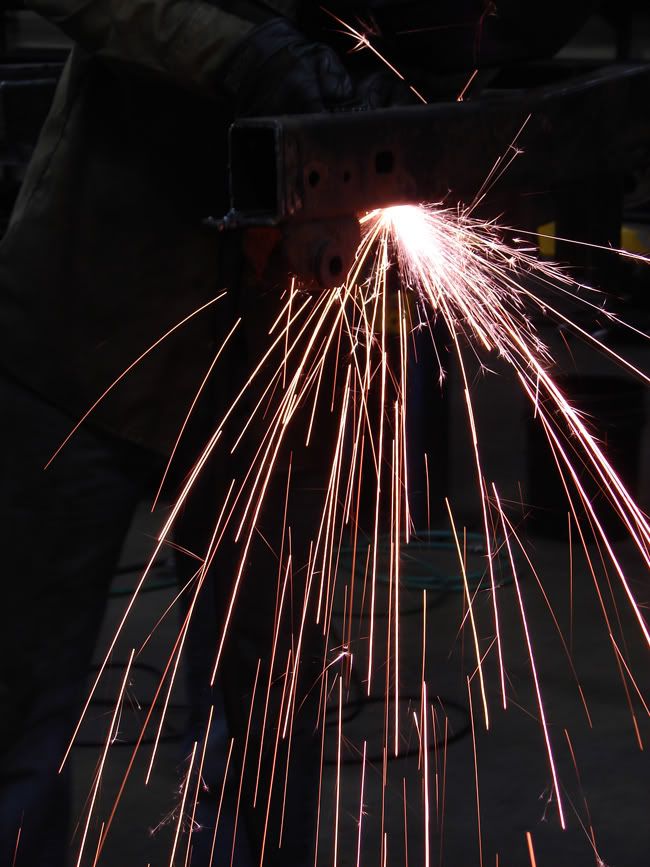
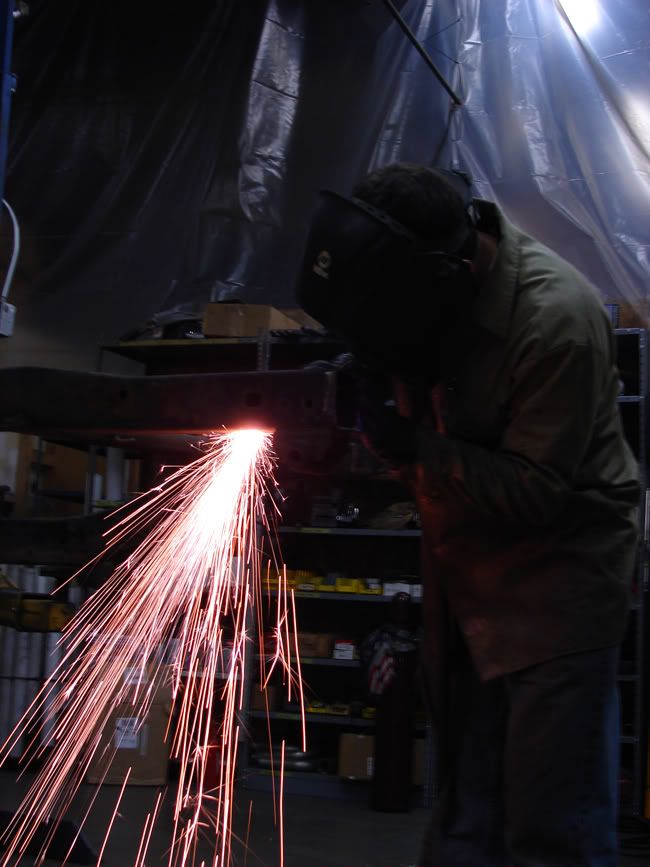
Well we are modifying the frame today. Removing one of the crossmembers (the stock Toyota one was not beefy enough for us) and replace it with square tubing to reinforce the frame, provide a stronger crossmember, and cap off the end of the frame. Made for some awesome pictures with the plasma cutter too!
Here is the frame without xmember

here is the xmember on the floor

and here is Brian cleaning up where he cut out on the frame with the plasma cutter before installing the new crossmember


Here is the frame without xmember
here is the xmember on the floor
and here is Brian cleaning up where he cut out on the frame with the plasma cutter before installing the new crossmember
Last edited by ORS; Mar 18, 2008 at 07:14 AM.
Mar 11, 2008 | 03:22 PM
#4
Thread Starter
Registered User
Joined: Jun 2006
Posts: 141
Likes: 0
More work done today on the truck to buggy conversion...
Basically he cut the frame off at the end and then reinforced where he took out that crossmember with 3x3".


Basically he cut the frame off at the end and then reinforced where he took out that crossmember with 3x3".
Mar 11, 2008 | 05:40 PM
#5
Registered User
Joined: Jan 2008
Posts: 23
Likes: 0
those are the sexiest welds i've ever seen.
Mar 12, 2008 | 08:04 AM
#6
Thread Starter
Registered User
Joined: Jun 2006
Posts: 141
Likes: 0
Ill let Brian know you think so!
Mar 12, 2008 | 08:52 AM
#7

Registered User
Joined: Mar 2007
Posts: 182
Likes: 0
From: Vero Beach, Florida
Yeah I was thinking the same thing, very nice, clean and uniform welds.
Trending Topics
Mar 12, 2008 | 12:29 PM
#8
Thread Starter
Registered User
Joined: Jun 2006
Posts: 141
Likes: 0
More work done today. Added in a crossmember/frame support in the middle of the frame, in order to remove the factory one and have the frame still be supported (the stock one was in the way of our drivetrain placement and not as sturdy as teh replacement we were putting in). We added in the new one before we removed the old one to make sure the frame was stabilized and that it would not tweak or anything of the sort.
Here you can see where we tacked in the new crossmember

Welding in more tabs on the frame (these are going to be frame brackets for the cab mounts and also aid in making the structure stronger for shipping as a whole when the product is finished being developed)


Cutting out the factory middle crossmember (cleaned it up afterwards as well)


Here you can see where we tacked in the new crossmember
Welding in more tabs on the frame (these are going to be frame brackets for the cab mounts and also aid in making the structure stronger for shipping as a whole when the product is finished being developed)
Cutting out the factory middle crossmember (cleaned it up afterwards as well)
Last edited by ORS; Mar 18, 2008 at 07:20 AM.
Mar 18, 2008 | 07:29 AM
#9
Thread Starter
Registered User
Joined: Jun 2006
Posts: 141
Likes: 0
Well over the end of the week and the weekend, ALOT more work has been completed. The 4runner/buggy has a floor and sliders. We are still working on finishing up the detail work in the sliders to make them more sturdy and ready to wheel. And I'm sure you noticed, the frame just keeps getting cleaner and cleaner!
Here is the main layout of the floor and sliders (keep in mind they are not finished yet and will be braced to be made more sturdy)

Here we are fitting some bracing for the sliders, to make them sturdier.

Here is the main layout of the floor and sliders (keep in mind they are not finished yet and will be braced to be made more sturdy)
Here we are fitting some bracing for the sliders, to make them sturdier.
Mar 21, 2008 | 07:32 AM
#10
Thread Starter
Registered User
Joined: Jun 2006
Posts: 141
Likes: 0
The guys have been working hard on this 4runner/buggy this week.
Got the floor/slider bracing measured, cut and tacked in.
Bent the Main hoops and tacked those in, bent the drive train hump tubing and tacked that in, and got the a-pillars bent and tacked in.
We have a full cab now!
Not to mention the motor is mounted.
This thing is coming along great, and its impressive to watch the guys in back work on this type of custom fab.
And the pictures:
here you can see the 2 main hoops in along with the floor hump

the hump itself

the chassis again

the a-pillars are added here, as is the motor

(ignore the bar sitting across the floor that you see)


here's the sliders, notice that the back goes down and the front goes up. We did this to accommodate fitting the large tires in there, with the axles location being so close and not causing clearance issues

the motor/floor hump

a rear view

Got the floor/slider bracing measured, cut and tacked in.
Bent the Main hoops and tacked those in, bent the drive train hump tubing and tacked that in, and got the a-pillars bent and tacked in.
We have a full cab now!
Not to mention the motor is mounted.
This thing is coming along great, and its impressive to watch the guys in back work on this type of custom fab.
And the pictures:
here you can see the 2 main hoops in along with the floor hump
the hump itself
the chassis again
the a-pillars are added here, as is the motor
(ignore the bar sitting across the floor that you see)
here's the sliders, notice that the back goes down and the front goes up. We did this to accommodate fitting the large tires in there, with the axles location being so close and not causing clearance issues
the motor/floor hump
a rear view
Mar 27, 2008 | 07:57 AM
#11
Thread Starter
Registered User
Joined: Jun 2006
Posts: 141
Likes: 0
Alright, this 4runner/truggy REALLY looks like a vehicle now. Got the windshield bracing in, the roof bracing in, and "fenders" and hood/grille bracing. Granted there is more tube to come, but it really looks like you could ride in it now. Especially since they threw the seats in for test fitting.
The seats will end up sitting about 3" higher than they are right now, but you get the idea anyways.
The front of the cab/rear of the fenders will also have more tubing for support and strength.


from the rear


The seats will end up sitting about 3" higher than they are right now, but you get the idea anyways.
The front of the cab/rear of the fenders will also have more tubing for support and strength.
from the rear
Mar 28, 2008 | 01:43 PM
#12

Registered User
Joined: Mar 2008
Posts: 58
Likes: 0
Looking good, compliments to the welder, those are impressive. Can't wait to see this sucker finished, going to be one awesome mod. How much are you charging the guy to do this?
Mar 28, 2008 | 02:03 PM
#13
Thread Starter
Registered User
Joined: Jun 2006
Posts: 141
Likes: 0
I honestly couldn't tell ya what the final cost is.
The big bossman wrote up this order.
Well, the guys got more of the tubing done. The notch they had to make to get this to work was pretty crazy. You will see the "fender tube" that was there already, and this is another bracing tube for the fender/hood area to add structure and integrity.
Looking from the front:

Looking from the back:

The guys also got the rear hoop built, the one for behind the back seats.

Also, they strung up some string (the yellow string you see in the picture above and this photo) around the chassis to show you points they will be re-enforcing in the near future with more tubing.

The big bossman wrote up this order.
Well, the guys got more of the tubing done. The notch they had to make to get this to work was pretty crazy. You will see the "fender tube" that was there already, and this is another bracing tube for the fender/hood area to add structure and integrity.
Looking from the front:
Looking from the back:
The guys also got the rear hoop built, the one for behind the back seats.
Also, they strung up some string (the yellow string you see in the picture above and this photo) around the chassis to show you points they will be re-enforcing in the near future with more tubing.
Apr 2, 2008 | 01:24 PM
#14
Thread Starter
Registered User
Joined: Jun 2006
Posts: 141
Likes: 0
More Bending & Welding!
The guys spent alot of time cutting/bending/fitting/notching tube this week on the 4runner/truggy. As you can see overall there is alot of bracing to all the hoops, the roof is more complete and the fender bars are tacked in too.

Here is a side view. you can see the door bar on the driver side, that is just set in place (not tacked) yet, it will be the same for the passenger side.
Some other bars to come:
~off of the back 2 hoops, there will be a cross bar to protect the back seat area more (the owner plans on bringing his kids wheeling sometimes and wants to make sure there is additional protection there for them - which is why the rear hoop is also "X"d)
~from the top of the rearmost hoop there will be bars going down to the horizontal hoop you see
~from the rear horizontal hoop there will be bracing in 4 places down to the frame


this is an "under" view of the roof tubes. the front of the vehicle is at the right of the picture

once again, there will be tubes from the rear hoop to the rear horizontal bar, then to the frame. there will also be brace tubes on the side of the horizontal bar to the frame for more support.


they actually started welding some of the bars in all the way also

And I'm short so I did my best to get a top view of the roof.

The guys spent alot of time cutting/bending/fitting/notching tube this week on the 4runner/truggy. As you can see overall there is alot of bracing to all the hoops, the roof is more complete and the fender bars are tacked in too.
Here is a side view. you can see the door bar on the driver side, that is just set in place (not tacked) yet, it will be the same for the passenger side.
Some other bars to come:
~off of the back 2 hoops, there will be a cross bar to protect the back seat area more (the owner plans on bringing his kids wheeling sometimes and wants to make sure there is additional protection there for them - which is why the rear hoop is also "X"d)
~from the top of the rearmost hoop there will be bars going down to the horizontal hoop you see
~from the rear horizontal hoop there will be bracing in 4 places down to the frame
this is an "under" view of the roof tubes. the front of the vehicle is at the right of the picture
once again, there will be tubes from the rear hoop to the rear horizontal bar, then to the frame. there will also be brace tubes on the side of the horizontal bar to the frame for more support.
they actually started welding some of the bars in all the way also
And I'm short so I did my best to get a top view of the roof.
Apr 2, 2008 | 01:41 PM
#15
Contributing Member
Joined: Jun 2004
Posts: 2,644
Likes: 2
From: Monett, MO (Springfield)
lookin sweet! I have a feeling one day my rig will progress to something like this.
Apr 2, 2008 | 03:09 PM
#16
Contributing Member
Joined: Apr 2004
Posts: 5,464
Likes: 6
From: Arvada, Colorado
SWEET!
Looks awesome. Can't wait to see the axles hung. Are you putting on your C/O kit?
Great work all around.
Looks awesome. Can't wait to see the axles hung. Are you putting on your C/O kit?
Great work all around.
Apr 4, 2008 | 06:06 PM
#17
Registered User
Joined: Nov 2007
Posts: 102
Likes: 0
From: Austin, TX
Very clean... are those welds TIG?
Last edited by Toyotero; Apr 5, 2008 at 02:29 PM.
Apr 7, 2008 | 06:58 AM
#18
Thread Starter
Registered User
Joined: Jun 2006
Posts: 141
Likes: 0
No we are putting essentially his suspension back on there. With the exception of we are making new shock mounts for him!
They are MIG welds
They are MIG welds
Apr 10, 2008 | 07:33 AM
#19
Thread Starter
Registered User
Joined: Jun 2006
Posts: 141
Likes: 0
The chassis has been finished (well, the part of it we are saving the blue prints for and will be offering as a product later down the road).
All of the rear tubing has been completed and everything has been welded into place (as opposed to just tack welded).
The hood/fender area, cab area, floor, roof, and rear area are all finished along with adding a front stinger. You can see the rear bracing that was added from the rear hoop to the rear horizontal bar, and the rear and side supports from that rear horizontal bar to the 4Runner frame. Not to mention the cross bars on the "side windows" in the rear seat area.
The owner (Rob) wanted to make sure the rear really offered security to the rear passengers since his children will be riding with him sometimes.
Now, by no means are we done with this project. We still have the sheet flooring, sheet firewall, seats & harnesses, motor/trans, axles, new shock mounts and steering to put together for the project.
Rob will be doing more work to it as well, but for the most part that covers what we will be doing in the shop for him.
Here are some pictures of the completed chassis with the motor in, still on the lift.


Here are some pictures with no motor, axles underneath and rolled outside.


a shot of the windshield tubing, to roof tubing

driverside fender area back

passengerside fender area back

looking up from the engine compartment to the back


looking from right behind the rear seat, forward

All of the rear tubing has been completed and everything has been welded into place (as opposed to just tack welded).
The hood/fender area, cab area, floor, roof, and rear area are all finished along with adding a front stinger. You can see the rear bracing that was added from the rear hoop to the rear horizontal bar, and the rear and side supports from that rear horizontal bar to the 4Runner frame. Not to mention the cross bars on the "side windows" in the rear seat area.
The owner (Rob) wanted to make sure the rear really offered security to the rear passengers since his children will be riding with him sometimes.
Now, by no means are we done with this project. We still have the sheet flooring, sheet firewall, seats & harnesses, motor/trans, axles, new shock mounts and steering to put together for the project.
Rob will be doing more work to it as well, but for the most part that covers what we will be doing in the shop for him.
Here are some pictures of the completed chassis with the motor in, still on the lift.
Here are some pictures with no motor, axles underneath and rolled outside.
a shot of the windshield tubing, to roof tubing
driverside fender area back
passengerside fender area back
looking up from the engine compartment to the back
looking from right behind the rear seat, forward
Apr 10, 2008 | 09:19 AM
#20
Registered User


Joined: Mar 2006
Posts: 2,586
Likes: 9
From: Atlanta, GA
holy hell this thing is sweet! Great job on this one. yall do fantastic work.


