
Weber dumping gas, stuck float?
 Mar 23, 2020 | 07:30 PM
#1

Thread Starter
Registered User
Joined: Sep 2019
Posts: 42
Likes: 0
Weber dumping gas, stuck float?
Ive got a 32 36 on my 20r pickup. Ive been haveing some issues in the past, when hot it would take a while to start.... Puff o smoke... Ect. I was just poking around the engine bay, truck off but warm, just curious and checked the cap and rotor. Then took the vac advace line off the carb to check the advance diaphram and gasoline poured out the vacume port on the carb!!! The vac line was full of gas too. After removing it I could hear gasoline inside the carb pouring into the intake... No bueno. My oil smells like gas and is over full. Why would this happen. A stuck float? Bad gasket or seal? The carb is brand new, with only 5000 miles on it. If it is a stuck float why does that happen and how to I keep it from happening.
Mar 24, 2020 | 07:13 AM
#2
Registered User


Joined: Jun 2016
Posts: 719
Likes: 190
From: Florida
It sounds like a stuck float, or an improperly adjusted float (float set too high). But there is another thing to consider. What kind of fuel pump are you running that Weber on? Stock Toyota electrical or mechanical pump? Aftermarket electric fuel pump?
I mention this because the Weber 32/36 is notorious for not liking fuel pressures above 3 PSI. Stock Toyota fuel pumps for the 20R (electric or mechanical) are usually rated at 5 to 8 PSI. The higher pressure can overwhelm the needle & seat valve on the float and cause flooding.
On some aftermarket electric fuel pumps the rating could be anything, so if you have one of those, check the documentation/specs on it.
You have to use a fuel pressure regulator to get that pressure down to what the carb "wants" or the problem is going to persist. You either need a regulator preset for no more than 3 PSI or use an adjustable regulator.
I prefer an adjustable so I can "dial it in". This is a decent one: https://www.holley.com/products/fuel...ors/parts/9710
Fairly easy to install & set. I'd recommend getting one of these if you do not have one & starting with 2.5 PSI setting.
Mar 24, 2020 | 04:05 PM
#3
Thread Starter
Registered User
Joined: Sep 2019
Posts: 42
Likes: 0
Ive got a Mr gasket 3-4 psi pump but I think ill get the regulator anyway. What is the float setting for this carb. It has the plastic floats. Right now my float setting is 41mm/ 45mm I'm reading different opinions online. Which is correct? Ive read 35mm / 51mm and 39mm/ 50mm .The tech guy at redline told me 18mm/26mm, which is just wrong... When I set the open setting to 50mm, it had to drop so much that it doesn't sit on the tab, it sits in the accel-pump spring... These aren't the correct settings for my carb. Do I have different floats?
This is the method I'm using.
https://www.weberperformance.com.au/pub/Tips%20Sheets%20&%20info/Float%20adjustments.pdf
Ive also heard that these carbs come with the float level not set? Is that true?
This is the method I'm using.
https://www.weberperformance.com.au/pub/Tips%20Sheets%20&%20info/Float%20adjustments.pdf
Ive also heard that these carbs come with the float level not set? Is that true?
Last edited by CMiller; Mar 24, 2020 at 10:35 PM.
Mar 25, 2020 | 09:16 AM
#4
Registered User
Joined: Jun 2016
Posts: 719
Likes: 190
From: Florida
Good on the regulator. Weber needle & seat valves don't seem to like the higher pressures.
41mm with the float closest to the top cover? Measured from bottom of float to inside top cover, with gasket? Why? The stock setting is 35mm. That may be your problem. The float may not be rising enough to shut off the needle valve & the carb is flooding. That would certainly explain the gas in the oil problem. That's a 6mm difference, nearly a 1/4" of travel.
Explanation - The needle valve looks like this:
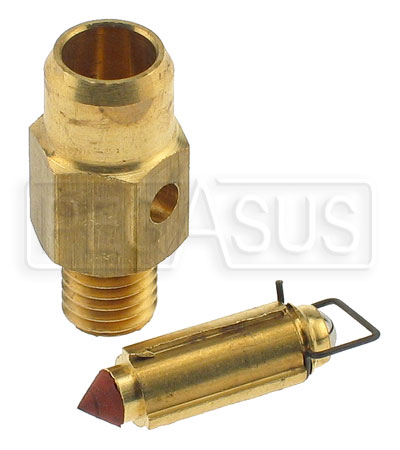
When the float rises, it pushes the rubber-cone part up into the seat inside the other part, and shuts off fuel flow. If the arm cannot rise enough to push those 2 parts together, the valve remains open & fuel keeps flowing.
The best info I have on the 32/36 DGV is the 35mm/51/mm specs for street use for the plastic float version. That PDF page is the Weber source for this and it is correct (first two illustrations DGV Series). Note the difference on that PDF on the first 2 diagrams; one says brass float, the other says plastic float. They have different specs because of the different weights of the floats, due to the materials they are made from.They react differently due to their weights.
You also need to account for the thickness of the top cover gasket, as noted in the "general instructions" or your float setting will be off a bit.
Also carefully check the float pin for any nicks or gouges; use a magnifying glass if you have one. Any of those defects can cause the float to hang up or bind on that hinge pin. The float should move smoothly on the pin through it's entire travel.
Also look through the holes in the float arm for the pin, & make sure they aren't bent or deformed from any previous rough handling at the factory.
The float may or may not be set at the factory. Just as a rule of thumb I never trust any supposed "factory setting" of an adjustable part, but measure & check it myself before installing. Like "factory gapped" spark plugs, I always find at least one that isn't correct out of the box. Like someone once said, trust but verify.
The only "optional" float setting I have seen for the 32/36 is 33mm instead of 35mm; this is for race applications where you are moving larger quantities of fuel through the carb. I do NOT recommend this setting for street use.
The Redline Tech guy was probably looking at the wrong spec. Just follow whats on that PDF for the plastic float & it should work fine. Just take you time & work carefully. These small carb parts can be delicate.
41mm with the float closest to the top cover? Measured from bottom of float to inside top cover, with gasket? Why? The stock setting is 35mm. That may be your problem. The float may not be rising enough to shut off the needle valve & the carb is flooding. That would certainly explain the gas in the oil problem. That's a 6mm difference, nearly a 1/4" of travel.
Explanation - The needle valve looks like this:
When the float rises, it pushes the rubber-cone part up into the seat inside the other part, and shuts off fuel flow. If the arm cannot rise enough to push those 2 parts together, the valve remains open & fuel keeps flowing.
The best info I have on the 32/36 DGV is the 35mm/51/mm specs for street use for the plastic float version. That PDF page is the Weber source for this and it is correct (first two illustrations DGV Series). Note the difference on that PDF on the first 2 diagrams; one says brass float, the other says plastic float. They have different specs because of the different weights of the floats, due to the materials they are made from.They react differently due to their weights.
You also need to account for the thickness of the top cover gasket, as noted in the "general instructions" or your float setting will be off a bit.
Also carefully check the float pin for any nicks or gouges; use a magnifying glass if you have one. Any of those defects can cause the float to hang up or bind on that hinge pin. The float should move smoothly on the pin through it's entire travel.
Also look through the holes in the float arm for the pin, & make sure they aren't bent or deformed from any previous rough handling at the factory.
The float may or may not be set at the factory. Just as a rule of thumb I never trust any supposed "factory setting" of an adjustable part, but measure & check it myself before installing. Like "factory gapped" spark plugs, I always find at least one that isn't correct out of the box. Like someone once said, trust but verify.
The only "optional" float setting I have seen for the 32/36 is 33mm instead of 35mm; this is for race applications where you are moving larger quantities of fuel through the carb. I do NOT recommend this setting for street use.
The Redline Tech guy was probably looking at the wrong spec. Just follow whats on that PDF for the plastic float & it should work fine. Just take you time & work carefully. These small carb parts can be delicate.
Mar 25, 2020 | 02:04 PM
#5
Thread Starter
Registered User
Joined: Sep 2019
Posts: 42
Likes: 0
My floats/ needle valve are working fine. Ive adjusted it to 35mm. Fuel pressure is not pushing it open. I can see it shut off thru the top of the carb.
my problem is something else. I think its the accelerator pump. Ive warmed up the truck... When I rev it, the pump nozzle seems to spray alot of gas, I never checked it it before but seems like alot. Anyway... When I shut it down. The fuel level is stable.... About 1 minuite after shutdown. I can see the surface of the fuel in the bowl is in motion. I think it's boiling, and I can hear the carb making noises, sounds like slurping the end of a soda thru a straw. Gas will drop from the accel pump nozzle... The primary butterfly valve has a small pool of gas on it, and when I open the butterfly valve there's a pool of gas in the intake with white vapors rising out. I quickly take the top plate off the carb to see the fuel boil. As soon as I open the carb it stops bubbling, but just for a second theres a couple more bubbles coming out of the holes at the bottom of the bowl on the choke side of the carb. Those holes go to the accelerator pump... I don't think it's boiling... Air is coming out of the accel pump as fuel drains into the intake?
I thought it was because of the power valve and the thing on the bottom center of the bowl, I removed the power valve and the same thing happens...
Last edited by CMiller; Mar 25, 2020 at 11:30 PM.
Mar 26, 2020 | 07:49 AM
#6
Registered User
Joined: Jun 2016
Posts: 719
Likes: 190
From: Florida
This sounds like heat soak & percolation. Residual engine heat after shutoff is heating the fuel in the bowl & pressurizing it, forcing it through the jets and into the carb. Since the engine isn't running & using any excess fuel from this condition, it's pooling in the carb throat & intake manifold.
The boiling mostly stops when you take the carb cover off because you are releasing the pressure in the fuel bowl. You still see a few small bubbles from the bottom ports because the gas is still hot.
Did your installation kit come with a base insulator or not? If not you probably need one. The insulator is usually made from a phenolic (non-metallic) material that is not a good heat conductor, so it insulates the carb from the intake manifold, & less heat can affect the carb & cause boiling.
Weber doesn't seem to offer one, but here are a few I found online:
https://www.ebay.com/itm/Phenolic-Ba...4383.l4275.c10
https://www.pegasusautoracing.com/pr...asp?RecID=3585
Both already have gaskets installed so all you'd have to do is unbolt the carb, slide it on & bolt the carb back down, IF your bolts & studs are long enough to handle the extra 1/4" of height the spacer adds.
By the way, did you ever move your fuel pump OUT of the engine compartment & back near the tank, as I previously recommended on another thread? If you haven't that could also be a big part of this issue.
Underhood temps can get to 200 F+ so that fuel pump is also absorbing engine heat & transferring it to the fuel going through it. The body of the pump can act like a heat transfer device. The boiling point of gasoline is 185 F.
If the pump hasn't be relocated yet I'd do that first & see if the condition stops, then go for the insulator if needed.
Mar 26, 2020 | 06:04 PM
#7
Thread Starter
Registered User
Joined: Sep 2019
Posts: 42
Likes: 0
Your right the fuel was boiling. Ive added 2 thick cork gaskets and that seems to have solved the issue But I may get a phenolic spacer in the future. But it wasnt pressureizing the bowl, the fuel is open to the air, you can look down thru the top of the carb and see the fuel. Anyway it's fixed.
I haven't moved my fuel pump but I will when I get around to it. I got a pressure regulator.
While messing woth the carb this whole time ive realized that the accelerator pump sprays so much gas down the throat, my truck has always bogged on hard acceleration (Although I dont do that often). just as an experiment ive deleted my accel pump. I just removed the spring and diagram and put a gasket there which allows the arm to fall out of the way of the cam on the throttle arm thing. I did it because 1. Seems like it should save alot of gas. 2 the way i drive I dont need it much. And 3 it bogged/ doesn't work anyway.
I just took it for a drive and it doesn't bog anymore, it accelerates great. Yes there are probably lean spots when accelerating but like I said, I drive this truck like a grandma. The pump only comes into effect when accelerating of course, so its totally dormant when cruising. So I don't see a problem deleting it, do you? If someone was to drive like a mad man then those lean spots might have a negitive effect... What do you think?
Trending Topics
Mar 27, 2020 | 09:04 AM
#8
Registered User
Joined: Jun 2016
Posts: 719
Likes: 190
From: Florida
Moving that fuel pump should be primary, for reasons of proper performance, fuel pressure at the carb and for safety. Think of it this way. The pump is the source of all fuel pressure,and the closer it is to the carb, the higher the pressure. Granted, this may be a difference of tenths in PSI, but given the Weber's long known fickleness on fuel pressure, it can make a difference.
Of course once you have a regulator in it doesn't matter so much, as the regulator should offer a constant pressure, but it's still a good idea to get that pump out of the engine bay & away from all that heat ASAP.
I do NOT recommend you run that carb with the accel pump "deleted" or disabled. It's there for a reason. Do you really want "lean spots" on accel? Lean conditions are the greatest killer of engines I know of, short of running one without oil in it. And no, it doesn't make a difference that you "drive like a grandma", lean is lean.
That accelerator pump squirt into the carb throat is supposed to happen. It should not cause bogging if everything else is in order (ignition, timing, etc.) and if all your mechanical pieces are in decent order (piston rings, valves, valve seats, valve springs, timing chain, vacuum & mechanical advance in the distributor).
How have you been running these "tests"? Engine should be at full operating temp, choke visually verified that it is fully opened. No binding of the throttle linkage anywhere. If you are doing these running tests without verifying all of those things, your results really don't tell me much. Please verify.
This is a DGEV model yes? Do you have ignition power hooked up to the choke?
I'm asking this because if the choke isn't working right, it affect the fuel/air mixture. A stuck closed choke or onje that isn't fully opened can make a big difference.
Mar 28, 2020 | 02:24 PM
#9
Thread Starter
Registered User
Joined: Sep 2019
Posts: 42
Likes: 0
I think my problem is a bad/ dieing ingition coil. Ive got the GM swap with a cheapo stock coil. My ignition module is from a 79 chevy truck w/ 350. Do you think a better coil like the MSD blaster 2 will be compatible in this situation?
Mar 28, 2020 | 07:01 PM
#11
Registered User

Joined: Jun 2017
Posts: 2,436
Likes: 965
From: 02176
I don�t know that carb specifically but often carbs have adjustments on the acc pump, either different holes for the actuator arm, cams and squirters. Did you get this carb new or used or with the truck?
Mar 29, 2020 | 06:59 AM
#12
Registered User
Joined: Jun 2016
Posts: 719
Likes: 190
From: Florida
Melrose 4r - As far as I know, the accel pump on the 32/36 isn't adjustable. Also Weber's documentation on the carb has no info on adjusting it. CMiller's main problem has been bogging on accel & that's why he's maybe suspecting the coil.
CMiller - I'd like to hear some more specific info about the current ignition coil you are running with that GM HEI Module. I've learned that cheap coils aren't worth using, are low quality & can often blow up ignition modules when the coil starts going bad (developing higher resistance, especially primary resistance).
If your coil has a part number of C624 or any part number like C*** (any 3 numbers), regardless of brand, I have LOTS of bad experience with this coil. Known brand names are Spectra Premium, ValueCraft (sold by Auto Zone or MasterPro (O'Reilley's). They are made in China and at best have 1 year warranties.
I went through two of these coils and ended up burning up 3(!) ignition modules because of them. I had run issues like yours during this, hot start issues (crank but no start when hot, but started after 10 minute cool down), and sometimes misfiring.
It was a bit confusing because the symptoms were always different. I since learned that the HEI modules can and do often fail in different ways due to the failing coil. The 3rd module actually didn't run all that bad, but I had it tested & it tested bad. The failing coil damaged it internally.
I still recommend the Standard Motor Products UC12 coil for the HEI conversion. The quality of it is good, it has a 3 year warranty, and is the right resistance specs to work well with the HEI Module.
Some parts stores (like O'Reilly's) stock & sell them for about $40. Cheap ignition coils just aren't worth your time or money. You get what you pay for.
The MSD Blaster coil does not have the correct resistance ranges to work with the HEI Module. They are designed to work with MSD own ignition boxes/modules. Would it work with the HEI Module? Maybe. But even if it did, it's almost double the price & really doesn't offer much more in performance for the 20R.
Also & of course, get out your Ohm Meter & test that coils primary & secondary resistances. It has to be disconnected from the ignition circuit to get accurate readings.
Your specs should be: Primary Resistance - 1.3 to 1.7 Ohms, Secondary Resistance - 6500 to 10.500 Ohms.
It also pays to take readings on the coil when it's hot. A failing coil can rise in resistance out of spec when hot. If either reading is out of these ranges the coil is bad & should be replaced with a quality coil.
If both reading are in range but within 10% of the "high side" of the range, especially on Secondary Resistance, I would replace it anyway, as this can be a sign that the coil is failing. That would be a max reading of 9450 Ohms.
If the coil turns out bad or failing, I'd also take my ignition module with me to the parts store for testing, to be sure it's OK. I learned this lesson the hard way & still have all 3 bad modules sitting next to my desk to remind me of it.
BTW, what brand & part number of module are you using?
Mar 29, 2020 | 09:01 PM
#13

Registered User
Joined: Jan 2019
Posts: 139
Likes: 37
From: SW CO
Posted in a different thread...got his wires crossed.
The carb boiling is a separate issue. And its taken care of now. I still have a hard start issue when the engine is hot. This is the first time ive had the truck in hot wheather, I bought it in oregon on the winter, now in south arizona, its been high 80's most days. It began with an issue I had where it would randomly idle very rough when i came to a stop sign. But i could make it stop by turning the idle mixture screw way out, but it would later idle rough again wanting the screw back in. I thought it was an air leak at first, checked and siliconed my carb adapter plates, still happened. That symptom seemed to stop after I changed the fuel filter...
Still hard starting when hot...
And the hard start sometimes started with a thud, with white smoke. I thought maybe it's hydrolocking? Maybe a bad head gasket? Then I noticed my oil seemed more full, thought maybe a bad head gasket putting coolant in the cylinder. Tested the cooling system pressure, it was ok.
I thought my gas gauge seems to drop quickly, I noticed the smoke looked more grey/black. The oil kinda smelled like gas, so I adjusted the float hieght, it was set at 41mm and supossed to be 35. Then i noticed the gas boiling in the carb. So i put 2 thick gaskets in, I also have a phenolic spacer in the mail. But the boiling seems to have stopped.
Still hard to start when hot...
Also sometimes after a hard start while driving slow, it would chug the truck back and forth( kinda like running out of gas, but a soft chugging. And only one time it chugged hard! Just about gave me whiplash, I pushed the clutch in, it came to an idle and I took off again, never happened again.
Yesterday I read an article that was listing the symptoms of a bad ignition coil, bad gas milage, chugging, hard starts when hot, smoke on startup. Possibly gas in oil too if it's not burning completely?
Also, when I've been tuning the carb, if the engine dies, with the key still on, rarely ill hear a buzzing sound from the distributor. I tried to flip the dis cap off, and got a big ol shock. I thought the engine happened to die while the rotor was near a plug wire and stayed arcing out. But could be a bad ground? Can i ground the coil directly, - on the coil goes to C on the module, what would happen if I ran another wire from coil - to the body of the truck? My other grounds are in good shape.
I'll check it out with the ohmeter. Thanks for the coil suggestions.
Mar 30, 2020 | 06:40 AM
#14
Registered User
Joined: Jun 2016
Posts: 719
Likes: 190
From: Florida
Wanted to add something else. I don't know about the age or condition of the distributor but there is something else in there that needs to be checked/tested. That is the Pickup Coil.
Sometimes when these age, the Pickup Coil can also develop some higher resistance and not provide a good signal to the module. Again, use your Ohm meter to check this from the leads for the Pickup Coil, coming out of the distributor.
Resistance spec for it s 130 to 180 Ohms. Just like on testing the ignition coil, if it's on the high side towards the 180 mark cold, it's probably failing. Best thing to do in such a case is replace the whole distributor, as you are likely to have other worn or failing parts in it.
Here's the correct distributor for a '78: https://www.rockauto.com/en/catalog/...stributor,7108
There is also an air gap spec on the Pickup Coil. If the gap is too wide, again the coil may not be generating enough signal to properly trigger the module.
The spec is 0.008" to 0.016", or 0.2mm to 0.4mm. I have mine set right in the middle of the spec at 0.012". Gap should be measured as shown in this picture:
http://www.offroadforum.cz/toyota/aa...DJUSTMENT.html
One of the "vanes" on the rotor shaft has to be lined up directly with the center face of the coil.
You are supposed to use non-magnetic (brass, plastic or paper) feeler gauges to set this gap, because the magnet in the coil could affect the feel of the "drag" when you move the feeler gauge to check it.
I just use a thick business card, because they are usually right at 0.012" thick. You can also use a dollar bill folded into three layers. The paper in a dollar bill is 0.004" thick, so three layers gives you 0.012".
If you have to adjust the gap, loosen the hold-down screws in the coils baseplate, make sure the "vane" is lined up as described, put in your "gauge" & move the coil towards the vane. It should be close enough to have light contact & slight drag on your "gauge" when you move it.
Make sure you hold it still while you retighten the hold-down screws, then check the gap again after you tighten the screws, to make sure it didn't move.
Last edited by 13Swords; Mar 30, 2020 at 06:42 AM.
Mar 31, 2020 | 05:13 PM
#15
Thread Starter
Registered User
Joined: Sep 2019
Posts: 42
Likes: 0
My distributor us remanufactured from oriley but the pickup coil in it looks old. The wire insulation looks old and they had been cut and spliced at some point. Theres shrink wrap on the wires inside the distributor. Ive been thinking about geting a new coil but the autoparts stores dont sell them. Just a whole distributor. Also, my truck came with a points distributor, i got the electronic one when I put on the GM module on. The coil I have now is stock for a 77 pickup... But would a coil for the points system be the same as the electronic system... I assume it is the same?
Mar 31, 2020 | 05:21 PM
#16
Thread Starter
Registered User
Joined: Sep 2019
Posts: 42
Likes: 0
I used a IR thermometer to see the carb temp, it was around 120-130 F. Later I put in a plastic spacer, its made by redline but im not sure its phenolic, the part number is 99005.119. It will be fine either way.
Also the temp of my ignition coil was 140F and the primary resistance jumped between 7 and 2.9 ohms. It was connected to the circuit though, I'll check it again or just replace it.
Also the temp of my ignition coil was 140F and the primary resistance jumped between 7 and 2.9 ohms. It was connected to the circuit though, I'll check it again or just replace it.
Apr 1, 2020 | 06:40 AM
#17
Registered User
Joined: Jun 2016
Posts: 719
Likes: 190
From: Florida
I really don't want to get out of line here, but you aren't following what recommendations & instructions I have been giving you. I specifically said that the ignition coil has to be disconnected from the circuit entirely to get an accurate resistance test reading. Trying to measure the ignition coil resistance without disconnecting it is useless & tells you nothing.
I advised you to test the pickup coil for resistance. Where are those results?
I advised you to check the air gap on the pickup coil. No info provided.
Just saying the pickup coil in the distributor looks old or has spliced wires doesn't mean it's malfunctioning or out of spec. Test it and know for sure.
Even if it is bad there are replacements available here: https://www.rockauto.com/en/catalog/...ckup+coil,7176
"The coil I have now is stock for a 77 pickup... But would a coil for the points system be the same as the electronic system... I assume it is the same?"
If you mean ignition coil and NOT pickup coil, yes, the ignition coil specs are all the same for 1975 to 1979 truck, points or electronic ignition. The only difference is that there should not be a ballast resistor in the ignition circuit for the electronic ignition.
Apr 1, 2020 | 08:54 AM
#18
Thread Starter
Registered User
Joined: Sep 2019
Posts: 42
Likes: 0
I apologize, I've been trying to do all this while working and using my truck for work, so I just did a quick check when stopped, didn't have much time to disassemble anything. But i will check those specs, I've gotta check them cold and hot, but when my trucks hot im on the clock.
Apr 1, 2020 | 10:43 AM
#19
Thread Starter
Registered User
Joined: Sep 2019
Posts: 42
Likes: 0
Ok, my pickup coil air gap is good at .12. The resistance is 162 ohms cold and 182 ohms hot. I unplugged the wires from the ignition module and measured from there.
I'm replacibg the coil with a UC12 anyway.
I'm replacibg the coil with a UC12 anyway.
Last edited by CMiller; Apr 1, 2020 at 10:44 AM.

Thread
Thread Starter
Forum
Replies
Last Post


