system install in my rig '95 4Runner
 05-20-2007, 06:59 PM
#1
Registered User
Thread Starter

Join Date: Jul 2006
Posts: 124
Likes: 0
Received 0 Likes
on
0 Posts
system install in my rig '95 4Runner
Well, I asked for some advice on putting everything in and having it well hidden and I did some checking and this is what I came up with. I think it works pretty well. I have been running it for several weeks to test it under live terms. It doesn't overheat as of yet and I don't think my play will overheat it.
Here is what I have gotten to put in my rig:
Sony HU - CDX-GT200 - It is a cheap model that plays one CD at a time (that's all I can listen to myself), but it has an aux input on the front that I can put my XM SkyFi2. That was my main concern.
Profile - AP1040 - 80w X 4 @ 4 ohms
Profile - AP1200 - 200w X 2 @ 4ohms
Polk Audio - DB400 - 4" two way drivers for the front
Polk Audio - DB6500 - 6.5" component drivers with crossover
Pyle Pro 1080/4 - 10", 80 Oz. magnet, 2.5" VC in ported box tuned to 34 Hz.
I have an Alpine digital signal processor with surround sound, EQ, and subwoofer controller which I decided to leave out so it is for sale. It was over $550 new and I will let it go for $300 OBO.
Here are some pics:
This is the front speaker.

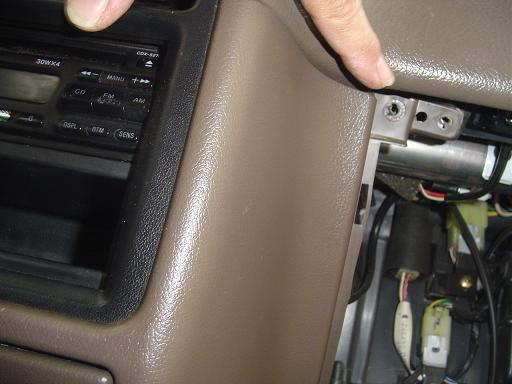
This is the bolt you need to take off after you remove the left side (under steering wheel), the glove box and the lower center console. The center section will be held on by snap clips. Remove the AC dial/slide tabs and pull the center section.

You now have access to the radio's four screws that hold it on. Below shows the stock connectors that you should get an adapter to plug right in so you don't have to hack into your harness.

Here is what I have gotten to put in my rig:
Sony HU - CDX-GT200 - It is a cheap model that plays one CD at a time (that's all I can listen to myself), but it has an aux input on the front that I can put my XM SkyFi2. That was my main concern.
Profile - AP1040 - 80w X 4 @ 4 ohms
Profile - AP1200 - 200w X 2 @ 4ohms
Polk Audio - DB400 - 4" two way drivers for the front
Polk Audio - DB6500 - 6.5" component drivers with crossover
Pyle Pro 1080/4 - 10", 80 Oz. magnet, 2.5" VC in ported box tuned to 34 Hz.
I have an Alpine digital signal processor with surround sound, EQ, and subwoofer controller which I decided to leave out so it is for sale. It was over $550 new and I will let it go for $300 OBO.
Here are some pics:
This is the front speaker.

This is the bolt you need to take off after you remove the left side (under steering wheel), the glove box and the lower center console. The center section will be held on by snap clips. Remove the AC dial/slide tabs and pull the center section.
You now have access to the radio's four screws that hold it on. Below shows the stock connectors that you should get an adapter to plug right in so you don't have to hack into your harness.

Last edited by OSIRIS; 05-20-2007 at 07:02 PM.
 05-20-2007, 07:20 PM
#2
Registered User
Thread Starter
Join Date: Jul 2006
Posts: 124
Likes: 0
Received 0 Likes
on
0 Posts
This is my new deck. My old one was attempted to be stolen, but they just busted up a lot of buttons and really just crapped out anyway. It was about 13 years old. My Orion old school HCCA-250A amp was stolen with my Pyle 8" woofers in their little box was taken too. I had it set up in a quick disconnect set up with the amp on top of the box and all I had to do was plug in power, ground, remoter turn-on and RCAs and it would be set up. Only problem with that is, it is that simple for someone else to unplug and remove it in one full swoop. Well, I didn't have very much in those, $200 maybe over 12 years ago, so it wasn't that much of a hit, but more of an annoyance because that Orion is competition quality and they don't make 'em like that anymore. If you get one off ebay, you'll definitely like it. Bumpin'Yota probably knows these amps. Anyway, here goes.
HU - Sony. You either love 'em or hate 'em. Just like everything else I guess.
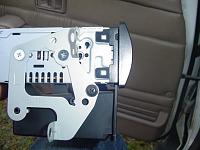
This is the bracket that the Sony HU will bolt straight up to that bolts to the center console in the 4Runner.
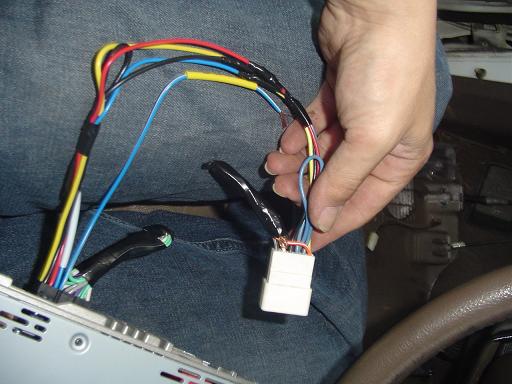
This is the adapter that comes with the HU from Crutchfield.

This is the new HU installed and the center console replaced. It comes out just a little, but the outer edge of the deck's front face pops off and it fits snug right in the center console.

HU - Sony. You either love 'em or hate 'em. Just like everything else I guess.
This is the bracket that the Sony HU will bolt straight up to that bolts to the center console in the 4Runner.

This is the adapter that comes with the HU from Crutchfield.
This is the new HU installed and the center console replaced. It comes out just a little, but the outer edge of the deck's front face pops off and it fits snug right in the center console.
 05-20-2007, 07:45 PM
#3
Registered User
Thread Starter
Join Date: Jul 2006
Posts: 124
Likes: 0
Received 0 Likes
on
0 Posts
In the back, I did not want to lose my rear cargo area, but I wanted to be able to put in subs. I did not want to bolt my amps to the back of the rear seats like others had and the amps were too big go under the front seats. So I came up with this.
I installed my two amps in the rear boxes behind the rear access panels. I took out the entire rear panels so if anyone has questions about that I have experience. It is pretty easy.
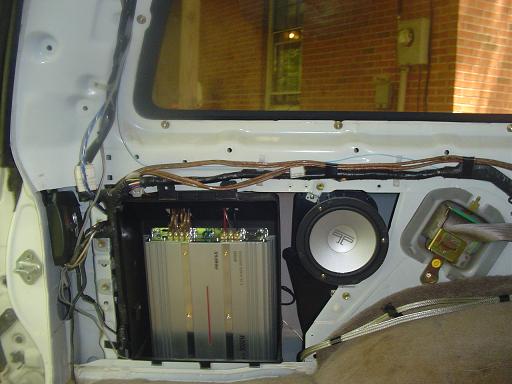
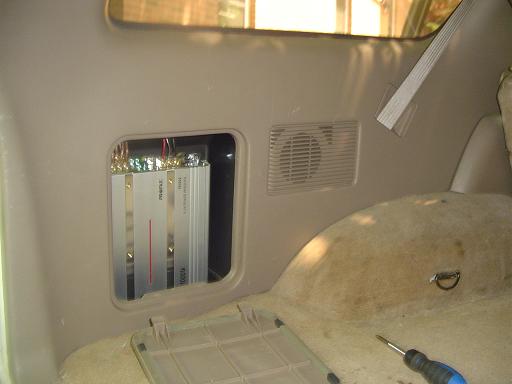
Here is my 4 channel amp installed and wired. I cut holes in the top and bottom to run the power and speaker wires. On the right, you will see the DB6500 woofer.
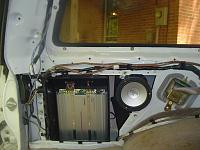
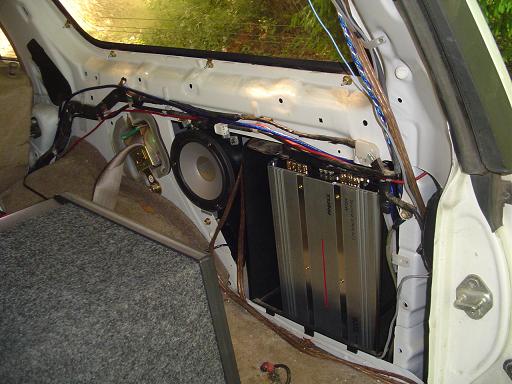
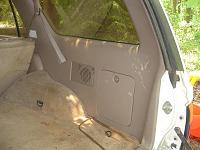
Here is the sub amp on the right side of the car. It too has only big enough holes for the wires to fit through. The sub's wires come through the bottom of the panel and that is all.

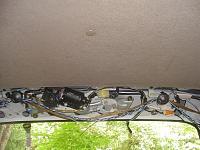
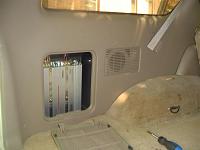
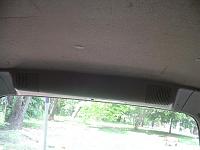
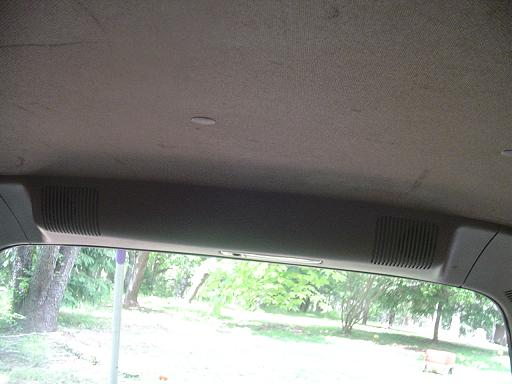
These are the tweeters in the rear of the cargo area.
I installed my two amps in the rear boxes behind the rear access panels. I took out the entire rear panels so if anyone has questions about that I have experience. It is pretty easy.
Here is my 4 channel amp installed and wired. I cut holes in the top and bottom to run the power and speaker wires. On the right, you will see the DB6500 woofer.
Here is the sub amp on the right side of the car. It too has only big enough holes for the wires to fit through. The sub's wires come through the bottom of the panel and that is all.
These are the tweeters in the rear of the cargo area.
 05-20-2007, 08:06 PM
#5
Registered User
Thread Starter
Join Date: Jul 2006
Posts: 124
Likes: 0
Received 0 Likes
on
0 Posts
Well, here are shots of the completed rear cargo area. It seems to work well. If you look at the right rear panel, you will see the sub's wires coming out to hook into the subs. This is all that is taking up the rear cargo area. I can unhook the subs, tie off the connections to prevent shorts and have full use of the rear cargo space.
4 channel amp exposed.
right rear panel, completed. notice the sub speaker wires coming out.
The rear tweeters w/ cover. All speakers were in stock locations and my goal of having the appearance of everything looking stock, except for the HU and a box of subs in the back.
I think this works well for me. I don't play my music for anyone else, but I will say it does shake the entire car and plays very loud and most important for me, very clean and crisp. With the basslink up front, I can adjust the bass to the subs right there and so with different styles of music I can adjust it to optimum sound quality and liking. Not like that is something special that nobody else has, but I like that.
I got all this for under $1,000. Only had my woofers, but I can still do it for the same price if I had to get them also.
The Pyles are only $60 for a pair of 10's and you can get a 4'x8' sheet of MFD for $20.
Any way. This is it. I did it all myself and it was fun getting it in there.
Now, on to my BudBuilt skid plates and belly pan install!!
Osiris
4 channel amp exposed.
right rear panel, completed. notice the sub speaker wires coming out.

The rear tweeters w/ cover. All speakers were in stock locations and my goal of having the appearance of everything looking stock, except for the HU and a box of subs in the back.
I think this works well for me. I don't play my music for anyone else, but I will say it does shake the entire car and plays very loud and most important for me, very clean and crisp. With the basslink up front, I can adjust the bass to the subs right there and so with different styles of music I can adjust it to optimum sound quality and liking. Not like that is something special that nobody else has, but I like that.
I got all this for under $1,000. Only had my woofers, but I can still do it for the same price if I had to get them also.
The Pyles are only $60 for a pair of 10's and you can get a 4'x8' sheet of MFD for $20.
Any way. This is it. I did it all myself and it was fun getting it in there.
Now, on to my BudBuilt skid plates and belly pan install!!
Osiris
05-21-2007, 12:36 PM
#6
Registered User
Join Date: May 2007
Location: New Braunfels, TX
Posts: 15
Likes: 0
Received 0 Likes
on
0 Posts
looks good. only suggestion i would make is instead of having the speaker wires coming out of the side compartment, run them under the carpet and cut a small slice to poke them through where the subs sit. then you won't have any wires exposed.
05-22-2007, 10:20 AM
#7
Registered User
Thread Starter
Join Date: Jul 2006
Posts: 124
Likes: 0
Received 0 Likes
on
0 Posts
That is a good thought. I don't like cutting into the carpet and such. Having these speaker wires here is ok. I can just wind them up and set them on the the side. If I had them coming up in the middle of the floor, then there wouldn't be anyway to move them out of the way when I have to carry a motor or something else back there.
Trending Topics
05-27-2007, 09:13 PM
#8
Registered User

Yup hcca's are nice amps i actually have a 225 and a 250.... sucks to hear yours was stolen... they were about 800 new... can find em on ebay from 100-200...
clean set up.
clean set up.
05-27-2007, 10:06 PM
#9
Registered User
Join Date: Apr 2007
Location: Sacramento, CA (Carmichael)
Posts: 1,056
Likes: 0
Received 5 Likes
on
2 Posts
That's very clean. I like it. The real challenge would be to make the sub look factory. But that's hard to do with a properly tuned box. Does your runner have one of the rear cargo covers?
08-09-2007, 10:06 AM
#10
Registered User
Join Date: Apr 2007
Location: Valencia, California
Posts: 1,301
Likes: 0
Received 3 Likes
on
3 Posts
damn osiris, ive been looking for you haha!
im planning on doing my speakers, but it looks like a big job (im not too savvy). ill add you to contacts, but let me tell you what i have.
lol, maybe if you live in/near los angeles you can help me?
i have a headunit single cd player etc.and total factory speakers.
ive heard soo much different opinions on these speakers.
i heard that they are "individually amped. (i think thats why you put 2 amps in, but i got another question, you put those in the little storage areas in the back of the runner right?
i think you have to take out the whole inside paneling to do this, but i dont know how? ok i think i can take out hte glove box and the other thing, but with some help from the manual of from you. i dont understand what to disconnect, cut, and connect. i saw you took out the middle? why did you do that?
ill get back to you to help me, because i could fill up pages of this haha.
08-09-2007, 10:53 AM
#11
Contributing Member
Join Date: Mar 2003
Location: COTKU,Ontario,Canada
Posts: 11,334
Likes: 0
Received 0 Likes
on
0 Posts
Damn Ossiris! Very very nice and clean install!
Sound quality... exactly what I am planning for in my install.
Do you find you get a lot of interferrence from those heavy plastic grills?
As an idea for the back sub box connection why not put a Kellon [sp?] plug in the side wall? It would be a very clean look and could mascarade as an aux power outlet for stealth purposes.
Just an idea...
08-09-2007, 05:45 PM
#12
Registered User
Thread Starter
Join Date: Jul 2006
Posts: 124
Likes: 0
Received 0 Likes
on
0 Posts
Thank you. Now I need to get replacement inner panels at least in the rear because I scarred them up so much when I would haul motorcycle parts and motors around.
Yep, there's a way to have excellent sound quality, and loudness on a budget if you have an open mind.
What heavy plastic grills? I don't have big, gold teefs???? I did not use any grills for the speakers. The speakers are in the factory locations and the stock grills posed no harm or interferrence to the Polks. I got the DB400 for the front, but notice the DB401 is also offered. The only difference is the tweeter on the 401s is liquid cooled and can handle an extra 40 watts RMS or so. I have not had any problems with them and I am pushing 80 watts RMS to them. Crutchfield said there was a clearance issue with the front speakers. The tweeter stuck out too far and would come in contact with the stock speaker grill. It did not.
That is a great idea! I don't know what a Kellon plug is, but I can put any type of dual connection plug there to unplug when I want to remove the box. That would alleviate any potential for shorting the amp with the wires left untouched on the side. Thanks.
Osiris
Yep, there's a way to have excellent sound quality, and loudness on a budget if you have an open mind.
I did not use any grills for the speakers. The speakers are in the factory locations and the stock grills posed no harm or interferrence to the Polks. I got the DB400 for the front, but notice the DB401 is also offered. The only difference is the tweeter on the 401s is liquid cooled and can handle an extra 40 watts RMS or so. I have not had any problems with them and I am pushing 80 watts RMS to them. Crutchfield said there was a clearance issue with the front speakers. The tweeter stuck out too far and would come in contact with the stock speaker grill. It did not.Osiris
08-09-2007, 06:22 PM
#13
Registered User
Thread Starter
Join Date: Jul 2006
Posts: 124
Likes: 0
Received 0 Likes
on
0 Posts
damn osiris, ive been looking for you haha!
im planning on doing my speakers, but it looks like a big job (im not too savvy). ill add you to contacts, but let me tell you what i have.
lol, maybe if you live in/near los angeles you can help me?
i have a headunit single cd player etc.and total factory speakers.
ive heard soo much different opinions on these speakers.
i heard that they are "individually amped. (i think thats why you put 2 amps in, but i got another question, you put those in the little storage areas in the back of the runner right?
i think you have to take out the whole inside paneling to do this, but i dont know how? ok i think i can take out hte glove box and the other thing, but with some help from the manual of from you. i dont understand what to disconnect, cut, and connect. i saw you took out the middle? why did you do that?
ill get back to you to help me, because i could fill up pages of this haha.
im planning on doing my speakers, but it looks like a big job (im not too savvy). ill add you to contacts, but let me tell you what i have.
lol, maybe if you live in/near los angeles you can help me?
i have a headunit single cd player etc.and total factory speakers.
ive heard soo much different opinions on these speakers.
i heard that they are "individually amped. (i think thats why you put 2 amps in, but i got another question, you put those in the little storage areas in the back of the runner right?
i think you have to take out the whole inside paneling to do this, but i dont know how? ok i think i can take out hte glove box and the other thing, but with some help from the manual of from you. i dont understand what to disconnect, cut, and connect. i saw you took out the middle? why did you do that?
ill get back to you to help me, because i could fill up pages of this haha.
I believe the stock speakers in the rear had a little amp in the box they were in. That is not why I have two amps though. One amp is a 4 channel amp that powers the fronts and rears speakers. The other amp is a 2 channel amp that powers the subwoofers.
Yes, I put the amps in the storage compartments in the rear of the 4runner. I put them in with the speaker, power and fuse connections facing up so if you take off the access door, and you have a blown fuse for some reason, you can change it without taking the entire side panel off. All of the settings for the amp is down in the bottom, so you need to hook everything up and do some dry runs with the settings done while you have access and then put them all together and put up the panels.
Dealing with the panels to replace your stereo is pretty easy as well as the rear panels in the back of the 4Runner. The front driver panel has maybe 5-6 screws to take out and it will fall down. I let it rest on the floor because the gas lever and hood lever are connected to it and it is a pain to try to remove them, so just let it sit there out of the way on the floor. There are two screws holding the left front speaker on. Then on the right side, open the glove box. There are 3-4 screws at the top of the box and 2-3 screws below the box to remove it. You will need to disconnect the glove box light as you take it off as well as the speaker connection. The right speaker is connected to the glove box. There is one screw under where the glove box covers up top (pointed out in one of my pictures). You need to remove that screw. You will need to remove the lower center panel which rests on the center floor under the radio console. It is held on by two pop-type rivots. Just take a pin or screwdriver and push the center part in and pop it out. There is one on each side. Then remove the slide knobs and pull the center bezel out. It just pops right in and very easy to remove. The aircon stuff will come with it, no problem. You need to unhook the clock and one other thing I think. The radio will be in plain view for you to change out. There are four screws that hold the entire bracket that the radio is connected to. Remove the four screws and unplug the radio from the stock connections. Install the new radio to the radio bracket and connect the radio wire adapter to the back of the stereo and plug it into the connections in the car. Now start connecting all the pieces back together. You are done. I did my radio to car adapter before I removed any panels. It takes about 30-40 minutes to change out the radio for a new one if you have all the wiring done and it is just a swap and plug deal.
I can help you out. Whatever you need, but this reply is getting too loooonnnnggggg and I am getting tired.
later,
Osiris
08-10-2007, 08:32 AM
#14
Contributing Member
Join Date: Mar 2003
Location: COTKU,Ontario,Canada
Posts: 11,334
Likes: 0
Received 0 Likes
on
0 Posts
My bad it was Cannon not Kennon. here is a link for you to a supplier
http://www.e-sonic.com/aboutus/cat/C...ctors%2030.pdf
If it works you want to look at pg 298pdf. I think the one that will work best for you is the model 14s-7 or some similar model.
If the link does not work go to www.electrosonic.com and click on the catalogue under sec. C scroll down to connectors and select MS (mil spec).
These are the same kind of conectors used in the military and aviation fields and will provide, I think, a very unique and stealthy install. I plan to use them for my bass tube connection when I get around to it.
Hope this helped you
Prost Aviator
Edit: Just tried the first link... it works. YEA!
08-10-2007, 09:54 AM
#15
Registered User
Join Date: Apr 2007
Location: Valencia, California
Posts: 1,301
Likes: 0
Received 3 Likes
on
3 Posts
i went to the site where you got those 4'' speakers (the polk audio) and then i searched for the 6.5 and now i see thats what you have done. i heard polk is good, its rated better than kenwood on the site.
your setup is golden. EXCELLENT pricing on the speakers, and amp, and i found my own set of 2, 12'' mtx subs WITH A BOX for 130 bucks! crutchfield is from heaven!to your help.
your setup is golden. EXCELLENT pricing on the speakers, and amp, and i found my own set of 2, 12'' mtx subs WITH A BOX for 130 bucks! crutchfield is from heaven!to your help.
Last edited by infiltrator; 08-12-2007 at 06:40 PM.
08-11-2007, 10:35 AM
#16
Registered User
Join Date: Apr 2007
Location: Valencia, California
Posts: 1,301
Likes: 0
Received 3 Likes
on
3 Posts
i also wanted to note that crutchfield.com will give you 6 1/2 inch back speakers and include mounting brackets and harnesses as well as directions for installatoin for free! if you put in your car and year.
total with 4'' front speakers and 6 1/2 inch back speakers comes to just over 120 bucks. thats a steal!!!!!
i know i need wiring now. i talked to the tech chat support guy and he said i need a "dual amp wiring kit" and its 120 bucks but looks great.
http://www.crutchfield.com/S-DIv9Yxg...t&i=575CP4DCKS
in your post you said you can change the power of the subs from the drivers seat how???
Last edited by infiltrator; 08-12-2007 at 06:42 PM.
08-12-2007, 02:53 PM
#17
Registered User
Join Date: Apr 2007
Location: Valencia, California
Posts: 1,301
Likes: 0
Received 3 Likes
on
3 Posts
osiris, you still didnt tell me how to take off the back paneling. but you can help me with that later, i still need to buy those speakers, and sub and maybe that wiring kit. (link here: http://www.crutchfield.com/S-DIv9Yxg...t&i=575CP4DCKS)
do you have to wire anything from the front speakers to the back? i think i know how to wire the 2 channel amp to the subs doesnt look hard. still stumped on the tweeters. do they make a big difference?
sorry for the 10,000 questions.
do you have to wire anything from the front speakers to the back? i think i know how to wire the 2 channel amp to the subs doesnt look hard. still stumped on the tweeters. do they make a big difference?
sorry for the 10,000 questions.
Last edited by infiltrator; 08-12-2007 at 06:43 PM.
08-13-2007, 06:18 AM
#18
Registered User
Thread Starter
Join Date: Jul 2006
Posts: 124
Likes: 0
Received 0 Likes
on
0 Posts
Check on the wiring kit. You can get what you need for $20 and not $120. I'll find it for you.
Here you go. http://www.knukonceptz.com/productMa...lation%20Kits#
Go to the bottom and you will want the 7th and 8th kits. One is for the 2 channel amp (subs) and the other is for the 4 channel amp (fronts/rears). It's under $60 for the two of them. Half of Crutchfield. Get everything else from Crutchfield except the wiring. Heck tell crutchfield that you can get two wiring kits, one for a 2 channel and one for a 4 channel amp and see if they will match it. The worst they will say is no. They will still help you even if you don't buy everything from them.
As far as the rear speakers go. Did you get the 6.5 component speakers, where you have a 6.5 woofer and a seperate tweeter?
The speaker adapters they give you are ones that go in the door I think, but I made them work. They gave me them also. I took the old speakers out and took the brackets off of the old speaker box and connected them to the new speaker adapter and installed them that way. You will have to look at that and check out my picture of the rear area to see how it turned out for me.
The rear panels come out like this. The bottom plastic piece that goes across the carpet has to come out first, 5 screws under round covers. Then the top part is just snapped in. Slide your fingers under the rubber window surround as you are sitting inside the back facing rear. You will pull down starting at one side and moving to the other side. then pull the front part down after the back half is pulled out. The wiring for the rear hatch light will be the only thing holding on to it. Just undo the quick disconnect. You will see a screw on each side at the top. That screw is the only screw that holds the side panels on in the rear. All the other connectors that hold the panel on are pop connectors. Now go the the rear seats. Pull up the rear seat and undo the seat belt (14MM bolt). take out the floor panel (3 screws). Then let the seat back down to open the entire back of the car. Remove the rounded plastic side piece that has the seatback hook coming out of it. Just reach your hand around it and pull out and over the hook. You may not think it will make it, but it will. You won't break it. Then you need to take off the seatbelt rest hook. It it connected by a screw and the screw is hidden by a little square cover. Pop off the square cover with a little screw driver and under screw it off. Then you have the panels connected to the sides by pop connectors all the way around. Start at the bottom and the front. Pop them off and work your way to the back. You do not want to pull them all the way off just yet. Just pop them out and let the panel stay right where it is. After you pop all of them off, you go to the back of the car and pull the bottom of the panel to the middle of the car and the top will come down and you can remove it from the back. It sounds more complicated than it is. Just doing it will make what I am saying more understandable. You may want to print this out and read it as you stand with the car so you can see the part I am trying to describe and remove.
Yes, you need to wire the front speakers to the 4 channel amp. The rear speakers (6.5 components) have a crossover. You will send the speaker wire from the 4 channel amp to the crossover and then the crossover will have one set of wires going to the woofer and one set of wires going to the tweeter.
Osiris
08-13-2007, 10:56 AM
#19
Registered User
Join Date: Apr 2007
Location: Valencia, California
Posts: 1,301
Likes: 0
Received 3 Likes
on
3 Posts
heres what i plan to buy
speakers
http://www.crutchfield.com/S-h2jxeol...lay=Polk+Audio
http://www.crutchfield.com/S-h2jxeol...lay=Polk+Audio
subs
http://www.crutchfield.com/S-1ibSgDw...&pg=2&sortBy=3
and heres where it gets complicated. i talked to a service guy on crutchfield for this amp here. he liked my setup so far but had concerns with my amps.
http://www.crutchfield.com/S-Y6WfE7K...40&i=489AP1040
he said that 80 wats for those speakers (35 watt max in front, and 60 watt max in back) is way too much power. he gave me a link to some pioneer amplifiers.
http://www.crutchfield.com/cgi-bin/P...p?i=130gm4300F
http://www.crutchfield.com/cgi-bin/P...p?i=130GM5300T
but in previous forums, people say pioneer has good hu, but not good quality of sound. this is what he suggested me, but should i just go for the profile, but maybe find one that has lower wattage per speaker?
maybe this 60 watt per speaker, its the lowest 4 channel that they have.
http://www.crutchfield.com/S-K5i7X9X...ile&i=489AP740
what do you think?
ps. i have no clue on how to go about wiring speakers from the front to the back. would i just have to tear up the floor? or is there some clever way?
thanks for the wiring kit!
Last edited by infiltrator; 08-13-2007 at 11:00 AM.
08-14-2007, 05:58 AM
#20
Registered User
Thread Starter
Join Date: Jul 2006
Posts: 124
Likes: 0
Received 0 Likes
on
0 Posts
You could go with these. http://www.crutchfield.com/S-oKzRwER...200&I=107DB401
They have the liquid cooled tweeter and handle 45 RMS watts.
The price is $80, but you get 1/2 price on another set of polks when you buy one set. So if you buy the DB6500 at $150 and add $40 for these (1/2 price), then you are spending $190.00. Much better sound for your dollar. You were spending $110-$120.
http://www.crutchfield.com/S-oKzRwER...10&I=107DB6500
They are separate woofers and tweeters so you can put the woofers in the stock location in the sides and the tweeters will go in the stock tweeter location in the top back facing the front. Much better sound clarity and location.
subs
and heres where it gets complicated. i talked to a service guy on crutchfield for this amp here. he liked my setup so far but had concerns with my amps.
http://www.crutchfield.com/S-Y6WfE7K...40&i=489AP1040
he said that 80 wats for those speakers (35 watt max in front, and 60 watt max in back) is way too much power. he gave me a link to some pioneer amplifiers.
http://www.crutchfield.com/cgi-bin/P...p?i=130gm4300F
http://www.crutchfield.com/cgi-bin/P...p?i=130GM5300T
but in previous forums, people say pioneer has good hu, but not good quality of sound. this is what he suggested me, but should i just go for the profile, but maybe find one that has lower wattage per speaker?
maybe this 60 watt per speaker, its the lowest 4 channel that they have.
http://www.crutchfield.com/S-K5i7X9X...ile&i=489AP740
what do you think?
If you go with the db400 & db650, then stick with the 740 and AP1000 amp for the subs. You may find that the POLKS will sound under powered compared to the sub and you may have to work with getting them to sound good. You may have the bass over powering the other speakers and you want them to mesh together.
I suggest the db401 & db6500 (notice extra '0') with the AP1040 amp for front and rears and the AP1200 amp with the MTX box. The difference between the AP1000 and AP1200 is not much (160 vs. 200), but the AP1200 has the 'wired bass level remote control'. You run the line up to the front and you can adjust the subs bass level right at your front seat. You set the subs to what you want as the maximum and then you can adjust the bass level down if it is too much for different types of music.
Left side of the car for speaker wiring and the right side of the car is for power.
I can send you pics of where to run the wiring to help you if you would like.
Osiris


