2nd Gen 4runner Front Bumper Build w/ CAD Files
 11-26-2020, 03:19 PM
#1
Registered User
Thread Starter
2nd Gen 4runner Front Bumper Build w/ CAD Files
EDIT APRIL 2022: I actually finished the bumper Spring of 2021 but never got around to updating anything.
**GRABCAD FILES: https://grabcad.com/library/toyota-4...en-1990-1995-1
(STEP Files added 4/9/22) Let me know if these links and downloads work. I'll fix them if not =)
Some finished pictures, but really were because I painted the hood: https://drive.google.com/drive/folde...Qq?usp=sharing
Will try to upload some final pics this weekend and then get back to updating the thread. /EDIT
Hi guys, and Happy Thanksgiving to everyone here in the U.S. I finally have some down time so I wanted to start a build thread for the front bumper I've been designing for the last month or so. I'd like to start by giving a shoutout to both Redeth's front bumper build, as well as that of Bandit Runner. Both of their builds/threads have heavily influenced my design and how I'd like to present it and format this thread. Ever since I bought my truck back in 2011 I've wanted to build a front bumper for it, but simply didn't have the means at the time. Well, fast forward nine years, and I now use SolidWorks daily and have access to a CNC laser cutter at work. So after finishing a rather large project for my boss, (and catching him in a good mood), I presented my idea and he agreed to let me cut my parts in exchange for the cost of material. Since he agreed I've spent just about every lunch hour drawing up and editing my design.
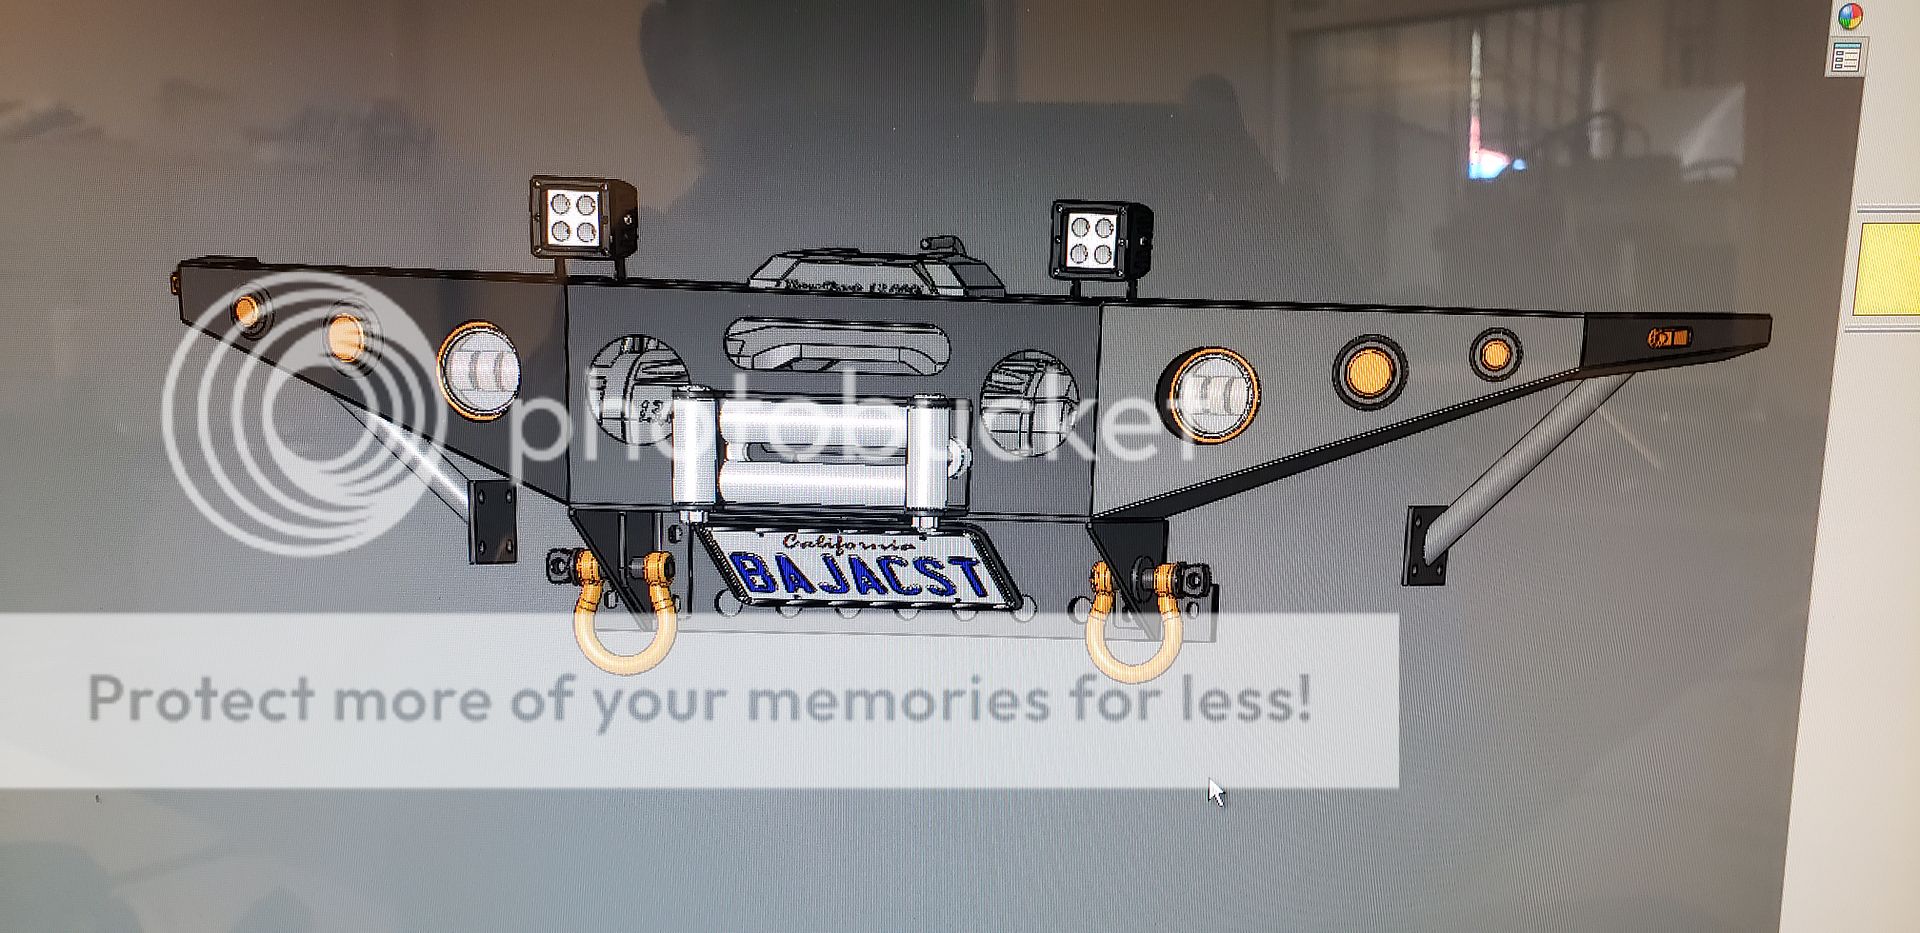
Below is what I have in CAD so far. I also plan on uploading all of my files to GrabCAD and posting the link here once I am completely done with this build, that way anyone can download them and tweak them to fit their application. I have gained a wealth of knowledge from this website and don't see any reason why not to give back.
And what I have physically done so far:

I have been able to print out profiles of each piece 1:1 on a D-sheet on our plotter at work, which I then cut out and glue to 1/8" MDF, and cut out with my jigsaw. It has worked pretty well so far and I have been able to get fairly accurate measurements this way. As of today I have the lower half of the bumper completely welded and mounted on my truck. I still need to make a small spacer/shim though for the driver side though, because the previous owner got in a front end collision and the frame is bent. The driver side front rail sits about a 1/4" further back than the passenger side... But I think it will be fine in the end.
**GRABCAD FILES: https://grabcad.com/library/toyota-4...en-1990-1995-1
(STEP Files added 4/9/22) Let me know if these links and downloads work. I'll fix them if not =)
Some finished pictures, but really were because I painted the hood: https://drive.google.com/drive/folde...Qq?usp=sharing
Will try to upload some final pics this weekend and then get back to updating the thread. /EDIT
Hi guys, and Happy Thanksgiving to everyone here in the U.S. I finally have some down time so I wanted to start a build thread for the front bumper I've been designing for the last month or so. I'd like to start by giving a shoutout to both Redeth's front bumper build, as well as that of Bandit Runner. Both of their builds/threads have heavily influenced my design and how I'd like to present it and format this thread. Ever since I bought my truck back in 2011 I've wanted to build a front bumper for it, but simply didn't have the means at the time. Well, fast forward nine years, and I now use SolidWorks daily and have access to a CNC laser cutter at work. So after finishing a rather large project for my boss, (and catching him in a good mood), I presented my idea and he agreed to let me cut my parts in exchange for the cost of material. Since he agreed I've spent just about every lunch hour drawing up and editing my design.
Below is what I have in CAD so far. I also plan on uploading all of my files to GrabCAD and posting the link here once I am completely done with this build, that way anyone can download them and tweak them to fit their application. I have gained a wealth of knowledge from this website and don't see any reason why not to give back.
And what I have physically done so far:
I have been able to print out profiles of each piece 1:1 on a D-sheet on our plotter at work, which I then cut out and glue to 1/8" MDF, and cut out with my jigsaw. It has worked pretty well so far and I have been able to get fairly accurate measurements this way. As of today I have the lower half of the bumper completely welded and mounted on my truck. I still need to make a small spacer/shim though for the driver side though, because the previous owner got in a front end collision and the frame is bent. The driver side front rail sits about a 1/4" further back than the passenger side... But I think it will be fine in the end.
Last edited by ztbailey1; 06-08-2022 at 11:58 AM. Reason: update, added Google Drive link

The following users liked this post:
BPattOn (09-25-2021)
11-26-2020, 03:32 PM
#2
Registered User
Thread Starter
Early Prototyping/ Frame Brace
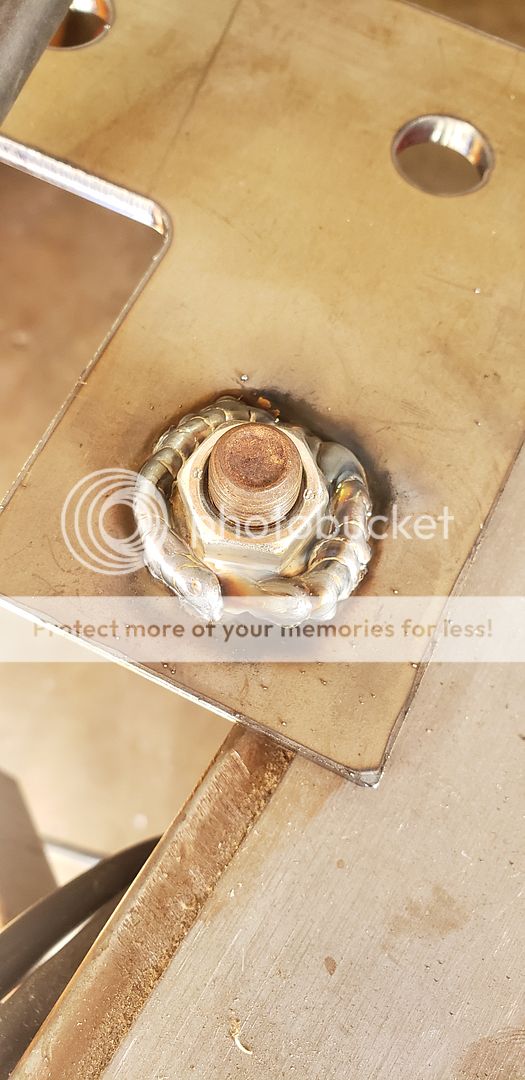
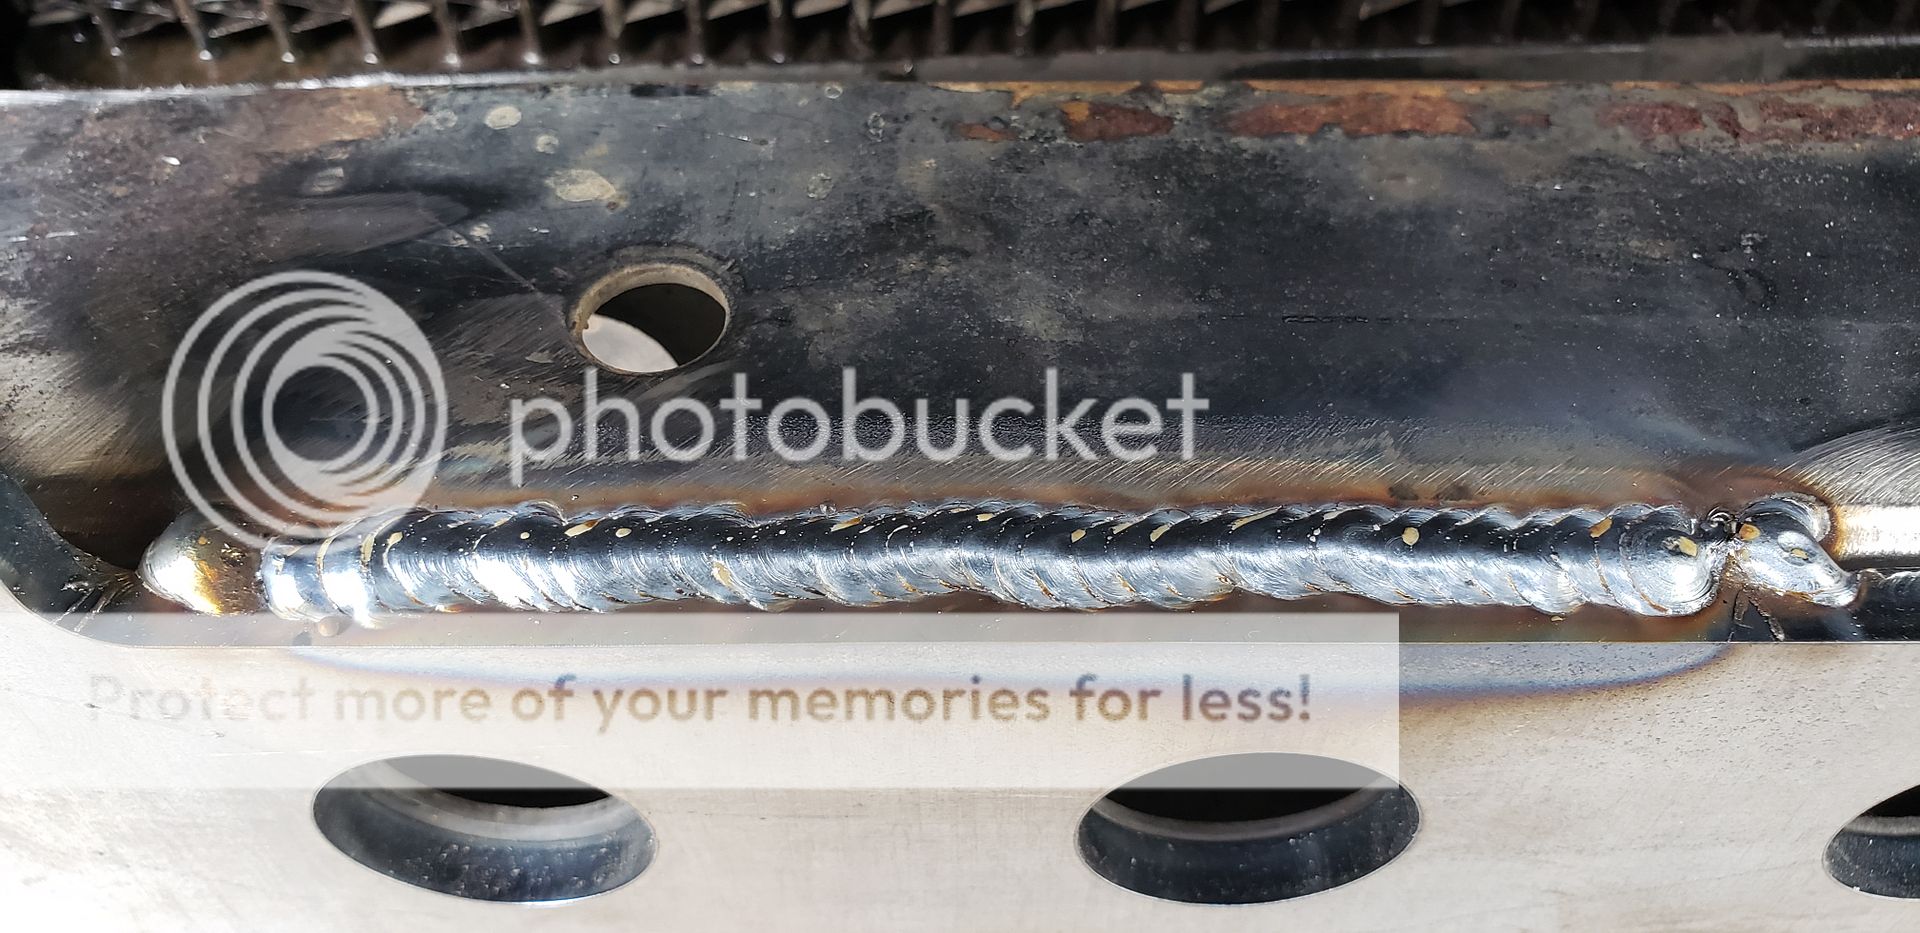
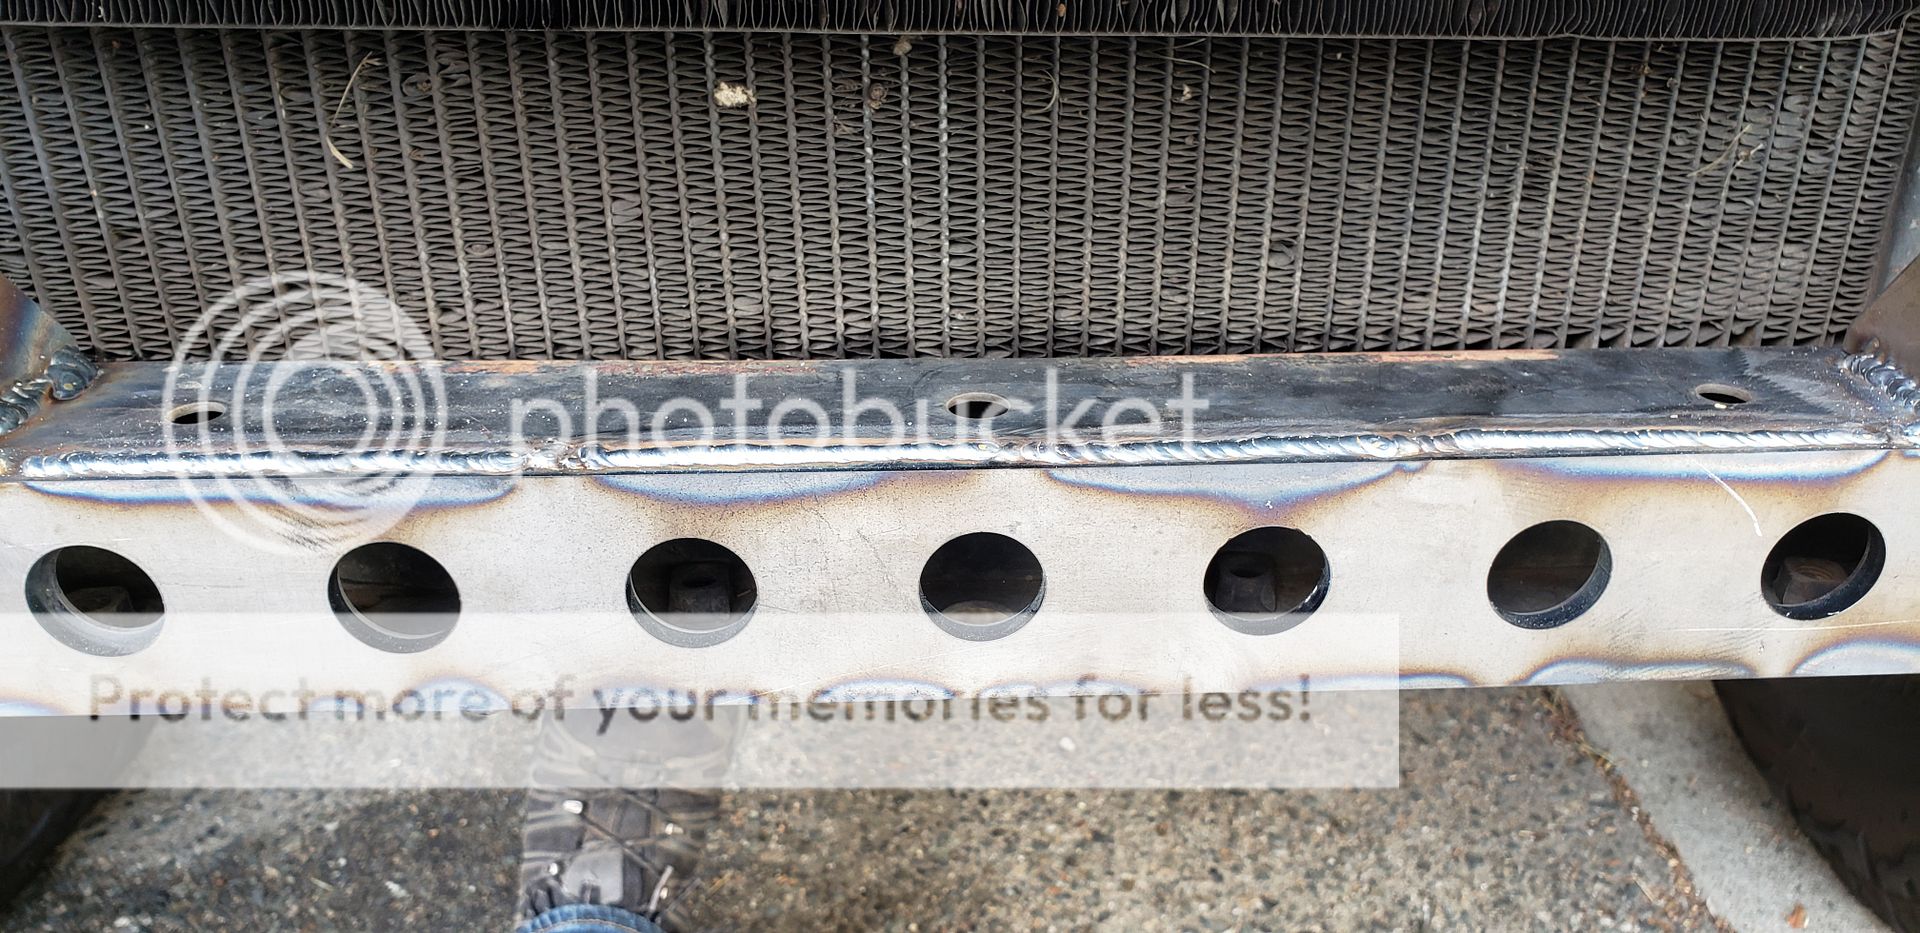
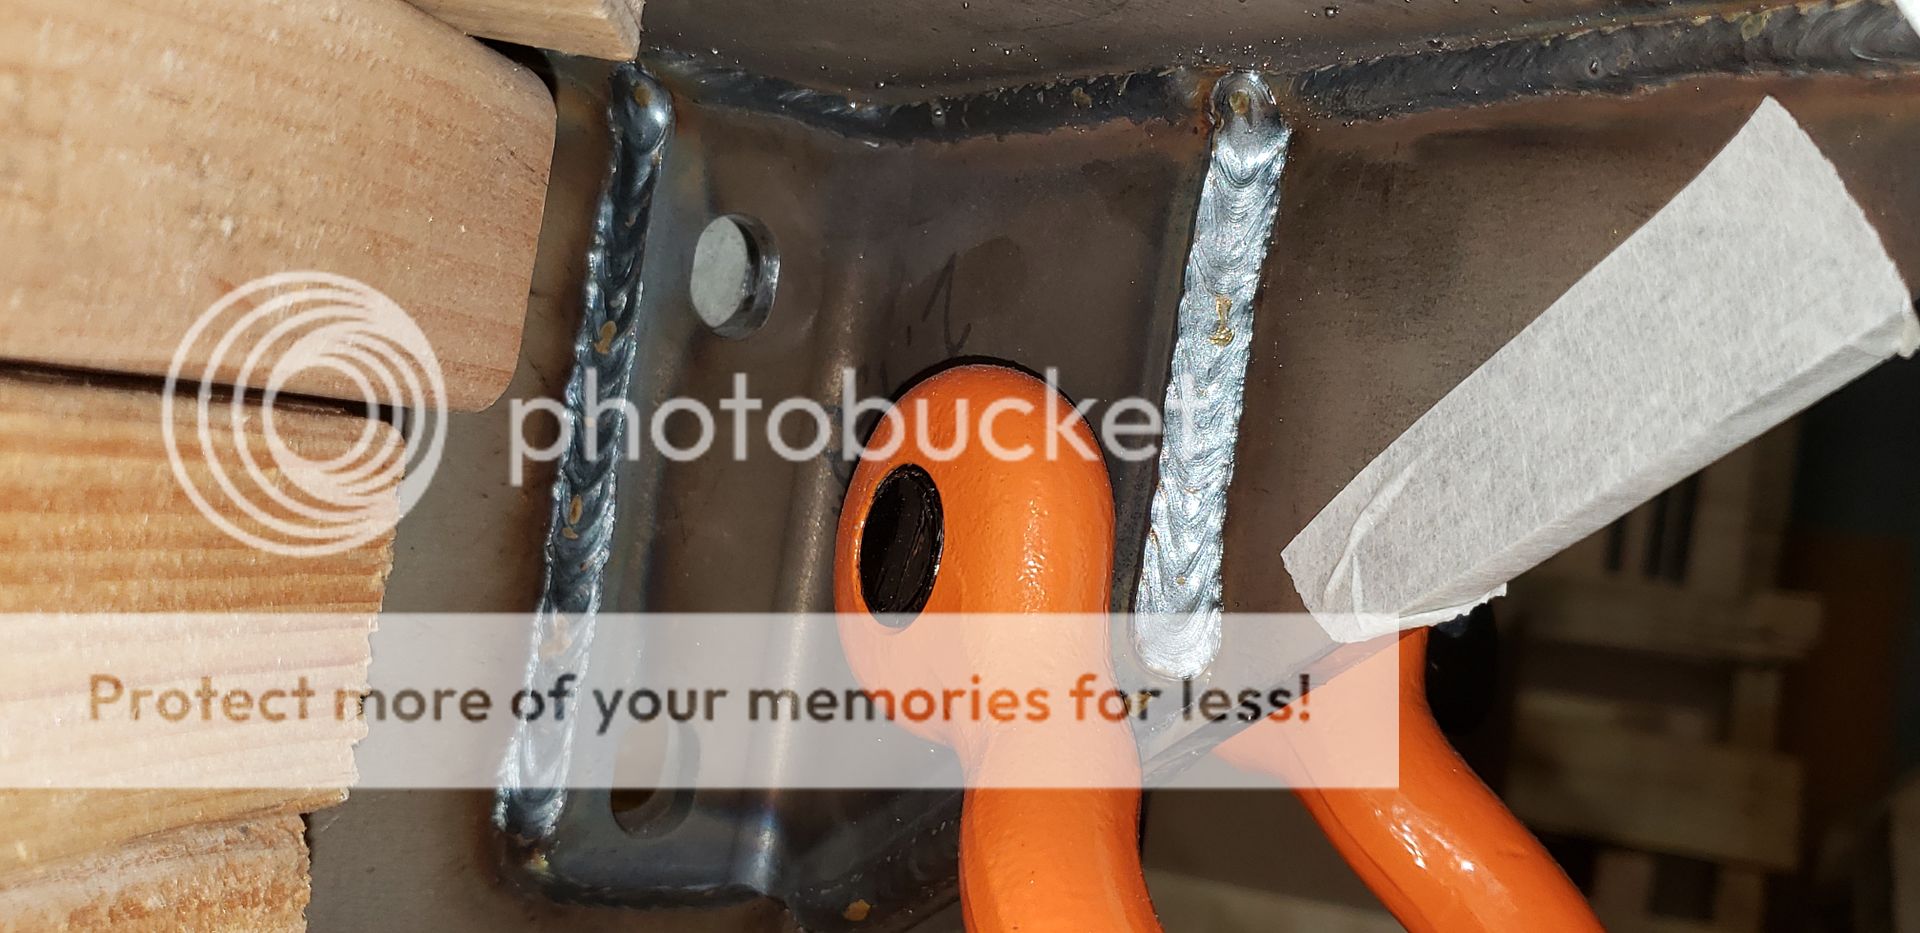
The first thing I did after I decided I was going to follow through with this build was draw up a frame support similar to that of Addicted Offroad or Yotamasters. After I got all the holes lined up how I wanted I had it cut from 1/4" plate and welded grade 8 nuts on the back for additional mounting points before welding it to the frame. I made sure to clean up the frame before welding the brace on, and I also added some 2" gussets to the rear. After the frame was cleaned up I bolted it on, tacked it, and then went full send. I'd say the welds turned out alright for a novice welder with a 120V Lincoln. Looking at the pictures again I think I'll make another pass on the gussets. Also feel free to critique, I'll take any constructive criticism


11-26-2020, 03:49 PM
#3
Registered User
Thread Starter
Early Prototyping- Lower Half/ Winch Mount
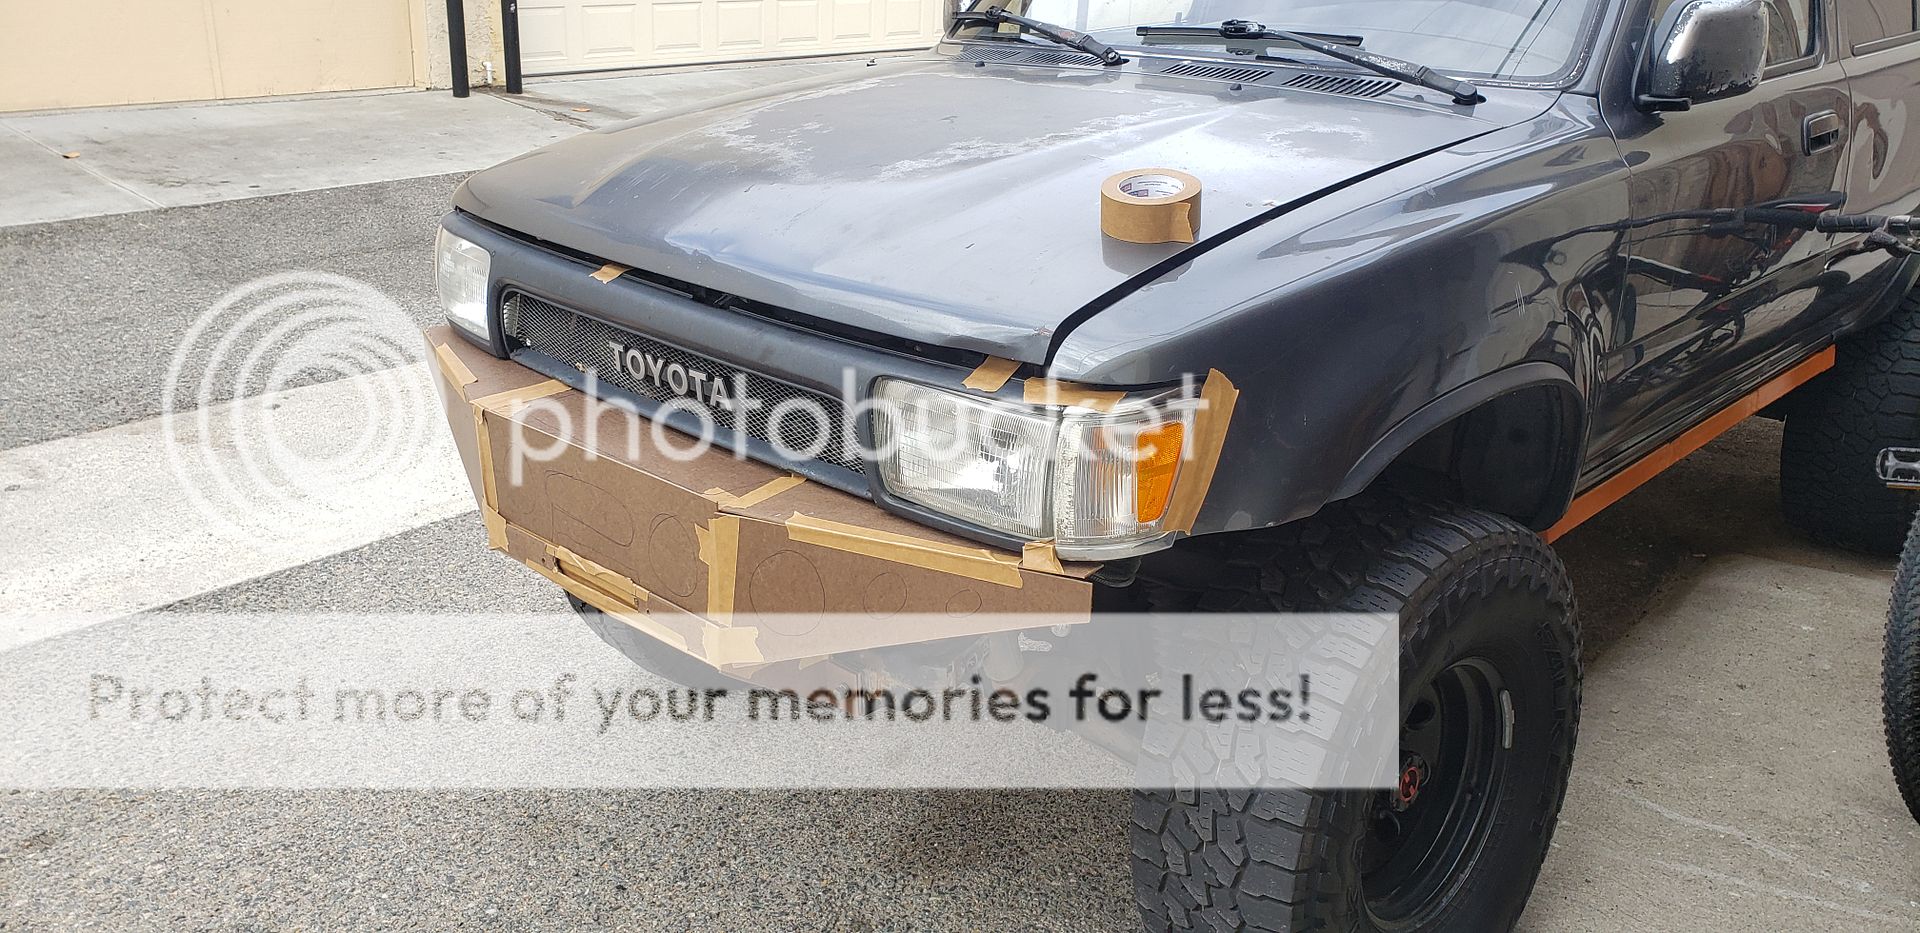
After I got the frame brace on I started with a straight-up rough cardstock mockup. This allowed me to get a starting point for my dimensions in every direction. I then began my CAD design, and ended up doing probably 3 or 4 mockups and design tweaks before I got it happy.
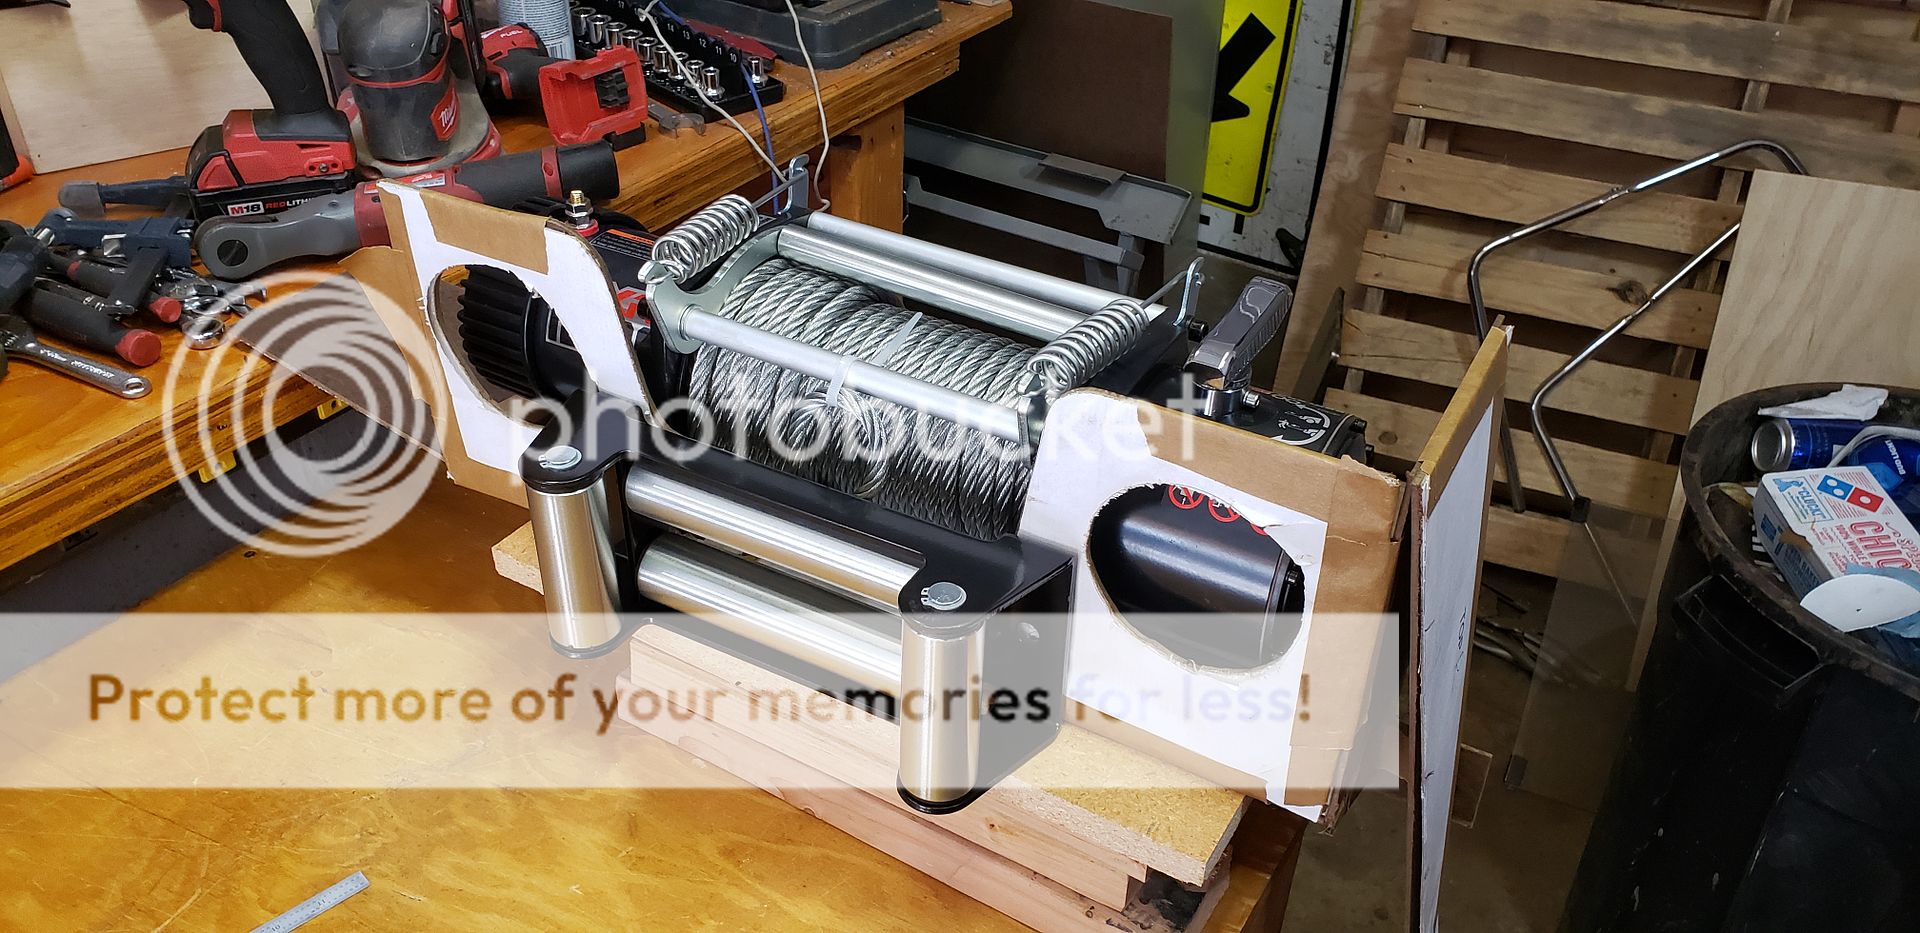
I even bought a winch from Harbor Freight, and compared its dimensions to those of WARN and Smittybilt, to help figure out fitment constraints. But don't worry, I have 90 days from the purchase date to return it. I may trust their hand tools, but if I'm ever in a spot where I NEED a winch, I want to be 100% confident that it will do its job. Plus I can't justify spending three or four hundred dollars for a winch to sit on a rig that is my daily driver and hardly sees dirt anymore...
On to the pictures!
Early mockup:

Early mockup:
Winch clearance:
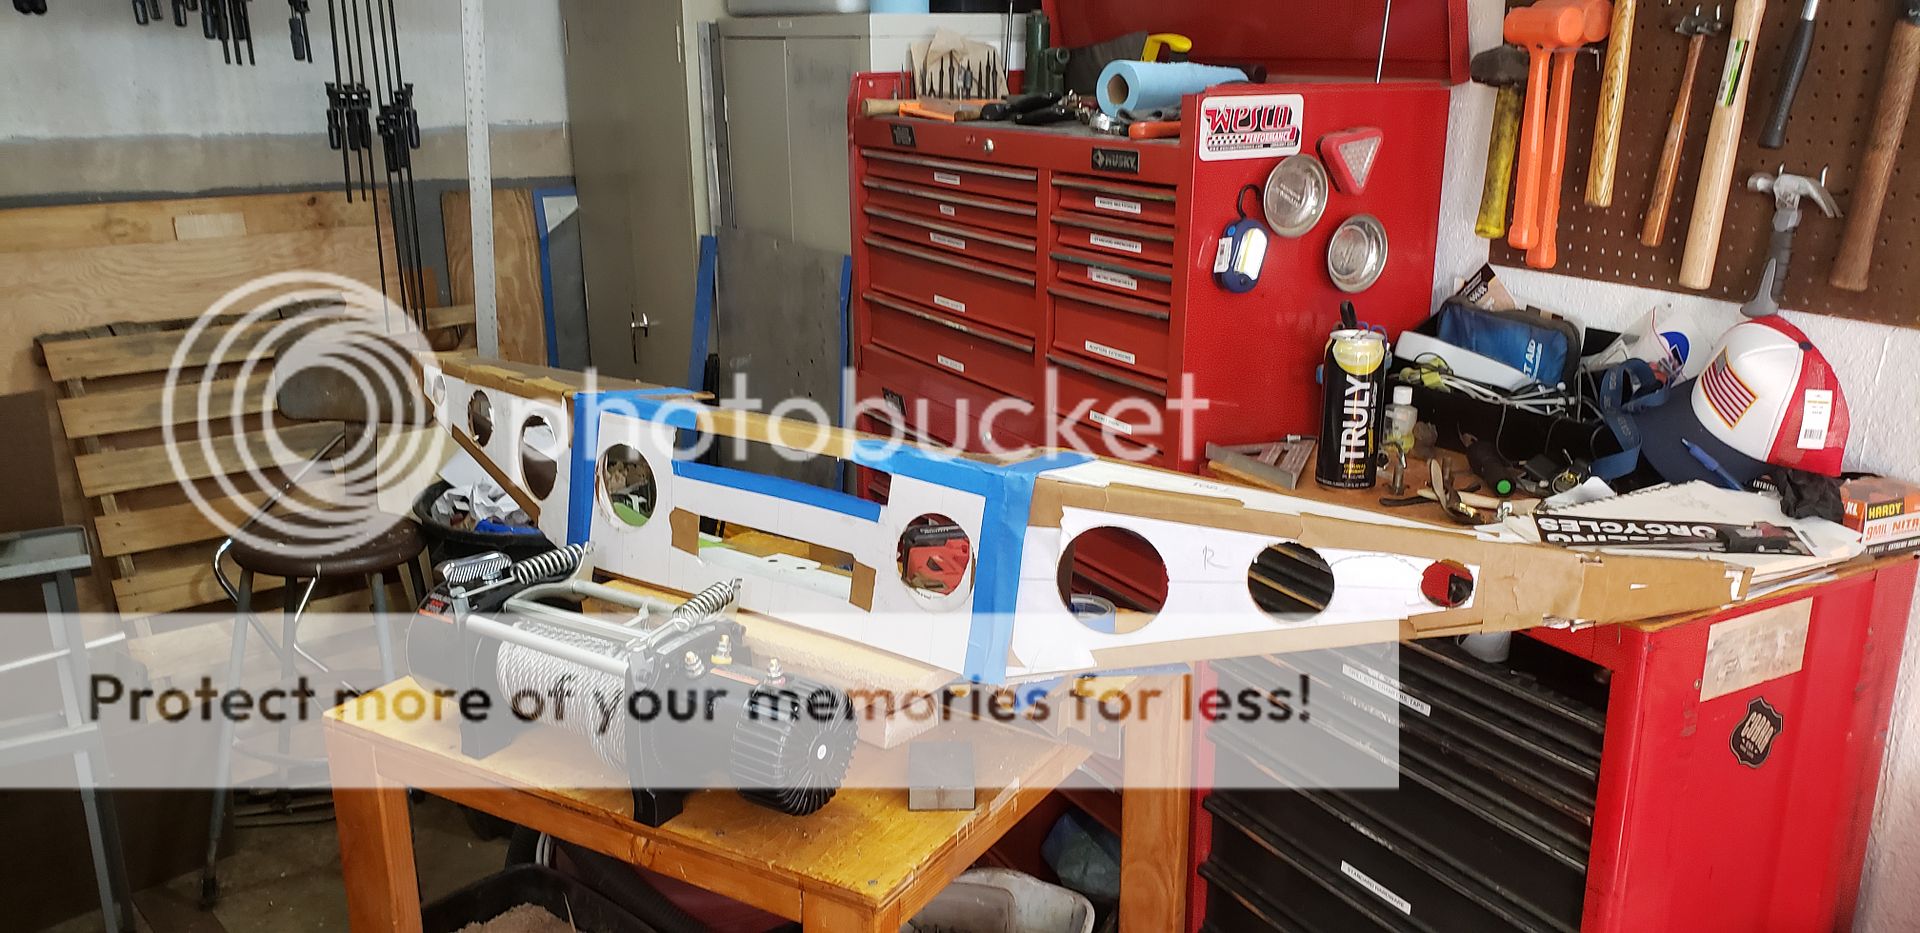
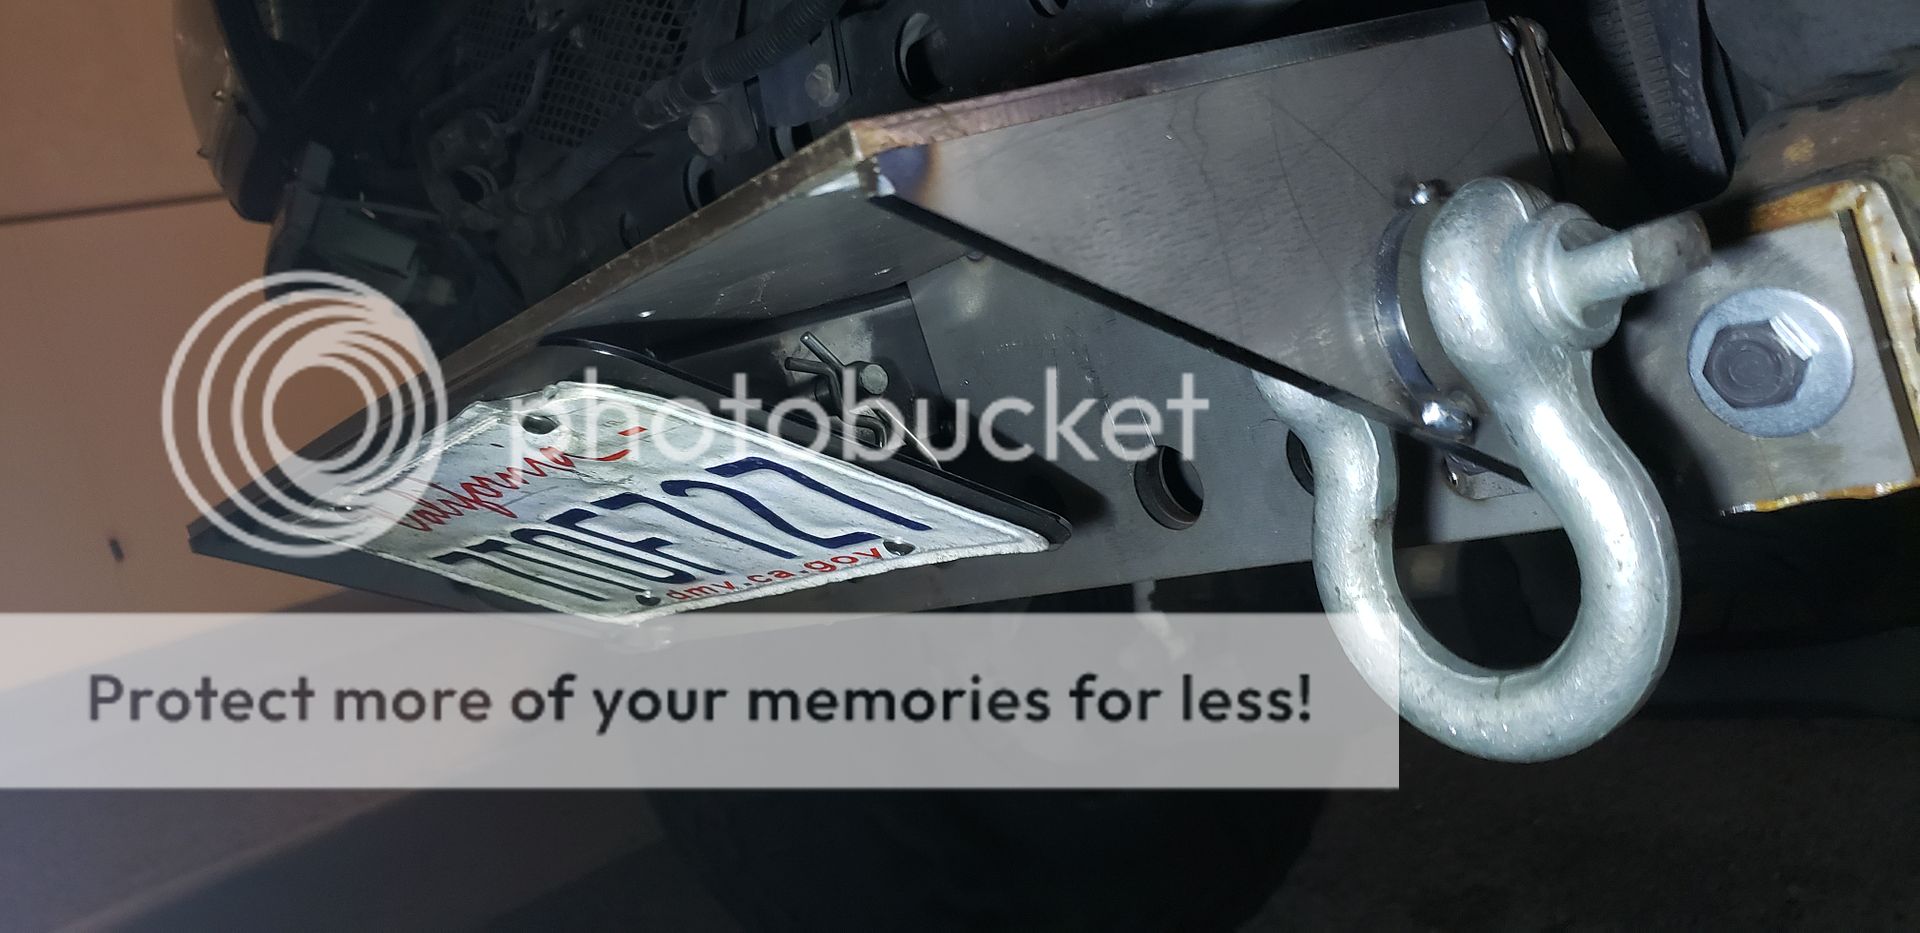
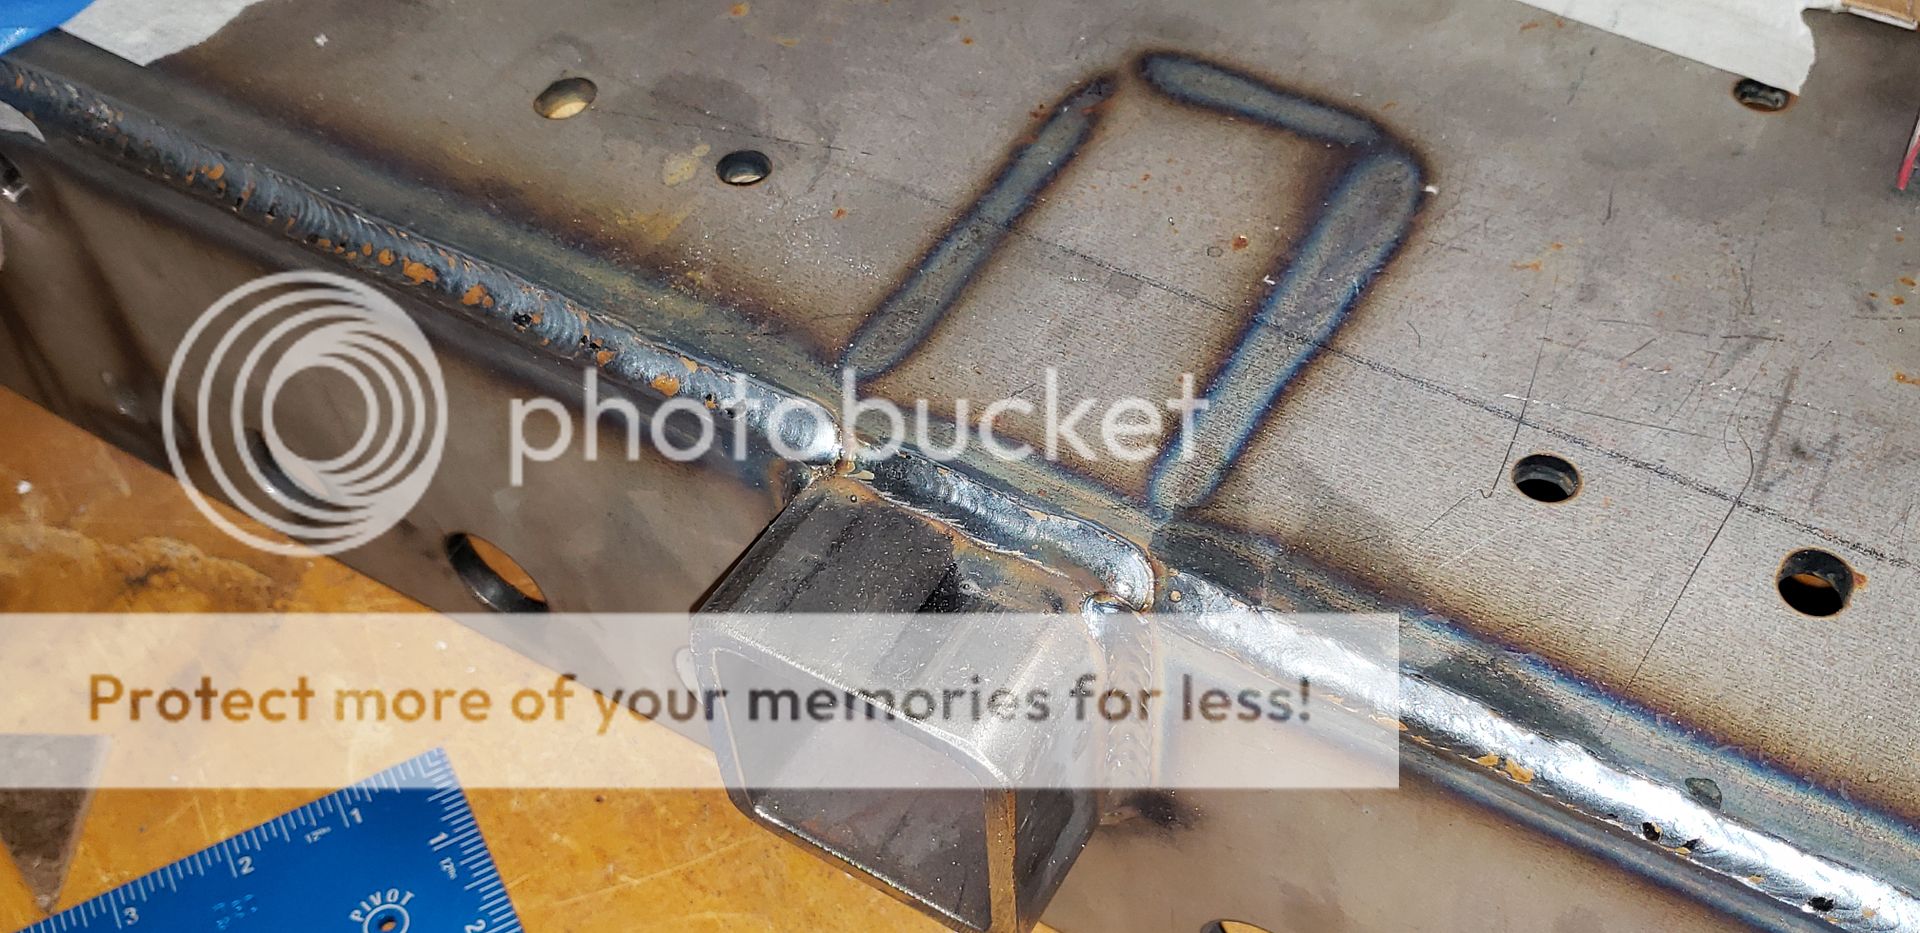
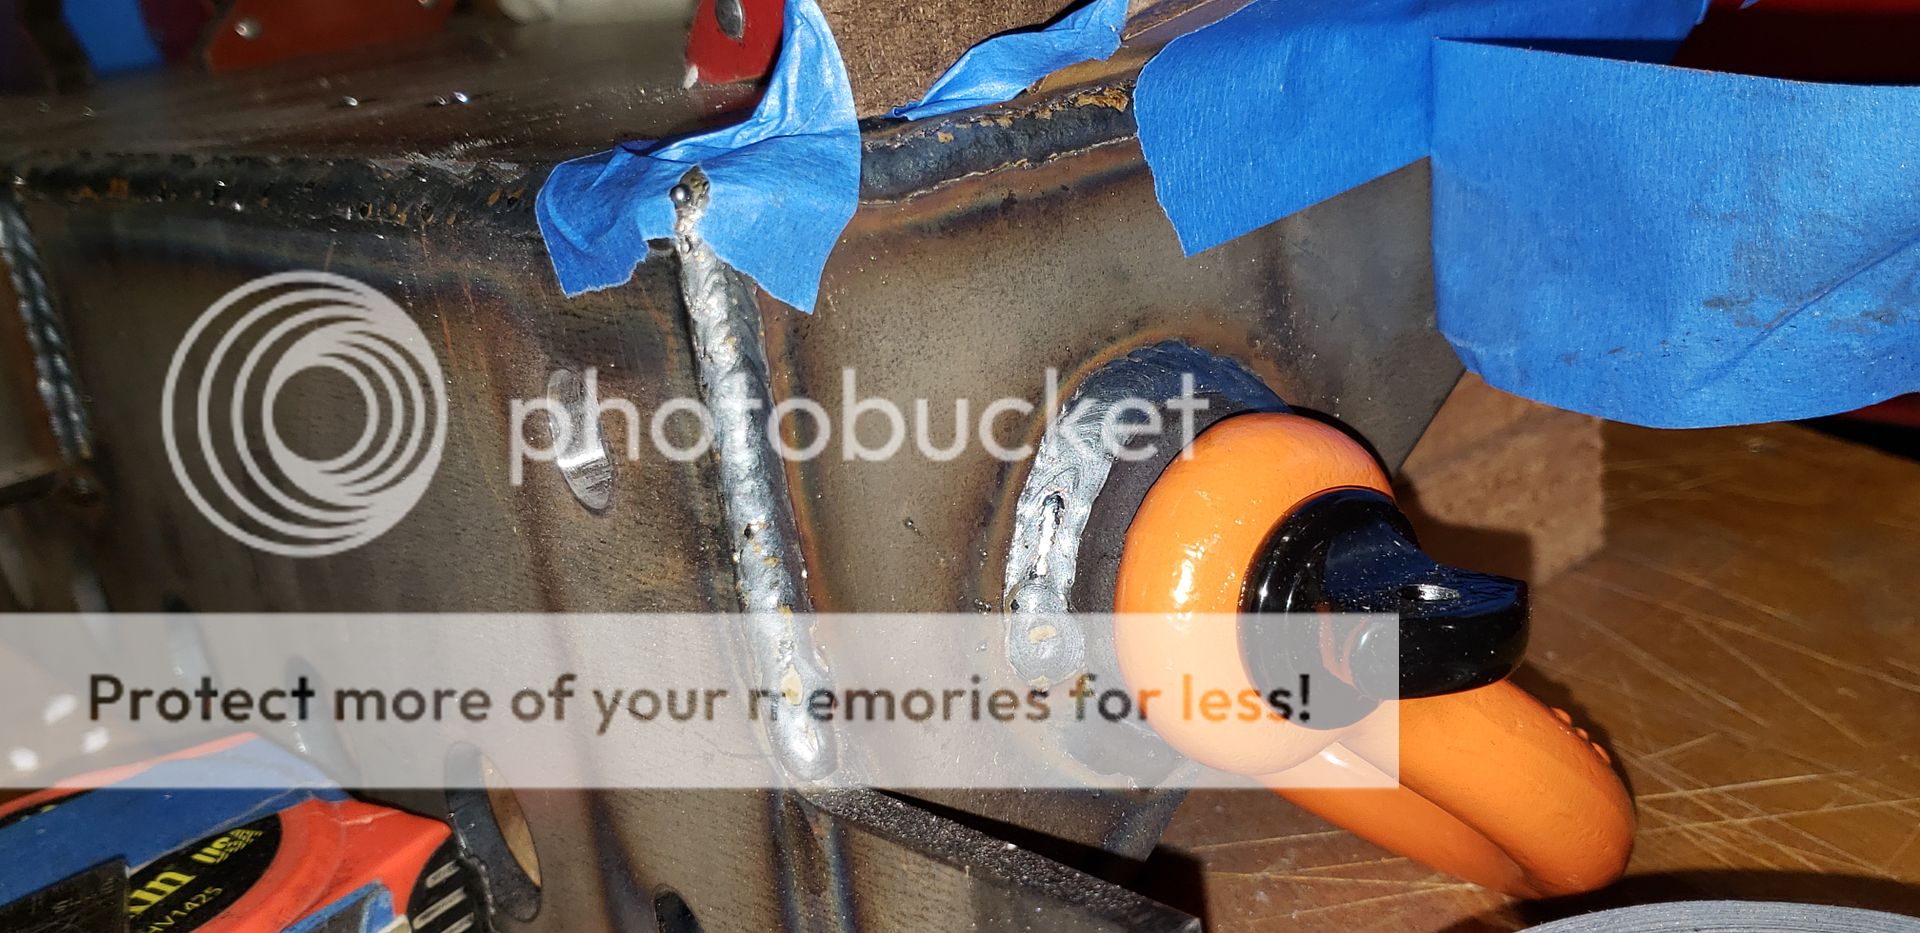
After some trial and error and getting everything lined up how I'd like, I had the lower pieces cut from 1/4" steel plate as well. I even designed a bent reinforcement to help tie the D-rings into the frame mounts.

_20201111_182031.jpg)
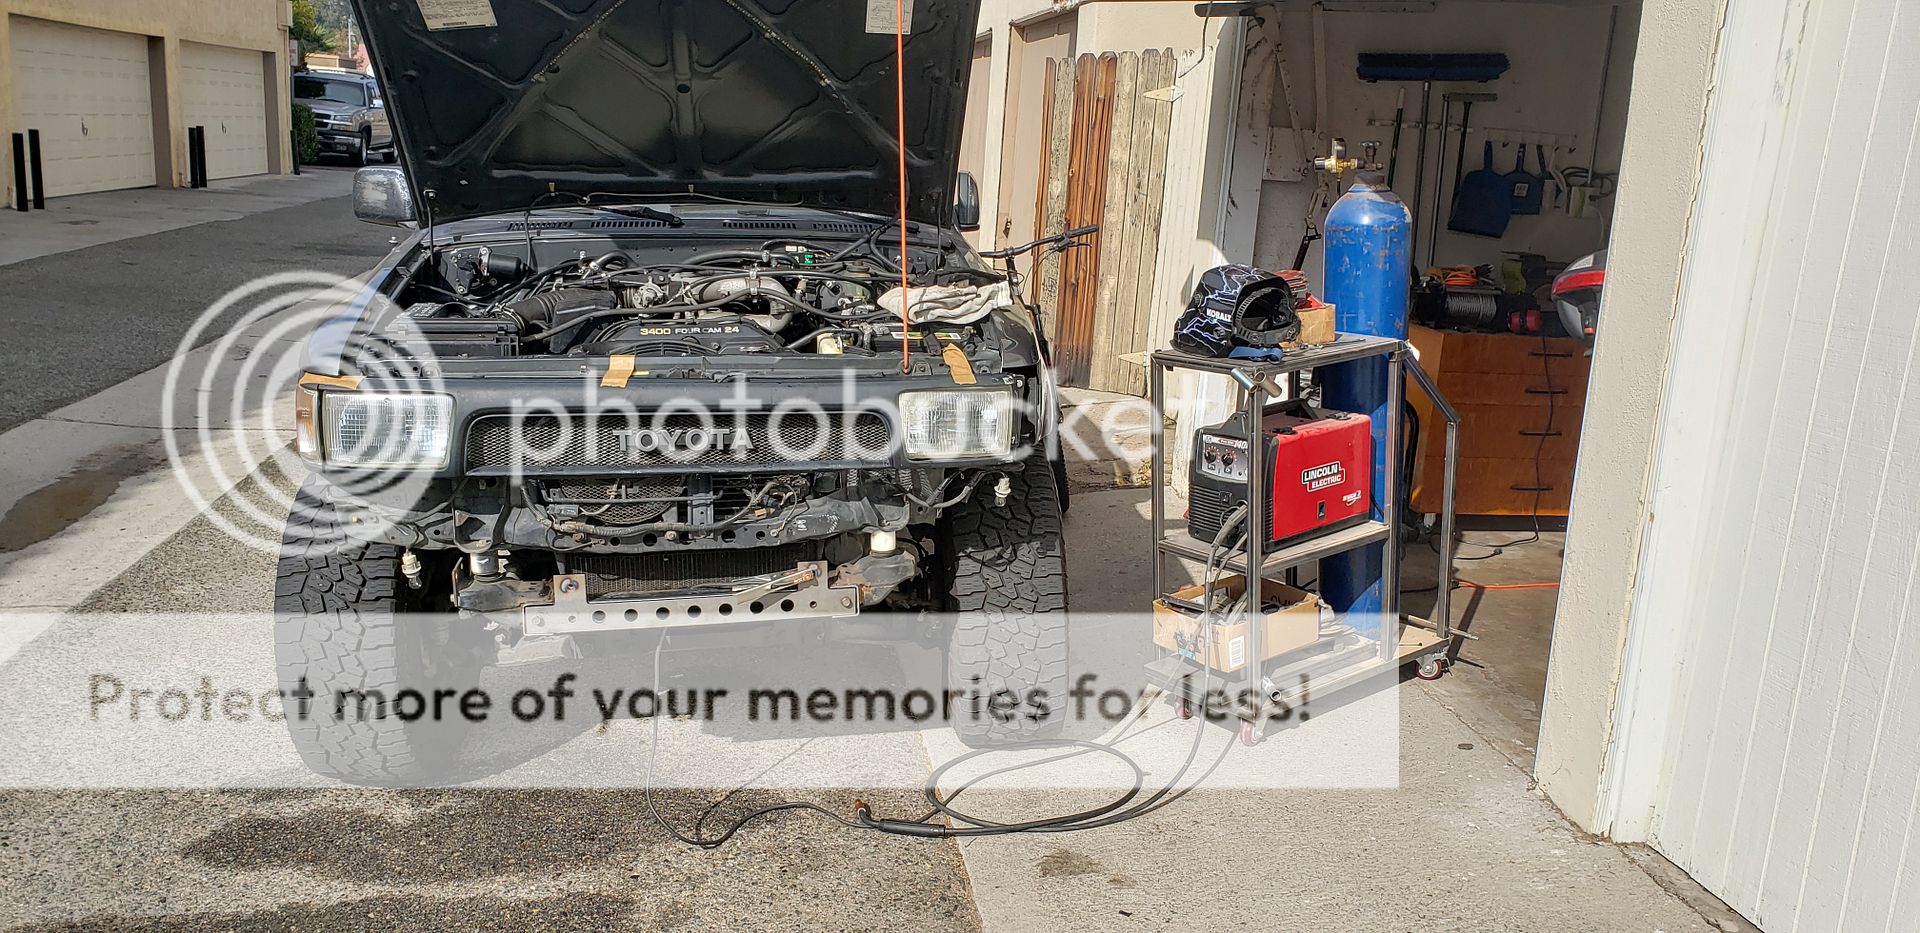
Once I had everything tacked up nicely, I had a guy at work weld everything together with one of the 220V welders we have. This is the most integral part of the bumper and I didn't want any weak points. Plus my 120V at home trips the breaker every few minutes...
I even bought a winch from Harbor Freight, and compared its dimensions to those of WARN and Smittybilt, to help figure out fitment constraints. But don't worry, I have 90 days from the purchase date to return it. I may trust their hand tools, but if I'm ever in a spot where I NEED a winch, I want to be 100% confident that it will do its job. Plus I can't justify spending three or four hundred dollars for a winch to sit on a rig that is my daily driver and hardly sees dirt anymore...
On to the pictures!
Early mockup:
Early mockup:
Winch clearance:
After some trial and error and getting everything lined up how I'd like, I had the lower pieces cut from 1/4" steel plate as well. I even designed a bent reinforcement to help tie the D-rings into the frame mounts.
Once I had everything tacked up nicely, I had a guy at work weld everything together with one of the 220V welders we have. This is the most integral part of the bumper and I didn't want any weak points. Plus my 120V at home trips the breaker every few minutes...
Last edited by ztbailey1; 11-28-2020 at 10:17 AM.
The following users liked this post:
SomedayJ (11-27-2020)
11-26-2020, 04:17 PM
#4
Registered User
Thread Starter
Fog lights, turn signals, and running lights.
One of the major steps on getting everything drawn to spec was figuring out which lights I wanted to run so I could figure out the necessary hole size for the grommets.
These are all the lights I ended up purchasing that I decided on actually using. And to be completely honest I also utilized Amazon's free return policy to order and return quite a few different lights so I could figure out exactly what I wanted...
(And no these are not affiliate links or anything, just want to share)
Side Marker Clearance Lights:
Outermost Clearance Lights (1-1/4"):
Middle Turn Signals (2"):
Fog Lights/Running Lights. These are actually direct replacements for J**Ps, but I like the Halo look and trust me when I say these are BRIGHT:
The lights:
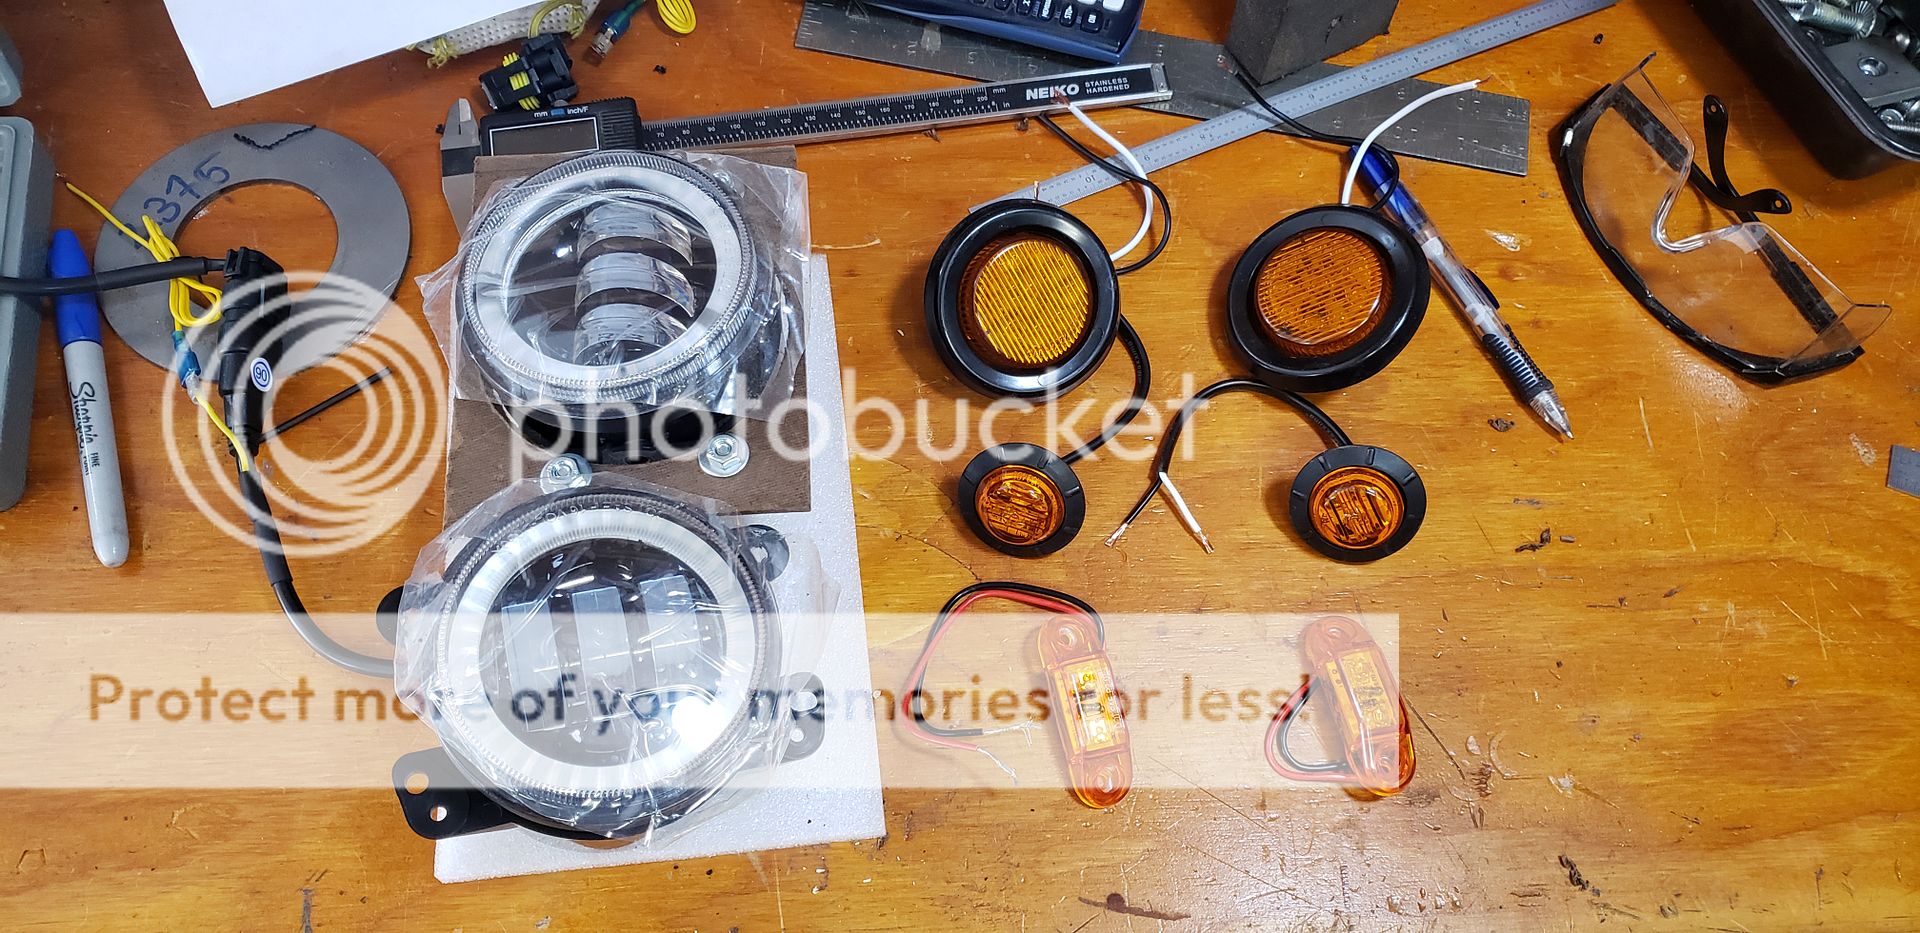
And here is an extremely rough mockup to get an idea of how they would look.
To confirm the hole sizes to best fit the grommets I had a few different test pieces cut:
_20201113_172814.jpg)
For the fog lights, I took measurements and designed a bracket that uses M6 PEM nuts so it's easy to take them on/off. I'm also going to use some 4" round tube to fill in the gap between the lights and the bumper plate.
_20201125_105845.jpg)
_20201125_105839.jpg)
These are all the lights I ended up purchasing that I decided on actually using. And to be completely honest I also utilized Amazon's free return policy to order and return quite a few different lights so I could figure out exactly what I wanted...
(And no these are not affiliate links or anything, just want to share)
Side Marker Clearance Lights:
Outermost Clearance Lights (1-1/4"):
Middle Turn Signals (2"):
Fog Lights/Running Lights. These are actually direct replacements for J**Ps, but I like the Halo look and trust me when I say these are BRIGHT:
The lights:
And here is an extremely rough mockup to get an idea of how they would look.
To confirm the hole sizes to best fit the grommets I had a few different test pieces cut:
For the fog lights, I took measurements and designed a bracket that uses M6 PEM nuts so it's easy to take them on/off. I'm also going to use some 4" round tube to fill in the gap between the lights and the bumper plate.
The following users liked this post:
SomedayJ (11-27-2020)
11-26-2020, 04:21 PM
#5
Registered User
Thread Starter
I'm getting extremely close to being ready to have the upper portion of the bumper cut out, and am really looking forward to seeing this thing come together. Hoping to finish up any small edits next week and have everything tacked together by the end of the week. Goal is to get the bumper done by the end of the year.
The following users liked this post:
SomedayJ (11-27-2020)
12-02-2020, 12:49 PM
#6
Registered User
Thread Starter
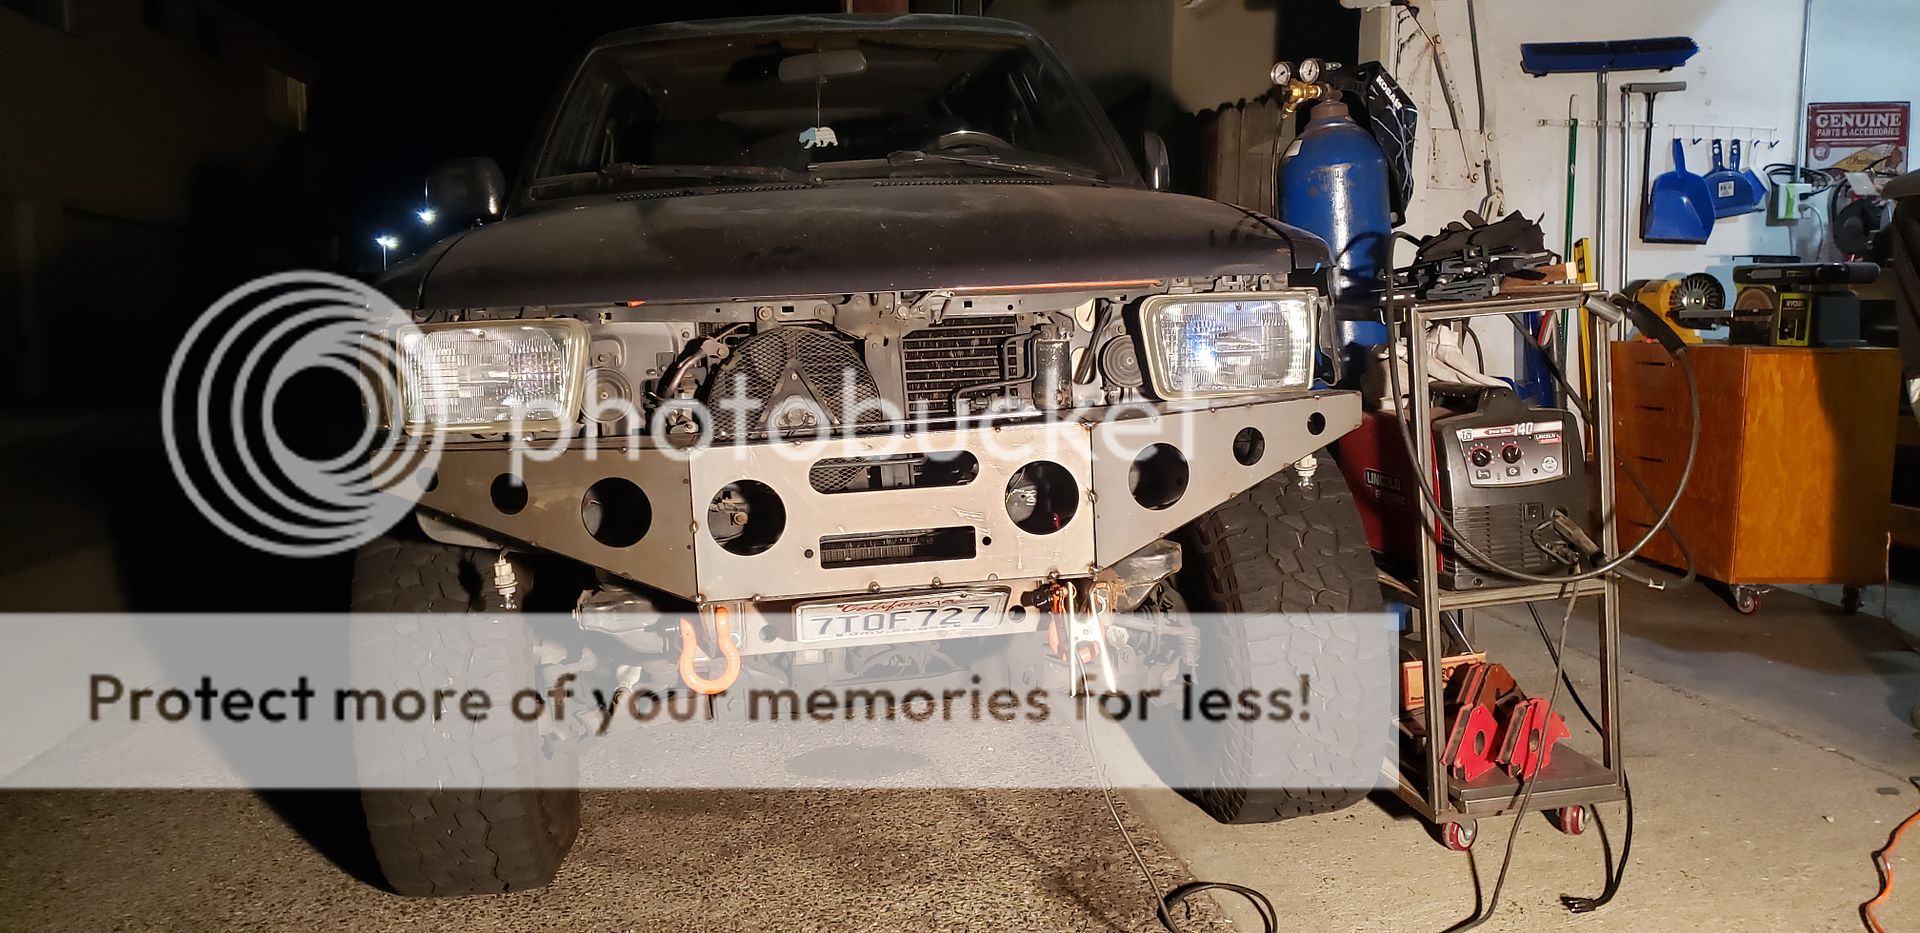
Making Progress!! Upper Half Tacked
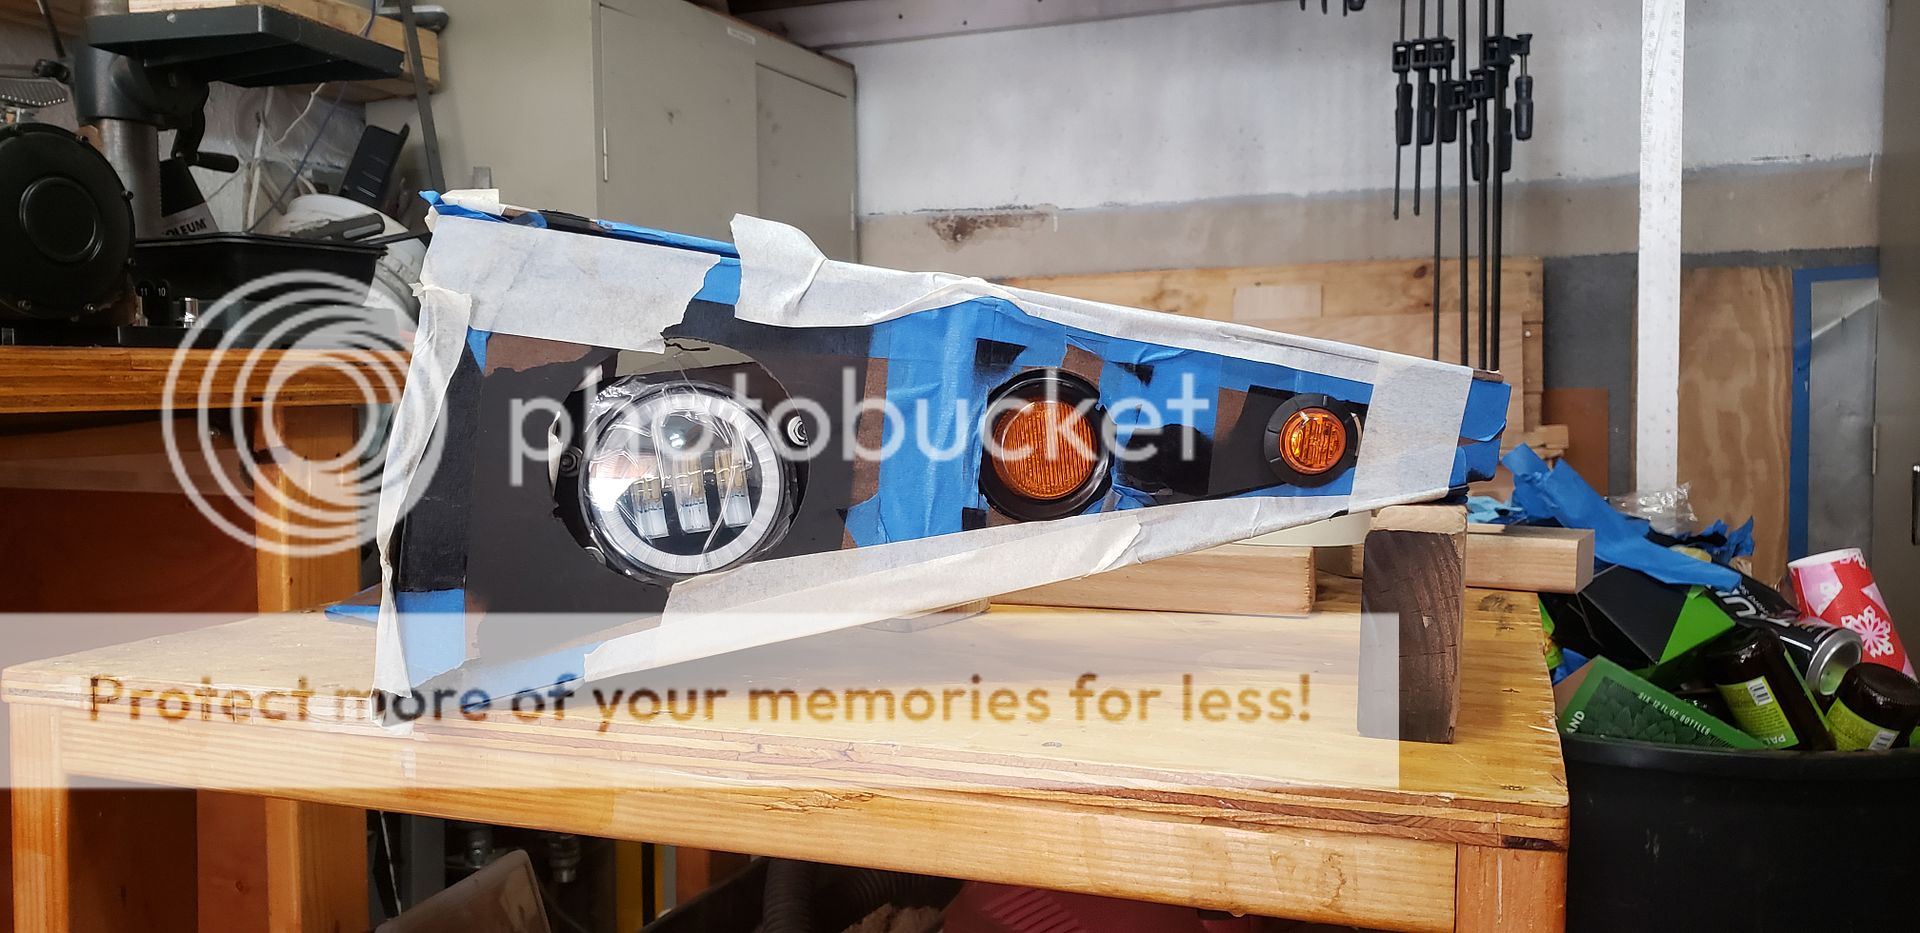
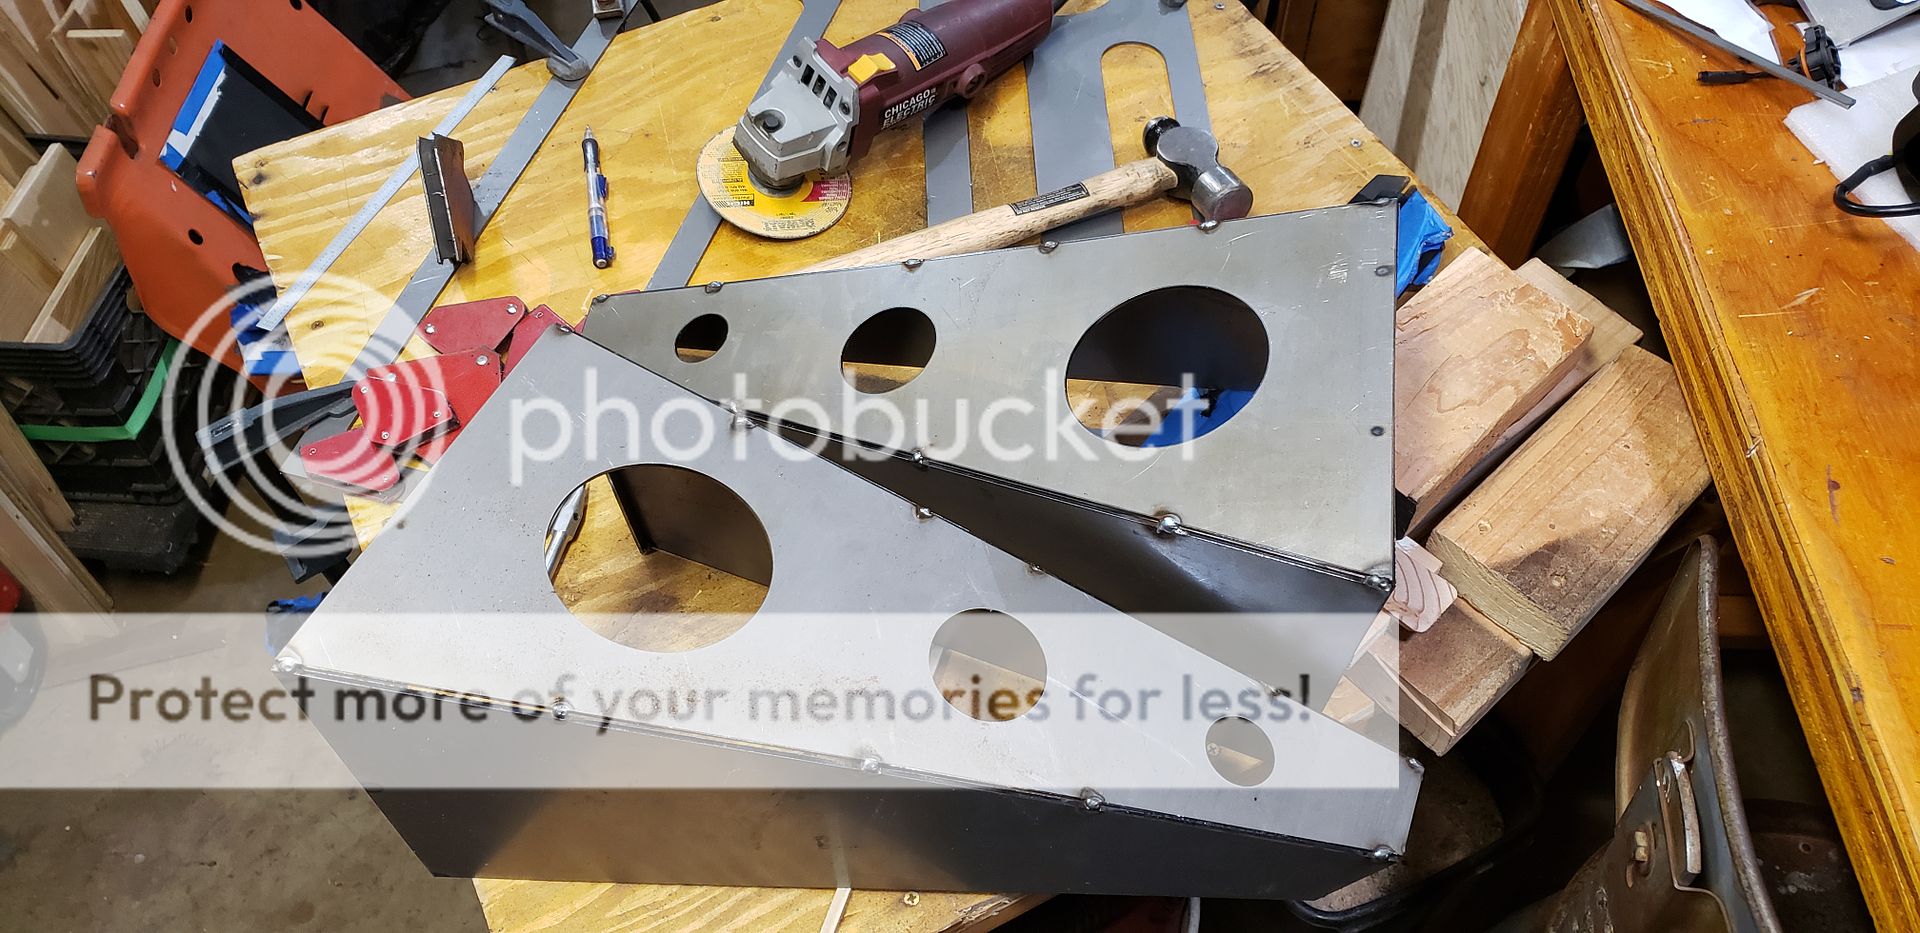
So after checking and re-checking, and doing multiple mock-ups and fitment checks, I decided to pull the trigger and get my upper pieces cut out. The 11 gauge didn't seem to weigh anything compared to the stout 1/4" lower plates and massive 2" receiver hitch. Once I got home I got straight to tacking up each of the side wings before tacking them to the lower half. Everything lined up nicely and didn't take long to put together. I guess that's one of the perks of having everything laser cut! I did however need to trim a bit on the very top pieces because they interfered with the grill, but that didn't take long. Didn't take any pictures though.
My "wings" tacked together in the garage:
All tacked up on the truck. It gets dark way too early now...

And just for fun I put my fairlead and lights on. Couldn't put the fog lights in because I forgot to put PEM fasteners in the bracket while I was at work...


I also finally got some decent pictures of the fog lights.
_20201201_181816.jpg?width=1920&height=1080&fit=bounds)
_20201201_181918.jpg?width=1920&height=1080&fit=bounds)
_20201201_175731.jpg?width=1920&height=1080&fit=bounds)
It's nice to see it finally coming together, but there is still a lot of work that needs to be done. First I need to make a new mount for my driver side headlight and get it realigned with everything. Hopefully then the grill and everything factory above the bumper will sit nicely. I might get around to wiring the lights this evening if I have time, otherwise it will have to wait until this weekend. I also didn't cut the very outside pieces because I wanted to do another template check to see how they fit and make adjustments as necessary. Once those are done I'll draw up a bracket to tie the sides into the factory bumper mounts. Gussets still need to be added on the inside of the wings as well. Eventually everything will be fully welded, blended together, and powder coated.
Would love to hear some feedback from you guys! This is my first major design/fab project and would appreciate some alternative points of view. Thanks and I'll try to keep this updated as I move things along.
My "wings" tacked together in the garage:
All tacked up on the truck. It gets dark way too early now...
And just for fun I put my fairlead and lights on. Couldn't put the fog lights in because I forgot to put PEM fasteners in the bracket while I was at work...
I also finally got some decent pictures of the fog lights.
It's nice to see it finally coming together, but there is still a lot of work that needs to be done. First I need to make a new mount for my driver side headlight and get it realigned with everything. Hopefully then the grill and everything factory above the bumper will sit nicely. I might get around to wiring the lights this evening if I have time, otherwise it will have to wait until this weekend. I also didn't cut the very outside pieces because I wanted to do another template check to see how they fit and make adjustments as necessary. Once those are done I'll draw up a bracket to tie the sides into the factory bumper mounts. Gussets still need to be added on the inside of the wings as well. Eventually everything will be fully welded, blended together, and powder coated.
Would love to hear some feedback from you guys! This is my first major design/fab project and would appreciate some alternative points of view. Thanks and I'll try to keep this updated as I move things along.
12-03-2020, 11:14 AM
#7
Registered User
Awesome!
Great work! Its always exciting to see progress go from a mere picture to something in real life right!?!! I was really happy to see my build inspired you to make one of your own that was the whole point of my build thread. Next fab project on your list has got to be a camping trailer. That was my 3rd and last major fab project and I love how it came out. Just wanted to give you a big thumbs up on the build. I wish I had a cnc machine when I made mine. Yours is gonna turn out awesome! Get it powder coated! Don't paint. I wish I would have done that before welding it on my truck lol trust me you'll be happier with powder coat in the long run.
Anyway good job. Keep up the great work.
Anyway good job. Keep up the great work.
Trending Topics
12-07-2020, 10:05 AM
#8
Registered User
Thread Starter
Great work! Its always exciting to see progress go from a mere picture to something in real life right!?!! I was really happy to see my build inspired you to make one of your own that was the whole point of my build thread. Next fab project on your list has got to be a camping trailer. That was my 3rd and last major fab project and I love how it came out. Just wanted to give you a big thumbs up on the build. I wish I had a cnc machine when I made mine. Yours is gonna turn out awesome! Get it powder coated! Don't paint. I wish I would have done that before welding it on my truck lol trust me you'll be happier with powder coat in the long run.
Anyway good job. Keep up the great work.
Anyway good job. Keep up the great work.
And yeah definitely gonna get it powder coated. Hoping I can get a discount through the vendor we use at work.
Lots of hours put in but it's all worth it seeing it come to fruition.
12-13-2020, 07:56 PM
#9

Super cool thread. Thanks for sharing. You are so spoiled having that laser cutter. Those pieces are a thing of beauty!
Question, how did you make the model? Using the sheet metal tool in solidworks? What about transferring the model to the individual parts that will but cut?
Question, how did you make the model? Using the sheet metal tool in solidworks? What about transferring the model to the individual parts that will but cut?
01-14-2021, 10:04 AM
#10
Registered User
Thread Starter
Super cool thread. Thanks for sharing. You are so spoiled having that laser cutter. Those pieces are a thing of beauty!
Question, how did you make the model? Using the sheet metal tool in solidworks? What about transferring the model to the individual parts that will but cut?
Question, how did you make the model? Using the sheet metal tool in solidworks? What about transferring the model to the individual parts that will but cut?
Also I am terrible at keeping threads updated... I promise I'll get an update post and CAD files posted eventually lol.
The following 2 users liked this post by ztbailey1:
84 yota dude (02-08-2021),
jazz1 (04-27-2022)
02-08-2021, 10:12 PM
#11
Thanks for the reply!
I think I understand. I have to do some practice..
I think I understand. I have to do some practice..
09-25-2021, 06:05 PM
#13

CAD files
Bumper looks great. We are working on getting a 92 4runner back in shape for my some time drive. We are just wrapping up suspension repairs and the next project is to replace the missing front bumper.
through his school he has access to a water jet and/or plasma table. Any chance you could post the CAD files or point me to where they may already be posted? Thanks
through his school he has access to a water jet and/or plasma table. Any chance you could post the CAD files or point me to where they may already be posted? Thanks
04-08-2022, 01:39 PM
#14
Registered User
Thread Starter
GrabCad Files
Quick Update: I actually finished it Spring of 2021. Will post lots of pictures this weekend.
Here is a Google Drive link to all the files. I still need to take the time to organize it and upload to GrabCad so they are easier to look at and download.
https://drive.google.com/drive/folde...HiBduhM6orBKEA
APRIL 8th EDIT: **GRABCAD FILES: https://grabcad.com/library/toyota-4...en-1990-1995-1
Let me know if those work or not and I will try to fix them =)
Last edited by ztbailey1; 04-18-2022 at 02:10 PM. Reason: added link
The following users liked this post:
jazz1 (04-23-2022)
10-28-2022, 11:18 AM
#15
Registered User

Nice bumper! I think I may have to try this, living in Alaska it's hard to get things shipped up here, and if they do ship, the shipping generally costs more than the bumper would.
11-21-2022, 11:13 AM
#16
Registered User
Thread Starter
Thanks flyer! If you have access to CAD and a plotter to print full size sheets, you could design and mock up with cardboard, and then potentially send your completed files somewhere like SendCutSend to get them cut and shipped to you. Not sure if they ship to Alaska but their website says shipping anywhere in US and only $19 to Canada, with decent prices on material from what I've seen. Just an idea. Best of luck.

Thread
Thread Starter
Forum
Replies
Last Post


