Sandbox's 1988 22RE pickup Build up thread
 01-30-2012, 06:31 PM
#1
Registered User
Thread Starter

Join Date: Dec 2011
Posts: 20
Likes: 0
Received 0 Likes
on
0 Posts
Sandbox's 1988 22RE pickup Build up thread
Hey guys! Some of you probably saw me posting in the newbie thread about buying this thing. Well, here's the updates as far as what I've done. Keep in mind the point of buying this thing was to learn some automotive skills and end up with a cool toy at the end. I'm COMPLETELY new to this, so wish me luck. Constructive criticism is always appreciated!
Without further adieu, here's how it started out:


Ran ok, seemed a little sluggish, burned a little oil. Paid $2300. Probably could have haggled them down some, but it was a young couple with a new baby and they looked like they needed the money.
Without further adieu, here's how it started out:
Ran ok, seemed a little sluggish, burned a little oil. Paid $2300. Probably could have haggled them down some, but it was a young couple with a new baby and they looked like they needed the money.
 01-30-2012, 06:37 PM
#2
Registered User
Thread Starter
Join Date: Dec 2011
Posts: 20
Likes: 0
Received 0 Likes
on
0 Posts
Repairing rust
So the bed on this thing has a LOT of rust! In fact the bed has so many holes in it I've decided to keep the plastic bedliner just so I don't have to worry about stuff falling through the bed lol. Here's how I fixed the rust holes before painting:
Here's a sample rust hole:

Same rust hole. Rust and paint cleaned down to bare metal with the angle grinder and a wire-bristle brush disc.:

Then spot spray where the rust used to be with some primer. (no picture)
Here's a sample rust hole:
Same rust hole. Rust and paint cleaned down to bare metal with the angle grinder and a wire-bristle brush disc.:
Then spot spray where the rust used to be with some primer. (no picture)
01-30-2012, 06:50 PM
#3
Registered User
Thread Starter
Join Date: Dec 2011
Posts: 20
Likes: 0
Received 0 Likes
on
0 Posts
Painting the truck
First you're going to start by sanding/roughing up the paint some. I used a 3m pad that looked like a cross between a sponge and a brillo pad. It worked really well but it didn't show up well in the pictures I took.
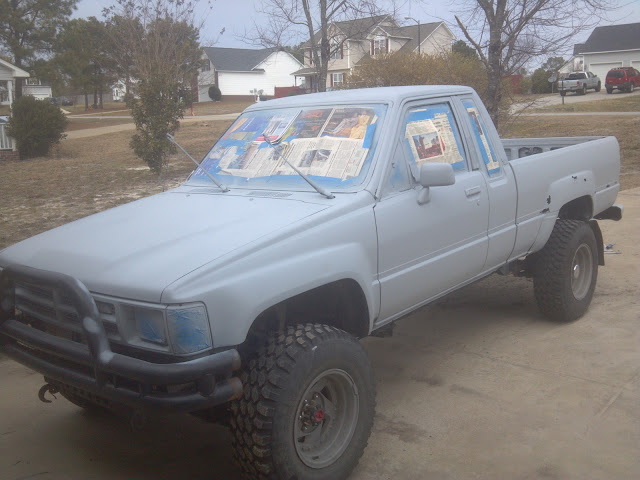
Next clean the sanded paint with mineral spirits. When that dries you are ready for primer. The first coat of primer should look like the hood does in this picture, or even a little lighter. Also be sure to tape off EVERYTHING you don't want painted such as headlights and turn signals. Some cardboard between the grill and the radiator will prevent it from smoking like crazy the first time it heats up. Spot spray any rusted spots with a heavier coat of primer, which you can see on the bumper.

Don't forget to paint the top! I recommend doing the bed first, a few days before you paint the truck. When you paint the truck do the roof while standing in the bed, and leave the tailgate for last so you can use it to climb in and out

Full coat of primer. It will dry fairly fast, and be nice and smooth to the touch. The primer is important to help smooth out minor scratches, prevent future rust, stop current rust, and ensure even coating of the new paint. The last point is especially important when painting black on black like I am. Without a layer of gray primer in between it will be hard to tell if you have a good even coat of black on black.
Another pic of the full coat of primer. You can see in the bed where I used two colors of primer. It wont be an issue because the plastic bedliner is going back into the bed when it's all painted. I didn't bother painting the inside of the bed since it'll be covered, I just primed it for rust prevention. I'll keep pulling the bedliner out to check on it.

Like the primer, your first layer of paint should be between 20% and 40% coverage. The whole truck should look like this before you try to fill any of it in.

Lesson learned: Do not store can of rubberized undercoating next to cans of semi-gloss black paint, and if you do let your assistant (wife) know about it ahead of time. You will end up with rubberized undercoating on your passenger side door. Fortunately it isn't hard to fix. Wipe it off with mineral spirits while it's still wet, then recoat with primer and paint.

Note that everything below the trim line is still primer. While sanding I noticed how many scratches this area gets from rocks and stuff coming off the road, especially with oversize M/T tires, so I decided to coat it in bedliner instead of painting it. Paint a few inches below where the transition will be. Later you will tape off the transition but for now we must wait 48 hours to ensure the paint is fully dried.

He's smiling about his new coat of paint >=)
Once it's done the paint should cover up all small scratches, but anything that goes down to bare metal will probably still show up. So if you have to scrape off decals like I did, expect it to show up afterwards. This can probably be fixed with a very small amount of Bondo and some sandpaper, but it really doesn't bother me

Next clean the sanded paint with mineral spirits. When that dries you are ready for primer. The first coat of primer should look like the hood does in this picture, or even a little lighter. Also be sure to tape off EVERYTHING you don't want painted such as headlights and turn signals. Some cardboard between the grill and the radiator will prevent it from smoking like crazy the first time it heats up. Spot spray any rusted spots with a heavier coat of primer, which you can see on the bumper.
Don't forget to paint the top! I recommend doing the bed first, a few days before you paint the truck. When you paint the truck do the roof while standing in the bed, and leave the tailgate for last so you can use it to climb in and out
Full coat of primer. It will dry fairly fast, and be nice and smooth to the touch. The primer is important to help smooth out minor scratches, prevent future rust, stop current rust, and ensure even coating of the new paint. The last point is especially important when painting black on black like I am. Without a layer of gray primer in between it will be hard to tell if you have a good even coat of black on black.
Another pic of the full coat of primer. You can see in the bed where I used two colors of primer. It wont be an issue because the plastic bedliner is going back into the bed when it's all painted. I didn't bother painting the inside of the bed since it'll be covered, I just primed it for rust prevention. I'll keep pulling the bedliner out to check on it.
Like the primer, your first layer of paint should be between 20% and 40% coverage. The whole truck should look like this before you try to fill any of it in.
Lesson learned: Do not store can of rubberized undercoating next to cans of semi-gloss black paint, and if you do let your assistant (wife) know about it ahead of time. You will end up with rubberized undercoating on your passenger side door. Fortunately it isn't hard to fix. Wipe it off with mineral spirits while it's still wet, then recoat with primer and paint.
Note that everything below the trim line is still primer. While sanding I noticed how many scratches this area gets from rocks and stuff coming off the road, especially with oversize M/T tires, so I decided to coat it in bedliner instead of painting it. Paint a few inches below where the transition will be. Later you will tape off the transition but for now we must wait 48 hours to ensure the paint is fully dried.
He's smiling about his new coat of paint >=)
Once it's done the paint should cover up all small scratches, but anything that goes down to bare metal will probably still show up. So if you have to scrape off decals like I did, expect it to show up afterwards. This can probably be fixed with a very small amount of Bondo and some sandpaper, but it really doesn't bother me
01-30-2012, 06:54 PM
#4
Registered User
Thread Starter
Join Date: Dec 2011
Posts: 20
Likes: 0
Received 0 Likes
on
0 Posts
Bedliner Interior
Ratty old carpet removal has started. This carpet STINKS and probably has more diseases than... well... nevermind, we'll keep this rated PG.

Bench seat, seat belts, rear shelf, and nasty carpet all removed to make way for the bedliner. Don't forget to tape off the bolt holes so you can get all that stuff back in. Also tape off any connectors like the yellow one pictured here, so you can disconnect them if you need to. It's OK to spray the wires so they end up secured to the floor. It will protect them from people's feet now that the carpet is gone. Avoid the temptation to just spray around the holes, or even worse to not bother taking all the stuff out. I promise some day you will need it to be removable.

When the bedliner dries it will look like this. I used 2 coats of Rustoleum spray in bedliner:

The pictures don't really do it justice. The bedliner looks pretty good, and anything would be an improvement over the old ratty carpet.
Bench seat, seat belts, rear shelf, and nasty carpet all removed to make way for the bedliner. Don't forget to tape off the bolt holes so you can get all that stuff back in. Also tape off any connectors like the yellow one pictured here, so you can disconnect them if you need to. It's OK to spray the wires so they end up secured to the floor. It will protect them from people's feet now that the carpet is gone. Avoid the temptation to just spray around the holes, or even worse to not bother taking all the stuff out. I promise some day you will need it to be removable.
When the bedliner dries it will look like this. I used 2 coats of Rustoleum spray in bedliner:
The pictures don't really do it justice. The bedliner looks pretty good, and anything would be an improvement over the old ratty carpet.
01-30-2012, 07:02 PM
#5
Registered User
Thread Starter
Join Date: Dec 2011
Posts: 20
Likes: 0
Received 0 Likes
on
0 Posts
Bedliner to protect your new paint
This part is pretty simple as long as you take your time and go SLOW with the spraying. First off you put down a level line of tape with the bottom edge exactly where you want your bedliner to start.

I don't really have any pictures of the spraying process because it pretty much looks the same as the paint pictures. Definitely go slow when spraying. Your first coat should be about 20% coverage, wait a while for it to harden some before you do the second. Bedliner is heavier than paint so it'll run and leave drip marks much easier if you aren't careful. Especially on a vertical surface. Second coat should be about 50% coverage. Wait a while again then finish up with your third coat.
Be sure to remove your tape WHILE IT'S STILL WET. If you wait for the bedliner to harden completely, the tape will become a permanent addition to your truck. The bedliner doesn't show up well in the pictures but trust me it looks great.
01-30-2012, 07:11 PM
#6
Registered User
Thread Starter
Join Date: Dec 2011
Posts: 20
Likes: 0
Received 0 Likes
on
0 Posts
Burned out valves
So the truck started burning a LOT more oil. Here's me finding out why. Keep in mind this is the farthest I've ever taken an engine apart, and this is the first time. Wish me luck!

There was some oil leaking out on the exhaust side just above the spark plugs, so I wasn't surprised to find out the valve cover gasket looked like this:

Here's the culprit! All 4 exhaust valves look like this:

So it looks like the valves aren't sealing properly. Rather than pull the head apart, replace some parts, have some stuff machined ect ect... I've decided to order a complete Street RV head with O/S valves, chilled iron valve guides, RV springs, and a 268C cam from Engnbldr.com. As long as I'm in there and pulling stuff apart i'm going to replace the oil pump (probably full of sludge) and the exhaust manifold gasket (I can see parts of it sticking out, so I'm pretty sure it's not installed properly). Wish me luck!
There was some oil leaking out on the exhaust side just above the spark plugs, so I wasn't surprised to find out the valve cover gasket looked like this:
Here's the culprit! All 4 exhaust valves look like this:
So it looks like the valves aren't sealing properly. Rather than pull the head apart, replace some parts, have some stuff machined ect ect... I've decided to order a complete Street RV head with O/S valves, chilled iron valve guides, RV springs, and a 268C cam from Engnbldr.com. As long as I'm in there and pulling stuff apart i'm going to replace the oil pump (probably full of sludge) and the exhaust manifold gasket (I can see parts of it sticking out, so I'm pretty sure it's not installed properly). Wish me luck!
Trending Topics
03-27-2012, 08:41 PM
#8
Registered User
Thread Starter
Join Date: Dec 2011
Posts: 20
Likes: 0
Received 0 Likes
on
0 Posts
Hey everyone, the repair/replace is going well, just taking a while. I'll get more pics posted when I get finished. Because of how poorly the truck was cared for before I purchased it, it's taking some creativity. It'll all work out in the long run though.

Thread
Thread Starter
Forum
Replies
Last Post
6th Gear
84-85 Trucks & 4Runners (Build-Up Section)
19
12-10-2019 07:31 AM
Peteyg39@hotmail.com
Newbie Tech Section
1
06-26-2015 08:15 AM


