rusty gas tank?
 11-20-2013, 07:50 PM
#1
Registered User
Thread Starter
iTrader: (1)

Join Date: Nov 2013
Location: Virginia
Posts: 244
Likes: 0
Received 0 Likes
on
0 Posts
rusty gas tank?
I'm full of questions! But you guys keep answering so imma keep asking! Getting my 84 going, been sitting for a couple of years. Wanted to check if my tank is rusty inside without actually taking the tank off. Dont wanna damage any rusty gas lines, sending unit, etc. But I'd like to know if its rusty cause I dont wanna clauge my carb up with rusty gas. Should I put some gas in and pull the drain plug and see what comes out? What are my options?
 11-21-2013, 07:02 AM
#2
Super Moderator
Staff
iTrader: (1)
Join Date: Aug 2008
Location: Anderson Missouri
Posts: 11,788
Likes: 0
Received 21 Likes
on
19 Posts
Lift the bed and remove the float assembly or fuel supply assembly and get a good look at it. I remove the bed anyways when working on the tank. Trying to drop the tank is alot of stress on the fuel lines if done incorrectly and not alot of room to work with on the lines in my opinion.
11-21-2013, 07:21 AM
#3
Registered User
Thread Starter
iTrader: (1)
Join Date: Nov 2013
Location: Virginia
Posts: 244
Likes: 0
Received 0 Likes
on
0 Posts
Float and sending unit are pretty rusty...would be taking a chance with the screws messing up/not coming out. Think I could just look through the hose hole?
11-21-2013, 08:50 AM
#4
Super Moderator
Staff
iTrader: (1)
Join Date: Aug 2008
Location: Anderson Missouri
Posts: 11,788
Likes: 0
Received 21 Likes
on
19 Posts
Pretty sure you wont be able to see the tank thru the hose hole. Try soaking the bolts in PB Blaster and taking a brass wire tooth brush and give them a good scrubbing and let set for a few days. Alot of the time the Phillps screw heads will strip on me so what I do is get a good grip with some vise grips, but not so hard to distort the head and break them loose with the vise grips and them finsih removing with the screw driver. Some use a 6 or 8mm bolt.
Last edited by Terrys87; 11-21-2013 at 09:10 AM.
11-21-2013, 09:08 AM
#6
Super Moderator
Staff
iTrader: (1)
Join Date: Aug 2008
Location: Anderson Missouri
Posts: 11,788
Likes: 0
Received 21 Likes
on
19 Posts
You mentioned about draining the tank. Depending on how bad your tank is rusted. I would suggest not using the drain plug. Reason being is I had one that was bad and I did the same thing. The rust build up on the thread, stripped the hole in the tank. I had to have it retapped afterwards.
About every time a gas tank thread comes up on the 22r, some dont know of the in tank filter. I have seen these get really bad. In each of my threads below, I go thru the entire fuel system as I live in a humid region and the moisture gets to the tank. Along with the poorer quality of fuel that we get, these tanks get in bad shape. I go further then just changing fuel filters.
On my 88 build below on the first page is what I do to go thru the fuel system.
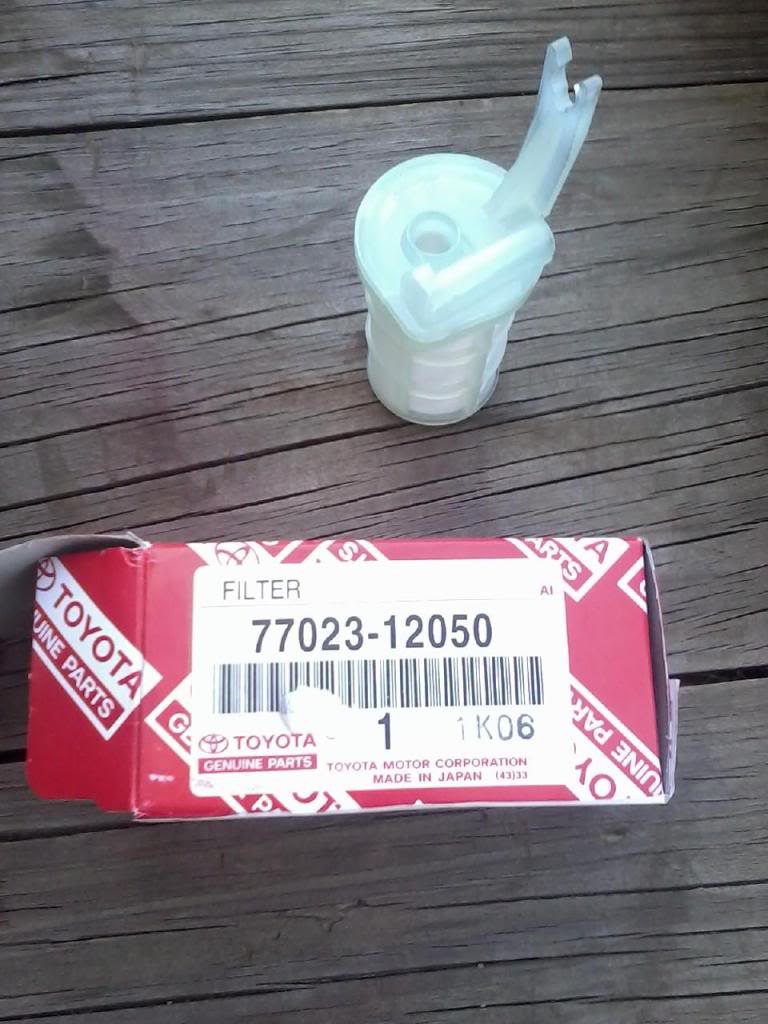
Here is the filter that you may need to replace. About $15 at Toyota.
Part number for a new intank filter is #77023-12050. On ebay it is called a TOYOTA FACTORY NIB FUEL FILTER SUCTION TUBE DIESEL. It was selling for $4.50 when I finally found it. I paid $15 at Toyota. (83 pg 8) This filter is for carburated trucks.
About every time a gas tank thread comes up on the 22r, some dont know of the in tank filter. I have seen these get really bad. In each of my threads below, I go thru the entire fuel system as I live in a humid region and the moisture gets to the tank. Along with the poorer quality of fuel that we get, these tanks get in bad shape. I go further then just changing fuel filters.
On my 88 build below on the first page is what I do to go thru the fuel system.
Here is the filter that you may need to replace. About $15 at Toyota.
Part number for a new intank filter is #77023-12050. On ebay it is called a TOYOTA FACTORY NIB FUEL FILTER SUCTION TUBE DIESEL. It was selling for $4.50 when I finally found it. I paid $15 at Toyota. (83 pg 8) This filter is for carburated trucks.
Last edited by Terrys87; 11-21-2013 at 09:10 AM.
11-21-2013, 09:27 AM
#7
Registered User
Thread Starter
iTrader: (1)
Join Date: Nov 2013
Location: Virginia
Posts: 244
Likes: 0
Received 0 Likes
on
0 Posts
Thanks for the info! Where does that go inside the tank? Also I have no clue yet if rust will even be a problem. I have the option of a rebuilt carb or a weber to put on and before I do, just want to make sure everything is clean ish.
Trending Topics
11-21-2013, 04:55 PM
#8
Super Moderator
Staff
iTrader: (1)
Join Date: Aug 2008
Location: Anderson Missouri
Posts: 11,788
Likes: 0
Received 21 Likes
on
19 Posts
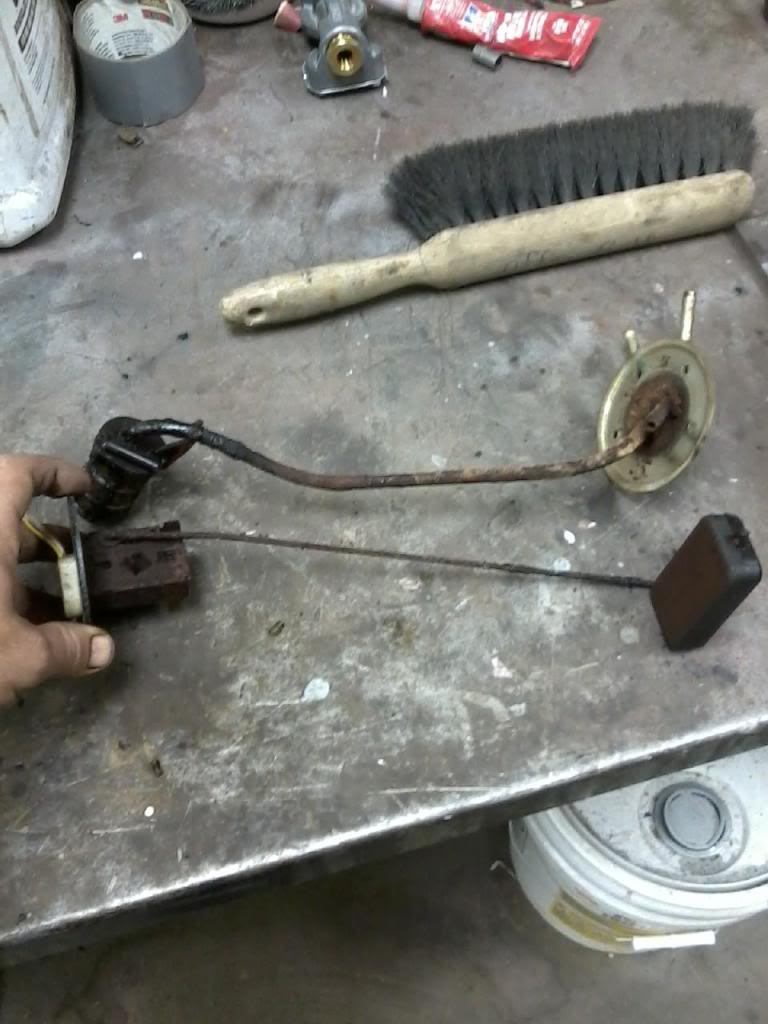
Here is where the filter goes on the end of the fuel assembly. I have seen several like this or where the screen is just completely missing. This filter is on 79-88 that I have worked on and I am sure newer trucks have them as well.
The pick up assembly can be expensive but mostly on the fuel injected models, but probably could be just as hard to find. The reason the trucks seem to be in worse shape then 4Runners is the 4Runners gas tank is a little better protected. The trucks tank is easily covered with mud and then it just sits on top of the tank and the fuel line getting eaten with rust.
The carbed trucks fuel line is not under nearly as much pressure so you could probably repair it with rubber line if you had to.
If you do have a rusty tank, I soak mine in white vinegar for a few days and it will clean it up. The rust will turn to red dust that has the texture of cooking flour. I have tried to blow it out with an air hose and still cant get it all out. What I do is seal the tank with Red-Kote that can be picked up at most auto part stores. You may not even have a problem but just so that you have some info in worse case scenario.
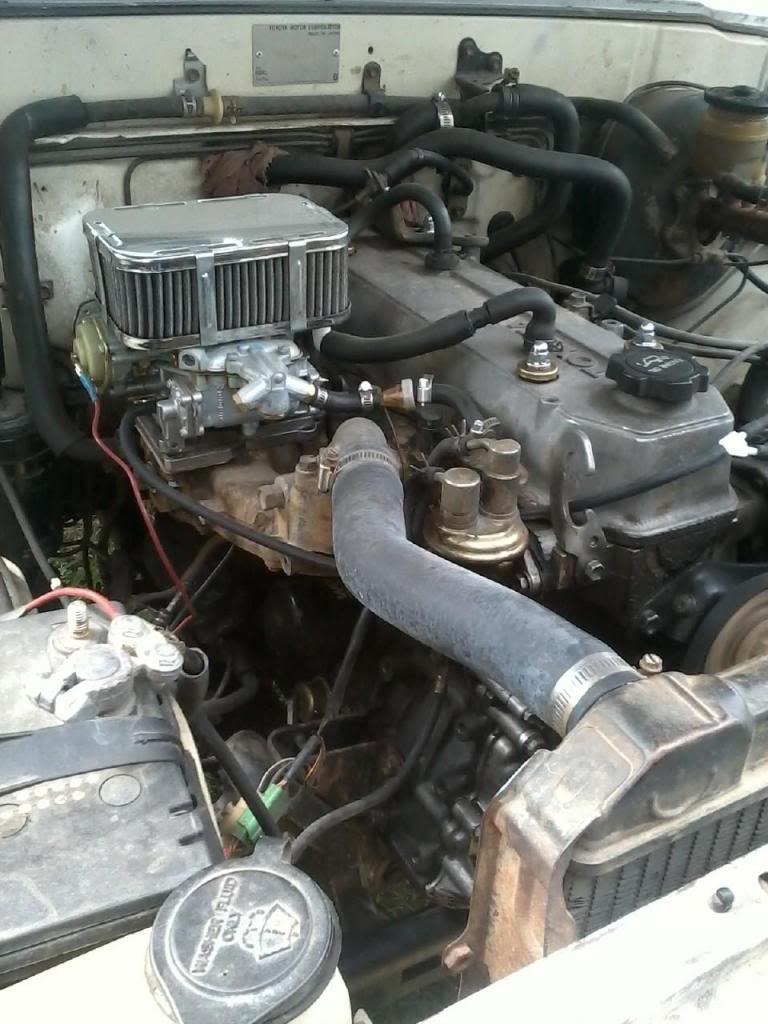
As far as rebuilt carb or a Webber. I suggest a Webber. It gets rid of the vacuum hose nitemare that is on the factory carbs.
Here is where the filter goes.
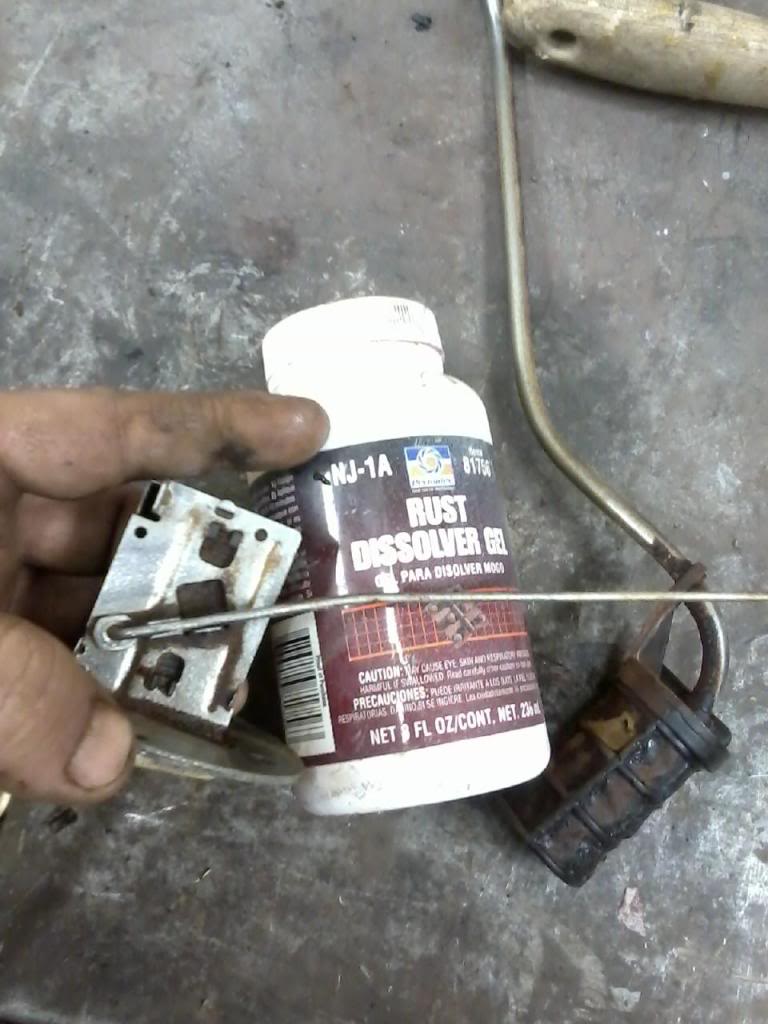
The float was frozen solid. I put the rust dissolver on it and had it working in 2 minutes. I am really starting to like this brand over PB Blaster. Here it is frozen up with rust. Fuel filter is hard as a rock also.
Cleaned up.

Here is a Webber installed on my brothers truck.Very few vacuum lines.
The pick up assembly can be expensive but mostly on the fuel injected models, but probably could be just as hard to find. The reason the trucks seem to be in worse shape then 4Runners is the 4Runners gas tank is a little better protected. The trucks tank is easily covered with mud and then it just sits on top of the tank and the fuel line getting eaten with rust.
The carbed trucks fuel line is not under nearly as much pressure so you could probably repair it with rubber line if you had to.
If you do have a rusty tank, I soak mine in white vinegar for a few days and it will clean it up. The rust will turn to red dust that has the texture of cooking flour. I have tried to blow it out with an air hose and still cant get it all out. What I do is seal the tank with Red-Kote that can be picked up at most auto part stores. You may not even have a problem but just so that you have some info in worse case scenario.
As far as rebuilt carb or a Webber. I suggest a Webber. It gets rid of the vacuum hose nitemare that is on the factory carbs.
Here is where the filter goes.
The float was frozen solid. I put the rust dissolver on it and had it working in 2 minutes. I am really starting to like this brand over PB Blaster. Here it is frozen up with rust. Fuel filter is hard as a rock also.
Cleaned up.
Here is a Webber installed on my brothers truck.Very few vacuum lines.

Last edited by Terrys87; 11-22-2013 at 10:21 AM.
11-21-2013, 05:06 PM
#9
Registered User
Thread Starter
iTrader: (1)
Join Date: Nov 2013
Location: Virginia
Posts: 244
Likes: 0
Received 0 Likes
on
0 Posts
Thanks for all the info! Really cleared alot up for me. So after white vinegar in the tank...you pour red kote in it? And let it dry? Sounds good to me!
11-21-2013, 05:12 PM
#10
Super Moderator
Staff
iTrader: (1)
Join Date: Aug 2008
Location: Anderson Missouri
Posts: 11,788
Likes: 0
Received 21 Likes
on
19 Posts
Soak in venegar a few days and then try to get as much of the dust out as possible. When dry, coat it with Red Kote and I let it set a day or so. It also says it will seal up some pin holes as well. Depending on your humidity in your area, you may not have a problem, if the truck is in a humid area, dont be suprised at the condition.
If you have to do the tank, even if it looks bad, I think you will be suprised at how well it will clean up and work for you.
If you have to do the tank, even if it looks bad, I think you will be suprised at how well it will clean up and work for you.
11-21-2013, 05:22 PM
#12
Super Moderator
Staff
iTrader: (1)
Join Date: Aug 2008
Location: Anderson Missouri
Posts: 11,788
Likes: 0
Received 21 Likes
on
19 Posts
You should be okay if you just let it soak in a rust dissolver and let time do most of the work for you. If you go that route, I have been seeing comercial for WD-40. I have never tried using any of that, but if you try some of it, can you post your results for it? I think it is called Blue Flame or something like that. A fairly new product if I recall right, for soaking the bolts/screws.
11-21-2013, 05:32 PM
#14
Super Moderator
Staff
iTrader: (1)
Join Date: Aug 2008
Location: Anderson Missouri
Posts: 11,788
Likes: 0
Received 21 Likes
on
19 Posts
Thanks. I subscribed to this thread to see what the results of it are. WD 40 has always worked great for me so am intrested in seeing how good their new product is.
11-21-2013, 07:36 PM
#15
Registered User
Thread Starter
iTrader: (1)
Join Date: Nov 2013
Location: Virginia
Posts: 244
Likes: 0
Received 0 Likes
on
0 Posts
Do i have any options of cleaning out tank without removing sending unit and float? Sounds a little crazy I know. I can see inside my tank from the filler hole with hose removed. Only rust I see is right at the filler hole of the tank but clean inside tank. I also see some rust on float and sending unit assembly inside tank. I really would like to not remove that rusty unit haha.
11-22-2013, 05:56 AM
#16
Registered User
Join Date: May 2010
Location: Durango, Colorado
Posts: 159
Likes: 0
Received 0 Likes
on
0 Posts
I have my old bed off, and I'm in the process of prepping my frame and such for putting on my new, rust-free AZ bed on my truck. Should I take this opportunity to replace my in tank filter? I replaced the external filter recently and it greatly improved the responsiveness of my engine.
Is it worth the trouble of replacing the in tank filter while i have easy access, even though performance is good right now?
Good information you're sharing, Terry. Thanks
Is it worth the trouble of replacing the in tank filter while i have easy access, even though performance is good right now?
Good information you're sharing, Terry. Thanks
11-22-2013, 05:57 AM
#17
Registered User
Thread Starter
iTrader: (1)
Join Date: Nov 2013
Location: Virginia
Posts: 244
Likes: 0
Received 0 Likes
on
0 Posts
OK so the wd-40 "blue torch" stuff seemed to work really well. I wish I would have taken a before picture of the sending unit. Mine has Philip head screws that def weren't coming out with a screw driver. Vice grips got them turning, all of them! I was really surprised, sending unit and float assembly. The plan is to run white vinegar in the tank for a couple days..let dry and then maybe red kote. That brings me to some questions the unit and float assembly are pretty rusty inside the tank. If insoak them in vinegar as well...what do I seal them with to prevent rust? Also what are my options when the time comes to put unit and float back on clean tank as far as screws? If I buy a new locking ring ill need one for both components and wonder if they come with new screws?
11-22-2013, 10:47 AM
#18
Super Moderator
Staff
iTrader: (1)
Join Date: Aug 2008
Location: Anderson Missouri
Posts: 11,788
Likes: 0
Received 21 Likes
on
19 Posts
Mikey... I dont have any suggestions for cleaning the pieces while in the tank. Afterwards you will still need to get the cleaning stuff out of the tank. On the float assembly I suggest spraying some rust dissolver on the outside and scrubbing it with a brass toothbrush. It will clean up in about 5-10 minutes. You can get moving freely by gently cleaning around the pivot points and just getting it looking good on the outside.
As far as inside the box where is basically a resistor, the cover will come off and you can get it clean in there. But I would suggest not taking it apart because really not much that you can do in there to get working. It is not hard to get apart, but if you can get it moving freely, just spray alot of WD-40 in there and rinse it with water until you get no more gunk out of it. Inside the box, the resistor is mostly a wire that is nearly the same diameter of a strand of hair. As the float rises and falls, it increases or decreases resistance that is in sync with your gas guage. I have seen where the wiper that rides against the hair like wire that the wires are broken. Not much you can do other then replace the whole assembly. If your gas guage is working fine, I wouldnt mess with inside the box. When done rinsing, just add plenty of WD-40. The float is designed to take the harshness of fuel and will get soaked with fuel. Anything you put on will just get washed off from the fuel.
I am sure Toyota sells those screws, but in very few instance that I use hardware store screws, I have used screws/bolts for the float and supply assemblies. I have reused my gaskets if they are in good shape and never had any problems. I have seen new gaskets on ebay for not too much.
If you have just a few light coats of rust, and just in places, I would not be to worried about it. Something that looks like the patina look on the rat rods you are starting to see now or what looks like flash rust, where a bare piece of metal gets rust over nite. If it is flaking, then I would clean the tank.
Not sure what part of the country you are in, but working on gas tanks scare me if it is to warm. If you can see fumes, that is when a gas tank is dangerous. In weather that is below say 50 degrees or so, you should be alright. It is the fumes that are dangerous as far as explosion. 20 year old tanks that are empty for several years are still dangerous. The cooler the weather, the better.
Rusto... Most likely the intank filter is orginal. With the bed off, I would suggest replacing it. If the screws/bolts come out easy it is a 3 minute job. Also you can get a good idea of what you tank condition is like. Your weather should be cool enough not to worry about fumes. I have found filters for $4.50 on ebay but by the time you had the cost of shipping, it is almost as cheap to get them from Toyota.
I recommend NOT using any fuel cleaners like STP if your tank has never been cleaned. Reason I say this is because you have nearly 30 years worth of varnish built up in your tank and lines. I have done this and know 2 others that thought we were doing a good thing of using a fuel cleaner and then what happened, was all of that varnish and crud got dissolved and clogged the filter. Some got past the filter and then clogged either an injector or a carb jet.
If you have your tank cleaned and then run fuel cleaners thru the system periodocally, it wont be so bad and most likely the filter will catch it or it will be so little that it will flow on thru to the combustion chamber and wont cause any problems. That is just my experience and suggestion.
Here is the float assembly that you can take apart but not much you can do in there. Just get the pivot points and surronding area clean. You can see 3 tabs that hold the cover onto the resistor and wiper arm. I have heard of people rewinding the resistor,but far beyond my skills. That wire is smalllllll in diameter. Probably a few feet in length.
Last edited by Terrys87; 11-22-2013 at 10:56 AM.
11-22-2013, 10:55 AM
#19

great thread, lots of good tips there terry!
the last gas tank that I cleaned and coated, I put pebbles in, and suspended it from the rafters of the garage with a bunch of bungee cords.
that allowed me to shake the pebbles inside rather violently :-) which helped to knock loose the rust and whatnot inside.
the last gas tank that I cleaned and coated, I put pebbles in, and suspended it from the rafters of the garage with a bunch of bungee cords.
that allowed me to shake the pebbles inside rather violently :-) which helped to knock loose the rust and whatnot inside.
11-22-2013, 11:04 AM
#20
a lot of rust treatment solutions, including that permatex gel, are based on phosphoric acid, I believe.
if you go to home depot, you can get bottles of phosphoric acid rust treatment under brand names like jasco... it's probably going to be very similar to the rust treatment cleaners that companies sell for the gas tanks, except it'll be cheaper.
the coating used after the cleaning is a different chemical entirely.
phosphoric acid works well for surface rust on the outside of the car as well, after sanding or whatever, just don't apply it after sandblasting, and be sure to rinse it off before it dries.


