Planning for a 1" RB Body Lift...tips?
 10-10-2004, 03:51 PM
#1
Contributing Member
Thread Starter

Join Date: Dec 2003
Location: Way down in the hole...
Posts: 767
Likes: 0
Received 0 Likes
on
0 Posts
Planning for a 1" RB Body Lift...tips?
So in a week or two I wil probably buy myself either a 1" or 1.5" Roger Brown Body lift for my Tacoma. Excellent website, and the number of users here with his stuff recomends it pretty highly.
I'm a big 5 P's (proper planning prevents poor performance) kind of guy, so I wanted to get way ahead of myself and ask what sort of problems I should plan for. Will all my original hardware be frozen with rust?
What about lengthening stuff? Which wires/hoses are likely to give me trouble?
Thanks,
Ian
*I know I could search for this stuff (and I will continue to do so), but I get way too many strings that just show peoples sigs who have the body lift
 10-10-2004, 04:04 PM
#2
Feel free to read the installation instructions I have on-line and especially the links I have to vehicle-specific installations. Biggest tip is to hit all the exposed bolt threads with penetrating oil every day or so for a week before the lift. Will give you a fighting chance at getting them off (cab mount bolts, bumper bracket bolts, steering shaft rag joint bolts, rear bumper bolts).
Oh and technically it is a 4Crawler Offroad body lit kit.
Oh and technically it is a 4Crawler Offroad body lit kit.
Last edited by 4Crawler; 10-10-2004 at 09:51 PM.
 10-10-2004, 09:49 PM
#5
Registered User
Join Date: May 2004
Posts: 48
Likes: 0
Received 0 Likes
on
0 Posts
like most things that are metal, they corrode a bit over time, especially if you live in the salt belt... or i should say if you live in a state where they use large amounts of salt when it snows. like people have said before, hit the bolts with PB blaster for a week or two and it should come loose, i dont have a body lift on my taco but i did order mine from 4crawler and should recieve it in a few days and will be in stalling soon. 
10-11-2004, 04:07 AM
#6
Senior Member

Join Date: May 2002
Location: Binghamton, NY
Posts: 2,752
Likes: 0
Received 0 Likes
on
0 Posts
Make friends with 3 things - PB Blaster, air tools, and Loctite Threadlocker.
Other than that... it's a piece of cake. Have some scrap lumber around to support the body when you jack it up. That's it.
Other than that... it's a piece of cake. Have some scrap lumber around to support the body when you jack it up. That's it.
10-11-2004, 04:29 AM
#7
http://www.drawhorn.org/2_roger_brown_body_lift.htm
1. PB Blaster the bolts several days in advance for sure.
2. Pull the steering extension assembly off the rig, put in the spacer, put it back in.
3. Extra set of hands is very beneficial.
4. Pay attention to the OEM bolts as you take them out and use the ones that are proportionally longer in the proper places.
Good luck.
Trending Topics
10-11-2004, 05:09 AM
#8

Originally Posted by waskillywabbit
http://www.drawhorn.org/2_roger_brown_body_lift.htm
1. PB Blaster the bolts several days in advance for sure.
2. Pull the steering extension assembly off the rig, put in the spacer, put it back in.
3. Extra set of hands is very beneficial.
4. Pay attention to the OEM bolts as you take them out and use the ones that are proportionally longer in the proper places.
Good luck.
1. I didn't need any PB Blaster, but my truck was born and raised in TX and didn't have ANY rust under it. Anywhere...
2. Don't pull the steering box. Undo the two bolts in the rag joint and the one on the steering shaft, then remove all nuts on all the body mount bolts. Jack up one side (on th pinch weld) and then pull back the carpet and pull out the old bolt, slide the spacer in, then pound off the old washer, put it on the new bolt, then install. Do all of them on that side, then lower it down and then put on the nuts, but don't tighten all the way. Do the other side. When all spacers are installed, then go around and tighten up the body mount bolts. Now get back under and slide the steering spacer into it's place, drop in the one bolt you can get access to and put the nut on and then go in the rig and turn the wheel about 1/8 turn, then go back down and install the other steering bolt and then tighten them up along w/ the spline bolt on the shaft.
3. I didn't need any extra hands. I put my BL on w/ steering extension in about 1hr 45min by myself.
4. Do pay attention to the bolts though.
Good luck.
10-11-2004, 08:23 PM
#9
Contributing Member
Thread Starter
Join Date: Dec 2003
Location: Way down in the hole...
Posts: 767
Likes: 0
Received 0 Likes
on
0 Posts
I just had a thought (okay I actually had while driving to work this morning), Will raising the rear bumper make the spare tire lift (still hoping to use it) on my tacoma inoperable?
In general, thanks for all the advice, keep it coming
Oh, another thought-which probably deserves its own thread-anyone know what the largetst tire size can use with the spare tire lift is?
thanks all,
Ian
In general, thanks for all the advice, keep it coming
Oh, another thought-which probably deserves its own thread-anyone know what the largetst tire size can use with the spare tire lift is?
thanks all,
Ian
10-11-2004, 08:32 PM
#10
Does the spare tire crank go though the bumper? If so, it'll be a little off line, but should still work at 1". I know on the 3rd gen 4Runners, 1" is OK, at 2", you need to open up the internal guides to allow the crank in at the greater angle. Or you can modify or make a new crank to fit in between the bumper and spare. Not sure on the Tacoma, but on my 1st gen 4Runner, I can squeeze a 33x9.50 spare up in the stock location:
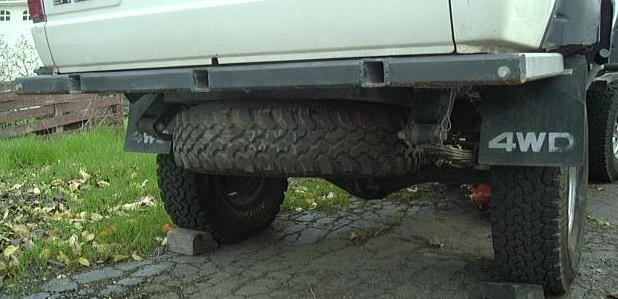
Limiting factors are the width between the shackles, the exhaust pipe routing (I've relocated mine up and over the frame):
http://www.4crawler.com/4x4/CheapTricks/TailPipe.shtml
and the e-brake cable on the rear axle. I find my limit is the space between the shackles. With a new 33, I have to take care to perfectly center the tire and then pull it back as far as I can before snugging it up.
10-11-2004, 08:38 PM
#11
Registered User
Join Date: Nov 2003
Location: Blowing Rock, NC
Posts: 536
Likes: 0
Received 0 Likes
on
0 Posts
Rear end noise after BL install
Ok, I installed the RB 1" body lift a couple days ago and followed all the instructions and now i'm getting a popping noise from the rear end of the vehicle. It's mostly heard when going over bumps or when turning sharp. All bolts I can find are secure and tight. Has anyone else heard of this happening?? It's on a 96 4runner.
10-11-2004, 08:44 PM
#12
Originally Posted by ASU4runner
Ok, I installed the RB 1" body lift a couple days ago and followed all the instructions and now i'm getting a popping noise from the rear end of the vehicle. It's mostly heard when going over bumps or when turning sharp. All bolts I can find are secure and tight. Has anyone else heard of this happening?? It's on a 96 4runner.
10-11-2004, 08:52 PM
#13
Registered User
Join Date: Nov 2003
Location: Blowing Rock, NC
Posts: 536
Likes: 0
Received 0 Likes
on
0 Posts
Thanks, i'll get someone to push down on the rear bumper while i look under it for the source of the noise. It's loud enough that I beleive I would've heard at least some noise before the lift. I will order the 9th and 10th body mount brackets soon and hopefully that will take care of it.
Oh, by the way, the install was relatively easy. I recommed finding someone with a hi-lift jack..
Oh, by the way, the install was relatively easy. I recommed finding someone with a hi-lift jack..
10-11-2004, 10:01 PM
#14
Contributing Member
Join Date: Oct 2003
Location: Escondido, CA
Posts: 709
Likes: 0
Received 0 Likes
on
0 Posts
I took some pictures along the way of my 1" RB lift. http://users.adelphia.net/~mattkeen/...Mods/BodyLift/
Soak the hell out of all the bolts you need to loosen or remove. I broke off one of the tacked on nuts on a body mount on the bed. It might have been because I didn't use anything on that mount to loosen it up even though I live in so cal. So now I have a bolt stuck in the body mount with the nut sort of on it and I have yet to figure out what to do other than cut open that piece of sub frame and cut the bolt, weld on a new nut somehow, close up the subframe and get a new bolt in there.
If your A/C unit is in the same location as mine it will be in the way of you dropping in one of the cab bolts on the front. You will need to loosen the clamp that holds it in place so you can push it up and make room for the bolt to drop in.
The rest is in the instructions. You shouldn't have to extend anything if you get a 1" lift. I didn't have to do anything and the fuel fillr still sits just inside its mount and I didn't need to remove the plastic piece that surrounds it. Had no problem with the fan shroud either.
The biggest pain was the rag joint spacer since I did it with all the parts still in. Just took some patience to wiggle all the parts around and get the steering lined back up.
Good luck!

Thread
Thread Starter
Forum
Replies
Last Post
GreatLakesGuy
The Classifieds GraveYard
8
09-04-2015 09:27 AM
defrag4
Vehicles - Trailers (Complete)
0
07-31-2015 10:50 AM
skoti89
Off Road Trip Planning, Expeditions, Trips, & Events
0
07-06-2015 07:45 PM


