tbr1977's 1986 Turbo 4Runner Build-Up Thread
 01-07-2010, 04:56 PM
#1
Registered User
Thread Starter
Join Date: Dec 2009
Location: Charleston, SC
Posts: 33
Likes: 0
Received 0 Likes
on
0 Posts
tbr1977's 1986 Turbo 4Runner Build-Up Thread
I recently bought an 86 turbo 4runner from Rhode Island, so it had the usual rust holes behind the rear wheel wells, so first thing was to get rid of the rust, so I chipped away until I had a good 2" buffer of good steel around the outside of the rust spots. After doing a little research on getting rid of rust, I bought a quart of ospho rust converter for 10.00 at true value. I brushed all of the loose rust away with a wire brush, then cleaned the areas good with denatured alcohol. I panted the ospho on using a paintbrush, you could almost immediately see the chemical reaction taking place. after letting the ospho sit for 24hrs there was a white powdery film over the area that was treated. after wiping the powder off fabbed up some sheet metal for the holes and mig welded them in place, then sanded the edges and welds down to the the body. I filled in the edges with bondo gold and and wet sanded, after getting the edges filled in I used glazing putty to fill in any imperfections that wouldn't show up until a coat of primer. I then put the first coat of primer on, and wet sanded it, I added an additional two coats of primer and let it dry in between each coat.
Now that the rust and body work were done, I decided to use herculiner on the fenders and rockers which works out great " No trying to match paint on the repair job!!" I used a roll of blue low tack painters tape and followed the bodyline from bumper to bumper. It helps to have full sunlight to find the exact line on the front fenders because the way the front fender is shaped, it's a little tricky getting the line even on both sides. Herculiner supplies you with a pot scrubber type pad to scuff the finish on the area that you're painting to insure a good bond. I used the supplied pad, but wasn't satisfied with the amount of time it takes to get a good rough finish, so I went to the hardware store and bought a 120 grit foam sanding block which worked much better with less effort, and with the pad it will contour to the shape of what you're sanding. I spent about an hour sanding, and taking my time getting into the tight areas around the pinch molding. after sanding I used xylene to wipe the area clean and dissolve any small particles left behind. While laying down on the driveway sanding I didn't realize I was lying on a xylene soaked rag! This stuff went through two shirts and felt like I was lying in fire ants!! Do not get xylene on your skin, I had to get in a cool shower and wash with dawn to stop the burning on my lower back! After that ordeal and a cold beer I cracked open the can of herculiner and used a paint stirrer in a 3/8 drill to stir the paint. It is very important to stir this stuff for at least a minute each time before you pour it in a roller pan, because the rubber particles will settle on the bottom very fast. It rolls on very easily and try and use the roller for the majority of the area, I only used the supplied brush to get in the corners and across the pinch molding. After the first coat you will notice some small smeared spots on the finish, That is normal on the first coat. Let it set for 1 to 1 1/2hrs and apply the second coat which will go on and fill any smeared areas and imperfections in the first coat. After the second coat sat for about 45 minutes, I pealed off all of the tape and let it sit overnight. the next morning the paint was hard and ready to be used. After doing two coats on each side and tailgate I have about a half gallon of liner and an extra roller left from the kit! Sorry about the long thread, I just wanted to add most of the details. Next thing on the agenda is herculining my step bars and push bar, then a set of black cragar soft 8's! Here is a link to my album


Now that the rust and body work were done, I decided to use herculiner on the fenders and rockers which works out great " No trying to match paint on the repair job!!" I used a roll of blue low tack painters tape and followed the bodyline from bumper to bumper. It helps to have full sunlight to find the exact line on the front fenders because the way the front fender is shaped, it's a little tricky getting the line even on both sides. Herculiner supplies you with a pot scrubber type pad to scuff the finish on the area that you're painting to insure a good bond. I used the supplied pad, but wasn't satisfied with the amount of time it takes to get a good rough finish, so I went to the hardware store and bought a 120 grit foam sanding block which worked much better with less effort, and with the pad it will contour to the shape of what you're sanding. I spent about an hour sanding, and taking my time getting into the tight areas around the pinch molding. after sanding I used xylene to wipe the area clean and dissolve any small particles left behind. While laying down on the driveway sanding I didn't realize I was lying on a xylene soaked rag! This stuff went through two shirts and felt like I was lying in fire ants!! Do not get xylene on your skin, I had to get in a cool shower and wash with dawn to stop the burning on my lower back! After that ordeal and a cold beer I cracked open the can of herculiner and used a paint stirrer in a 3/8 drill to stir the paint. It is very important to stir this stuff for at least a minute each time before you pour it in a roller pan, because the rubber particles will settle on the bottom very fast. It rolls on very easily and try and use the roller for the majority of the area, I only used the supplied brush to get in the corners and across the pinch molding. After the first coat you will notice some small smeared spots on the finish, That is normal on the first coat. Let it set for 1 to 1 1/2hrs and apply the second coat which will go on and fill any smeared areas and imperfections in the first coat. After the second coat sat for about 45 minutes, I pealed off all of the tape and let it sit overnight. the next morning the paint was hard and ready to be used. After doing two coats on each side and tailgate I have about a half gallon of liner and an extra roller left from the kit! Sorry about the long thread, I just wanted to add most of the details. Next thing on the agenda is herculining my step bars and push bar, then a set of black cragar soft 8's!
Here is a link to my album
Last edited by trb1977; 03-23-2010 at 05:41 PM. Reason: spelling error
 01-08-2010, 05:54 AM
#6
Registered User
Join Date: Jul 2002
Location: Milwaukee WI
Posts: 1,047
Likes: 0
Received 0 Likes
on
0 Posts
keep up the good work, have you checked out, http://www.22rte-trucks.com Its A great resource.
Trending Topics
01-09-2010, 02:39 AM
#8
YotaTech Milestone-Two Millionth Post
The 88 4runner my son (age 13) bought, had the obligatory rust around each wheel well. I didn't REALLY want to do the texture thing on the truck because it's paint is sooooo nice, but when I tried to just paint it, no matter how smooth it felt to me, it always looked like crap. So, I used DUPLICOLOR professional / paintable undercoating from Advance Auto for about $7 a can and the covered it with a nice gloss black enamel and now it feels bullet-proof.
It was just enough texture to hide imperfections of the bodywork no matter how good I thought I had it.
Also, because I had used a similar product on my truck, very much unsuccessfuly (faded gray, looks like crap), I wanted to seal it better y using enmel, and I wanted to make it so it was much harder with the enamel and I wanted to make sure it would not fade.
If the HERCULINER will not fade, then don't worry about it. If it's a product that is sensitive to UV, then, as long as you are able to (check to see if it's paintable), I would put some enamel on it if you like a certain color and want it to stay that way.
01-09-2010, 05:26 AM
#9
Registered User
Thread Starter
Join Date: Dec 2009
Location: Charleston, SC
Posts: 33
Likes: 0
Received 0 Likes
on
0 Posts
Looks nice I like how you followed the body line straight out on the front!! I have thought about some gloss black over my herculiner when it fades, because the more I look at it, the more I like the gloss! Great job on the 88!
01-10-2010, 04:55 PM
#10
Registered User
Thread Starter
Join Date: Dec 2009
Location: Charleston, SC
Posts: 33
Likes: 0
Received 0 Likes
on
0 Posts
Got bored this weekend, and I needed a better sound system in the runner, so I bought a memphis m class 10" sub and an alpine digital 3oo watt amp. My buddy built a sealed box out of 3/4 mdf with the sub hidden underneath. It fits perfectly behind the rear seats and best of all I threw some herculiner on it!! The stuff is perfect for sound dampening and makes a nice coating for a speaker enclosure. I'm gonna install some pioneer 6x9's in the rear side panels, and call it done. Not to much, just a nice crisp sound with clarity!

Last edited by trb1977; 02-04-2010 at 06:50 PM.
02-17-2010, 04:13 PM
#11
Registered User
Thread Starter
Join Date: Dec 2009
Location: Charleston, SC
Posts: 33
Likes: 0
Received 0 Likes
on
0 Posts
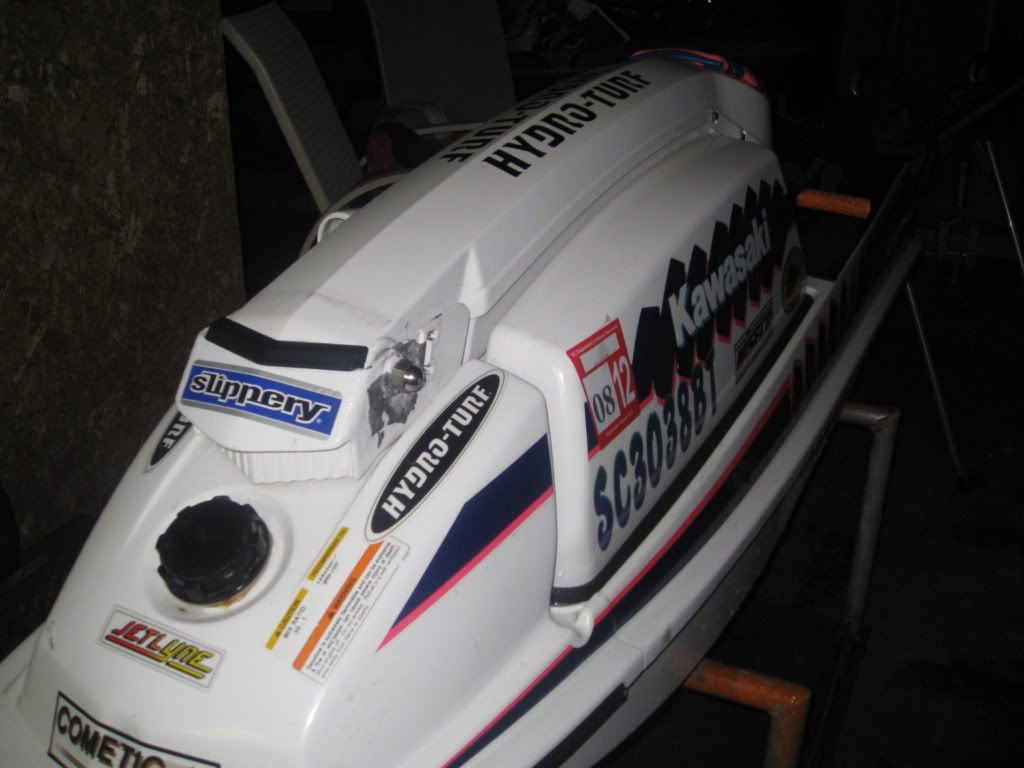
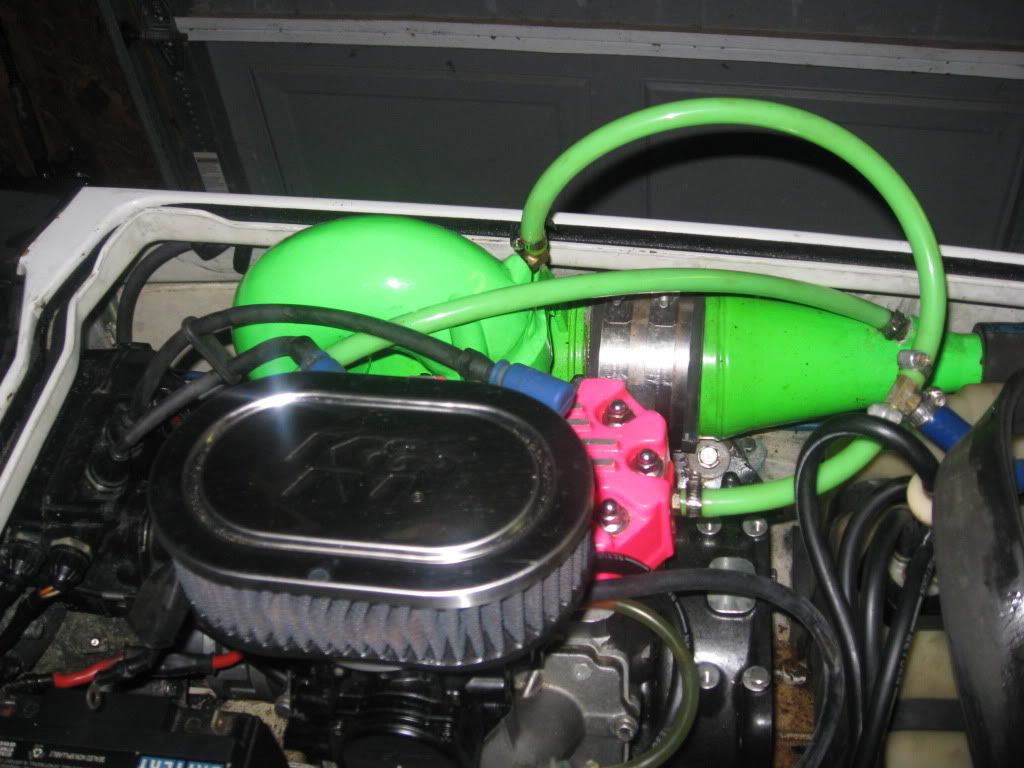
My latest project
I bought a 500lb rated receiver carrier from harbor freight for 49.00, and being in the electrical field I used galvanized uni-strut, spring-nuts, and L-brackets making the bunks completely adjustable with a 3/4 wrench. I welded the adjustable bunk assembly to the frame of the carrier. The extra 1/2" hole in the four outside L-brackets overhang and are perfect for my ratchet straps. You can't even tell its back there while driving and best of all no trailer to back or park! I threw in some pics of the ski too! Its a 91 js440 hull with a brand new custom built 550sx race ready engine, I haven't even broke it in yet. I have only put 45 minutes on the engine since the install. Its not a toyota but I'm pretty proud of the build lol!


Last edited by trb1977; 03-23-2010 at 06:45 PM.

Thread
Thread Starter
Forum
Replies
Last Post
RedRunner_87
95.5-2004 Tacomas & 96-2002 4Runners (Build-Up Section)
84
06-01-2021 01:51 PM


