Dropzone's 1994 4runner Build AKA: Project Recycle:
 01-04-2017, 04:14 PM
#361
Coopster it is actually an R151, would have to find a bell housing too. I think I might be able to pick up an R150 reasonable too. Gonna give the solenoid swap a try.
Been a little chilly, haven't decided to suck it up and lay out in the driveway to replace the solenoids yet.
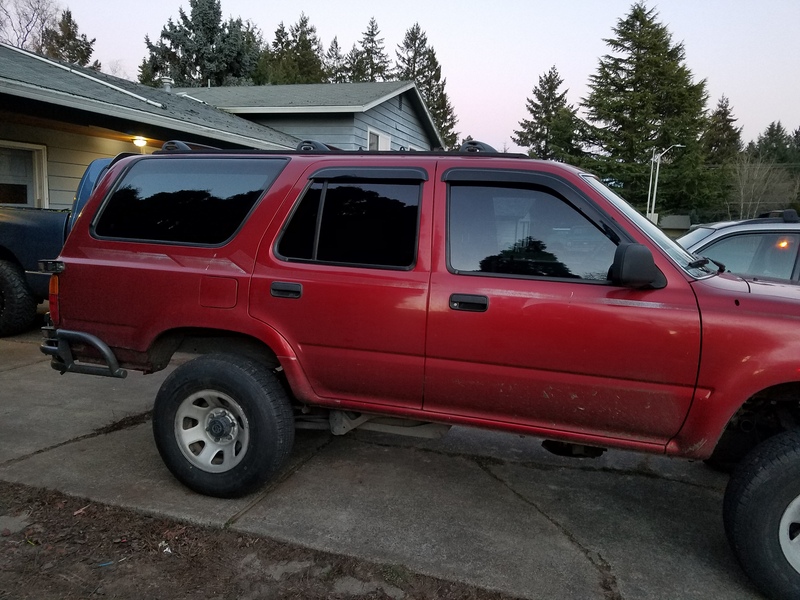
The missus gAve me a tint job for Christmas. Got it done this afternoon. Should add some privacy for sleeping in the back when this thing finally hits the trail
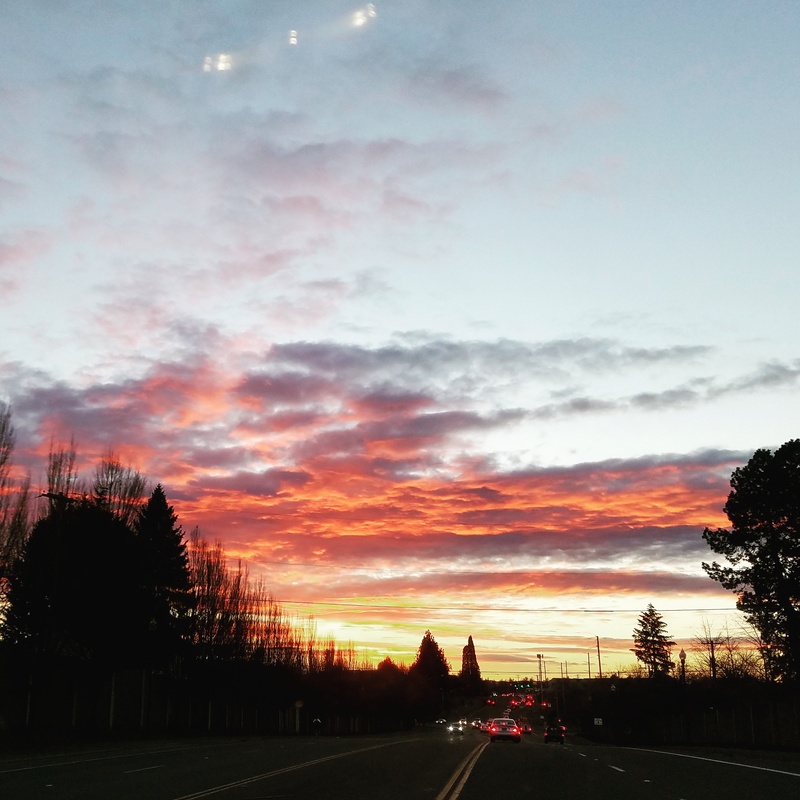
Thought the sunset looked cool on the way home
Been a little chilly, haven't decided to suck it up and lay out in the driveway to replace the solenoids yet.
The missus gAve me a tint job for Christmas. Got it done this afternoon. Should add some privacy for sleeping in the back when this thing finally hits the trail

Thought the sunset looked cool on the way home

 01-04-2017, 04:19 PM
#362
Registered User
iTrader: (2)
Join Date: Oct 2009
Location: Centeral Willamette Valley Oregon
Posts: 1,044
Likes: 0
Received 5 Likes
on
5 Posts
If your wanting an R151 bell housing I might be able to help you out. I have a complete R151 from bell to rear output flange. I bought a right hand drive R151 bell so I can put this thing into the Hilux. That leaves me an R151 bell left over for a left hand drive vehicle.
I have thought about putting the bell on Ebay to sell and recoup some cost of the R purchase. If you need let me know. I am not in a hurry to let it go so no rush.
I have thought about putting the bell on Ebay to sell and recoup some cost of the R purchase. If you need let me know. I am not in a hurry to let it go so no rush.
01-04-2017, 06:43 PM
#364
Thanks Don-I go back to work on Sunday so I will know more about the 151.
Reluctanse-yes an R150 would be easier than a 151 but thinking about it from a strength perspective too.
My main plan though is to stick with the Auto, get the geared case adapter from Inchworm or Marlin and use my duals from the Trekker.
Reluctanse-yes an R150 would be easier than a 151 but thinking about it from a strength perspective too.
My main plan though is to stick with the Auto, get the geared case adapter from Inchworm or Marlin and use my duals from the Trekker.
01-04-2017, 06:55 PM
#365
Registered User
iTrader: (2)
Join Date: Oct 2009
Location: Centeral Willamette Valley Oregon
Posts: 1,044
Likes: 0
Received 5 Likes
on
5 Posts
Cool, keep me posted on the R tranny, and remember I am a dealer for both companies and am happy to help get you parts if you need them, just call me and I would be more then happy to take care of you.
01-05-2017, 04:11 PM
#367
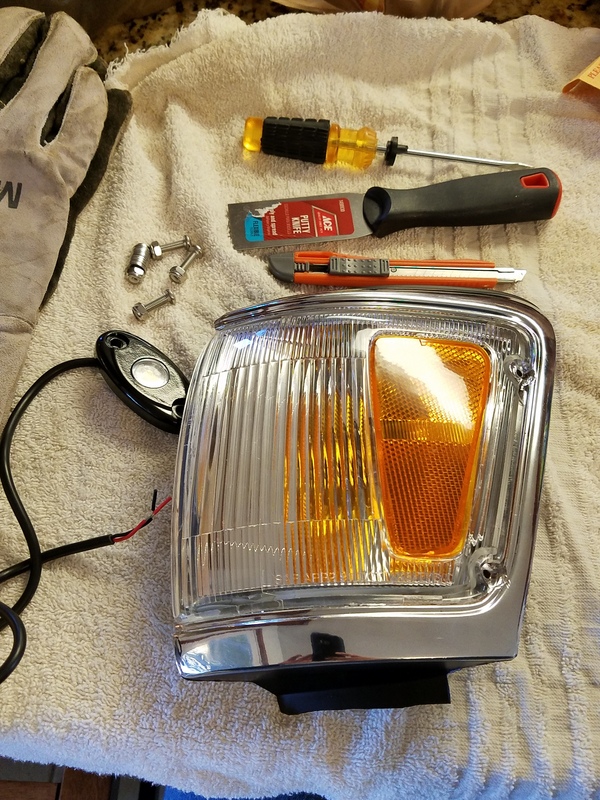
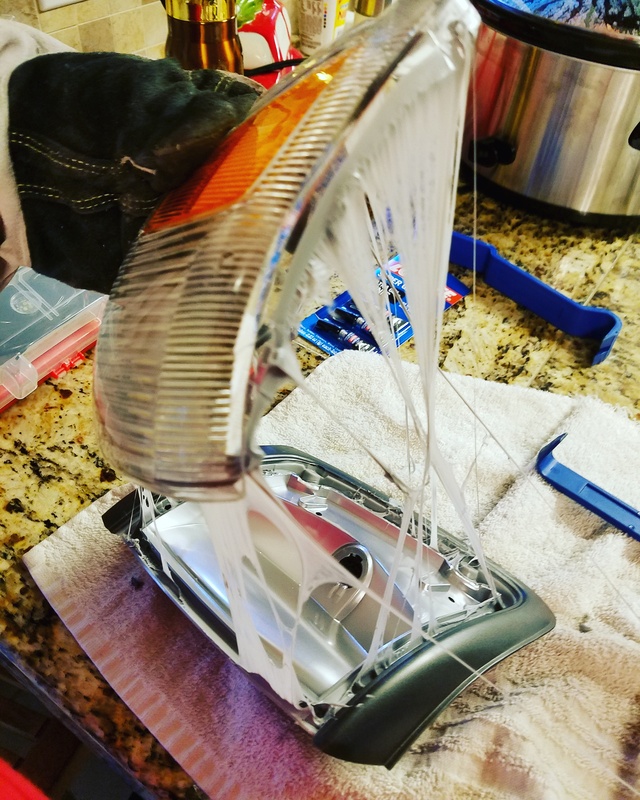
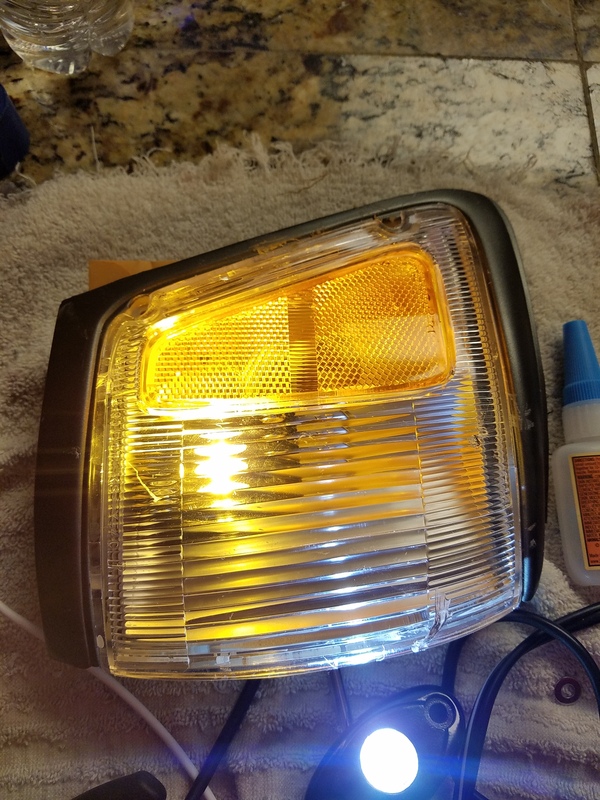
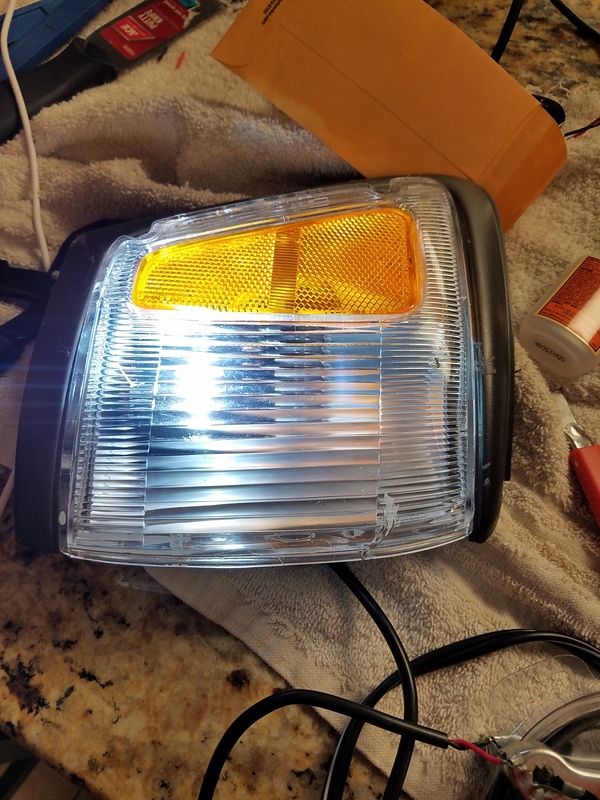
Found a few amber LED pods in my stash. Decided to try an experiment with a set of my extra corner lights.
The pod is a 9w so minimal draw to the electrical system Plan is to wire them into the turn signals. Other drivers can really only see a 2nd Gen signal from the front, this will hopefully allow the signal to be noticed from the side
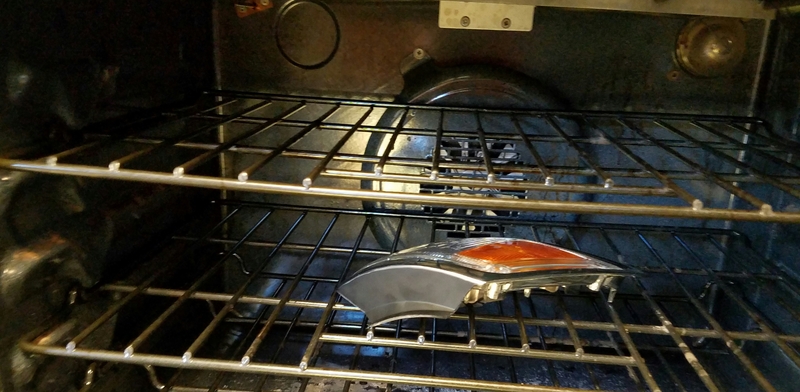
I tried the oven method for separating the housing and lens. 5 minutes at 225� worked but was a little too long. It wrinkles the plastichrome and warped the lens a bit
Lens and housing popped right apart
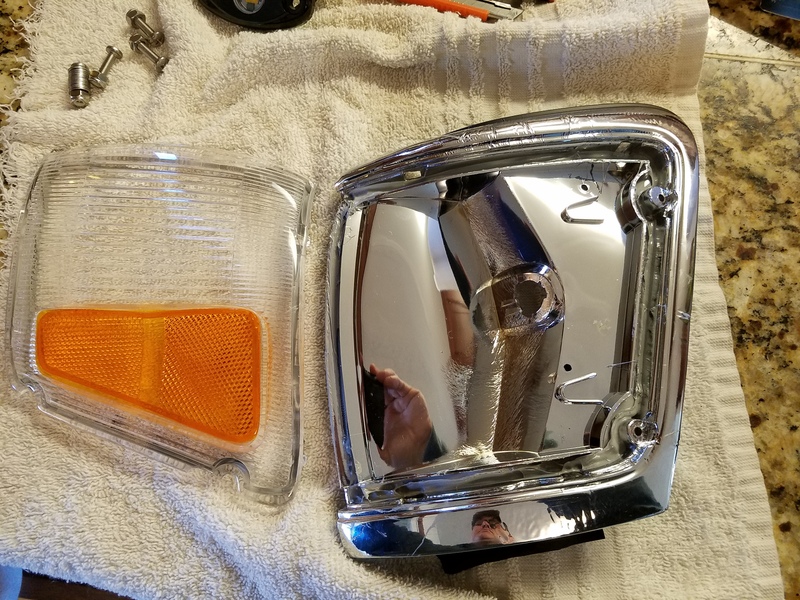
Sanded the housing and gave it shot of paint. Sealed it back up with silicone and clamped it down. Gonna let it sit over night to hopefully get a good seal. Should be able to wire it up in the morning
It will get another shot of paint, jumped the gun and got finger prints all over it
The pod is a 9w so minimal draw to the electrical system Plan is to wire them into the turn signals. Other drivers can really only see a 2nd Gen signal from the front, this will hopefully allow the signal to be noticed from the side

I tried the oven method for separating the housing and lens. 5 minutes at 225� worked but was a little too long. It wrinkles the plastichrome and warped the lens a bit

Lens and housing popped right apart

Sanded the housing and gave it shot of paint. Sealed it back up with silicone and clamped it down. Gonna let it sit over night to hopefully get a good seal. Should be able to wire it up in the morning
It will get another shot of paint, jumped the gun and got finger prints all over it

 01-06-2017, 09:51 AM
#369

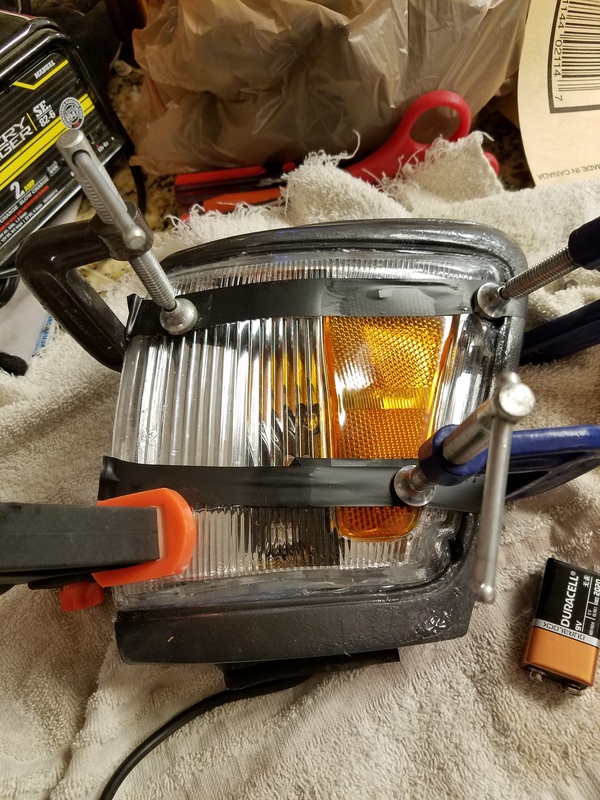
It's the little black UFO in the first image.
Looks like there wasn't enough room to get it mounted in the very bottom corner, which measurement got too tight to the lenses if so? Why did you not out in a light separator, not concerned or just never seen it? I thought you were mounting those silly but awesome at the same time turn lights. You know the white ones that light up the side of the road when you signal a turn and turn the wheel.
You've reminded me I need proper indicators, thanks.
01-06-2017, 09:02 PM
#370
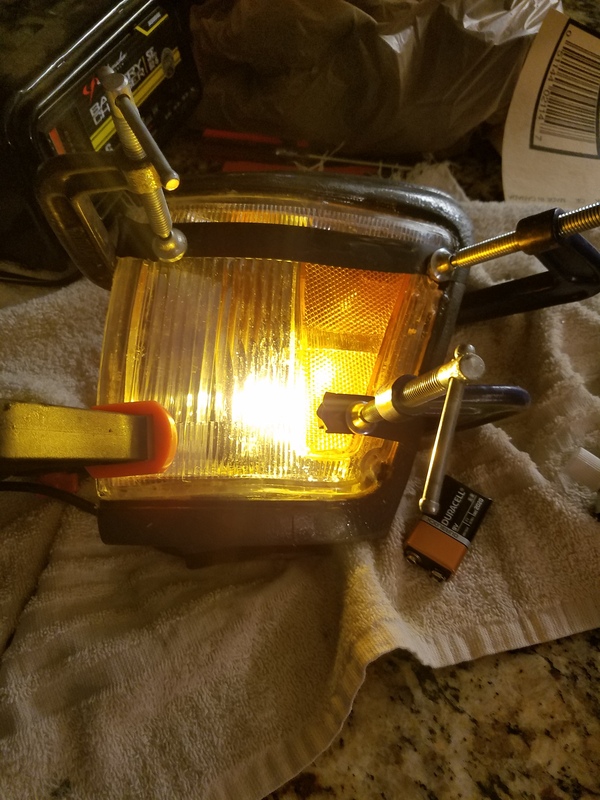
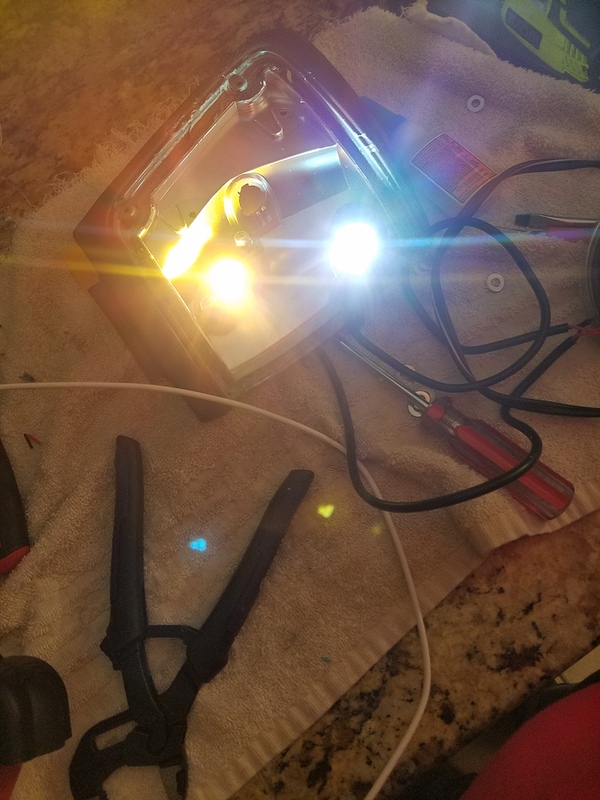
Night shot of V1.0
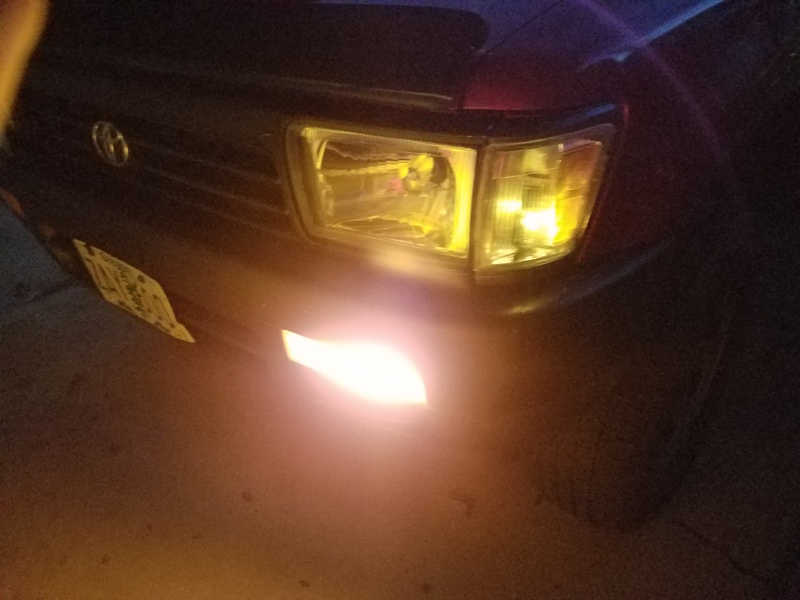
Co_94 is correct. There is a better picture of them below
You know, I was so fixated on using amber I didn't even think about using a white LED.
edit: just re-read your post again, those little corner lights would be cool too...hmmmm may have to find a circuit diagram on the web that shows constant power with a blinker. I think Caddy's had or have something like that
So I did a comparison.
didn't even think about a light separator..
anyway on to the passenger side aka V2.0
I dropped the oven temp down to 210� for 6 minutes.
That eliminates the wrinkles in the finish and no lens warping but reminded me of why I hate butyl adhesives
Close up of the pods. The amber is bolted in with a white one in for comparison
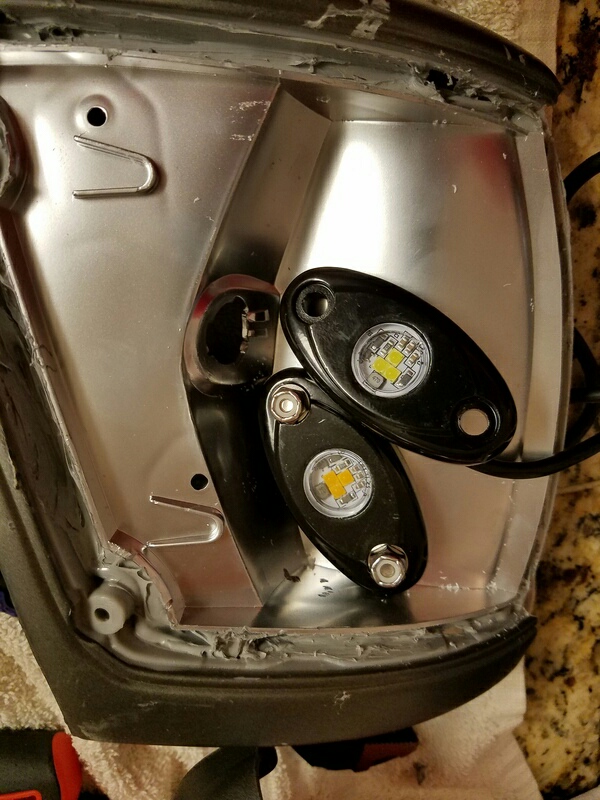
side by side with no lens
amber
white
So looking at the output of 2.0 I will swap the driver's side V1.0 amber with a white LED

It's the little black UFO in the first image.
Looks like there wasn't enough room to get it mounted in the very bottom corner, which measurement got too tight to the lenses if so? Why did you not out in a light separator, not concerned or just never seen it? I thought you were mounting those silly but awesome at the same time turn lights. You know the white ones that light up the side of the road when you signal a turn and turn the wheel.
You've reminded me I need proper indicators, thanks.
Looks like there wasn't enough room to get it mounted in the very bottom corner, which measurement got too tight to the lenses if so? Why did you not out in a light separator, not concerned or just never seen it? I thought you were mounting those silly but awesome at the same time turn lights. You know the white ones that light up the side of the road when you signal a turn and turn the wheel.
You've reminded me I need proper indicators, thanks.
edit: just re-read your post again, those little corner lights would be cool too...hmmmm may have to find a circuit diagram on the web that shows constant power with a blinker. I think Caddy's had or have something like that
So I did a comparison.
didn't even think about a light separator..
anyway on to the passenger side aka V2.0
I dropped the oven temp down to 210� for 6 minutes.
That eliminates the wrinkles in the finish and no lens warping but reminded me of why I hate butyl adhesives

Close up of the pods. The amber is bolted in with a white one in for comparison

side by side with no lens

amber

white

So looking at the output of 2.0 I will swap the driver's side V1.0 amber with a white LED
Last edited by dropzone; 01-06-2017 at 09:17 PM. Reason: Random thoughts
01-11-2017, 12:31 PM
#372
Registered User
iTrader: (2)
Join Date: Oct 2009
Location: Centeral Willamette Valley Oregon
Posts: 1,044
Likes: 0
Received 5 Likes
on
5 Posts
I like this mod! Slowly swapping out incandescent bulbs for led. I used a similar method putting my blinkers in my parking lights. I lost my front blinker housing going to the winch bumper.
01-12-2017, 05:38 AM
#373
Contributing Member
The tint looks really good, and the light mod is excellent.
01-12-2017, 11:19 AM
#374
Thanks! I love your 4Runner, pretty much what I am shooting for with this thing, just a little lower..
Thanks Don. I spoke to my buddy at work about his R-151, he has your contact info and will give you a shout if he decides to sell. I guess he had talked/emailed you last year about doing the auto to manual transmission swap in his 87. The engine blew last week...he is about ton with old toyotas
Thanks Hab! the tint came out a little darker than I expected but should keep stuff in the back a little more secure keeping keeping prying eyes out.
I know the light mod has been done a few million times but figured I would give it my take.
I just wish my lens had been in better shape..
Thanks Hab! the tint came out a little darker than I expected but should keep stuff in the back a little more secure keeping keeping prying eyes out.
I know the light mod has been done a few million times but figured I would give it my take.
I just wish my lens had been in better shape..
Last edited by dropzone; 01-12-2017 at 11:21 AM.
01-13-2017, 11:58 AM
#375
Registered User
 01-15-2017, 05:38 PM
#376
still too cold to swap the transmission solenoids. Since the roads have sucked intermittently I have had to go much above 40-45 mph so been driving the 4Runner and it has worked fine.
Above 45 and it shifts like crap
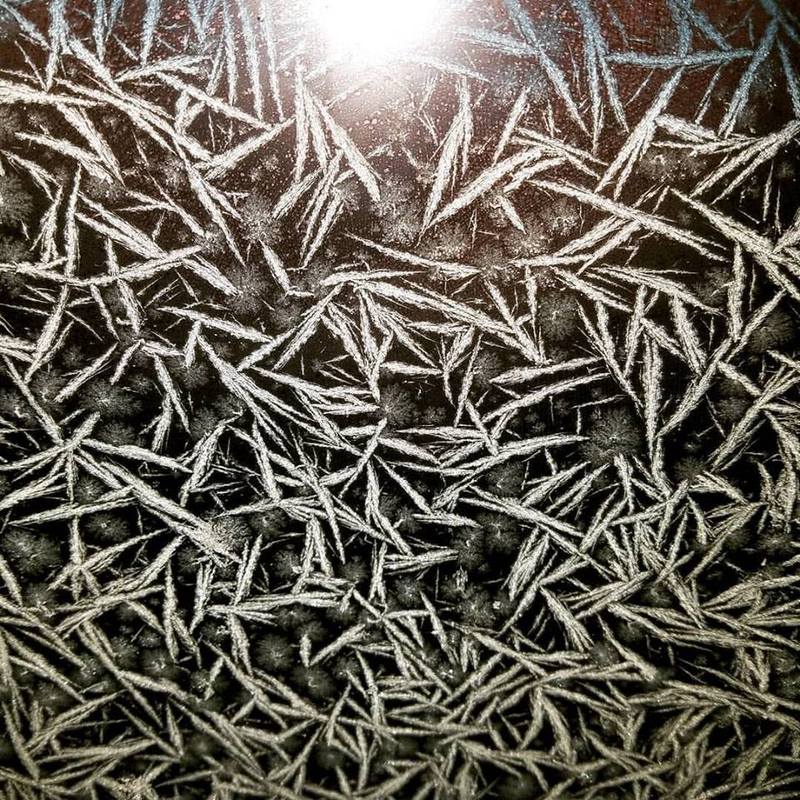
Anyway this was the windshield this morning, thought it was a cool pattern
Above 45 and it shifts like crap
Anyway this was the windshield this morning, thought it was a cool pattern
 01-15-2017, 06:30 PM
#377
Contributing Member
Is warm dry weather ever going to get here??? Sometimes it's so hard having to wait to get things done! That frost is awesome, very pretty. 
01-28-2017, 06:10 PM
#378
Well it finally warmed up and I had a free afternoon to get a couple of things fixed
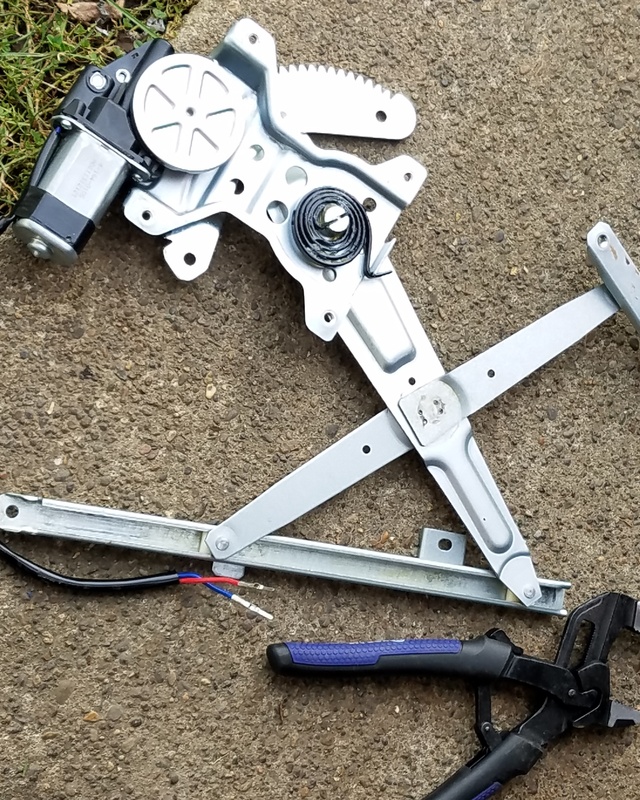
I have been having intermittent issues with the left rear window so I ordered a replacement regulator a few months ago. Tear the door apart to find out they send a passenger side regulator..
And too late to send it back..
So with that being a bust I started to tackle the tailgate. I could roll down the window but not open the tailgate.
This of course is a major PITA.
Started taking it apart, I was able to get it unlocked and the tailgate down.

Digging around I found a small broken spring that goes being the lock release pivot.
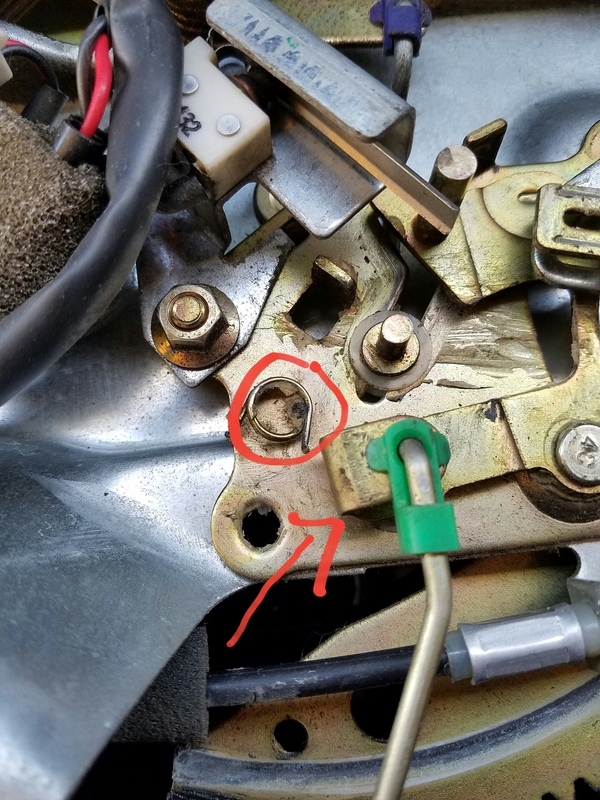
Ran out of daylight so threw it back together. Plan is to replace the broken spring with a coil spring.
Upside I can get the tailgate open now
I have been having intermittent issues with the left rear window so I ordered a replacement regulator a few months ago. Tear the door apart to find out they send a passenger side regulator..
And too late to send it back..

So with that being a bust I started to tackle the tailgate. I could roll down the window but not open the tailgate.
This of course is a major PITA.
Started taking it apart, I was able to get it unlocked and the tailgate down.

Digging around I found a small broken spring that goes being the lock release pivot.

Ran out of daylight so threw it back together. Plan is to replace the broken spring with a coil spring.
Upside I can get the tailgate open now
01-28-2017, 07:46 PM
#379
2nd Gen Rear Tailgate Taillight wiring diagram
Saving for future reference, borrowed from 4crawler
http://www.4crawler.com/4x4/CheapTri...arWindow.shtml
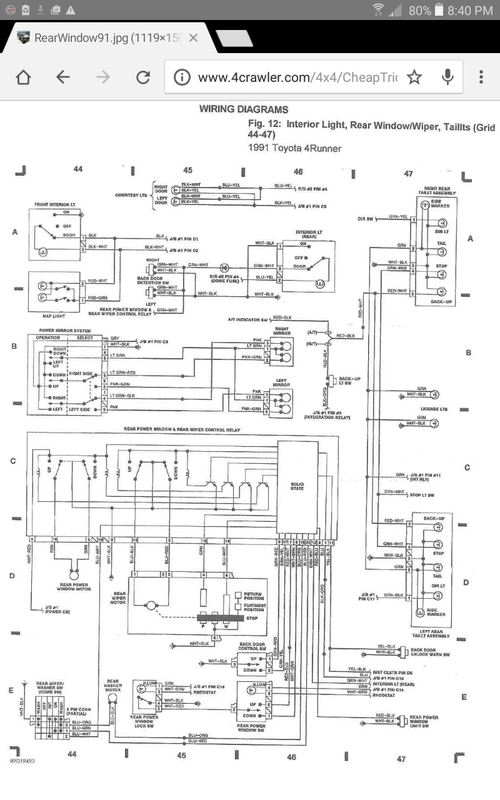
http://www.4crawler.com/4x4/CheapTri...arWindow.shtml
 01-28-2017, 10:37 PM
#380
Super Moderator
Staff
iTrader: (1)
Join Date: Aug 2008
Location: Anderson Missouri
Posts: 11,788
Likes: 0
Received 21 Likes
on
19 Posts
That is frustrating to get the wrong part. That pin in the slot just above the green clip, seems like I have had issues with it in the past where it will not move easily and can cause issues with the tail gate not to open. If I recall right, I just used some wheel bearing grease to lube it back up. While back there, I like to use wheel bearing grease on the track that rolls the back glass up with the metal wheel in it. I coat that track down in hopes of keeping it from rusting up. I think the 2nd gens were better about keeping moisture out of the tail gate.


