
Starter/ignition
 01-12-2013, 09:55 AM
#21
Quick voltage test you can do to tell if the problem is in the starter or extenral to it (wiring):
- http://www.4crawler.com/4x4/CheapTri...shtml#EasyTest
And easy enough to clean up the plunger:
- http://www.4crawler.com/4x4/CheapTri...PlungerCleanup
They should last a very long time, mine seems to be original and nearly 290k miles and been cleaned up once.
- http://www.4crawler.com/4x4/CheapTri...shtml#EasyTest
And easy enough to clean up the plunger:
- http://www.4crawler.com/4x4/CheapTri...PlungerCleanup
They should last a very long time, mine seems to be original and nearly 290k miles and been cleaned up once.
 01-14-2013, 09:03 AM
#23
01-21-2013, 03:33 PM
#24
Registered User
Thread Starter
Join Date: Oct 2011
Location: Baltimore, MD
Posts: 88
Likes: 0
Received 0 Likes
on
0 Posts
ok guys been super busy with work lately so i am just getting around to this (finally!) But i am a super big tard when it comes to electrical, and wiring diagrams look like Greek to me (and i even took Greek!)
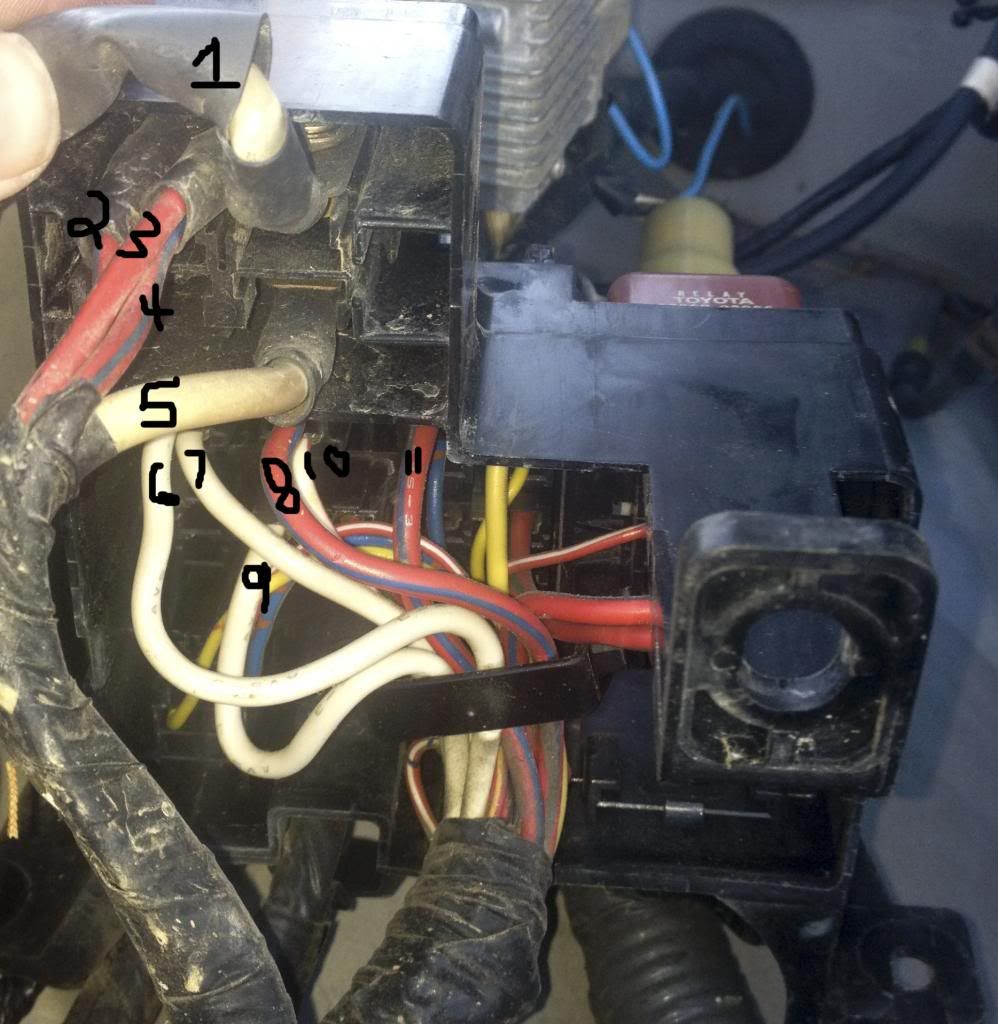
So im having trouble figuring out which wire in the fuse block i need to tap
This is a picture of my fuse block and i numbered some of the wires. if you can let me know id appeciate it. Just didnt want to tap the wrong wire and fry everything!

So im having trouble figuring out which wire in the fuse block i need to tap
This is a picture of my fuse block and i numbered some of the wires. if you can let me know id appeciate it. Just didnt want to tap the wrong wire and fry everything!
Last edited by mxdw88; 01-21-2013 at 03:41 PM.
01-21-2013, 06:14 PM
#25
ok guys been super busy with work lately so i am just getting around to this (finally!) But i am a super big tard when it comes to electrical, and wiring diagrams look like Greek to me (and i even took Greek!)
So im having trouble figuring out which wire in the fuse block i need to tap
This is a picture of my fuse block and i numbered some of the wires. if you can let me know id appeciate it. Just didnt want to tap the wrong wire and fry everything!
So im having trouble figuring out which wire in the fuse block i need to tap
This is a picture of my fuse block and i numbered some of the wires. if you can let me know id appeciate it. Just didnt want to tap the wrong wire and fry everything!
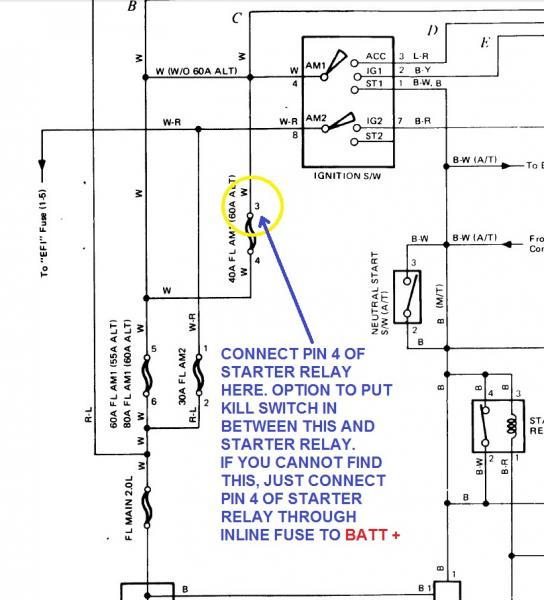
Best to trace it yourself:
To find Pin3, look for terminal of 40-Amp fuse that connects to 80A fusible link. This is terminal 4. Terminal 3 is the opposite terminal. To verify that you have the right Pin3 of FL, measure voltage there.
With 40-Amp fuse installed, you should get 12V.
Remove 40-amp fuse, you should get no voltage.
Connect (crimp or crimp PLUS solder) wire from Start relay Pin 4 to Terminal 3 of FL.
I updated my write-up on my sig to also reflect this
01-22-2013, 08:02 AM
#26
Registered User
Thread Starter
Join Date: Oct 2011
Location: Baltimore, MD
Posts: 88
Likes: 0
Received 0 Likes
on
0 Posts
Yeah I was thinking it was either 6 or 7 because they're directly under the 40amp fuse. So I just need to test 6 and 7 then to see which one I'm getting 12v off of?
01-22-2013, 08:48 AM
#27
01-27-2013, 06:09 PM
#29
Registered User
Thread Starter
Join Date: Oct 2011
Location: Baltimore, MD
Posts: 88
Likes: 0
Received 0 Likes
on
0 Posts
 so I will be picking a new one of those up this week. It ended up being wire #7 in the pic. If I tested everything correctly (no voltage with fuse removed and a little over 12v with fuse in.) Wire #6 had constant 12v with or without fuse does that sound right? Hope so. Anyways while I await a new soldering gun, I was also wondering how you connected Pin 4 to Terminal 3 of FL? Did you use butt connectors? It seems like it would be very hard to get up in there to connect to where the terminal 3 (#7) wire connects? Let me know thanks!
01-27-2013, 08:27 PM
so I will be picking a new one of those up this week. It ended up being wire #7 in the pic. If I tested everything correctly (no voltage with fuse removed and a little over 12v with fuse in.) Wire #6 had constant 12v with or without fuse does that sound right? Hope so. Anyways while I await a new soldering gun, I was also wondering how you connected Pin 4 to Terminal 3 of FL? Did you use butt connectors? It seems like it would be very hard to get up in there to connect to where the terminal 3 (#7) wire connects? Let me know thanks!
01-27-2013, 08:27 PM
#30
how you connected Pin 4 to Terminal 3 of FL? Did you use butt connectors? It seems like it would be very hard to get up in there to connect to where the terminal 3 (#7) wire connects? Let me know thanks!
1) Wrap tap wire around existing wire (for resistance to vibration), then
2) Solder for corrosion resistance, added resistance to vibration, and better/more contact area.
No need to connect directly to fuse terminal. Just carefully (Don't even cut a single strand of wire) strip insulation from #7 where it's easy enough to access (i.e., enclosed in green i pic below), strip enough insulation on end of tap wire that will go to starter relay, make a couple of wraps around #7 and solder.

Just directly splice tap wire to wire that goes to relay pin 4.
01-28-2013, 04:28 AM
#31
Registered User
Thread Starter
Join Date: Oct 2011
Location: Baltimore, MD
Posts: 88
Likes: 0
Received 0 Likes
on
0 Posts
02-05-2013, 03:36 PM
#32
Registered User
Thread Starter
Join Date: Oct 2011
Location: Baltimore, MD
Posts: 88
Likes: 0
Received 0 Likes
on
0 Posts
Let's put this thread to bed!
Ok guys finally got everything done this weekend! Thanks for all the help espeacially RAD! After I got everything rewired and cranked it for the first time, I immediately noticed that it was cranking faster like it had new life put back into it!
Here are some pics of the finished product before everything was buttoned up nicely (i know the tape job is horrendous looking, but i didn't have much room to work with!)
Again many thanks!
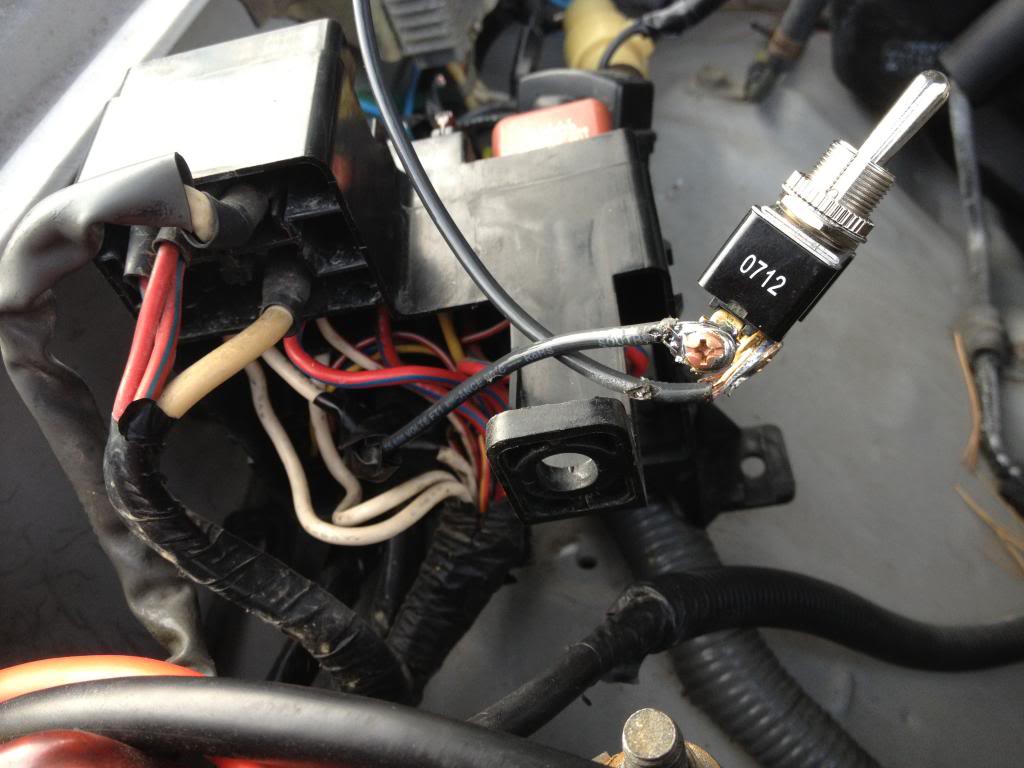
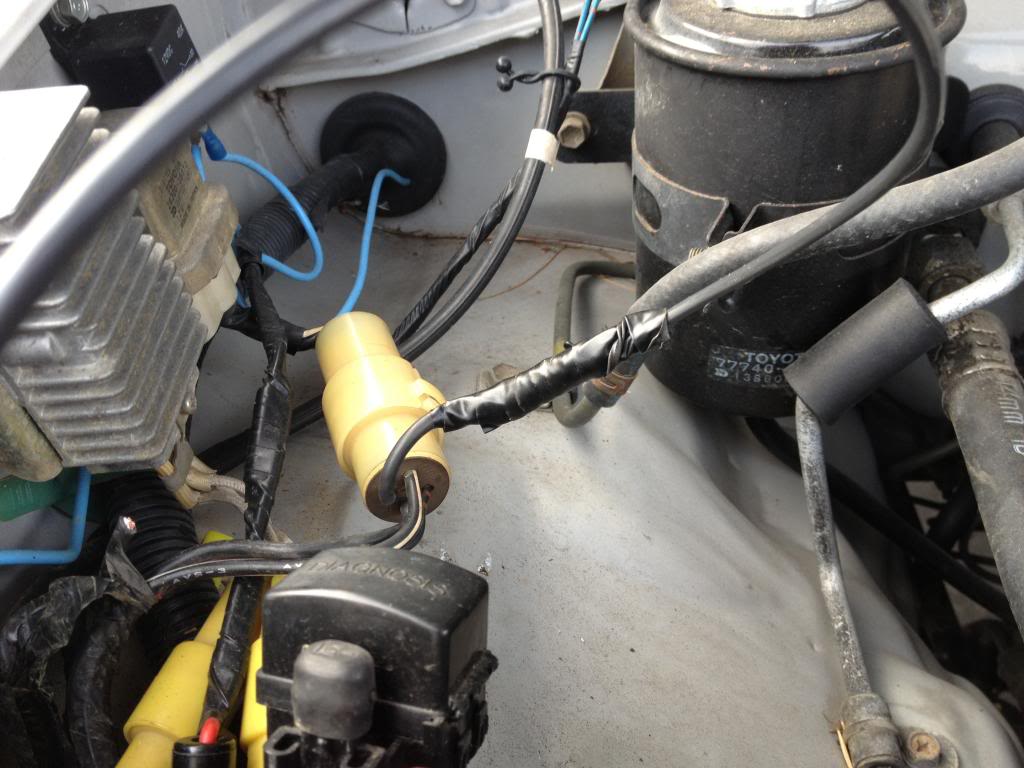
Here are some pics of the finished product before everything was buttoned up nicely (i know the tape job is horrendous looking, but i didn't have much room to work with!)
Again many thanks!
02-06-2013, 02:57 PM
#33
Glad It Worked Out
Yeah, when you get the chance, clean up wires, wrap wires back into harness... and hide your kill-switch - LOL!
Regards,
Ray

Thread
Thread Starter
Forum
Replies
Last Post


