
Installing a GM alternator and have some wiring questions
 03-07-2013, 03:16 PM
#1
Registered User
Thread Starter
iTrader: (2)
Join Date: Dec 2009
Location: Pleasanton, CA - SF Bay Area
Posts: 2,159
Likes: 0
Received 7 Likes
on
5 Posts
Installing a GM alternator and have some wiring questions
Hi guys - installing a Delco Remy GM alternator on my 87 4Runner 22RE. I have the Trailgear bracket kit and got some 4 gauge wire for the alt-bat connection.
What I'm trying to figure out is how to splice the wires - I found several existing threads on GM alternator swaps - below - but still a little confused.
http://www.toyotaoffroad.com/Article.../Chevy_Alt.htm
https://www.yotatech.com/forums/f115.../#post51274972
http://www.ultimateyota.com/index.ph...6&topic=9965.0
Here is the pigtail that came with the alternator:
S F L P on the plug, but only wires coming from "S" and "L". Inside the plug, there are only metal contacts for those 2 letters as well (even though the female plug on the alt itself has 4 metal prong contacts)
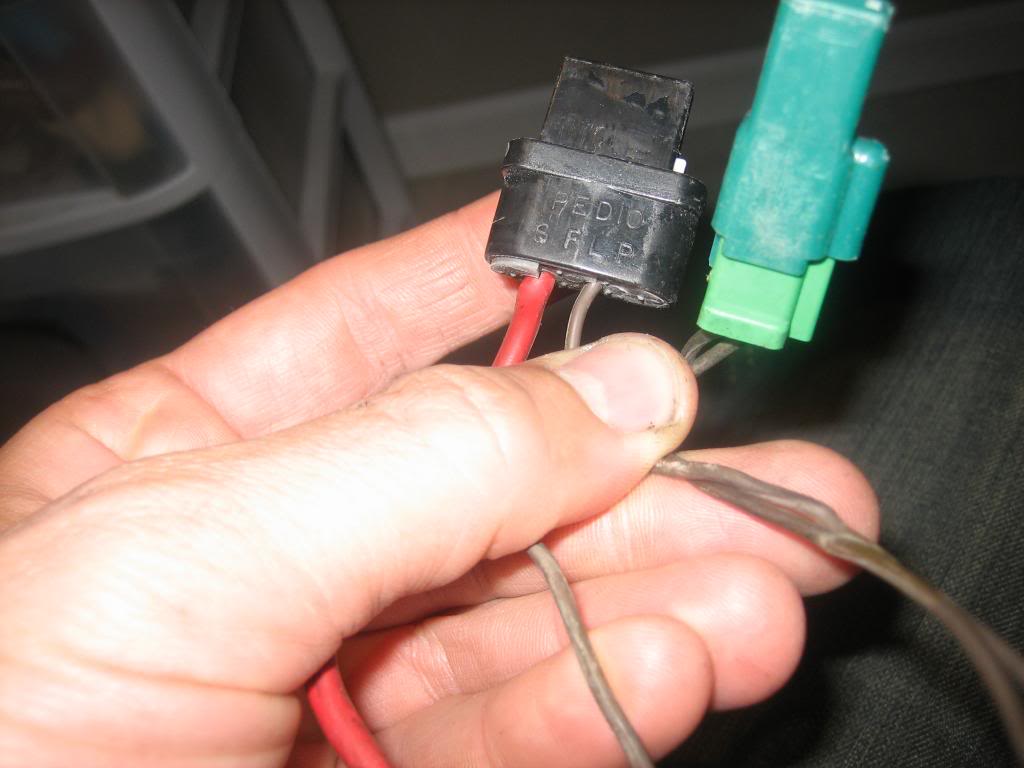
The "L" wire runs into this green plug, and has the same wire coming out again - I am guessing it's some kind of fusible link??
And then there is this black wire that came with everything, though not connected to anything:
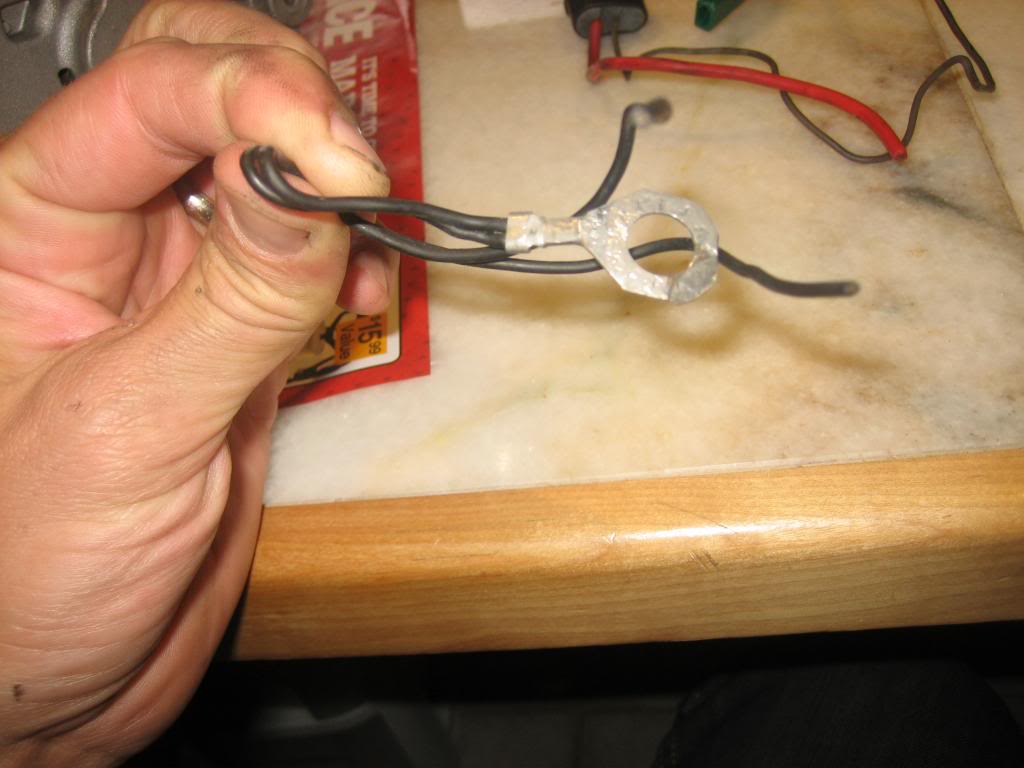
No clue what that is....
And then there is the pulley - I want to swap my 22RE pulley so I can keep my OEM belt - but how the heck do I remove this from the GM one??
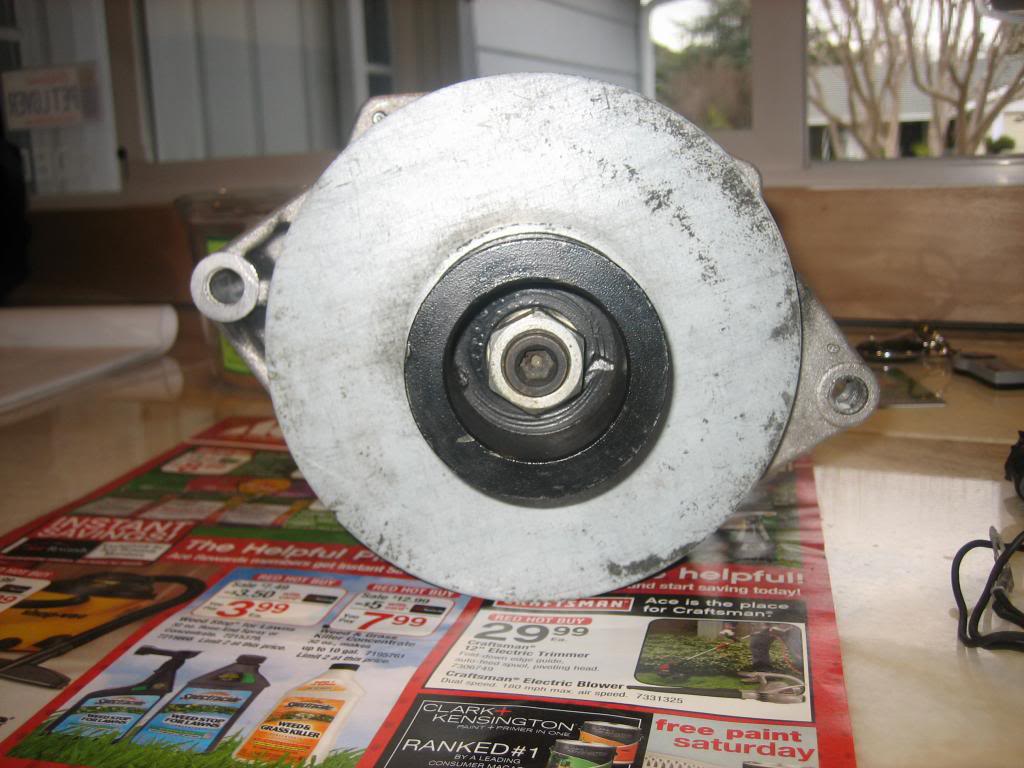
I have the right size allen wrench (5/16"), but both the nut and allen are recessed inside the pulley...can't get a wrench on the nut....
OK, so back to the wiring questions!
On one of the threads I found was this diagram:

I have "S" (connects to TOYOTA WHITE)
I have "L" (connects to TOYOTA YELLOW)
However I don't have "F" on mine....do I need to do anything or just connect the white and yellows?
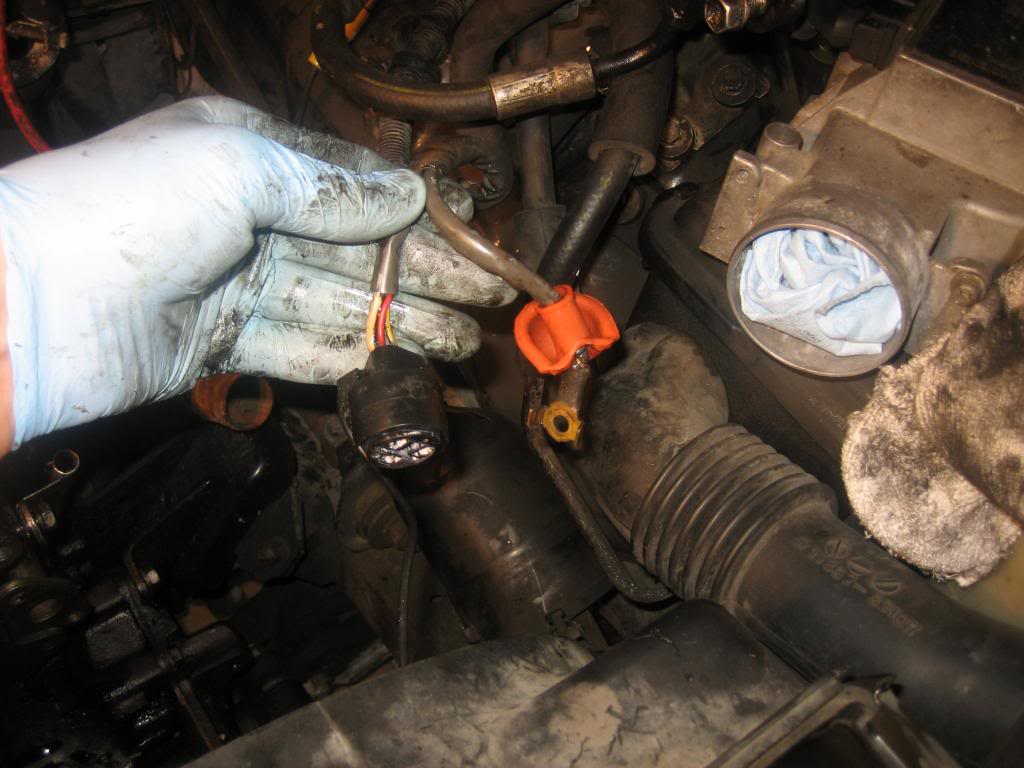
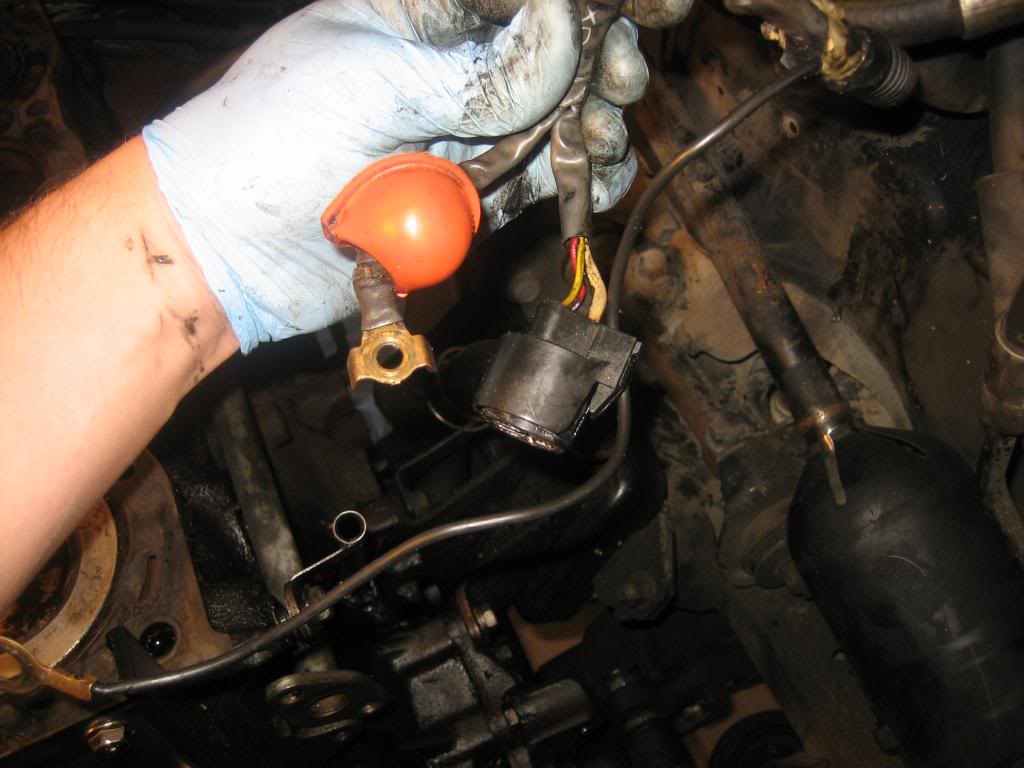
Do I need to disconnect the positive battery return OEM cable since I'm hooking up my own 4 gauge? The current one goes through my fuse box I believe, then to the battery - I believe this is it, with a fusible link in between it and the battery terminal that goes to my starter:

Here is my OEM pigtail with white, yellow, red, and battery return:
And lastly, any tips on "piggybacking" these wires would be welcome - I can solder, poorly, but I can. And I have heat shrink tubing.
Thanks in advance!
What I'm trying to figure out is how to splice the wires - I found several existing threads on GM alternator swaps - below - but still a little confused.
http://www.toyotaoffroad.com/Article.../Chevy_Alt.htm
https://www.yotatech.com/forums/f115.../#post51274972
http://www.ultimateyota.com/index.ph...6&topic=9965.0
Here is the pigtail that came with the alternator:
S F L P on the plug, but only wires coming from "S" and "L". Inside the plug, there are only metal contacts for those 2 letters as well (even though the female plug on the alt itself has 4 metal prong contacts)
The "L" wire runs into this green plug, and has the same wire coming out again - I am guessing it's some kind of fusible link??
And then there is this black wire that came with everything, though not connected to anything:
No clue what that is....
And then there is the pulley - I want to swap my 22RE pulley so I can keep my OEM belt - but how the heck do I remove this from the GM one??
I have the right size allen wrench (5/16"), but both the nut and allen are recessed inside the pulley...can't get a wrench on the nut....
OK, so back to the wiring questions!
On one of the threads I found was this diagram:
I have "S" (connects to TOYOTA WHITE)
I have "L" (connects to TOYOTA YELLOW)
However I don't have "F" on mine....do I need to do anything or just connect the white and yellows?
Do I need to disconnect the positive battery return OEM cable since I'm hooking up my own 4 gauge? The current one goes through my fuse box I believe, then to the battery - I believe this is it, with a fusible link in between it and the battery terminal that goes to my starter:
Here is my OEM pigtail with white, yellow, red, and battery return:
And lastly, any tips on "piggybacking" these wires would be welcome - I can solder, poorly, but I can. And I have heat shrink tubing.
Thanks in advance!
 03-07-2013, 06:30 PM
#2
Phil,
Here is a really nice write up about the wiring. It's for a 5vz but it looks like all the same wires are involved. Hope it helps.
http://www.expeditionportal.com/foru...05#post1250105
Here is a really nice write up about the wiring. It's for a 5vz but it looks like all the same wires are involved. Hope it helps.
http://www.expeditionportal.com/foru...05#post1250105
03-07-2013, 07:07 PM
#3
Registered User
Thread Starter
iTrader: (2)
Join Date: Dec 2009
Location: Pleasanton, CA - SF Bay Area
Posts: 2,159
Likes: 0
Received 7 Likes
on
5 Posts
Phil,
Here is a really nice write up about the wiring. It's for a 5vz but it looks like all the same wires are involved. Hope it helps.
http://www.expeditionportal.com/foru...05#post1250105
Here is a really nice write up about the wiring. It's for a 5vz but it looks like all the same wires are involved. Hope it helps.
http://www.expeditionportal.com/foru...05#post1250105
"The large 4 gauge red wire I ran from the alternator output post straight to the "+" battery terminal. The "+" terminal is also connected with the original wiring to the factory fuse block. I ran the alternator ouput wire straight to the battery terminal because I have a winch. It's not shown in the wiring diagram drawing, but in the last photo above you can see the cables coming up and over the forward edge of the dual battery holder with one going to the "-" post and one going to the "+" post of the left hand (primary) battery. I wanted to avoid having the winch be able to pull all of its power through the factory fuse block wiring. This way it's pretty much a straight shot to the alternator with large wires."
03-08-2013, 08:52 AM
#5
Registered User
Thread Starter
iTrader: (2)
Join Date: Dec 2009
Location: Pleasanton, CA - SF Bay Area
Posts: 2,159
Likes: 0
Received 7 Likes
on
5 Posts
Does anyone know if there is a standard adjuster bolt size for GM alts? The one I have I think is from an early 90s cadillac and didn't come with the bolt :/
Also, got mine installed last night and there is not much play in it, left to right - it sits really close to the timing cover water outlet pipe, and contacts the motor mounts pretty soon after pushing it to the drivers side - is this normal? I'm using the trail gear bracket mount kit
thanks!
Also, got mine installed last night and there is not much play in it, left to right - it sits really close to the timing cover water outlet pipe, and contacts the motor mounts pretty soon after pushing it to the drivers side - is this normal? I'm using the trail gear bracket mount kit
thanks!
03-09-2013, 06:31 PM
#6
Does anyone know if there is a standard adjuster bolt size for GM alts? The one I have I think is from an early 90s cadillac and didn't come with the bolt :/
Also, got mine installed last night and there is not much play in it, left to right - it sits really close to the timing cover water outlet pipe, and contacts the motor mounts pretty soon after pushing it to the drivers side - is this normal? I'm using the trail gear bracket mount kit
thanks!
Also, got mine installed last night and there is not much play in it, left to right - it sits really close to the timing cover water outlet pipe, and contacts the motor mounts pretty soon after pushing it to the drivers side - is this normal? I'm using the trail gear bracket mount kit
thanks!
As for the pulley swap I did put my stock pulley on the GM alt. I managed to get it off by putting an allen wrench in the center and holding it while angling a crescent wrench in their to turn the nut. Its very tricky and frustrating but it will work.
Good luck to ya
03-09-2013, 09:23 PM
#7
So this would be plain old dumb luck if this would work for you on the pulley removal but below is a trick I used on strut mount replacement on the VW. If a spark plug socket would fit for you that would be perfect. Allen wrench down the middle, hold with a pipe of some sort, turn the socket with a regular wrench.

Trending Topics
03-12-2013, 09:44 AM
#10
Registered User
Thread Starter
iTrader: (2)
Join Date: Dec 2009
Location: Pleasanton, CA - SF Bay Area
Posts: 2,159
Likes: 0
Received 7 Likes
on
5 Posts
Hi guys - took it into a HW store today and got the bolt along with washer and lock washer. It's a 10x1.5mm bolt for those who wanted to know 
I tried last night to get the nut off the pulley and could absolutely not! No wrench can fit in there due to the depth of the pulley. the spark plug socket I have is not large enough, and the socket that does fit (22mm I think?)...well I can't have the socket on there and the allen wrench on at the same time - can't hold the socket in place.
I'm going to try to run the GM pulley on it, but am worried a little because it's a grooved/ribbed belt and my crank pulley is all single row (not sure if that's the right term) belts....when I get another belt can I just run a replacement belt that's ribbed but skinny as my OEM belt so it fits on my crank pulley?
03-12-2013, 10:50 AM
#11
I'm going to try to run the GM pulley on it, but am worried a little because it's a grooved/ribbed belt and my crank pulley is all single row (not sure if that's the right term) belts....when I get another belt can I just run a replacement belt that's ribbed but skinny as my OEM belt so it fits on my crank pulley?
03-12-2013, 06:02 PM
#13
Registered User
Thread Starter
iTrader: (2)
Join Date: Dec 2009
Location: Pleasanton, CA - SF Bay Area
Posts: 2,159
Likes: 0
Received 7 Likes
on
5 Posts
So I take it to my local auto parts store today. They were able to pull the pulley off the Toyota alternator and got the nut off the GM alternator with an impact wrench... but could not get the pulley off to GM alternator. I have some gear pullers so I'll try that at home.
The issue seems to be that the hole in the GM pulley is larger than the hole in the Toyota V belt pulley. So I need to find a way to drill a larger hole in the Toyota V belt pulley to use it on the GM alternator
The issue seems to be that the hole in the GM pulley is larger than the hole in the Toyota V belt pulley. So I need to find a way to drill a larger hole in the Toyota V belt pulley to use it on the GM alternator
03-12-2013, 06:22 PM
#14
So I take it to my local auto parts store today. They were able to pull the pulley off the Toyota alternator and got the nut off the GM alternator with an impact wrench... but could not get the pulley off to GM alternator. I have some gear pullers so I'll try that at home.
http://www.ifsja.org/forums/vb/showthread.php?t=131960
03-13-2013, 10:35 AM
#16
Registered User
Thread Starter
iTrader: (2)
Join Date: Dec 2009
Location: Pleasanton, CA - SF Bay Area
Posts: 2,159
Likes: 0
Received 7 Likes
on
5 Posts
I tried out that 'whack with a hammer' technique just now with a 27mm impact socket and it popped the collar right off on the third whack - awesome!
The only issue is that the Toyota Pulley is still a tad small for the shaft on the GM alternator, so I think I will have to take it to a machine show to get the hole made larger? Not something I'd want to try at home since if it's one bit off, it could destroy the bearings in the alternator, right?
When I do get the V pulley back on, I keep the GM cooling fan and plate on (behind it), and use the same washer and GM nut, correct? I shouldn't need any kind of spacer to make the pulley line up with my crank pulley?
03-13-2013, 10:45 AM
#17
I tried out that 'whack with a hammer' technique just now with a 27mm impact socket and it popped the collar right off on the third whack - awesome!
The only issue is that the Toyota Pulley is still a tad small for the shaft on the GM alternator, so I think I will have to take it to a machine show to get the hole made larger? Not something I'd want to try at home since if it's one bit off, it could destroy the bearings in the alternator, right?
When I do get the V pulley back on, I keep the GM cooling fan and plate on (behind it), and use the same washer and GM nut, correct? I shouldn't need any kind of spacer to make the pulley line up with my crank pulley?
The only issue is that the Toyota Pulley is still a tad small for the shaft on the GM alternator, so I think I will have to take it to a machine show to get the hole made larger? Not something I'd want to try at home since if it's one bit off, it could destroy the bearings in the alternator, right?
When I do get the V pulley back on, I keep the GM cooling fan and plate on (behind it), and use the same washer and GM nut, correct? I shouldn't need any kind of spacer to make the pulley line up with my crank pulley?
Last edited by 83Toyota88; 03-13-2013 at 10:48 AM.
03-13-2013, 11:51 AM
#18
03-13-2013, 12:43 PM
#20
Registered User
Thread Starter
iTrader: (2)
Join Date: Dec 2009
Location: Pleasanton, CA - SF Bay Area
Posts: 2,159
Likes: 0
Received 7 Likes
on
5 Posts
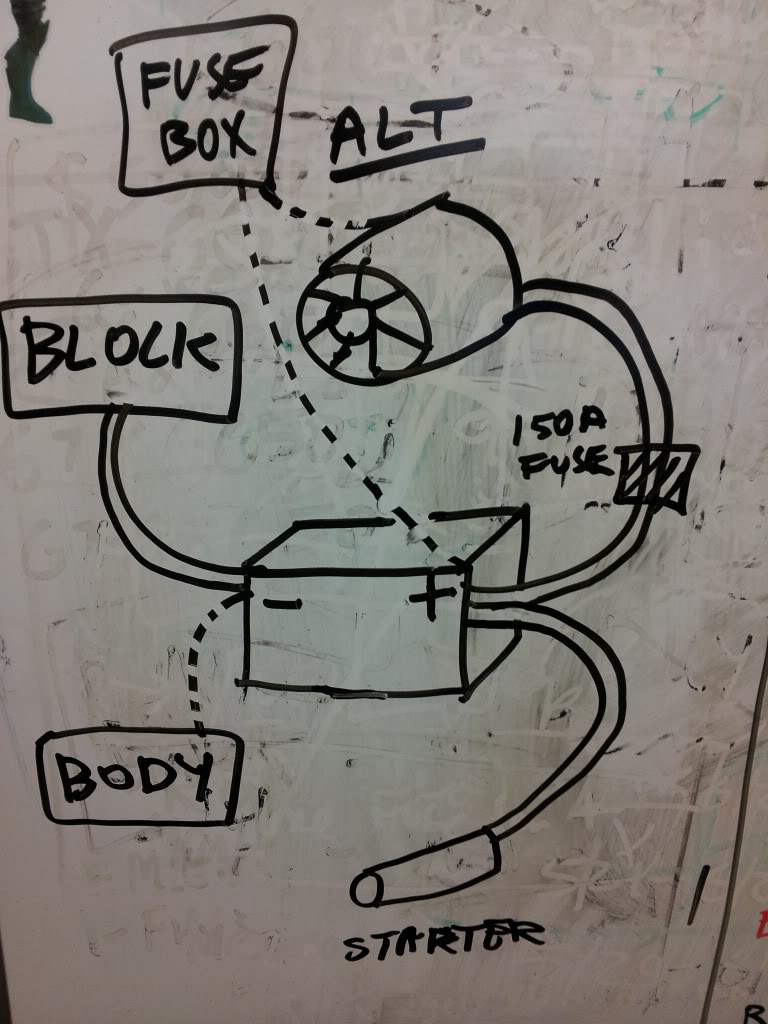
Oh, and this is the wiring plan I was leaning toward for when I get it all installed.
The thick wire in the drawing is 4 gauge.
The dashed line wire is ~10-12 gauge wiring.
The 150A fuse...does that need to got closer to the battery or to the alternator? I have a 4 gauge wire for the alt-bat connection but I'd rather not cut it and splice in the fuse...can I just hook it to the + terminal, and then to the end of the 4 gauge wire that goes to the alt?


