

 Apr 14, 2016, 01:43 PM
Last edit by: IB Advertising
See related guides and technical advice from our community experts:
Browse all: Engine Guides
- Toyota 4Runner 1984-1995 How to Replace Knock Sensor
Step by step instructions for do-it-yourself repairs
Browse all: Engine Guides

3.0 Intake Manifold Removal & Knock Sensor Replacement
Apr 17, 2011 | 05:36 PM
#1
Thread Starter
Registered User
Joined: May 2009
Posts: 103
Likes: 1
From: Seattle, WA
3.0 Intake Manifold Removal & Knock Sensor Replacement
I got a new engine installed last summer and immediately came up with a dreaded code 52. Long story short, it was more trouble than it was worth to get the guy who did the engine to do anything about it. after putting up with poor performance and bad mileage for a while, I decided to take care of it. a shop had quoted me like $600 to do the work and I wasn't about to pay that, so I set aside a couple days and did it myself. My girlfriend helped me out. (she probably knows more about engines than I do).
in many cases, only the wiring pigtail from the knock sensor is bad, but it's enough effort to get there that you might as well replace the sensor and the wire while you've got it open. in my case it turned out the sensor may have been the problem because of a bad mechanical connection, so I'm glad I got one. the bummer is they are usually around $160, but I found one on ebay for $80 that said it will work and appears near identical, though it's got a slightly different number. the wiring harness should be like $20-25.
be aware this is a long job. just getting it completely torn down to get access to the knock sensor took me about 11 hours, though that counts 3 different trips to the parts store and a fair bit of head scratching. I'm not the worlds best mechanic, so if you don't have much experience like me, I'd set aside 3 days for it. other people can probably do it much faster.
TOOLS:
- 10, 12, 14 and 17 mm sockets and wrenches. both a long and short extension will come in very handy.
- 27mm socket for the knock sensor. deep well is better but a standard will work too.
- very small sockets and 1/4 drive + extension for the water outlet studs.
- big open-ended adjustable wrench for EGR and cold-start injector.
- torque wrench
- screwdrivers
- pliers. angled needlenose pliers will be invaluable in removing and reinstalling the two hundred hose clamps you have to take off. regular pliers might get you by if they are wide enough.
- razors for scraping gaskets
- tape and pen for labeling hoses
- a bucket and funnel for draining/refilling your coolant
- a magnetic pen-type tool is very useful for getting some nuts/bolts in and out of tight spots.
- a Factory Service Manual that covers the 3VZE V6 (I used the '93 4runner manual, even though I have an '88). they don't outline this procedure specifically, but it's covered in the steps of a few other sections. refer to the "Engine Mechanical - Cylinder Head" and "Engine Mechanical - Timing Belt" sections. its a lot of skipping around, but the info is all there, including the torque specs. there are lots of links to them if you search here on Yotatech.
PARTS:
- RTV sealant
- set of intake manifold gaskets (1 for the air intake, 2 for the heads, 1 for the water bypass and one for the EGR valve)
- eight copper O-rings for the fuel pipes. you might get away with re-using the old ones, but I think they are a crush-seal part, and the FSM says not too. its about $10 for new ones.
1. Prep Work
Drain the coolant. you will be disconnecting a bunch of water inlets and pipes so you don't want coolant dumping into your heads.
Disconnect the battery at the negative terminal. that way you won't weld your wrench to the positive terminal when you are trying to loosen the power steering pump
spray down the egr union nuts (they are big, like 21mm maybe) with penetrating oil if they look at all rusted. mine were impossible at first, but after soaking with PB blaster for an hour or so they came right off.
2. Removing Air intake
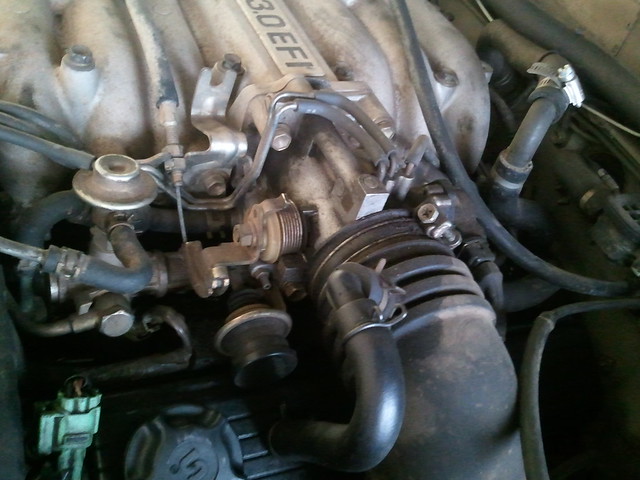
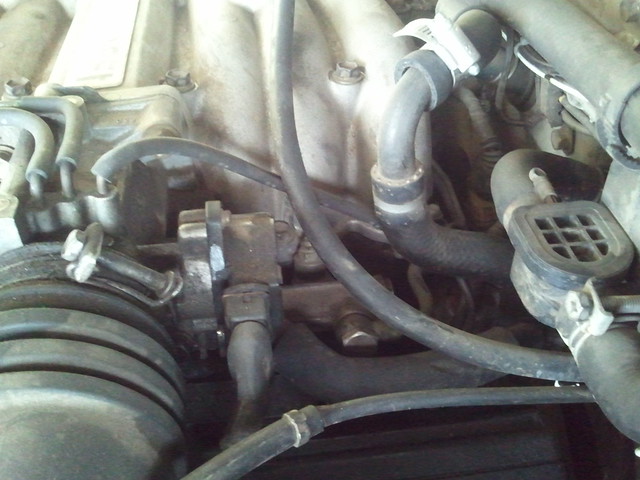
Here are a few "before" shots I took in case I needed to refer to where all the hoses go. you do need to take them all off, you can't really fudge it.
drivers side:
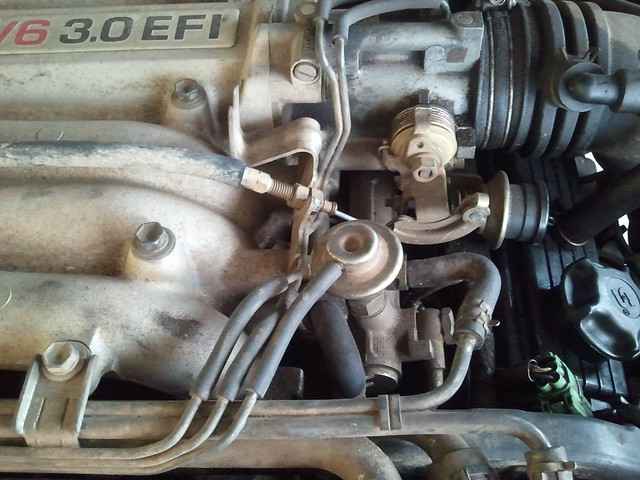
front passenger side:

rear passenger side where most of the hoses are:
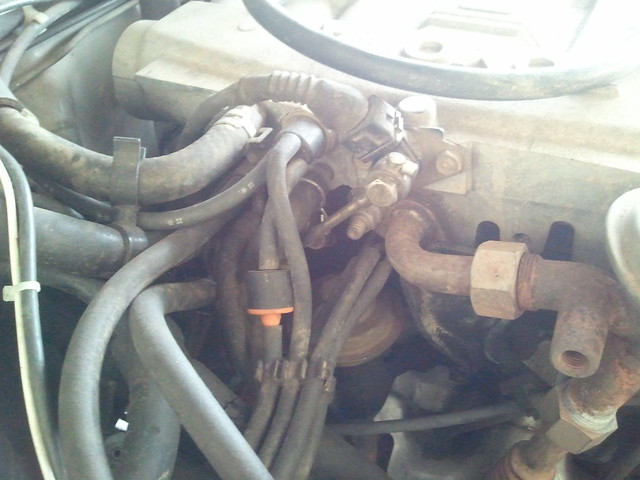
throttle body:
carefully disconnect and label all the vaccum tubes, hoses, and electrical connections from the air intake and throttle body. there are a ton of them.

remove the EGR valve on the passenger side of the intake. there are two flanges, one towards the front and one towards the rear. the one at the rear requires removal of the metal brace (stay). on my engine, the bottom bolt on this stay was basically impossible to remove
anyway, disconnect the two different flanges from either side of the EGR, and the two union nuts on the tubes coming out and it'll come off.
unhook all the stuff from the throttle body, including the big air intake tube. label these if you think you need to. most of it is pretty obvious when it's lined up, but YMMV. there's one or two electrical connections.
unhook the coolant hose that snakes along the firewall to the intake plenum. helps to grab a cork to cap this since leftover coolant will probably spill out.
disconnect the ground wire on the air intake near the back, and the bolt holding the throttle cable on the top of the plenum. disconnect the throttle cable by means of loosening one of the two nuts holding it to the throttle body. then you can pop the end of the cable out and set it aside.
there are four long bolts holding the air intake plenum to the intake manifold, and a few shorter ones too. remove all of these. at this point, the throttle body should come off, but there is a decent sized hose underneath and in the rear that will be still holding it down and pretty hard to get too. unplugging it from the manifold is a bit easier than getting the other end. might help to also disconnect the valve cover vent since it will get hung up on the other hoses even though its unplugged from the plenum.
here is the hose on bottom of the plenum:

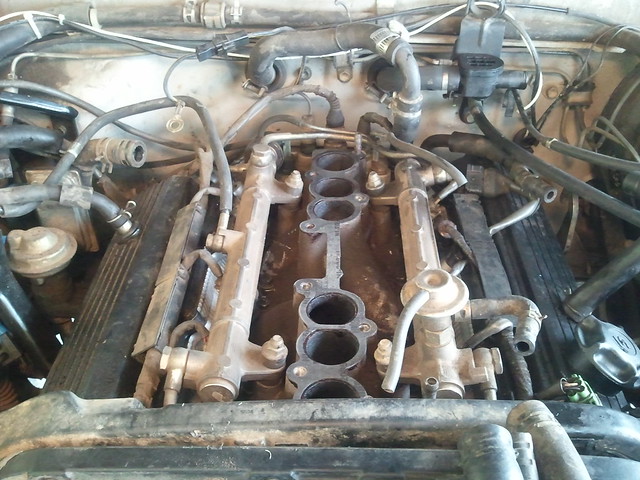
once you have the air intake plenum off, it should look something like this:
be aware when pulling the air intake plenum off, that there is still a bit of coolant inside it that will start pouring out of the hoses if you tilt it around, which will probably happen.
3. Removing Wiring
there are a bunch of electrical connections here that need to be unplugged, and the main wiring housing that runs along the front of the engine unbolted so you can get it out of the way
remove:
- one plug from each injector
- knock sensor plug, near the middle on the drivers side
- 3 wiring plugs and one ground plug on the water bypass, behind the intake manifold4
- one ground connection under the distributor near the oil dip stick
- one green connector near the front driver's side of the valve cover. (one of the bolts that secures the wiring housing is under this)
then unbolt the wiring housing. one is the bolt I mention above, and there is another on the passenger side engine hook, near the power steering pump. you should be able to pull the wiring housing and everything connected to it out of the way now. if not, i've forgotten something here but it should be unplugged.
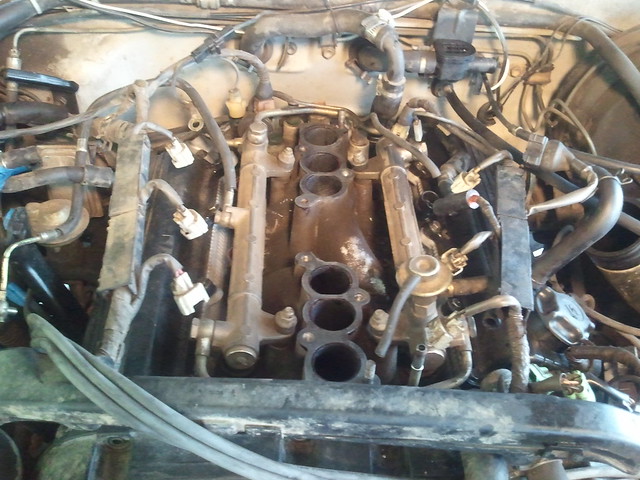
so with everything disconnected it should look something like this:
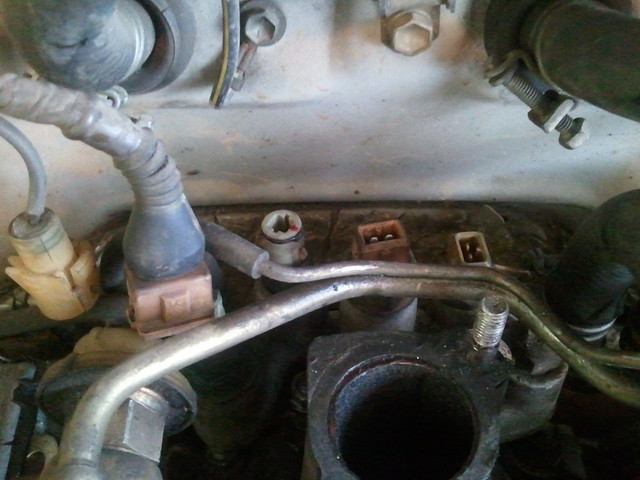
here is the water bypass with the plugs undone:
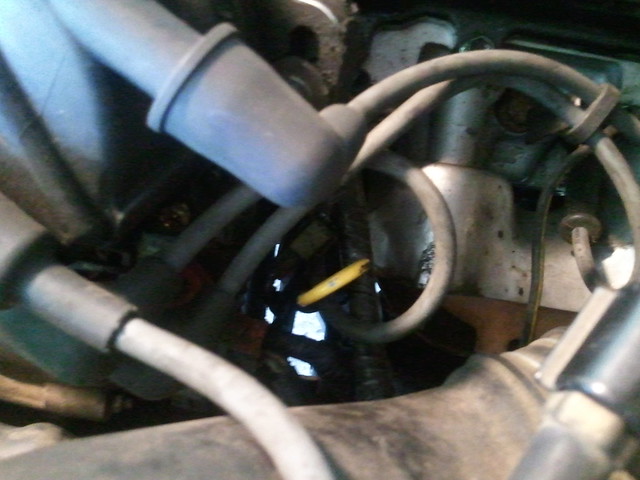
here is the small ground wire. its the white thing just above the dipstick.
this is a good time to unplug the three passenger side spark plugs wire from the distributor, and set them out of the way. (label them first, numbers are on the distributor cap).
4. Fuel pipes, Timing belt cover, Idler Pully, and Water Bypass
in the very rear of the intake manifold is the water bypass (pictured above). once the electrical connections are unplugged, there is one hose on the passenger side that needs to be removed (and labled), and then it comes off easily by unscrewing the two nuts holding it to the manifold. you can disconnect the vaccum tubes, or leave it where it is set out of the way.
next, remove the number 2 and 3 fuel pipes. these are the narrow tubes running between the two fuel rails in the front and the back. they take a 17mm socket and might be a little tight. have a rag handy, because when these are cracked, gasoline will start dumping out. also be aware that once these are removed, you'll be getting a fair amount of gas vapors coming out from the fuel system, so MAKE SURE YOU ARE IN A WELL VENTILATED AREA. doing this in an enclosed space might cause you to pass out or burst into flames, or both.
there is also one vaccum tube piggy backed onto the rear fuel crossover pipe to unplug.
In the FSM it says to remove the large union nut on the passenger side fuel rail that connects the main fuel line. however, this wouldn't budge on my truck and I didn't want to force it and break the fuel rail, so I just left it connected and had to carefully extract the manifold, making sure not to bend the metal fuel line (there is one bolt holding it to the head near the rear of the valve cover that will let you do this). it also means I don't know what happens if you remove that, so fuel might start gushing out if you do. on the other hand, if you need to take the Intake Manifold completely off, this is going to have to come out.
at this point, the manifold should come right off with the bolts undone, but the idler pully is in the way. unfortunately this is a bunch more work to get removed.
start with unbolting the two nuts on the water outlet. this is the square metal thing that comes out of the timing belt cover and has hoses running to the air intake and a big one to the radiator. once that is undone, unplug the large hose from the radiator (the other hose should be lose) and pull gently to get it off. it will stick, but it's RTV sealant only so it should come off without too much effort.
then take your small sockets and 1/4" drive ratchet and very gently unscrew the studs from the water outlet. (on my job, only one came out. the other was too rounded, but I was able to work around it though it was a pain).
next, remove the timing belt cover. the wire stays for the spark plug wires are plastic clips, which you can gently pry off. twist them a bit if you can't see where they clip on. once these are off, they will expose the top bolts holding the timing belt cover on. unbolt these. there are a handful of other bolts lower down that you will need to remove as well. one in particular was blocked by the power steering pump on my truck. I loosened the lower nut on the power steering adjustment arm (it's pretty hard to get a good angle on it, but a box end wrench and a cheater bar should work). with that loose, I was able to pry the power steering pump out of the way enough to get to the nut. this will slacken the power steering belt, so don't forget to put it back and tighten the adjusting arm nut back up when you are done.
with the plastic cover off the timing belt you should be able to see the idler pully, and to get at the four bolts holding the #4 timing belt cover (the small metal plate that bolts to the larger one. here is a pic:

get that #4 timing belt cover off, and you should be able to easily pull the idler pully out now. there are four bolts that hold it to the manifold. unscrew these and pull it back a little and it should come right out:
 .
.
5. Removing Intake Manifold
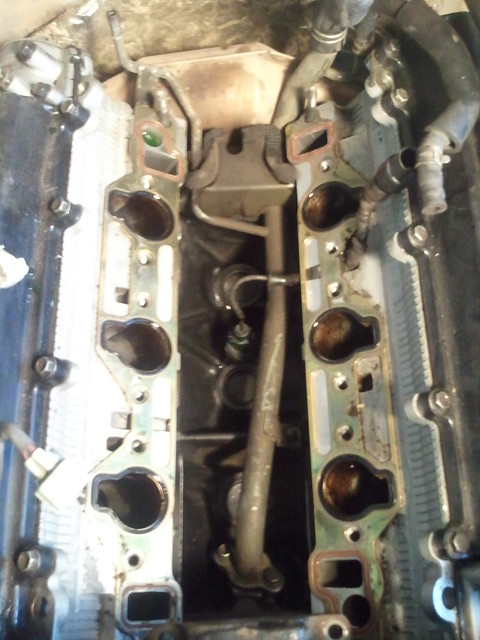
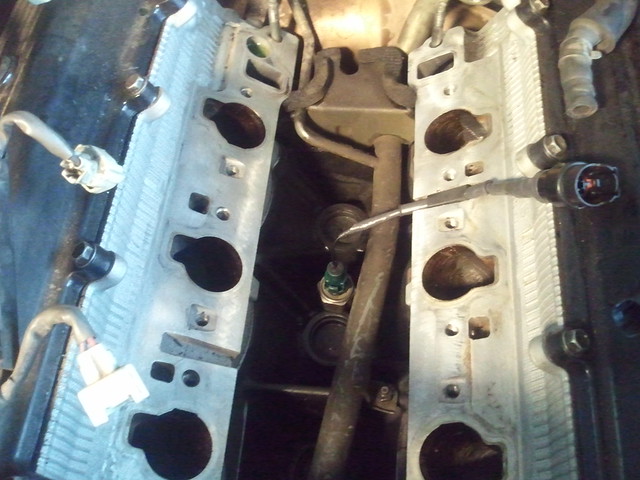
now you should be able to remove the intake manifold. its pretty simple. there are 12 bolts and four nuts (two on the front and two on the back) holding it in. the bolts have star head-bits, but a regular 12mm socket will work fine. this is where your long extension will come in hand. they shouldn't be on there very tight. once those are all up, you can lift the intake manifold right out. there is a hose in the rear on the drivers side that gets in the way a bit, and it might be helpful to undo it or have someone hold it out of the way.
Intake Manifold removed:
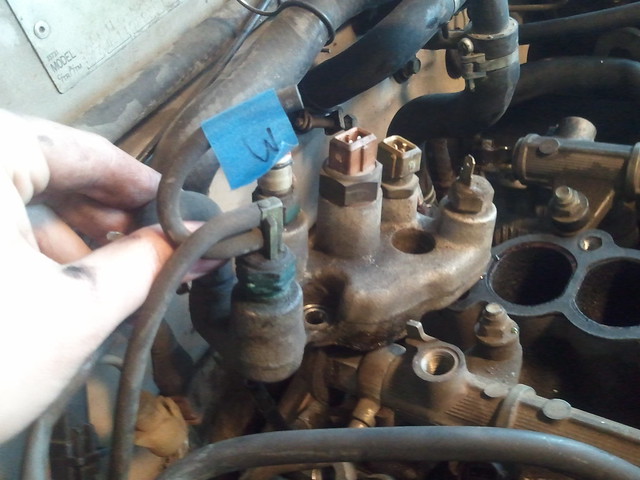
now you can remove that pesky knock sensor and install the new one! It's the only wire going to the engine block there. it's got a little valley for the wiring pigtail that runs under the gasket on the driver's side head.
looking at my knock sensor, it might not have been bad, but the clip that held the wiring harness on was broken off, so it's likely the harness just loosened up enough from vibration or bumps to lose connection. hell of a lot of work for such a little problem, but this is how to do it.
FINAL NOTES:
- allocate a fair amount of time for scraping old gaskets off, especially the one between the air intake plenum and the intake manifold. that one is glued on with RTV, as is the small one for the water bypass in the back of the manifold.
- the water outlet and the idler pully both have grooves for RTV as well when you put them back on. be careful putting the idler pully back on that you don't smear the RTV applied since it will be on the bottom of the outlet where it mates to the intake manifold.
- The FSM says to do a lot of extra steps that I didn't do here, like taking the fuel rails and injectors off the manifold, removing the power steering pump, PAIR reed valve, removing the radiator, etc. you don't need to do any more than I did here unless you are doing a full rebuild or something.
in many cases, only the wiring pigtail from the knock sensor is bad, but it's enough effort to get there that you might as well replace the sensor and the wire while you've got it open. in my case it turned out the sensor may have been the problem because of a bad mechanical connection, so I'm glad I got one. the bummer is they are usually around $160, but I found one on ebay for $80 that said it will work and appears near identical, though it's got a slightly different number. the wiring harness should be like $20-25.
be aware this is a long job. just getting it completely torn down to get access to the knock sensor took me about 11 hours, though that counts 3 different trips to the parts store and a fair bit of head scratching. I'm not the worlds best mechanic, so if you don't have much experience like me, I'd set aside 3 days for it. other people can probably do it much faster.
TOOLS:
- 10, 12, 14 and 17 mm sockets and wrenches. both a long and short extension will come in very handy.
- 27mm socket for the knock sensor. deep well is better but a standard will work too.
- very small sockets and 1/4 drive + extension for the water outlet studs.
- big open-ended adjustable wrench for EGR and cold-start injector.
- torque wrench
- screwdrivers
- pliers. angled needlenose pliers will be invaluable in removing and reinstalling the two hundred hose clamps you have to take off. regular pliers might get you by if they are wide enough.
- razors for scraping gaskets
- tape and pen for labeling hoses
- a bucket and funnel for draining/refilling your coolant
- a magnetic pen-type tool is very useful for getting some nuts/bolts in and out of tight spots.
- a Factory Service Manual that covers the 3VZE V6 (I used the '93 4runner manual, even though I have an '88). they don't outline this procedure specifically, but it's covered in the steps of a few other sections. refer to the "Engine Mechanical - Cylinder Head" and "Engine Mechanical - Timing Belt" sections. its a lot of skipping around, but the info is all there, including the torque specs. there are lots of links to them if you search here on Yotatech.
PARTS:
- RTV sealant
- set of intake manifold gaskets (1 for the air intake, 2 for the heads, 1 for the water bypass and one for the EGR valve)
- eight copper O-rings for the fuel pipes. you might get away with re-using the old ones, but I think they are a crush-seal part, and the FSM says not too. its about $10 for new ones.
1. Prep Work
Drain the coolant. you will be disconnecting a bunch of water inlets and pipes so you don't want coolant dumping into your heads.
Disconnect the battery at the negative terminal. that way you won't weld your wrench to the positive terminal when you are trying to loosen the power steering pump
spray down the egr union nuts (they are big, like 21mm maybe) with penetrating oil if they look at all rusted. mine were impossible at first, but after soaking with PB blaster for an hour or so they came right off.
2. Removing Air intake
Here are a few "before" shots I took in case I needed to refer to where all the hoses go. you do need to take them all off, you can't really fudge it.
drivers side:
front passenger side:
rear passenger side where most of the hoses are:
throttle body:
carefully disconnect and label all the vaccum tubes, hoses, and electrical connections from the air intake and throttle body. there are a ton of them.
remove the EGR valve on the passenger side of the intake. there are two flanges, one towards the front and one towards the rear. the one at the rear requires removal of the metal brace (stay). on my engine, the bottom bolt on this stay was basically impossible to remove
anyway, disconnect the two different flanges from either side of the EGR, and the two union nuts on the tubes coming out and it'll come off.
unhook all the stuff from the throttle body, including the big air intake tube. label these if you think you need to. most of it is pretty obvious when it's lined up, but YMMV. there's one or two electrical connections.
unhook the coolant hose that snakes along the firewall to the intake plenum. helps to grab a cork to cap this since leftover coolant will probably spill out.
disconnect the ground wire on the air intake near the back, and the bolt holding the throttle cable on the top of the plenum. disconnect the throttle cable by means of loosening one of the two nuts holding it to the throttle body. then you can pop the end of the cable out and set it aside.
there are four long bolts holding the air intake plenum to the intake manifold, and a few shorter ones too. remove all of these. at this point, the throttle body should come off, but there is a decent sized hose underneath and in the rear that will be still holding it down and pretty hard to get too. unplugging it from the manifold is a bit easier than getting the other end. might help to also disconnect the valve cover vent since it will get hung up on the other hoses even though its unplugged from the plenum.
here is the hose on bottom of the plenum:
once you have the air intake plenum off, it should look something like this:
be aware when pulling the air intake plenum off, that there is still a bit of coolant inside it that will start pouring out of the hoses if you tilt it around, which will probably happen.
3. Removing Wiring
there are a bunch of electrical connections here that need to be unplugged, and the main wiring housing that runs along the front of the engine unbolted so you can get it out of the way
remove:
- one plug from each injector
- knock sensor plug, near the middle on the drivers side
- 3 wiring plugs and one ground plug on the water bypass, behind the intake manifold4
- one ground connection under the distributor near the oil dip stick
- one green connector near the front driver's side of the valve cover. (one of the bolts that secures the wiring housing is under this)
then unbolt the wiring housing. one is the bolt I mention above, and there is another on the passenger side engine hook, near the power steering pump. you should be able to pull the wiring housing and everything connected to it out of the way now. if not, i've forgotten something here but it should be unplugged.
so with everything disconnected it should look something like this:
here is the water bypass with the plugs undone:
here is the small ground wire. its the white thing just above the dipstick.
this is a good time to unplug the three passenger side spark plugs wire from the distributor, and set them out of the way. (label them first, numbers are on the distributor cap).
4. Fuel pipes, Timing belt cover, Idler Pully, and Water Bypass
in the very rear of the intake manifold is the water bypass (pictured above). once the electrical connections are unplugged, there is one hose on the passenger side that needs to be removed (and labled), and then it comes off easily by unscrewing the two nuts holding it to the manifold. you can disconnect the vaccum tubes, or leave it where it is set out of the way.
next, remove the number 2 and 3 fuel pipes. these are the narrow tubes running between the two fuel rails in the front and the back. they take a 17mm socket and might be a little tight. have a rag handy, because when these are cracked, gasoline will start dumping out. also be aware that once these are removed, you'll be getting a fair amount of gas vapors coming out from the fuel system, so MAKE SURE YOU ARE IN A WELL VENTILATED AREA. doing this in an enclosed space might cause you to pass out or burst into flames, or both.
there is also one vaccum tube piggy backed onto the rear fuel crossover pipe to unplug.
In the FSM it says to remove the large union nut on the passenger side fuel rail that connects the main fuel line. however, this wouldn't budge on my truck and I didn't want to force it and break the fuel rail, so I just left it connected and had to carefully extract the manifold, making sure not to bend the metal fuel line (there is one bolt holding it to the head near the rear of the valve cover that will let you do this). it also means I don't know what happens if you remove that, so fuel might start gushing out if you do. on the other hand, if you need to take the Intake Manifold completely off, this is going to have to come out.
at this point, the manifold should come right off with the bolts undone, but the idler pully is in the way. unfortunately this is a bunch more work to get removed.
start with unbolting the two nuts on the water outlet. this is the square metal thing that comes out of the timing belt cover and has hoses running to the air intake and a big one to the radiator. once that is undone, unplug the large hose from the radiator (the other hose should be lose) and pull gently to get it off. it will stick, but it's RTV sealant only so it should come off without too much effort.
then take your small sockets and 1/4" drive ratchet and very gently unscrew the studs from the water outlet. (on my job, only one came out. the other was too rounded, but I was able to work around it though it was a pain).
next, remove the timing belt cover. the wire stays for the spark plug wires are plastic clips, which you can gently pry off. twist them a bit if you can't see where they clip on. once these are off, they will expose the top bolts holding the timing belt cover on. unbolt these. there are a handful of other bolts lower down that you will need to remove as well. one in particular was blocked by the power steering pump on my truck. I loosened the lower nut on the power steering adjustment arm (it's pretty hard to get a good angle on it, but a box end wrench and a cheater bar should work). with that loose, I was able to pry the power steering pump out of the way enough to get to the nut. this will slacken the power steering belt, so don't forget to put it back and tighten the adjusting arm nut back up when you are done.
with the plastic cover off the timing belt you should be able to see the idler pully, and to get at the four bolts holding the #4 timing belt cover (the small metal plate that bolts to the larger one. here is a pic:
get that #4 timing belt cover off, and you should be able to easily pull the idler pully out now. there are four bolts that hold it to the manifold. unscrew these and pull it back a little and it should come right out:
.5. Removing Intake Manifold
now you should be able to remove the intake manifold. its pretty simple. there are 12 bolts and four nuts (two on the front and two on the back) holding it in. the bolts have star head-bits, but a regular 12mm socket will work fine. this is where your long extension will come in hand. they shouldn't be on there very tight. once those are all up, you can lift the intake manifold right out. there is a hose in the rear on the drivers side that gets in the way a bit, and it might be helpful to undo it or have someone hold it out of the way.
Intake Manifold removed:
now you can remove that pesky knock sensor and install the new one! It's the only wire going to the engine block there. it's got a little valley for the wiring pigtail that runs under the gasket on the driver's side head.
looking at my knock sensor, it might not have been bad, but the clip that held the wiring harness on was broken off, so it's likely the harness just loosened up enough from vibration or bumps to lose connection. hell of a lot of work for such a little problem, but this is how to do it.
FINAL NOTES:
- allocate a fair amount of time for scraping old gaskets off, especially the one between the air intake plenum and the intake manifold. that one is glued on with RTV, as is the small one for the water bypass in the back of the manifold.
- the water outlet and the idler pully both have grooves for RTV as well when you put them back on. be careful putting the idler pully back on that you don't smear the RTV applied since it will be on the bottom of the outlet where it mates to the intake manifold.
- The FSM says to do a lot of extra steps that I didn't do here, like taking the fuel rails and injectors off the manifold, removing the power steering pump, PAIR reed valve, removing the radiator, etc. you don't need to do any more than I did here unless you are doing a full rebuild or something.
Last edited by chuntr; Apr 19, 2011 at 06:25 PM.

Thread
Thread Starter
Forum
Replies
Last Post
Spicer
86-95 Trucks & 4Runners
8
Apr 7, 2026 07:17 PM


