

 02-10-2016, 09:06 AM
Last edit by: IB Advertising
See related guides and technical advice from our community experts:
Browse all: Fuel System Guides
- Toyota 4Runner 1984-1995 How to Replace Fuel Filter
Step by step instructions for do-it-yourself repairs
Browse all: Fuel System Guides

Replacing the 3VZE Fuel Filter (w/pictures)
10-11-2010, 06:10 PM
#21

I just went to town with a hacksaw. The old bracket actually just bent and came right off with a bit of wiggling. I replaced the fuel line with fuel injection hose and I hung the filter with industrial strength zip ties. Its been fine for the last 7000 miles.
 01-04-2011, 06:10 PM
#22
Registered User

Join Date: Dec 2009
Posts: 49
Likes: 0
Received 0 Likes
on
0 Posts
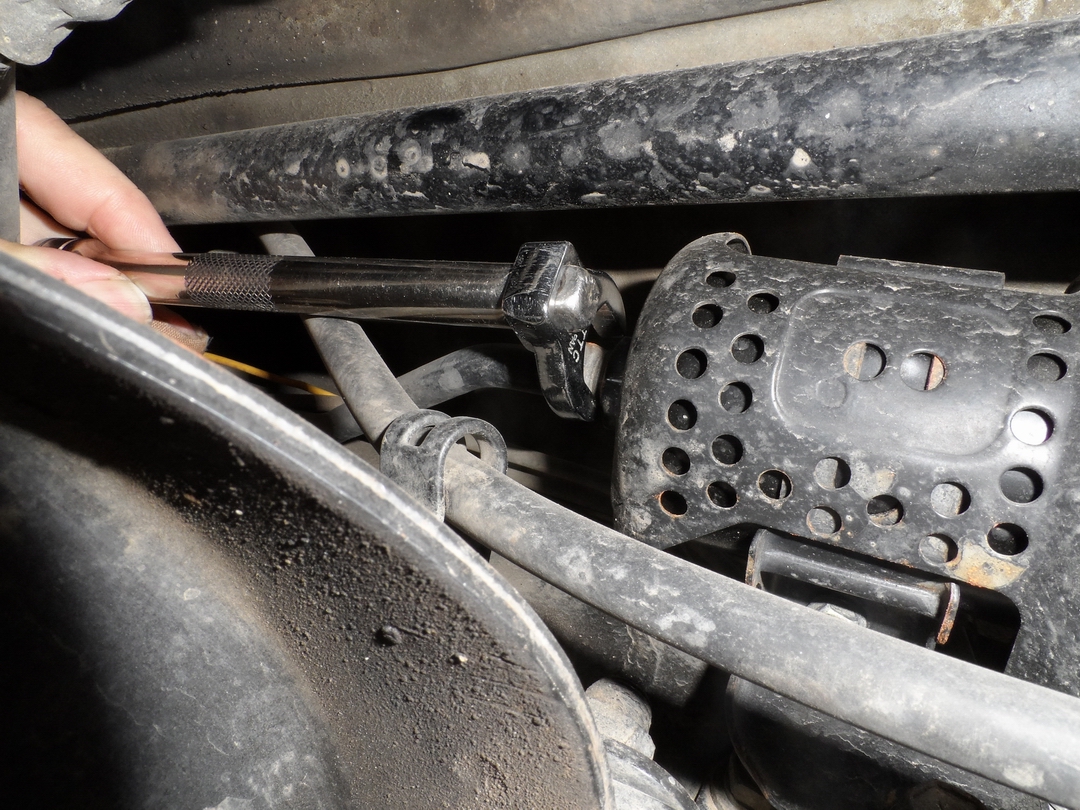
My flare nut wrench was also double sided and 7 3/4" long. There wasn't enough throw between front fitting and transfer case. I struggle for quite awhile till it became impossible. With a hack saw, I cut the handle down to 5 1/2" (sacrificed the 13mm wrench) rounded the cut edges with a file. The shortened 14mm worked great had plenty of throw, only took a minute to unfasten the fitting. Breeze when fastening new filter. Lubing the threads and flares also made for easier installation. Detaching the two forward line clamps also made it easier to pull the flares out of the old filter.
01-04-2011, 06:22 PM
#23
Registered User
Join Date: Dec 2009
Posts: 49
Likes: 0
Received 0 Likes
on
0 Posts
I disconnected the fuel pump electrical plug by the tank in wheel well. I also left the gas cap off. I ran the engine till it stalled. I had no pressure issue or fuel in line only residual in old filter.
 11-17-2012, 10:45 AM
#25

Digging up a wicked old thread, I know, but a quest for an aftermarket fuel filter replacement led me here.
In any case, the Summit filter listed here won't stand up to the pressure of a modern EFI system. The fine print reads that it will handle 90gph max (fine) but only 15psi; or roughly half of what the 3vze and 22re need. The page also indicates that the filter is designed for carbureted vehicles only.
I have yet to find a good aftermarket option that isn't as big a pain-in-the-butt as the factory solution.
01-24-2013, 02:10 PM
#26
Registered User

Join Date: Jan 2013
Location: sudbury, ontario, canada
Posts: 6
Likes: 0
Received 0 Likes
on
0 Posts
hey l'esperance - looks like i gotta swap the filter in my old 89 pickup reg cab with 3vze... ran the tank dry a couple times since fuel guage is dead. guessing the pressure in the filter is causing a leak, cause i smell raw gas all the time now, but cant find any drips while parked, and cant get a look at it while driving:0 lol also, -40C in sudbury right now... hoping to get by with only slight fuel loss and no fires till we warm up this weekend.
05-18-2013, 09:36 AM
#27
Registered User
iTrader: (1)
Join Date: Oct 2011
Location: Tahoe, California
Posts: 987
Likes: 0
Received 0 Likes
on
0 Posts
This may be a silly question but how do you go about torquing the flare nut? I have seen some flare wrenches with the slot for a drive but Scope is not using that, so how'd you do it? 
05-18-2013, 12:18 PM
#28
Registered User
Thread Starter

Join Date: Sep 2007
Location: San Francisco East Bay
Posts: 8,254
Likes: 0
Received 822 Likes
on
649 Posts
I used my calibrated fist.
You might be able to torque it with a crows-foot wrench, using the correct formula to take into account the extra length. But I'm not sure you could fit it in there. I suspect Toyota gives the torque value just to remind you the fittings are brass, so don't be a gorilla.
You might be able to torque it with a crows-foot wrench, using the correct formula to take into account the extra length. But I'm not sure you could fit it in there. I suspect Toyota gives the torque value just to remind you the fittings are brass, so don't be a gorilla.
05-18-2013, 02:54 PM
#29
Registered User
Join Date: Jan 2013
Location: sudbury, ontario, canada
Posts: 6
Likes: 0
Received 0 Likes
on
0 Posts
fuel filter OOPS
 anyway, i still have my 1995 4 runner. scrapping that 3vze piece of #$%^ as well, and putting in a 2L diesel.
i gotta say that 3vze is my least favourite motor i have EVER had the experience of using/working on. i had the one with the steel head, one with the aluminum head... anything else wouldve been better, for my luck anyway.
10-21-2013, 12:18 PM
#30
will the hose in this kit fir over the fuel line with a hose clamp?
http://www.summitracing.com/parts/su...tcombocontents
line fittings not cooperating, may have to cut line a bit and replace.
or can i use (2) -6 A/N to 3/8" barbs like in the image?
http://www.summitracing.com/parts/su...tcombocontents
line fittings not cooperating, may have to cut line a bit and replace.
or can i use (2) -6 A/N to 3/8" barbs like in the image?


 03-21-2014, 07:25 PM
#34
Registered User

Join Date: Jul 2013
Location: Colorado Springs, Colorado
Posts: 16
Likes: 0
Received 0 Likes
on
0 Posts
hope i am not reviving a dead thread but I wanted to step in and ask the reference to this 'special tool' that is being mentioned. I am getting ready to do this and my skill set isn't exactly the best... So I am hoping to ask a few questions before digging in too deep
08-29-2014, 12:47 PM
#36
Registered User
Thread Starter
Join Date: Sep 2007
Location: San Francisco East Bay
Posts: 8,254
Likes: 0
Received 822 Likes
on
649 Posts
http://www.harborfreight.com/7-pc-38...set-68999.html
I haven't tried them (I've got about 50,000 miles until my next fuel filter replacement, thank you very much!), but I suspect this will not only allow you to get a torque wrench on the flare nut, but it might also solve the access problem.
 10-02-2017, 06:35 PM
#37
Registered User

Join Date: May 2015
Posts: 13
Likes: 0
Received 0 Likes
on
0 Posts
read this first before you start
i know this is an old post but i read it and followed the instructions only to find a better way.
first you take off / loosen the easy side of the filter nut-, then you remove the bolt that crimps the filter and pry it a little
so the filter can spin.
now you put your 14mm tool on the hard to get at filter nut, then use the 19mm wrench on the filter, the easy side that you already loosened
and turn the 19mm side to break it lose.
to install put the guard cover over/on filter and leave it lose, start the hard side nut then the easy side so they about half way screwed in.
then bolt in the filter guard, then tighten the nuts.
10-02-2017, 06:51 PM
#38
Registered User
Perhaps you can do your own write up with pictures and step by step instructions.
I think all you did was just confuse others that have never done this before.
I think all you did was just confuse others that have never done this before.
10-02-2017, 07:50 PM
#39
Registered User
Thread Starter
Join Date: Sep 2007
Location: San Francisco East Bay
Posts: 8,254
Likes: 0
Received 822 Likes
on
649 Posts
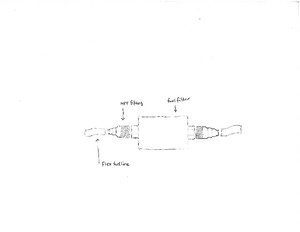
... Whew! If you were really clever, you might think you could install the new filter by getting it started on the forward flare nut, hold that nut with a wrench, and then "screw" the whole filter into the flare nut with the 19mm wrench on the back of the filter. You won't be happy with that. First, you're grinding the flared fuel line into the filter, rather than gently pulling it together with the nut. More importantly, the filter itself has three ribs spaced 120 degrees apart, and the filter carrier has three slots to capture the ribs. You need to get the filter aligned with the carrier, or you will crush the filter (via the ribs) when you tighten it. ....
... a better way.
first you take off / loosen the easy side of the filter nut-, then you remove the bolt that crimps the filter and pry it a little
so the filter can spin.
now you put your 14mm tool on the hard to get at filter nut, then use the 19mm wrench on the filter, the easy side that you already loosened
and turn the 19mm side to break it lose.
to install put the guard cover over/on filter and leave it lose, start the hard side nut then the easy side so they about half way screwed in.
then bolt in the filter guard, then tighten the nuts.
But it's your truck; you should use the way you like best.

Thread
Thread Starter
Forum
Replies
Last Post
TURBOrunnerNM
86-95 Trucks & 4Runners
4
07-22-2015 11:01 AM


