

 Mar 11, 2016, 03:04 PM
Last edit by: IB Advertising
See related guides and technical advice from our community experts:
Browse all: Electrical Guides
- Toyota 4Runner 1984-1995 How to Replace Alternator
Step by step instructions for do-it-yourself repairs
Browse all: Electrical Guides

First (1st ) generation ( gen ) 22r one ( 1 ) wire alternator parts / install
May 20, 2012 | 04:35 AM
#1

Thread Starter
Registered User
Joined: Oct 2011
Posts: 96
Likes: 0
First (1st ) generation ( gen ) 22r one ( 1 ) wire alternator parts / install
I searched for a couple of days for specific info on installing a one wire alt on my first gen 22r, but never found really easy instructions. I definitely got help here on this forum, but I wanted to post this so that anyone wanting to do this could do so easily. I put all the extra words in the title so that it would be easy to search. Disclaimer: I don't know what I am doing, you should not do this if you do not, you and your truck may blow up.
1. Should you use a 1 wire or 3 wire GM alt? It is generally believed by people smarter than me that you should use a 3 wire alt. However my wiring harness is butchered, and I am not smart enough to figure out how to wire a 3 wire.
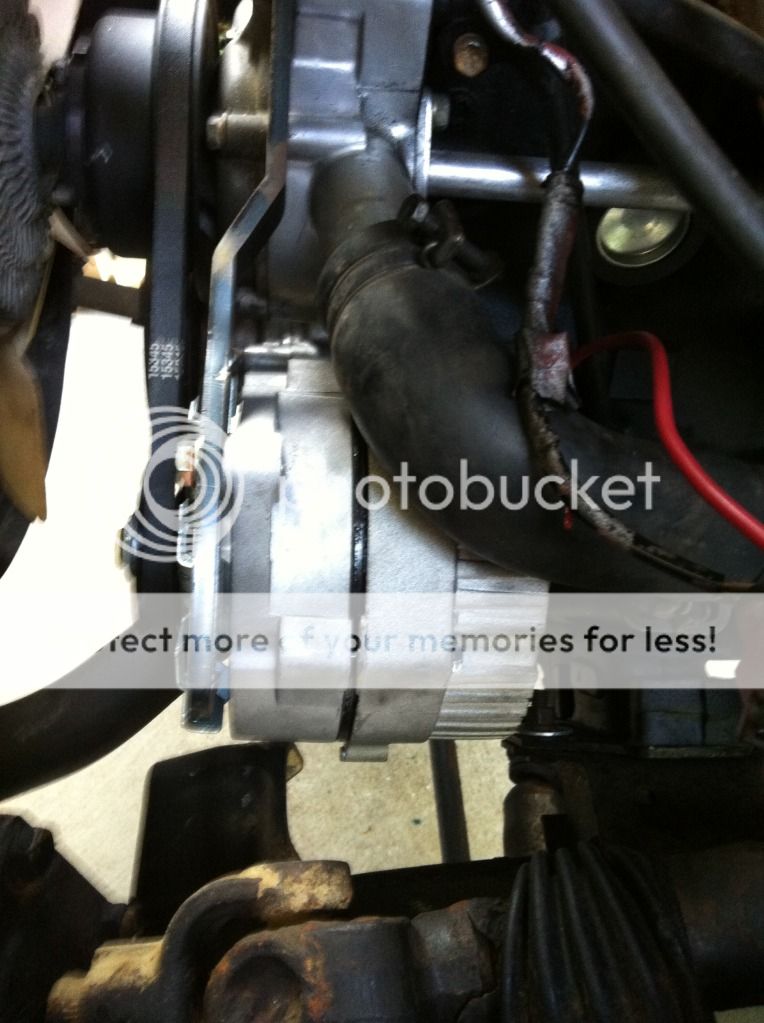
2. No modifications were required to these parts in order to install them. It was as simple as taking them out of the box and bolting them in place. The entire thing took me about 30 minutes once I had all the parts.
3. Parts: Alternator - P7127SE. I bought mine at Advance Auto Parts. Bracket - Low Range Off Road Toyota to GM 120120-1-K. http://www.lowrangeoffroad.com/index.php/yotamain/4runner/engine-upgrade/toyota-gm-alternator-bracket.html
Remove the old alternator, take off the old bracket, install the new one, bolt in the new alternator run one wire from the (+) post on the alternator to the (+) post on the battery (use heavy guage wire).
I installed a voltmeter so that I could watch it work.

1. Should you use a 1 wire or 3 wire GM alt? It is generally believed by people smarter than me that you should use a 3 wire alt. However my wiring harness is butchered, and I am not smart enough to figure out how to wire a 3 wire.
2. No modifications were required to these parts in order to install them. It was as simple as taking them out of the box and bolting them in place. The entire thing took me about 30 minutes once I had all the parts.
3. Parts: Alternator - P7127SE. I bought mine at Advance Auto Parts. Bracket - Low Range Off Road Toyota to GM 120120-1-K. http://www.lowrangeoffroad.com/index.php/yotamain/4runner/engine-upgrade/toyota-gm-alternator-bracket.html
Remove the old alternator, take off the old bracket, install the new one, bolt in the new alternator run one wire from the (+) post on the alternator to the (+) post on the battery (use heavy guage wire).
I installed a voltmeter so that I could watch it work.
May 30, 2012 | 01:58 PM
#2
Registered User
Joined: Aug 2011
Posts: 654
Likes: 2
From: Swamp east MO
So when you hooked it up like that did the factory charge light still work or was that bypassed?
My charge light recently started this blinking and I think I am gonna do the Gm instead of the little toy one..
My charge light recently started this blinking and I think I am gonna do the Gm instead of the little toy one..
Jun 1, 2012 | 11:18 AM
#3
Thread Starter
Registered User
Joined: Oct 2011
Posts: 96
Likes: 0
I did not have a charge light before or after, so I don't know.
Jun 12, 2012 | 09:21 AM
#4
Registered User

Joined: May 2009
Posts: 666
Likes: 13
From: Moscow, ID
I just ordered the parts to do this upgrade this weekend. I'm hoping it will get rid of my charge light problem and allow my battery to charge. I ordered a 94 amp gm agricultural alternator from napa yesterday, so I'll let you know if it turns that damn light off.

Trending Topics
Nov 30, 2012 | 11:49 AM
#10
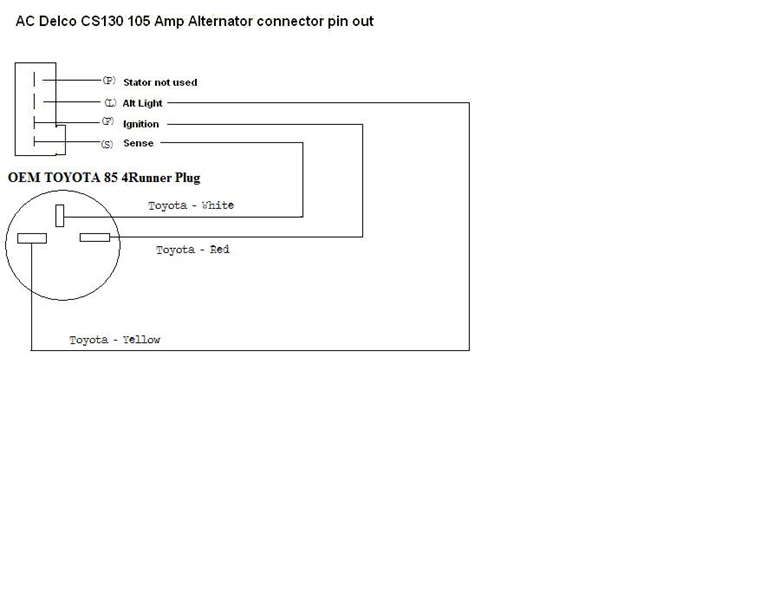
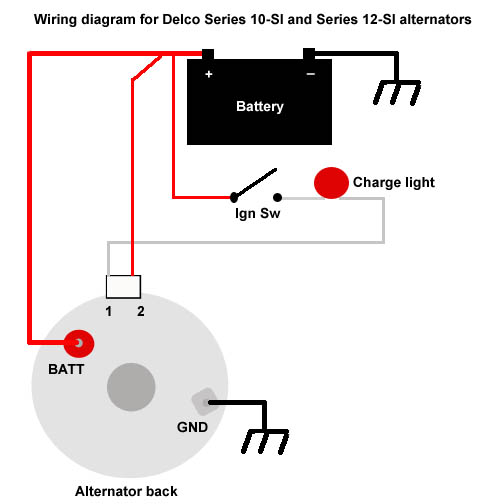
Looks to me like the yellow wire from the charge light circuit wires to the "F/Terminal 1" and the "S/Terminal 2" wires back onto the output of the alternator or onto the system voltage somewhere.
I saw your post on my thread on marlin crawlers website but your alternator wires up completely different than mine.
I saw your post on my thread on marlin crawlers website but your alternator wires up completely different than mine.
Nov 30, 2012 | 11:54 AM
#12
Did you remove the external voltage regulator? The yellow wire in the harness to it is what connects to the charge light circuit in case you didnt know.
Nov 30, 2012 | 12:00 PM
#13
Registered User
Joined: Jan 2011
Posts: 49
Likes: 0
From: Washington
Yes, the regulator is out. I have the yellow wire connected to #1. I'm wondering what to do with the original "B" wire? I haven't tried running it yet until I'm sure I've got everything hooked up correctly.
Nov 30, 2012 | 12:01 PM
#14
I have honestly thought about connecting just the old voltage regulator back up so it thinks its still controlling an alt and will control that damn charge light properly.
Alternatively I'm also doing this:
Ordered me a voltage reader to do the mod on last page of this thread:
https://www.yotatech.com/forums/f123...1/index35.html
Here is the part:
Alternatively I'm also doing this:
Ordered me a voltage reader to do the mod on last page of this thread:
https://www.yotatech.com/forums/f123...1/index35.html
Here is the part:
Nov 30, 2012 | 12:05 PM
#15
The white wire that is roughly 10 gauge in size? Leave it connected to the battery or it will cause other issues. Just make sure where it connected to the old alt it has been unplugged and tied up somewhere where it cant get caught in something or short out. You need to run a bigger wire from "B" on the new alt straight to the battery to account for the amp increase. That small white wire off the old one won't do that much amperage.
Jan 18, 2014 | 04:44 PM
#19

Registered User
Joined: Jan 2014
Posts: 6
Likes: 0
From: Cocoa Beach Fl
Thanks Posting this!
You made everything simple and uncomplicated. Just what I needed.
I ordered my bracket and 1 wire alternator. The same types and from the places you got yours. Plus I got a voltmeter while I was at it.
I have an '81 pickup that I beat my brains out on trying to get the charging system to work right. I discovered that my fuse box had had water leaking on it and was corroded. No amount of scraping, cleaning or wire chasing helped. I was resigned to paying an"expert" Shop rate to figure it out. I think the bill would have been more than this upgrade
I am looking forward to this swap! And the next step.....
Replacing the fuse box and eliminating some wires!!
Check out my post and fuse box pics at my post "1981 pickup charging system issues" in General Electrical & Lighting Related Topics forum.
There's also a pic of my rusty friend.
You made everything simple and uncomplicated. Just what I needed.
I ordered my bracket and 1 wire alternator. The same types and from the places you got yours. Plus I got a voltmeter while I was at it.
I have an '81 pickup that I beat my brains out on trying to get the charging system to work right. I discovered that my fuse box had had water leaking on it and was corroded. No amount of scraping, cleaning or wire chasing helped. I was resigned to paying an"expert" Shop rate to figure it out. I think the bill would have been more than this upgrade
I am looking forward to this swap!
And the next step.....Replacing the fuse box and eliminating some wires!!
Check out my post and fuse box pics at my post "1981 pickup charging system issues" in General Electrical & Lighting Related Topics forum.
There's also a pic of my rusty friend.

Thread
Thread Starter
Forum
Replies
Last Post


