When you click on links to various merchants on this site and make a purchase, this can result in this site earning a commission. Affiliate programs and affiliations include, but are not limited to, the eBay Partner Network.
1994 4runner ac not working after new ac fan control switch
Okay this is a 4wd 3vz.. So for years only the low speed worked on my fan and the actual slider fan lever was physically loose. So I bought a new fan slider switch and when I went to change it; the old one was melted to the harness. I had to take wire cutters and cut the plastic on the old switch to get it loose from the harness. Now the harness had some melting as well. I tried to clean up the burn female spade contacts but it was hard to get in there since the spades are so small. I ended up having to squeeze the harness on with channel lock pliers. Yeah not quite how its suppose to go. So I started it up and the fan works in all positions. The ac is blowing cold but I noticed the light on the ac button that switches the compressor on is not lit. I took it for drive for about a half hour. All was working. The next day it stopped blowing cold and I cannot hear the compressor kick on.
I bought a new ac button but the light on that one does not come on.
I don't know how to work professional ac gauge, but I have a gauge from a ac recharge kit and kit I attached it to the low side and the gauge shows halfway in the red.
I check the 10 amp ac fuse under the glove box and its good.
Maybe its the burnt harness to the fan speed switch. Not sure how the hell I can get a new harness and the wires in the harness are tiny and there are a lot of wires. Not sure how I could splice in a new harness connector.
If the AC ran ("cold") without the AC switch depressed, you have a short in the wiring. (The light is nice, but not essential to making it work.) Did the compressor only run with the switch depressed?
If your cheap-ass gauge from a recharge kit was in the red, that's a clue that you're way low on refrigerant. (Those gauges are intended to be used on the low-side with the compressor running, which would reduce the indicated pressure even further.) When the charge level is low enough, the pressure-switch won't close and the compressor won't run.
We're all for DIY here, but I think your next step is a real AC shop for a pressure test. They have the correct machines for measuring the refrigerant you have, and can safely recharge it if you're just low. If you have a leak, they have better gear to find the leak.
If you would have found the harness end melted to the ac fan switch, how would you handle it?
First inspect the rest of the AC electric Circuits for possible damage . The fact none of the circuit protection opened is scary
Repair or replace as needed.Depending what the End User wants to do how much is in the budget ??
Source a new connector either used or new always easier looking at what is in front of you to decide to rebuild the complete harness or splice in a pig tail repairing the damage .
That pretty much takes care of the Wiring end.
If you need the AC to work the next step is checking the pressure if the system is empty or very low Then under Federal Law if your a professional you need to check for leaks and repair them on older vehicles many people stop at that point of not repairing
the troubling shooting proceeds after all leaks are fixed could be very expensive pulling and holding a vacuum .Most Shops at that point on older vehicles have suggested replacing most all of the major parts nothing like another leak after a few days or weeks.
Thanks for your reply I'll try looking into this way as soon as i can.🙂👍
Melted wires isn't a good sign, something is drawing more power then it should. If it's a 10 amp circuit, but it's drawing 12 amps, it might not blow the fuse for days. The wire being small and melted but the 10amp fuse isn't blown suggests to me the draw was around 10amps or a little more.
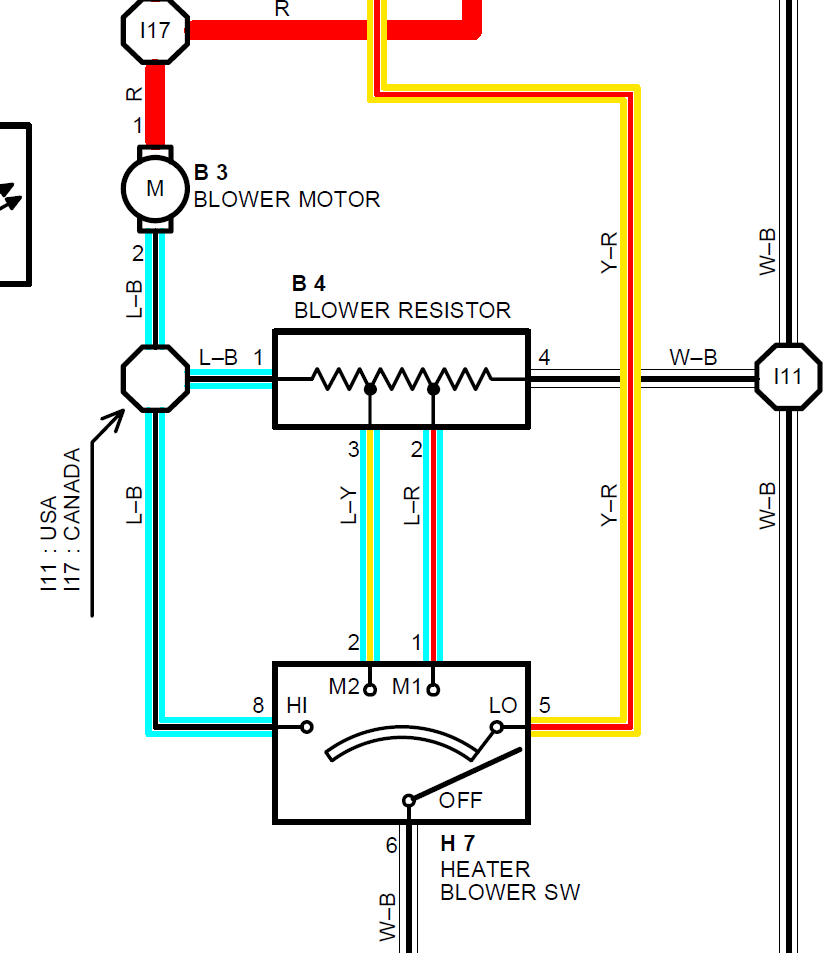
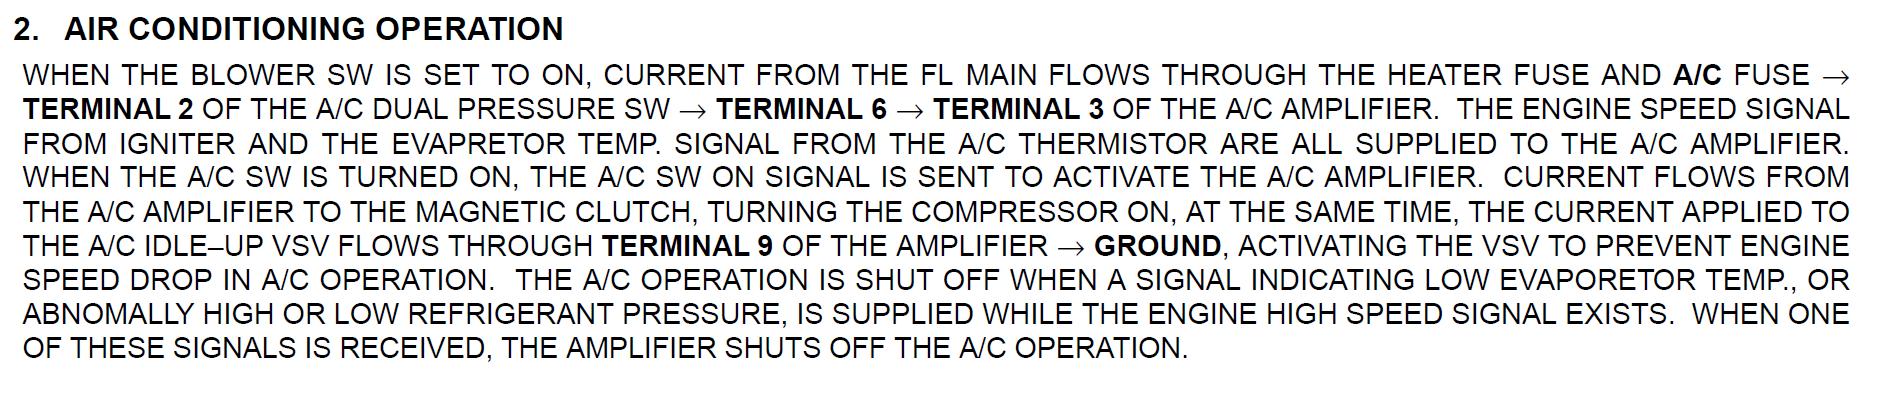
Looking over the EWD for the AC system shows it's a fairly odd design. It looks like when the "front heater relay" is activated, the blower motor gets power from the 40amp heater fuse and also passes power to the 10amp AC fuse to the AC switch and AC amp (control box for AC) which also powers the AC clutch on the compressor to make it spin.
The first thing I'd check is the blower motor to see what it's condition is. The raw power it draws is pulled through the slider switch, so if it's excessively high, that might be why the old switch failed, and also why the wire is melted. Luckily the switch is on the ground side of the power feed, so shorting together isn't the end of the world. Anyway, the best test I can think of is to run the blower motor at 12v (direct from a battery, bench test style) and have an AMP meter to test how much power it's pulling. Also spin it by hand, it should be very free with no resistance. If there's any signs of a dry bearing, worn bearings, etc it should be replaced since it seems like the circuit isn't protected well from the high draws and as said above, a fire could be the result if the root problem isn't discovered.
My T100 had burnt wires on the connector into the blower motor, I tossed the blower motor and swapped it out with another used one. Made up a pigtail (I make harness parts) and never had a problem since. My stock fan had a plastic housing, the older pickup I pulled the blower from had a metal backing, it physically fit just fine, the wiring was a tiny bit different but wasn't anything hard for me to solve. Clearly replacing yours with a factory correct one would probably be the best idea.
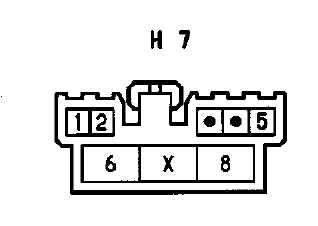
The blower switch connector looks to be a pretty odd ball connector, so I'm not sure if I'd be able to source the connector to make a pigtail or not. Here's what the wire diagram shows for the connector:
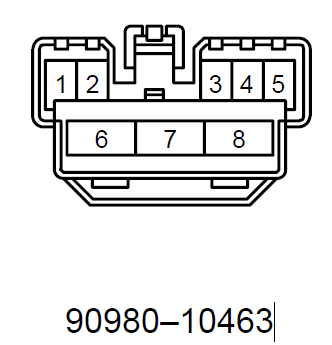
Here's the connector part number I think is the correct one (female terminals)
Googling the part number 90980-10463 brings up a lot of pics of burnt connectors, so clearly it's a common issue.
Here's the part numbers for the two types of pins in the housing. Typical style, they only offer them in one color.
smaller ones - 82998-12170 should need 5 (unless some aren't used)
bigger ones - 82998-12060 should need 3
Based on that, you should need 2 of the big ones, and 3 of the small terminals.
I suspect it not blowing cold relates to the wiring issues, maybe a blown AC fuse now since the blower would still work with it blown.
Photos of the damage is good too, which pins melted the most would suggest where the extra load is exactly in the circuit. I suspect it's the two big terminals pins 6 and 8.
The more I look at these older truck's wiring, the more I realize the core designs are flawed a bit, but the componets are so well built they last a long time even with abuse. A switch shouldn't have to deal with up to 40 amps of current unless it's a very heavy duty switch, a relay would handle the load really well if sized correctly.
I read a few threads on this issue, not one mention of a bad blower motor, maybe the cause is just an over stressed switch (and wiring probably). None really had melted wire, just the connection points on the switch, but I'd have to see pics to really know which way it is. One person mentioned each wire is about $7, so you might want to replace just the bad wires and the connector housing, should be 2-3 wires, maybe $28 and any Toyota dealership should be able to order the parts.
It would be quite a redesign, but adding a relay for atleast the high and 2nd to max speed setting to remove the stress off the switch would probably be a solid wiring upgrade, but it also complicates the system quite a lot more too. It seems like all the common electrical issues are related from poor electrical circuit design (aka switches with high current loads).
Anyway, hope this post helps, good luck on getting everything fixed up.
My only guess as to the cause would be the loose switch. If it bridged two different fan speeds at the same time that would have been unfortunate.
I'd get a used connector with wires and splice it in. Then check each one with a meter before plugging the fan switch in.
I have the same issue. The switch burns the High speed terminal and shorts to the wire next to it. The metal contact between high and Med high melt inside the switch which eventually damages the control unit to where the med high no longer gives you anything but low speed. A new switch and high speed terminal on the wire will last another year. I am on my 5th switch and haven't found anything that will help it. I was thinking about a heat sink before the switch, but I am not sure if that would work or not.
A relay sounds like it would work, but kind of a pain to do.
Do you happen to know the part number on the connector.
You info is very helpful. Unfortunately it is a Toyota wiring issue running high amperage through a switch. They did the same thing on the starter running high amps through the ignition switch. The fix for that was a relay.
Yea I've seen the starter wiring design, headlights also put their power through the headlight switch and continued that design for a very long time. The basic wiring design was used until atleast 2002 in the 4Runners, but the exact switch design I'm sure changed.
Anyway, I loaded up the 94 wire diagram and worked out what does what. A high amp relay should fix the problem, basically making the heater control switch only handle low to mild amp loads, and the high load through the "high" setting gets pushed to the relay instead. If you have continued issues with the connectors overheating, your blower motor might simply be wearing out and drawing more power than it should, replacing it might solve the root of your problems.
Back to the relay setup, the connector image is posted above, the wire diagram doesn't clearly state which side is male vs female for the actual connection on the switch. Simply put the high setting grounds the blue/black wire direct to ground through the switch. You'd be able to get the same effect by adding a relay and on the switching side put the blue/black wire on one leg, and the other leg direct to a body ground (just like the fan switch does normally), then run a power wire to the relay (fused 5-10 amp) and the blue/black wire coming out of the fan switch would run to the ground pin to trigger the relay and in turn puts the heavy load directly through the relay. The relay type you'd want is a "normally open" relay or NO, some have NO and NC (Normally Closed) pins. Factory fuse for the blower circuit is 40 amp, but the AC clutch appears to run off the same fuse (AC fuse 10amp), so I think it's pretty safe to say the spec is 30amp max, so a 30-40amp relay should be within spec.
Of course you will still have the problem of the connection points needing to be good. You could probably tie into the Blue/black wire real close to the blower and splice a wire off it (3 wires coming from the splice) and adding the relay near the blower motor. Shorter run helps resistances, voltage drops, etc.
Here's a pic of a relay to give a visual:
pins 3 and 5 on that relay are the switch, so ground and the blue/black wire to fan (note the other side of the wire needs to still connect to the blower resistor pack or you'll only have high speed).
pin 1 would go to battery (don't forget a fuse near the battery)
pin 2 would go to the blue/black wire on the heater control switch (cut and only connect the switch side).
I could probably build some sort of relay kit, but making it plug and play isn't super easy with out the potential of having the same issues pop up at one of the connection points.
Also note that connector source and terminals make a massive difference on quality, that or maybe between med high and high the pins short out for a short time and over a year of usage it gets bad enough to cause problems.
The really strange thing is, at any fan speed, Toyota has a relay kick on for the fan (power side), it just happens they designed the resistor pack on the ground side, so high has to be direct connected across the switch. If they added a 2nd relay factory, they could have put a high and med-low relay in and had one go through the resistor pack (and switch), and high just be direct across the relay, similar to how the cooling fans are setup.
Either case, good luck with your project. knowing the part sources would be interesting. Maybe something isn't OEM and that's why they fail every year. I've had 6 or so of these trucks, I think I have only seen the contact burnt up on one of them and I'm up in Michigan where winters are cold and almost everyone I've seen throws the heater to hot and turn the blower to high right after starting the cold engine to blow nice ice cold air on them.
Something like the attached pic? Kind of messy. I had the flow going the wrong way and had to correct, but I think you can see where I am going with it. Turns out I just happen to have some 30 amp relays with connectors and a spare switch in my tool box. When you own a Toyota you tend to have lots of spare parts around.
EDIT: I just saw the correction in the diagram, looks right to me, probably safe to tap into the fuse too, the drawing shows it's pre-fuse so it's on the 40amp side (heater fuse powers that side), but that's kind of hard to tell at the fuse anyway.
I will see how it looks when I pull it apart. I remember the connector was burnt the last time. I think I will cut off the corner of the connector where it is burnt and come in with just the wire and butt connector so any heat will stay outside the connector.
The switch I found in my tool box seems to be an original OEM. That should last longer than a replacement. The replacements are so cheap that you have to leave them on high speed or they come apart inside.Maybe now I can stop having to replace all the time.
Next I have to build a new compressor. Mine has been rattling this year. The china replacements are no good unless you replace the reed valve plate in the new compressor with an OEM one. Seems the metal the plate is made of is too hard and it allows the pressures to build to high. Had to deal with that a few years ago and know better now.
Thanks for the help here.
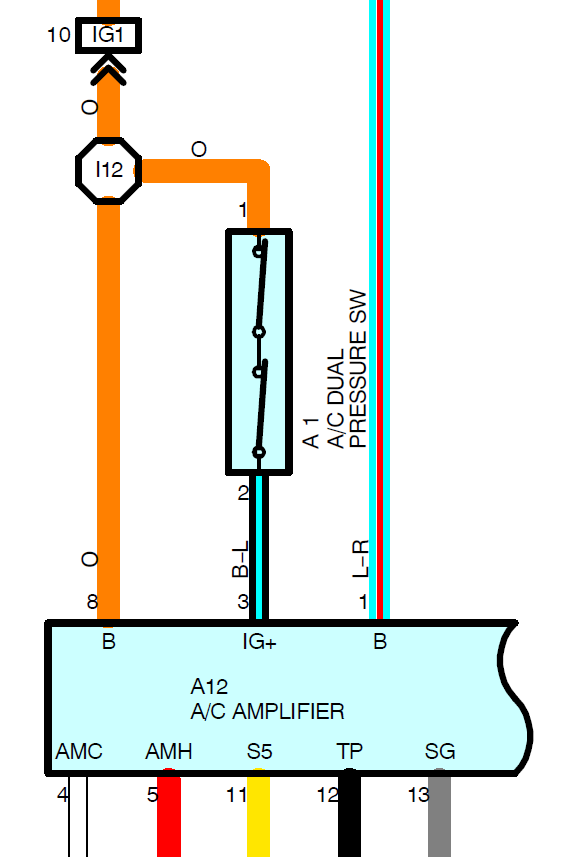
FYI, there's an under and over pressure protection switch that should auto turn off the AC pump. It being able to make too much pressure is a good thing (it's sized bigger than needed), but it needs the controller system working right. I think the pressure switch is under the hood, should be 2 wire on one of the AC lines. Here's a screen shot from the 94 4runner diagram. Looks like the min/max is 28-455 psi.
I have never noticed the dual pressure switch on mine. What would happen on the new compressor is the pressure would rise after start and move up to over 450 and shut off the compressor, so I believe the switch is working
What I did is open the compressor and replaced reed plate with a Toyota plate and the pressures would remain normal and the system would cool properly. I ended up changing every component in the system before I figured out it was the plate. The plate has to be the right hardness or the valves will not release and maintain the pressure.
I was doing a chevy suburban at the same time with a China compressor and it had the same problem. Had to use a delco plate on that one then it worked great.
The only thing like a switch I can remember is next to the receiver dryer and that has also been changed.
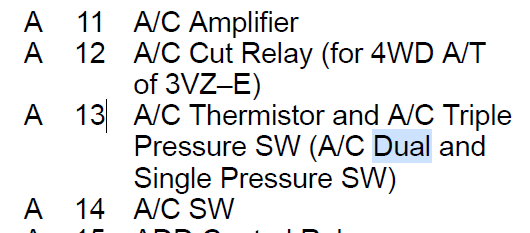
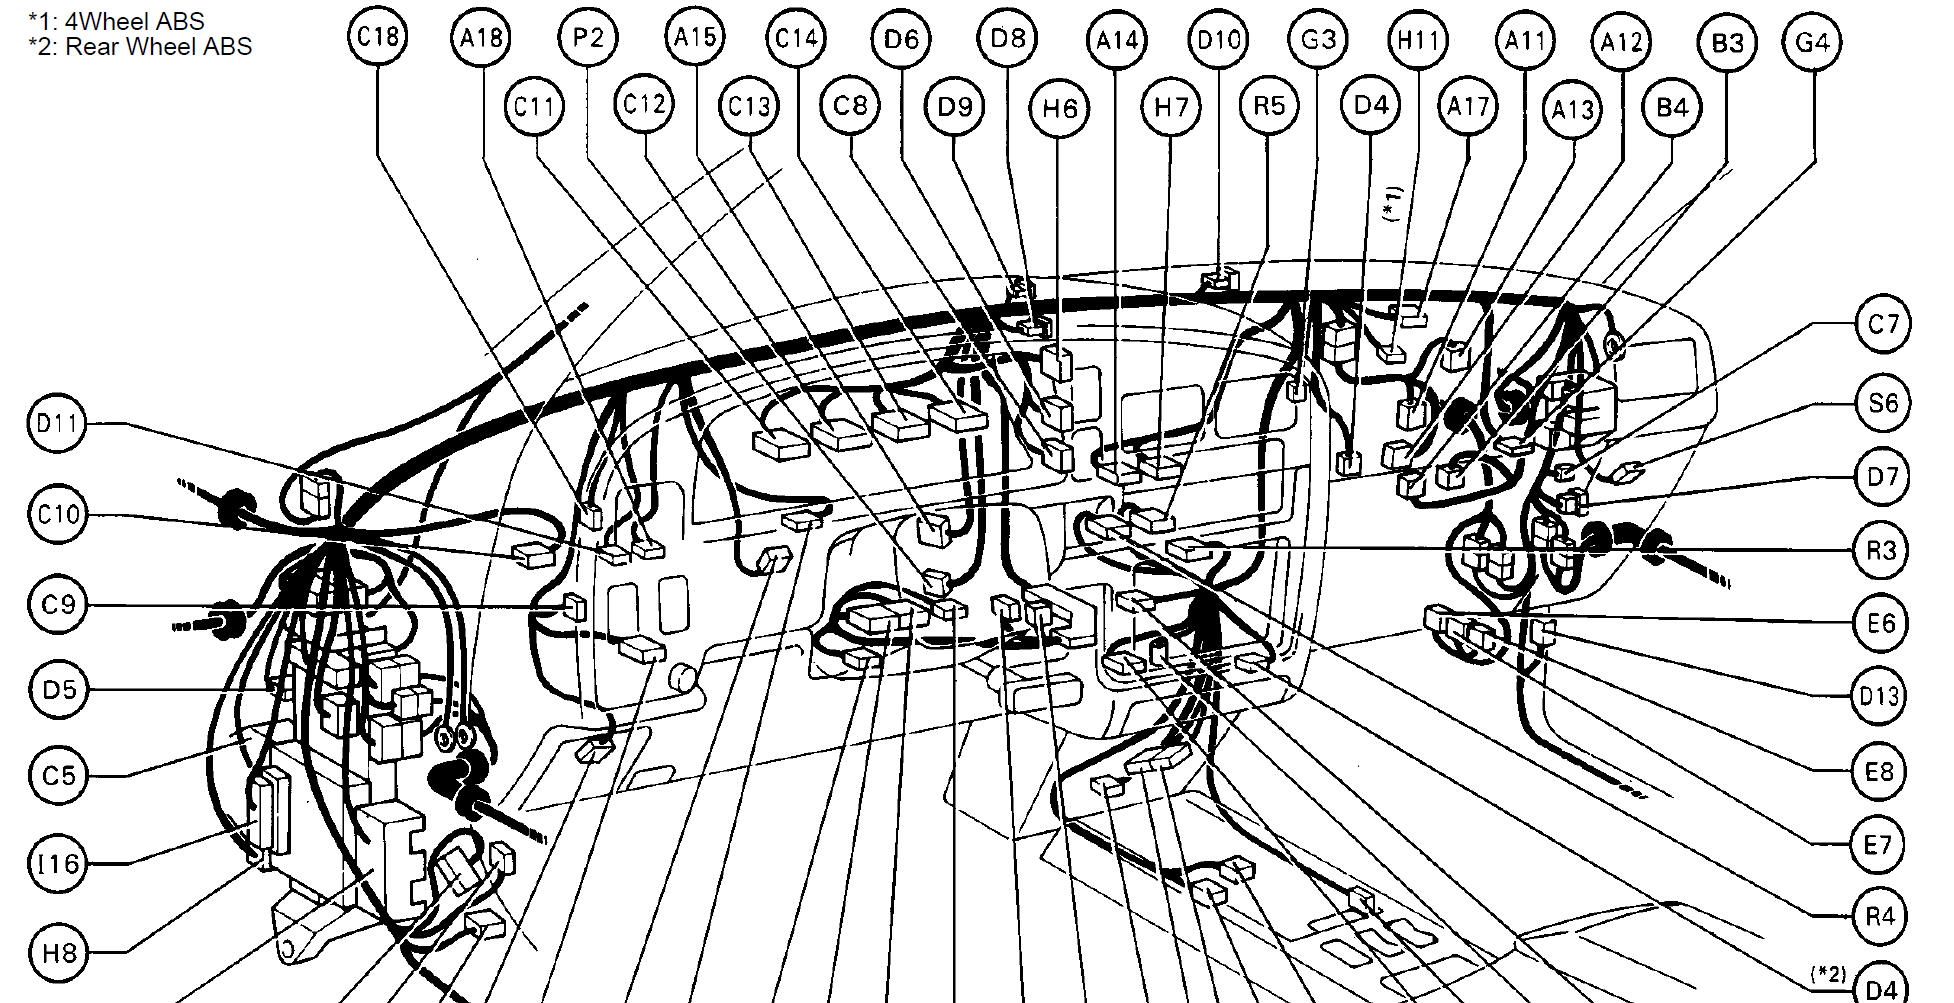
Here's some more diagrams, the switch is inside the vehicle, probably why you didn't notice it. There's also a thermistor to monitor temps of the evaporator. this all ties into the AC amplifier which from the description of the AC system, sounds to be the main brain that controls when the pump is on or off. I know the 80's era ones were adjustable (not sure what the adjustment does exactly though).
I'm no expert on AC systems, but I always viewed an ac compressor as simply a pump, it shouldn't have any effect on how much pressure the system runs at. A bad/weak pump will run lower pressures, and a healthy (new) pump should run higher. Hitting 450psi does seem high, but the description of the system says the ac amp will turn off the pump if the pressures are too high.
Of my understanding of an AC system, the pump size and expansion valve are matched to the desired rate of liquid vs gas refrigerant. This is more home AC units though, not sure exactly how automotive ones are designed, but there clearly has to be some sort of restriction to build the pressure up to the point the refrigerant turns to a liquid and after the device it expands back into a gas. Maybe that part is part of the assembly for the reed valves?
Anyway, hopefully you find the images below of interest and helpful.
All I know is the original compressor went out and after replacement the system would not cool properly and the pressures would spike within minutes of running.
After that I ended up changing all physical components of the system including some of the electronic components. The manufacture of the compressor even sent me a replacement compressor. Then when there was nothing else to change I replaced the plate in the compressor it suddenly worked again. Two months later I was doing a compressor on a Chevy and the same problem came up and it was the reed plate.
I would hope the manufactures have fixed the issue by now, but I have not done a system since Covid-19 hit, so I don't know.I stick with OEM now.
What brand where the AC pumps so other people know the brand might have pressure problems and they can avoid if they choose to? Personally, I'd normally go to a junk yard and pull a used OEM one if the system is sealed up yet, but I'm pretty cheap when it comes to things like that.
I can't remember the brand now. It was one of the most prevalent ones on eBay at the time. I don't buy much on E bay any more unless it's name brand. I have had mixed results with junk yard compressors. Some good some not so good.
Being I have a 93 4runner it is a R12 to 134A conversion and they can get you a hard time when changing over and all components, need to be clean of old oil. I use Ester oil on change over systems and usually use 134A condensers if I can get them. This one has all 96 134A hard components.
If I can find the brand in my history on eBay I will post it.
For others out there I have found Nylog HVAC sealant works well on AC seals for leak free installs.

 Aug 16, 2021 | 10:51 AM