
A Bodyman's Attempt at Fabbing a Bumper.....
 Apr 17, 2011 | 06:27 PM
#1
Thread Starter
Registered User
Joined: Mar 2011
Posts: 12
Likes: 0
A Bodyman's Attempt at Fabbing a Bumper.....
Hey all, first post here; been lurking too long. 
A little preface, this is a bottom-feeder, low-budget, half-assed winch bumper. Built entirely out of rusty scrap steel; my only out-of-pocket expense is a few bolts, consumables, and paint (which I think I have enough left-overs to accomplish without purchasing too much more)
I'm a body-man by trade and in no way am I an experienced welder (it shows) or a fabricator by any means. I've seen some pretty damn nice bumpers built and shown on here and this one is not in that league. Feel free to add comments, suggestions or bash-away
The bumper is going on my '94 std cab DD, the build pics show it on a '90, which is a builder that is in the shop right now and is minus the front bumper, makes a good test-mule. I need to add, there is no reason for building this for my dd, I don't wheel it...


 Apr 17, 2011 | 06:52 PM
#6
Thread Starter
Registered User
Joined: Mar 2011
Posts: 12
Likes: 0
I started with some 3/16" 3x5 and 3x7 box tube. Mocked up the angles with some cardboard (no pics though) to get the depth to accomadate a winch. Plasma'd out one side to reduce weight and layed out the angles and bent into rough shape.
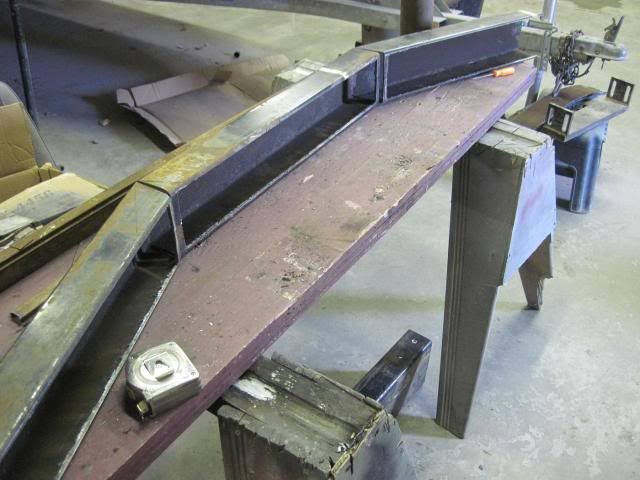
The sawhorse table goes with this gehto-build..
I scrounged a short chunk of 3/4 x 4" flat bar that I'm using for the base mount and shackle mounts. Drilled 13/16ths hole for the shackle and off-set two 1/2" holes to match with the OE bumper mounts. Set so the 5" box tube face will meet the grille with a resonable reveal.

Scribed up a carborad template for the winch plate (remembered a pic this time)

Sliced out the winch / base plate from a section of the 3x7 box tube (gotta love the plasma cutter )
)

Centered the base in the face bar and tacked it in.

Checked the fit.... ok Plus have plenty of overage on each end....

The sawhorse table goes with this gehto-build..
I scrounged a short chunk of 3/4 x 4" flat bar that I'm using for the base mount and shackle mounts. Drilled 13/16ths hole for the shackle and off-set two 1/2" holes to match with the OE bumper mounts. Set so the 5" box tube face will meet the grille with a resonable reveal.
Scribed up a carborad template for the winch plate (remembered a pic this time)
Sliced out the winch / base plate from a section of the 3x7 box tube (gotta love the plasma cutter
)Centered the base in the face bar and tacked it in.
Checked the fit.... ok Plus have plenty of overage on each end....
Trending Topics
Apr 17, 2011 | 07:06 PM
#10
Thread Starter
Registered User
Joined: Mar 2011
Posts: 12
Likes: 0
Ok, where was I ?
Slid the bumper back onto the mounts to re-check the distance from the grille for the winch (I don't want to cut the grille...)

Centered up from side-to-side and scribed out the ends. Cut out a radius for the transition into the wrap-around end caps.


Had some 4" sched 40 pipe chunks laying around; make a pefect radius!

Layed out and cut some end caps to match the fender and wheel arch.... Plus make both sides match.....

Tack it all together and check the fit... Lokks good from a distance...

Slid the bumper back onto the mounts to re-check the distance from the grille for the winch (I don't want to cut the grille...)
Centered up from side-to-side and scribed out the ends. Cut out a radius for the transition into the wrap-around end caps.
Had some 4" sched 40 pipe chunks laying around; make a pefect radius!
Layed out and cut some end caps to match the fender and wheel arch.... Plus make both sides match.....
Tack it all together and check the fit... Lokks good from a distance...


 Apr 17, 2011 | 07:42 PM
#13
Thread Starter
Registered User
Joined: Mar 2011
Posts: 12
Likes: 0
I think it need some more support, other than just off of the bumper mounts.... I made a cap to utilize the pre-threaded holes in the front X-menber. Note, the two outers are 10mm x 1.25 pitch and the two inners are 12mm by 1.25 pitch and are not in-line.

I'm tying the base plate to the X-member cap by means of
an angled plate. I also noticed there is about 3" of radiator showing above the X-member. I Drilled some 1-1/2" holes in the plate to add some air-flow to the radiator there.

I dug out a set of 1-1/2" dimple-dies I purchased off of e-bay and have never used....


Slid it back onto the mounts and tacked the plated together to check the fit and then welded'er up..


Still need turn signals! On a budget here so I'll utilize the originals. Traced around the lenses and cut them out of the face bar.

Ha, need to mount them.... Cut the original mounting tabs from the OE bumper and welded them in place.

Centered up the mess and tacked the bumper to the mounts. Liked what I saw then welded it up....


I need to cut the slot for the winch fairlead, some dress-up and it'll be ready for paint. I was thinking of a satin black, in a base-coat / clear coat (with a flatner) Any other options?
I'm tying the base plate to the X-member cap by means of
an angled plate. I also noticed there is about 3" of radiator showing above the X-member. I Drilled some 1-1/2" holes in the plate to add some air-flow to the radiator there.
I dug out a set of 1-1/2" dimple-dies I purchased off of e-bay and have never used....
Slid it back onto the mounts and tacked the plated together to check the fit and then welded'er up..
Still need turn signals! On a budget here so I'll utilize the originals. Traced around the lenses and cut them out of the face bar.
Ha, need to mount them.... Cut the original mounting tabs from the OE bumper and welded them in place.
Centered up the mess and tacked the bumper to the mounts. Liked what I saw then welded it up....
I need to cut the slot for the winch fairlead, some dress-up and it'll be ready for paint. I was thinking of a satin black, in a base-coat / clear coat (with a flatner) Any other options?
 Apr 18, 2011 | 08:47 PM
#20
Thread Starter
Registered User
Joined: Mar 2011
Posts: 12
Likes: 0
Thanks for the compliments!
@ 87, I think shipping out of Fairbanks would exceed the value.... LOL
I didn't think the dimpler would work that good too; I half expected the forcing bearing to explode as I was rattling the halves together over the 1/8" plate with the impact!
Not much done today, cut the fairlead slot and hung it on the truck for a few pics. Paint is next....

I was thinking I'd like to fill in the gap between the face bar and the grill on each side of where the winch would mount. Any opinions?


@ 87, I think shipping out of Fairbanks would exceed the value.... LOL I didn't think the dimpler would work that good too; I half expected the forcing bearing to explode as I was rattling the halves together over the 1/8" plate with the impact!
Not much done today, cut the fairlead slot and hung it on the truck for a few pics. Paint is next....
I was thinking I'd like to fill in the gap between the face bar and the grill on each side of where the winch would mount. Any opinions?


