
Ball Joint Replace Photos?
 Jan 17, 2011 | 06:46 AM
#1

Thread Starter
Registered User
Joined: Jan 2010
Posts: 16
Likes: 0
Ball Joint Replace Photos?
hi,
looks like i need to replace the ball joints on my 1990 4WD Pickup. it has manual hubs.
i've looked over the previous posts and they offered some great advice. but, i'm wondering if anyone knows of a posting that includes photos on how to do this?
thanks much.
looks like i need to replace the ball joints on my 1990 4WD Pickup. it has manual hubs.
i've looked over the previous posts and they offered some great advice. but, i'm wondering if anyone knows of a posting that includes photos on how to do this?
thanks much.
Jan 17, 2011 | 06:48 AM
#2
Registered User
Joined: Aug 2009
Posts: 13,574
Likes: 72
From: Wilkes-Barre, PA, USA
upper or lower or both?
lots of build threads here, you can start by threading through those, or possibly even ball joint spacer threads to give you an idea as well.
FSM (factory servie manual) is better than photos BTW.
lots of build threads here, you can start by threading through those, or possibly even ball joint spacer threads to give you an idea as well.
FSM (factory servie manual) is better than photos BTW.
Jan 17, 2011 | 07:35 AM
#3
Registered User
Joined: Sep 2008
Posts: 157
Likes: 1
From: San Jose, CA
X2 on xxxtreme22r ... just search there are couple of threads on this but here is pretty good write-up for replacing upper/lower ball joints that comes to my mind :
https://www.yotatech.com/forums/f116...ctures-158106/
Good Luck!
https://www.yotatech.com/forums/f116...ctures-158106/
Good Luck!
Jan 17, 2011 | 08:48 AM
#5
Registered User
Joined: Jun 2010
Posts: 175
Likes: 0
From: Orwigsburg, PA
Do yourself a favor and pick up a pitman arm puller. My uppers weren't too bad to free up. A pickle fork worked on them. The lowers one the other hand, I had to beat on them with a hammer and use the pitman arm puller to put tension on it, and beat it some more, more tension, plus beat it again, then more tension with the pitman puller and it finally broke loose. I though my truck was crashing down off the jack-stands when it broke loose.
Use a jack to lift up the rotor/hub assembly ( or remove it like the other thread) to give you more room to work on the lower. I have my torsion bars off too (total front end rebuild) so moving my control arms around was pretty easy. I found it easiest to do upper first then lower and install the 4 bolts first on the lower to bolt it up to the hub/rotor assembly (knuckle) then use the jack and lower the whole assembly and guide the bottom stud through the hole.
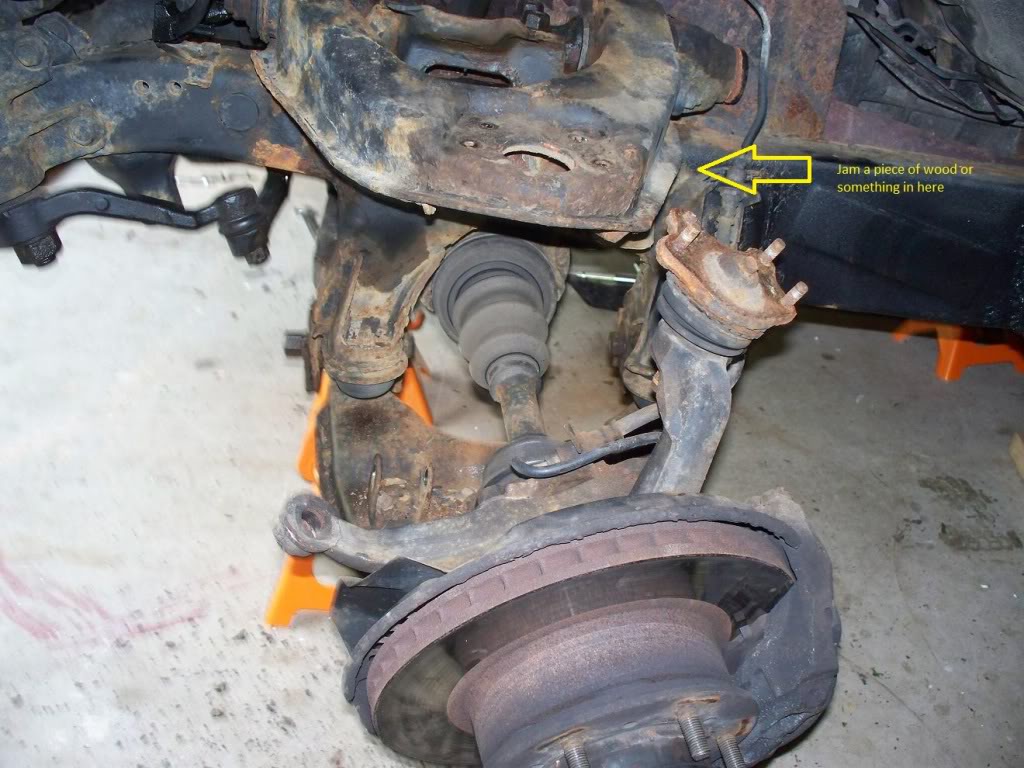
I'm install BJ spacers as well and I have a piece of wood jammed in between the UCA and I think it's a bump stop.
I didn't take any more pictures yesterday as I was working on it.
Use a jack to lift up the rotor/hub assembly ( or remove it like the other thread) to give you more room to work on the lower. I have my torsion bars off too (total front end rebuild) so moving my control arms around was pretty easy. I found it easiest to do upper first then lower and install the 4 bolts first on the lower to bolt it up to the hub/rotor assembly (knuckle) then use the jack and lower the whole assembly and guide the bottom stud through the hole.
I'm install BJ spacers as well and I have a piece of wood jammed in between the UCA and I think it's a bump stop.
I didn't take any more pictures yesterday as I was working on it.
Jan 17, 2011 | 09:22 AM
#6
Registered User
Joined: Jul 2010
Posts: 470
Likes: 0
From: vermont
i know mine is a third gen but the bottoms are not that hard, the tops are usally worse. i blew my passenger side bottom balljoint out on the trail in a foot of mud and pulled my axle out, and had to walk home 6 miles. i had to fix it out there to so you cant get much worse then that for putting in new ones.
Jan 17, 2011 | 12:38 PM
#7
Thread Starter
Registered User
Joined: Jan 2010
Posts: 16
Likes: 0
well, i'm hoping it won't be too tough to pop them out. i had my mechanic do all 4 less than two years ago, about 30,000 miles worth. last time i took the truck in for him to look at he said the bjs were going bad. told him we just did them, at about $700 as i recall. he said it could be due to tires being out of balance or alignment issue or bad shocks. i have my doubts, even if true, right after he did the bjs the first time i had 4 new tires mounted and balanced, by a reputable tire outfit, and immediately had the alignment done by another very good outfit. my one shock is leaking, but am is it true bad shocks can kill bjs?
the mechanic only uses toy oem parts, but i suspect it must have been a batch of bad bjs he installed. i've used the guy for decades and he has always been very honest in the past so don't think he trying to take me for a ride.
but, at $700, i thought for $200 in parts and maybe a $100 tool i could the the bjs myself. (i changed a bj once before on '78 volare, of all things, using a pickle fork. so, i'm not too scared about doing the job myself, but am looking for as much info as possible and as many tricks as i can find.)
Trending Topics
Jan 17, 2011 | 03:19 PM
#9
Registered User
Joined: Mar 2009
Posts: 588
Likes: 1
From: Midwest
I posted how to do mine a while ago, it's really easy. Here's the link: https://www.yotatech.com/forums/f116...43/index2.html
My Post is #27 in the link.
If you do loosen the torsion bar adjusting bolts, make sure you at least have a couple spares in case you break one, and also put anti-sieze on them to easily adjust them after the trucks on the ground.
Sorry, I don't have any photos that will help though.
My Post is #27 in the link.
If you do loosen the torsion bar adjusting bolts, make sure you at least have a couple spares in case you break one, and also put anti-sieze on them to easily adjust them after the trucks on the ground.
Sorry, I don't have any photos that will help though.
Last edited by cr@ves4wheelin; Jan 17, 2011 at 03:20 PM.
Jan 17, 2011 | 04:56 PM
#10
Registered User
Joined: Jun 2010
Posts: 175
Likes: 0
From: Orwigsburg, PA
Not even a $100 tool....try $15 from Autozone.
Pitman Arm Puller
Just make sure you thread the castle nut on a few turns. Otherwise you will make the same mistake I did, (even though I remember reading to have the nut on a little), and not have the nut on which will allow the tool to twist off as you tighten it.
With only 30k on them, they should come apart easily. I believe mine were originals from '93, or at least from the original owner over 100k miles ago.
Ruskymx
Jan 17, 2011 | 05:45 PM
#11
Registered User
Joined: Aug 2009
Posts: 13,574
Likes: 72
From: Wilkes-Barre, PA, USA
FYI that tool was crap for me to use, I dang near broke it. I had to rent/borrow this one from them: http://www.autozone.com/autozone/acc...er=209523_0_0_

Don't make the same mistake I did either, use some paint/nail polish or whatever other than a sharpie to mark the pitman arm location. Because it's really easy to get it off by a tooth or two. Mark the pitman arm, threads and the box body before putting the arm on make sure all three line up, otherwise your steering wheel will be off and the relay rod will not be exactly centered.
Of course, mine were the original 23 year old parts.

Thread
Thread Starter
Forum
Replies
Last Post
GreatLakesGuy
The Classifieds GraveYard
8
Sep 4, 2015 09:27 AM
TURBOrunnerNM
86-95 Trucks & 4Runners
4
Jul 22, 2015 11:01 AM
crashburnoveride
86-95 Trucks & 4Runners
1
Jul 10, 2015 06:39 AM


