
Warn Winch Revival
 Mar 15, 2012 | 07:59 PM
#1
Thread Starter
Registered User


Joined: Oct 2009
Posts: 4,832
Likes: 332
From: Northfield, Vermont
Warn Winch Revival
I got this winch a little while ago, its a Warn XD9000i. I got it from a trailer dealer who took it off a trailer some one traded in. They didnt know if it works or not, just wanted it gone, so I got it cheap. Perfect.
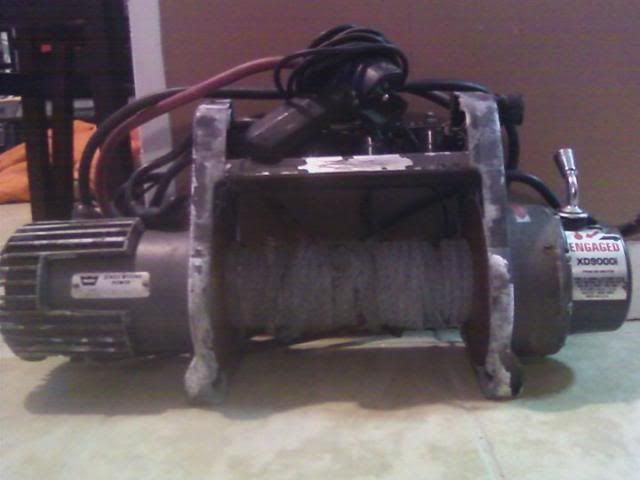
Well it didnt work. Haha. All it would do is click. The solenoids all check out, but the motor wouldan't spin. We took it off to find it seized from corrosion and all 4 of the brushes were frozen.
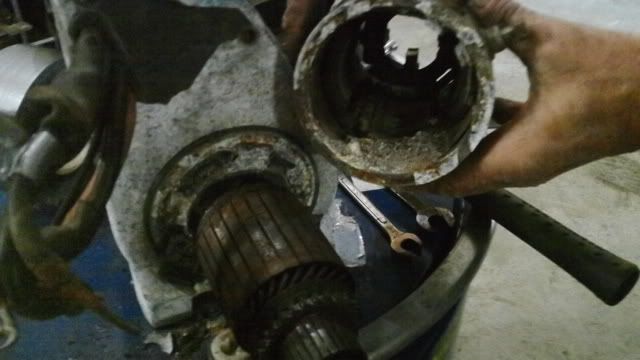
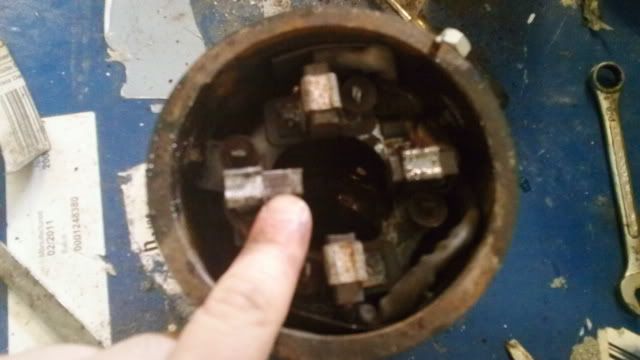
Even though they were corroded, they didnt look to be in bad shape, so we took it apart, cleaned it and put it back together.
Then decided to take the other end apart and re-grease the gears
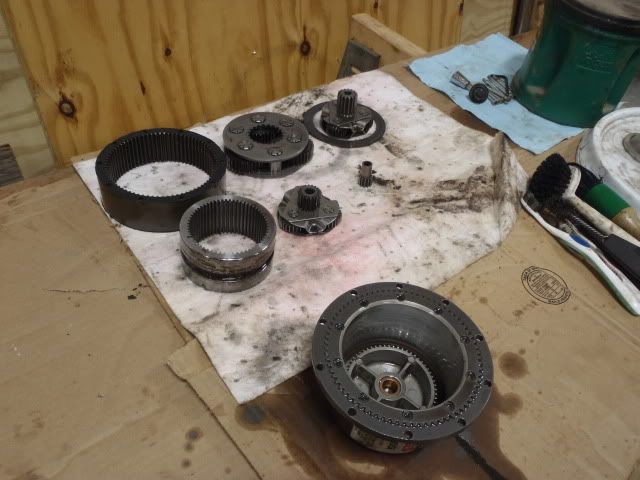
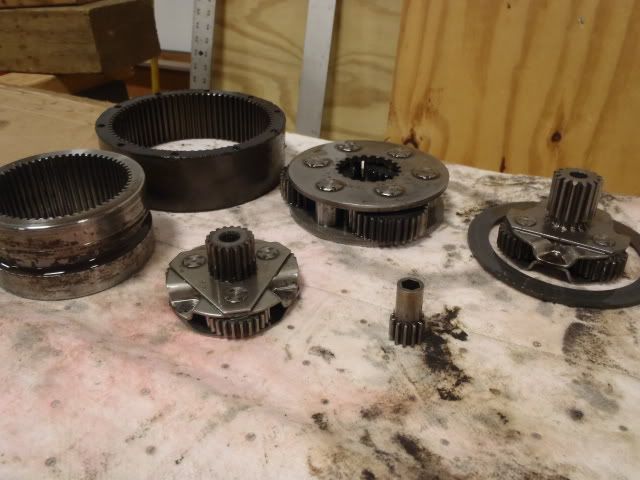

All greased up and ready to go back on.
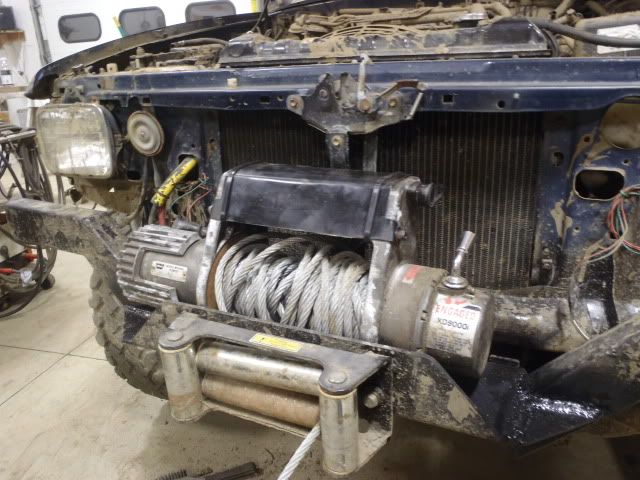
I got a free cable from a friend with a broken winch, roller fairlead for $1 at a yard sale, spent about $25 on a hook, hardware, and electrical connectors, and it works! I did however, have to build a bumper to mount it on using the TG winch mount. Haha.

The top part is a little bent, so a stock solenoid cover wont fit anymore, so I have a piece of sheet metal all traced out, just needs to be cut that will cover the top. I destroyed the first grill, I was rushing to get it on before going wheeling and got a little too happy cutting it up. So 4wheelinvt gave me one of his spares.
In cab winch control coming soon
Well it didnt work. Haha. All it would do is click. The solenoids all check out, but the motor wouldan't spin. We took it off to find it seized from corrosion and all 4 of the brushes were frozen.
Even though they were corroded, they didnt look to be in bad shape, so we took it apart, cleaned it and put it back together.
Then decided to take the other end apart and re-grease the gears
All greased up and ready to go back on.
I got a free cable from a friend with a broken winch, roller fairlead for $1 at a yard sale, spent about $25 on a hook, hardware, and electrical connectors, and it works! I did however, have to build a bumper to mount it on using the TG winch mount. Haha.
The top part is a little bent, so a stock solenoid cover wont fit anymore, so I have a piece of sheet metal all traced out, just needs to be cut that will cover the top. I destroyed the first grill, I was rushing to get it on before going wheeling and got a little too happy cutting it up. So 4wheelinvt gave me one of his spares.
In cab winch control coming soon
Last edited by rattlewagon; May 10, 2014 at 11:12 AM.
 Mar 21, 2012 | 12:05 PM
#4
Thread Starter
Registered User
Joined: Oct 2009
Posts: 4,832
Likes: 332
From: Northfield, Vermont
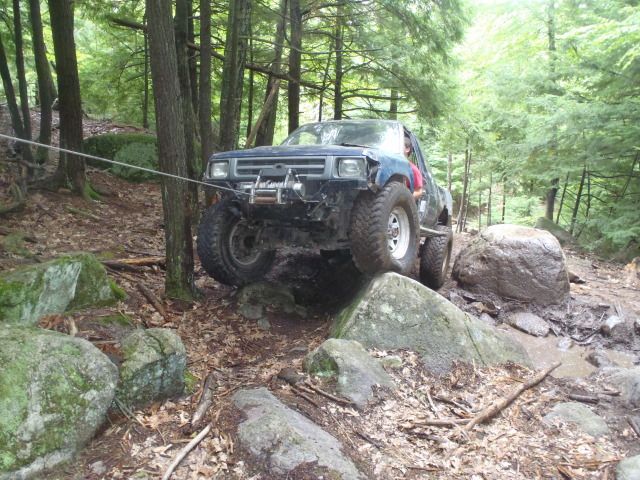
I knew some one was going to mention that. Haha. That pic was taken right after it was used, It got respooled right after this pic. Guess I should have waited. 
Last edited by rattlewagon; Mar 21, 2012 at 12:24 PM.
Mar 21, 2012 | 05:52 PM
#7
Thread Starter
Registered User
Joined: Oct 2009
Posts: 4,832
Likes: 332
From: Northfield, Vermont

Trending Topics
Mar 21, 2012 | 06:17 PM
#8
Thread Starter
Registered User
Joined: Oct 2009
Posts: 4,832
Likes: 332
From: Northfield, Vermont
So Im thinking about mounting the switches right under the radio. Some where easy, so I can keep one hand on the wheel, and the controls semi close to the shifter. Will have a hand throttle on the shifter soon too.
This is an old pic, but it the dash is still the same. If this was your truck, where would you put the switches?
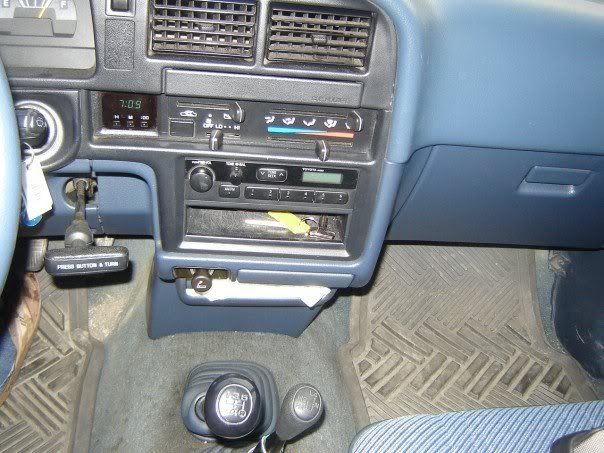
This is an old pic, but it the dash is still the same. If this was your truck, where would you put the switches?
Last edited by rattlewagon; Mar 22, 2012 at 06:32 AM.
 Mar 30, 2012 | 08:50 AM
#10
Registered User
Joined: Jan 2007
Posts: 6,106
Likes: 27
The Operator's Manual for the XD9000i states the following.
Spooling Out
Spooling In Under Load
Never exceed winch’s rated line pull.
Power-in the wire rope evenly and tightly on the drum. This prevents the outer wire wraps from sinking into the inner wraps, binding, and damaging the wire rope.
Avoid shock loads when spooling, by pulsing the control switch to take up wire rope slack. Shock loads can momentarily far exceed the winch and rope ratings.
Spooling In Under No Load
Spooling with an Assistant: Have the assistant hold the hook strap putting as much constant tension on the wire rope as possible. While keeping tension, the assistant should walk toward the winch while you operate the control switch spooling in the wire rope. Release the switch when the hook is a minimum of 6 ft. (2 m) from the fairlead opening. Spool in the remainder for storage as directed below.
Spooling Alone: Arrange the wire rope to be spooled so it will not kink or tangle when spooled. Be sure any wire rope on the drum is tightly and evenly layered. Spool enough wire rope to complete the next full layer on the drum. Tighten and straighten the layer. Repeat process until the hook is a minimum of 6 ft. (2 m) from the fairlead opening. Spool in the remainder for storage as directed below.
Spooling Remainder for Storage
Spooling Out
Freespooling is generally the quickest and easiest way to spool out wire rope. Before freespooling wire rope out from the winch, power out enough rope to remove any tension the wire rope might be under. Disengage the clutch. Then freespool by manually spooling out enough wire rope for the winching operation. See The Basic Guide to Winching Techniques for more information.
Always leave at least 5 wraps of rope on the drum.Spooling In Under Load
Never exceed winch’s rated line pull.
Power-in the wire rope evenly and tightly on the drum. This prevents the outer wire wraps from sinking into the inner wraps, binding, and damaging the wire rope.
Avoid shock loads when spooling, by pulsing the control switch to take up wire rope slack. Shock loads can momentarily far exceed the winch and rope ratings.
Spooling In Under No Load
Spooling with an Assistant: Have the assistant hold the hook strap putting as much constant tension on the wire rope as possible. While keeping tension, the assistant should walk toward the winch while you operate the control switch spooling in the wire rope. Release the switch when the hook is a minimum of 6 ft. (2 m) from the fairlead opening. Spool in the remainder for storage as directed below.
Spooling Alone: Arrange the wire rope to be spooled so it will not kink or tangle when spooled. Be sure any wire rope on the drum is tightly and evenly layered. Spool enough wire rope to complete the next full layer on the drum. Tighten and straighten the layer. Repeat process until the hook is a minimum of 6 ft. (2 m) from the fairlead opening. Spool in the remainder for storage as directed below.
Spooling Remainder for Storage
When the hook is within 6 ft. (2 m) of the fairlead, disconnect the hook from the anchor or load. Hold onto the supplied hook strap and hold tension on the winch rope. Slowly power-in the winch by “pulsing” the power-in switch on the remote control until the hook is within 3 ft. (1 m) of the fairlead. Stop winching in and attach the hook to a suitable anchor point on the vehicle. DO NOT POWER THE HOOK INTO THE FAIRLEAD. This could cause damage to the fairlead. Once the hook is suitably attached to the vehicle, power-in the remaining slack in the winch rope by “pulsing” the power-in switch on the remote control until there is minimal slack in the winch wire rope.
Last edited by MudHippy; Mar 30, 2012 at 09:10 AM.
Mar 30, 2012 | 11:59 AM
#11
The Operator's Manual for the XD9000i states the following.
Spooling Out
Spooling In Under Load
Never exceed winch�s rated line pull.
Power-in the wire rope evenly and tightly on the drum. This prevents the outer wire wraps from sinking into the inner wraps, binding, and damaging the wire rope.
Avoid shock loads when spooling, by pulsing the control switch to take up wire rope slack. Shock loads can momentarily far exceed the winch and rope ratings.
Spooling In Under No Load
Spooling with an Assistant: Have the assistant hold the hook strap putting as much constant tension on the wire rope as possible. While keeping tension, the assistant should walk toward the winch while you operate the control switch spooling in the wire rope. Release the switch when the hook is a minimum of 6 ft. (2 m) from the fairlead opening. Spool in the remainder for storage as directed below.
Spooling Alone: Arrange the wire rope to be spooled so it will not kink or tangle when spooled. Be sure any wire rope on the drum is tightly and evenly layered. Spool enough wire rope to complete the next full layer on the drum. Tighten and straighten the layer. Repeat process until the hook is a minimum of 6 ft. (2 m) from the fairlead opening. Spool in the remainder for storage as directed below.
Spooling Remainder for Storage
Spooling Out
Freespooling is generally the quickest and easiest way to spool out wire rope. Before freespooling wire rope out from the winch, power out enough rope to remove any tension the wire rope might be under. Disengage the clutch. Then freespool by manually spooling out enough wire rope for the winching operation. See The Basic Guide to Winching Techniques for more information.
Always leave at least 5 wraps of rope on the drum.Spooling In Under Load
Never exceed winch�s rated line pull.
Power-in the wire rope evenly and tightly on the drum. This prevents the outer wire wraps from sinking into the inner wraps, binding, and damaging the wire rope.
Avoid shock loads when spooling, by pulsing the control switch to take up wire rope slack. Shock loads can momentarily far exceed the winch and rope ratings.
Spooling In Under No Load
Spooling with an Assistant: Have the assistant hold the hook strap putting as much constant tension on the wire rope as possible. While keeping tension, the assistant should walk toward the winch while you operate the control switch spooling in the wire rope. Release the switch when the hook is a minimum of 6 ft. (2 m) from the fairlead opening. Spool in the remainder for storage as directed below.
Spooling Alone: Arrange the wire rope to be spooled so it will not kink or tangle when spooled. Be sure any wire rope on the drum is tightly and evenly layered. Spool enough wire rope to complete the next full layer on the drum. Tighten and straighten the layer. Repeat process until the hook is a minimum of 6 ft. (2 m) from the fairlead opening. Spool in the remainder for storage as directed below.
Spooling Remainder for Storage
When the hook is within 6 ft. (2 m) of the fairlead, disconnect the hook from the anchor or load. Hold onto the supplied hook strap and hold tension on the winch rope. Slowly power-in the winch by �pulsing� the power-in switch on the remote control until the hook is within 3 ft. (1 m) of the fairlead. Stop winching in and attach the hook to a suitable anchor point on the vehicle. DO NOT POWER THE HOOK INTO THE FAIRLEAD. This could cause damage to the fairlead. Once the hook is suitably attached to the vehicle, power-in the remaining slack in the winch rope by �pulsing� the power-in switch on the remote control until there is minimal slack in the winch wire rope.
Mar 30, 2012 | 01:25 PM
#12
Registered User
Joined: Feb 2007
Posts: 441
Likes: 0
From: Pleasant Grove, Utah
My warn 8000lb manual said something like it wanted 600-1000lbs of load on the wire as it spooled in. I just went to an underground parking lot and pulled all the wire off except the last several wraps. then I engaged the parking brake so it would still roll with resistance, then had my wife steer as I wound the wire back on under the winch's power. I just anchored with a tow rope to a big strong pillar. We got a pretty good coil pattern and the wire didn't sink into the prior layers. The manual recommended that I reload the wire under tension before actually using the winch in a real-world application.
Mar 30, 2012 | 01:59 PM
#13
Registered User
Joined: Jan 2007
Posts: 6,106
Likes: 27
STRETCHING WIRE ROPE
The life of a wire rope is directly related to the use and care it receives. During its first use, a new wire rope must be spooled onto its drum under a load of at least 1000 lbs. (454 kgs).
The life of a wire rope is directly related to the use and care it receives. During its first use, a new wire rope must be spooled onto its drum under a load of at least 1000 lbs. (454 kgs).
Preparing the Wire Rope
1. The wire rope must be properly coiled under tension to be able to support a load without damage.
2. Uncoil the wire rope, except for 5 full wraps.
3. Recoil the wire rope back into the winch under at least 500 lb. of tension.
OPERATION
1. Examine the wire rope. Do not use the winch if the wire rope is frayed, kinked or damaged.
-
6. Do not operate the winch at extreme angles - do not exceed the angles shown above. Pay attention to how the wire rope is coiling onto the drum. If it is building up on one end of the drum, stop, uncoil the wire rope and recoil it from a less severe angle to prevent damage.
Apr 22, 2012 | 05:47 PM
#15
Thread Starter
Registered User
Joined: Oct 2009
Posts: 4,832
Likes: 332
From: Northfield, Vermont
Got my switches mounted. So much easier than pulling the controller out every time.
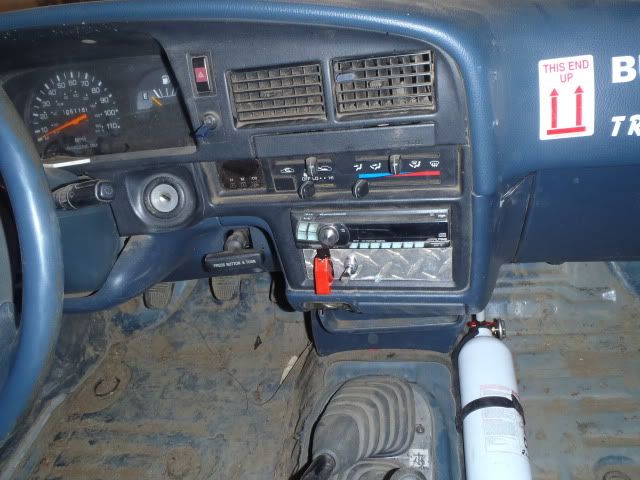
I used 3 of the 4pins on a trailer connector to make a quick release in case I need to take the winch off.
I didnt get a pic of it, but I just spliced wires in to the solenoid harness. Oddly enough, the extension cord had white, green, and black wires in it. And you splice them into the white ( hot ) and green and black ( in and out ) wires on the winch.
Last edited by rattlewagon; Apr 23, 2012 at 03:04 AM.
May 8, 2012 | 07:01 PM
#16
Thread Starter
Registered User
Joined: Oct 2009
Posts: 4,832
Likes: 332
From: Northfield, Vermont
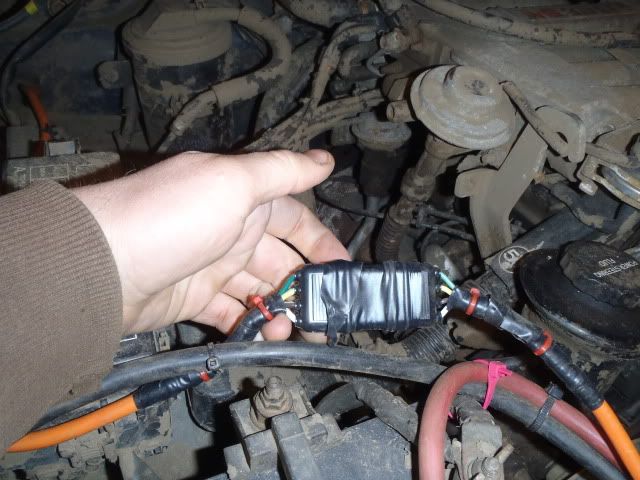
Heres a pic from 4x4wire showing how the extension cord splices into the solenoid harness.

And a link to their excellent write up: http://www.4x4wire.com/tech/winch/remote/
And a link to their excellent write up: http://www.4x4wire.com/tech/winch/remote/
May 8, 2012 | 07:12 PM
#17
Registered User
Joined: Nov 2008
Posts: 85
Likes: 0
From: brooks alberta canada
How did you hook up the main power to the winch? I have the exact same winch. I only have a power cable coming off no ground cable and no holes or anything on the cover or case for a ground to come thru. Does it ground off the case? i dont want to hook up power and no ground and burn something out
May 9, 2012 | 03:15 AM
#18
Thread Starter
Registered User
Joined: Oct 2009
Posts: 4,832
Likes: 332
From: Northfield, Vermont
In the picture of the trailer harness, you see a black and red wire hooked to the battery, those are the main power and grounds. If we have the same winch (XD9000i) there should be a series of holes on the motor side of the case for the cables to come through.
Last edited by rattlewagon; May 9, 2012 at 03:20 AM.
Nov 21, 2013 | 06:36 AM
#19
Thread Starter
Registered User
Joined: Oct 2009
Posts: 4,832
Likes: 332
From: Northfield, Vermont
Had to pull the bumper off last night to get at some stuff, VERY glad I put that quick disconnect on the in cab controls. Pulled 3 wires and 6 bolts and bumper and winch were off!
Heavy SOB though.. I think some synthetic may be in order if I can find a good deal on some...
Heavy SOB though.. I think some synthetic may be in order if I can find a good deal on some...
Dec 26, 2013 | 08:23 PM
#20
Registered User
Joined: Apr 2007
Posts: 568
Likes: 0
From: Yuba City, CA
Nice find, and nice rebuild!
Here's how I did my interior winch control:
https://www.yotatech.com/forums/f31/...-winch-270258/
Here's how I did my interior winch control:
https://www.yotatech.com/forums/f31/...-winch-270258/


