93YotaGuy '93 2WD Build Up 'Back from the grave"

 04-22-2011, 05:53 AM
#42
Registered User
Thread Starter
Join Date: Jul 2009
Location: Denver, Colorado
Posts: 319
Likes: 0
Received 0 Likes
on
0 Posts
04-22-2011, 04:51 PM
#44
Registered User
I had my timing chain replaced by a Toyota Stealership mechanic who also worked out of his own garage on weekends and he did it without removing the head. Within 1000 miles the cover started leaking where it meets the head and the head went 15k miles later which may or may not have been related. I did have 190k on the truck so it was due more or less I guess.
04-22-2011, 05:14 PM
#45
Really? I did the job on my truck some 1.5 years ago. It's been holding up great, no leaks, and I have a couple thousand miles since. (have pics on my profile) Of course I did some research before I jumped in also followed the fsm word by word.
It leaked where the cover meets the head? Mechanic error, sealant is supposed to be applied there.
It leaked where the cover meets the head? Mechanic error, sealant is supposed to be applied there.
04-22-2011, 05:22 PM
#46
Registered User
Yes was definitely his error, just saying that it can happen if you're not careful and obviously he wasn't or he wanted me to bring the truck back for a head gasket shortly. Either way I will be learning how to do it myself this time around.
04-23-2011, 01:26 PM
#47
Registered User
Thread Starter
Join Date: Jul 2009
Location: Denver, Colorado
Posts: 319
Likes: 0
Received 0 Likes
on
0 Posts
Did you apply silicone around the whole area where it meets the head or just on the corners? I know that there's a gasket there and i'm sure if I apply it around the whole thing it won't leak but if I do that I am also thinking the next time I take the cover off if need be I will have to replace the gasket since it will be covered in silicone. Thoughts?
04-23-2011, 05:04 PM
#48
Yeah, I applied sealant/silicon on the corners and on the whole top area. There's no gasket at the top; the headgasket seals it up. Make sure the surfaces are clean and dry/no oil!! Brake cleaner does a pretty good job with that.
The only way you'd need to replace it is if you somehow damage it bad. Otherwise just clean off as much of the old silicon and apply new.
To make it easier there's a product called permatex copper gasket spray. Just spray a light coat on the surface and wait till it becomes tacky. This will hold the gasket in place and seal any imperfections.
If you haven't bought the gaskets yet I'd recommend fel-pro. I got my fron auto zone, I believe it's a kit if not you'll also need the waterpump gasket the oilpump o-ring and you might aswell get a new crank seal.
Last edited by streetlancer; 04-23-2011 at 05:17 PM.
04-29-2011, 04:44 PM
#49
Registered User
Thread Starter
Join Date: Jul 2009
Location: Denver, Colorado
Posts: 319
Likes: 0
Received 0 Likes
on
0 Posts
So since i've posted last I have been working on the truck and I just finished. I haven't started it yet cause I want to give the silicone time to dry and not risk having an oil leak. It went pretty smooth. The only problems I had were getting the crank bolt and crank gear out and dropping the relay rod in order to get to the oil pan.
It was worse than I suspected. As soon as I got the oil pan out I found this.

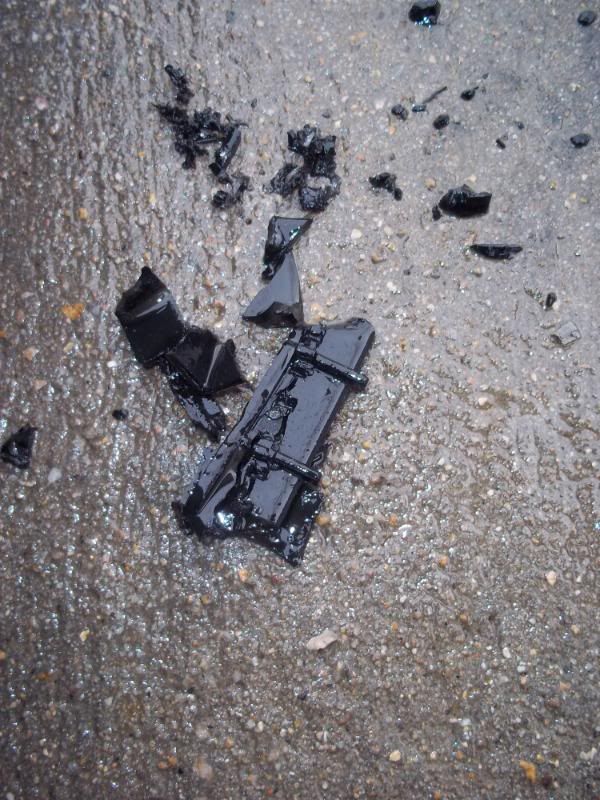
The oil pickup wasn't too clogged but I'm glad I was able to get this stuff out.

Overall I think the chain and crank gear were in pretty good shape. I'm glad I replaced the timing components when I did because I know I would have probably run into worse problems by what I found.


Overall the job was relatively easy. Just time consuming. I really hope I don't have any oil leaks. Guess we'll find out tomorrow. She sure does clean up nice though!


It was worse than I suspected. As soon as I got the oil pan out I found this.
The oil pickup wasn't too clogged but I'm glad I was able to get this stuff out.
Overall I think the chain and crank gear were in pretty good shape. I'm glad I replaced the timing components when I did because I know I would have probably run into worse problems by what I found.
Overall the job was relatively easy. Just time consuming. I really hope I don't have any oil leaks. Guess we'll find out tomorrow. She sure does clean up nice though!
Last edited by 93YotaGuy; 04-30-2011 at 05:27 AM.
06-04-2011, 02:40 PM
#53
Registered User
Thread Starter
Join Date: Jul 2009
Location: Denver, Colorado
Posts: 319
Likes: 0
Received 0 Likes
on
0 Posts
Just a quick update as to the progress of the little pickup.
After installing the timing chain kit I developed a few minor problems. After tightening several bolts to fix various leaks I am down to just one small leak coming from the oil pump bolt that requires sealant. I'm going to have to pull the oil pump off, add a new gasket, and fix the oil leak. I'm waiting until my next oil change because it is so minimal that it doesn't really make a difference.
Now as for the good news... The past few days I've been working on it non-stop with a friend of mine andddddddddddddddddd
WE PAINTED IT!
I chose to keep it white. The body work we did has a few minor defects but nothing really noticeable unless you are paying close attention. It is now super white with blue pearl.
I'll post pictures of the progress and the finished product as soon as I get it all put back together.
Last edited by 93YotaGuy; 06-07-2011 at 08:08 PM.
06-11-2011, 09:38 AM
#55
Registered User
Thread Starter
Join Date: Jul 2009
Location: Denver, Colorado
Posts: 319
Likes: 0
Received 0 Likes
on
0 Posts
I finally got it all put back together. Here is the work in progress and some of the body work that we had to deal with.


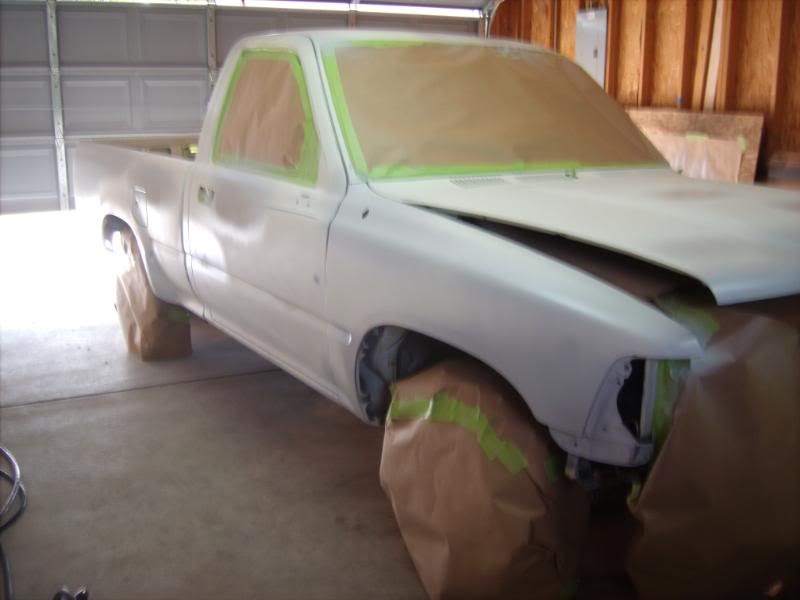


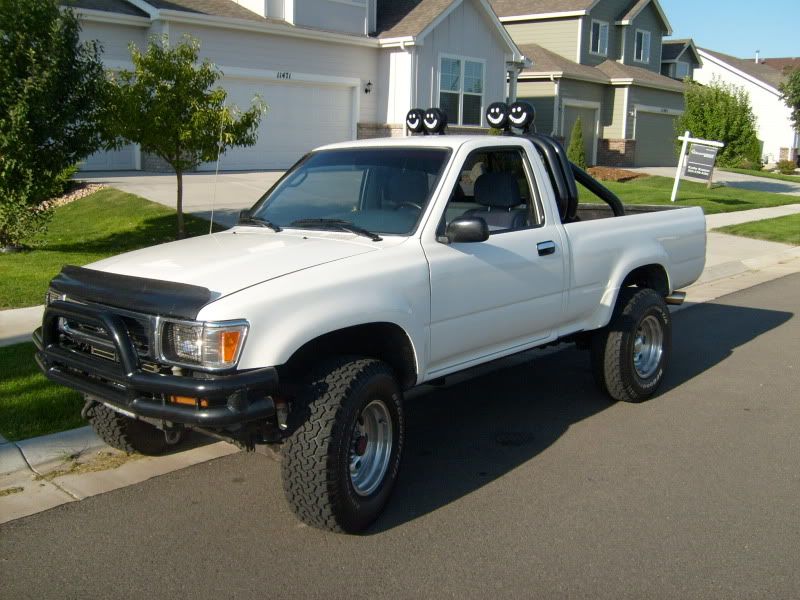
This is the 90% completed project. I still have to wet sand it and polish it up to help the pearl stick out a little more. Hope you guys like!
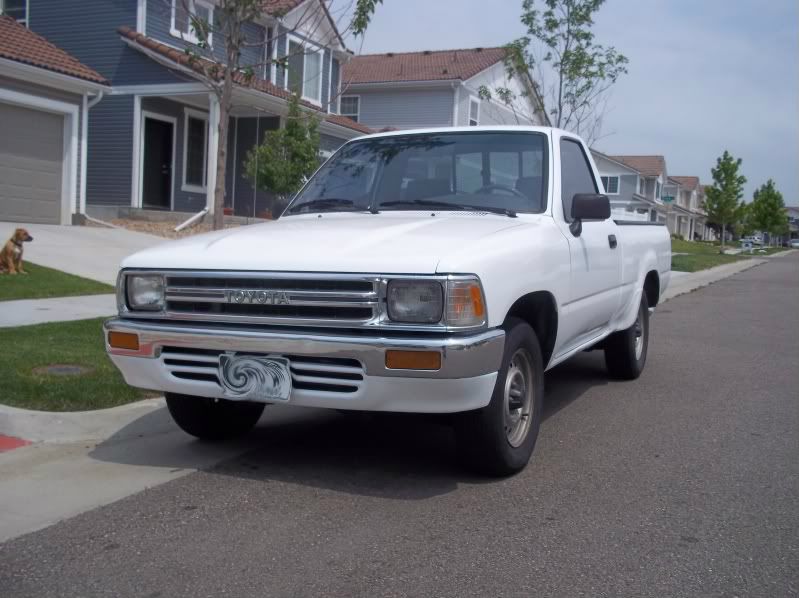


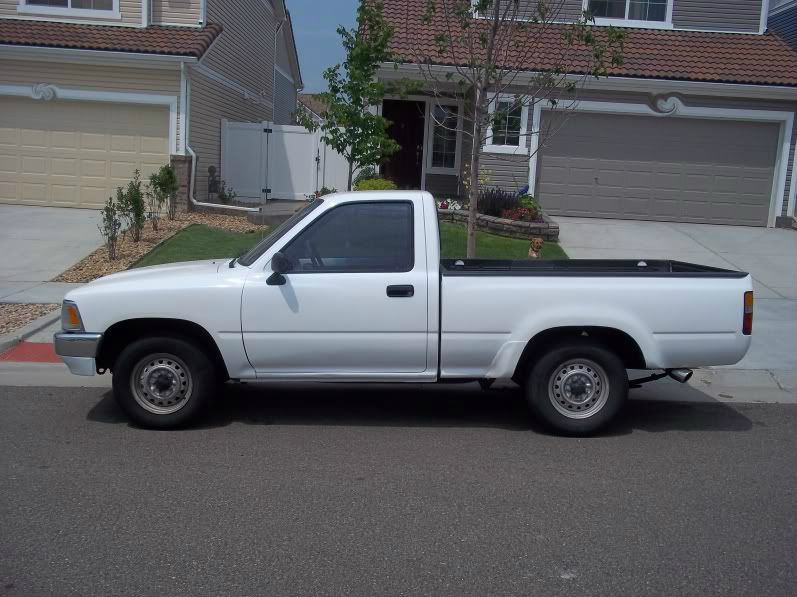
The stock rims that are on there don't make the truck look as nice as it should. I've always been a firm believer that rims and tires make a vehicle.
I'm still on the market for some all black 17-18 inch rims. I have yet to find some on craigslist that I really like but am sure i'll find something soon. I'll post updates as they come along.
She sure has come a long way though...
This is the 90% completed project. I still have to wet sand it and polish it up to help the pearl stick out a little more. Hope you guys like!
The stock rims that are on there don't make the truck look as nice as it should. I've always been a firm believer that rims and tires make a vehicle.
I'm still on the market for some all black 17-18 inch rims. I have yet to find some on craigslist that I really like but am sure i'll find something soon. I'll post updates as they come along.
She sure has come a long way though...
Last edited by 93YotaGuy; 06-26-2011 at 06:31 PM.
06-11-2011, 10:01 AM
#56
Registered User
Join Date: Jun 2011
Location: Illinois
Posts: 45
Likes: 0
Received 0 Likes
on
0 Posts
Doest even look like the same truck anymore, it looks great! Amazing that this truck was only $250. Tirerack.com has a feature where you can view wheels and tires on your vehicle; if your in the market for new rims/tires.
06-26-2011, 10:23 AM
#58
Hey Man, .....thanks for the link! 
Great project, ...my buddy has this very truck in metallic Super-Red#2, ..something like that, ..my favorite colors of these years.... Red and White! hahah
Far as the oil pump sealant bolt....why remove the pump? You don't need to in order to slather up that bolt and slap it back in, ya know? It IS a pump-to-cover mounting bolt....but it's not the ONLY one...and the o-ring is the seal...so I'd just TRY, at least, to just pull the crank pulley and have at it! lol. I mean, the pulley/harmonic only goes on one way, ya know?
Just also wanted to ask, .... 'You know that the oil pump bolts are of three different torque values, unrelated to the timing cover torque values, right?' >> 2 bolts I believe are at 18#, 2 bolts get 14# and 1 bolt get's 9#? Something like that, just wanted to be sure you knew that, as I only caught it after installing my last motor(machinist did all of that and SCREWED UP ALMOST EVERYTHING, ....but I had to pull the pump/cover cuz of leaks on his crappy work,...that's when I found it).
Great lil rig you got there, 93(WHOM DRIVES A 91! HAHAHA)
Great project, ...my buddy has this very truck in metallic Super-Red#2, ..something like that, ..my favorite colors of these years.... Red and White! hahah
Far as the oil pump sealant bolt....why remove the pump? You don't need to in order to slather up that bolt and slap it back in, ya know? It IS a pump-to-cover mounting bolt....but it's not the ONLY one...and the o-ring is the seal...so I'd just TRY, at least, to just pull the crank pulley and have at it! lol. I mean, the pulley/harmonic only goes on one way, ya know?
Just also wanted to ask, .... 'You know that the oil pump bolts are of three different torque values, unrelated to the timing cover torque values, right?' >> 2 bolts I believe are at 18#, 2 bolts get 14# and 1 bolt get's 9#? Something like that, just wanted to be sure you knew that, as I only caught it after installing my last motor(machinist did all of that and SCREWED UP ALMOST EVERYTHING, ....but I had to pull the pump/cover cuz of leaks on his crappy work,...that's when I found it).
Great lil rig you got there, 93(WHOM DRIVES A 91!
HAHAHA)
06-26-2011, 11:43 AM
#59
Registered User
Thread Starter
Join Date: Jul 2009
Location: Denver, Colorado
Posts: 319
Likes: 0
Received 0 Likes
on
0 Posts
Far as the oil pump sealant bolt....why remove the pump? You don't need to in order to slather up that bolt and slap it back in, ya know? It IS a pump-to-cover mounting bolt....but it's not the ONLY one...and the o-ring is the seal...so I'd just TRY, at least, to just pull the crank pulley and have at it! lol. I mean, the pulley/harmonic only goes on one way, ya know?
I began to think that if I pull the pulley off I might as well remove 4 more bolts and replace the oil pump seal again since I have another sitting around. At least that way I could lather up the bolt really well and not have to worry about it.
It would also give me a little piece of mind since I went past the torque specs when it started leaking and tightened all bolts as tight as I could to try and stop the leak. :-X
I probably shouldn't have done that but oh well.....
Just also wanted to ask, .... 'You know that the oil pump bolts are of three different torque values, unrelated to the timing cover torque values, right?' >> 2 bolts I believe are at 18#, 2 bolts get 14# and 1 bolt get's 9#? Something like that, just wanted to be sure you knew that, as I only caught it after installing my last motor(machinist did all of that and SCREWED UP ALMOST EVERYTHING, ....but I had to pull the pump/cover cuz of leaks on his crappy work,...that's when I found it).
Haha well the name came from my other original toy. a 93! :-D
 06-26-2011, 12:23 PM
#60
Oh yeah, I remember! lol...
Far as the rest.... honestly, you DO NOT need to pull the pump.
Also, you don't want to LATHER the thing too much.... ESPECIALLY on the end.. NONE on the end, k? (Reason; The bolt, sitting just perfectly plum with the timing cover insert where it sits?>> it's RIGHT IN FRONT of the tensioner! If you have a bead on the end of it....it WILL touch the tensioner when it pushes in to pick up the slack.
HOWEVER, if you're concerned that you really overtorqued them and might have pinched the oil pump o-ring , ..... I don't know, I guess you could. The best way is to put the oil pump on, w/sealant, etc., while the timing cover is off. I'm assuming you did so, but forgot the sealant? Hey, CRAP HAPPENS, ...to all of us, man! Don't let anyone tell you otherwise! lol. I would avoid removing it, as installing the thing onto the vertically facing timing cover, over the oil pump drive spline, keeping the o-ring perfectly in place.... well, you're asking for more trouble, ya know? NOT impossible, at all.... but just safer, if indeed you have everything on there right, just forgot the sealant..... to just put the sealant on and give it a try-see, ya know?
PS> 9# is enough! lol. Just like the timing cover..... about 9 bolts that are all 9# on there....that's a bit more of a chunk of weight, ya know? They know what they're doing, 93.... and most of them never leaked for even 200K, ....that is, until we dug into them, right? hahaha. The o-ring is different, sure, ...but if YOU DID stop all the leaking but the sealant bolt,...why mess with the rest, eh?
PSS> Remember, ...there is an o-ring in there, ...and when you overtorque, you're changing clearances of things, etc. IOW: When you torque it down more.....and it comes closer to the rest in there......what's that thing I mentioned about the tensioner? NOT EVEN saying it will be a problem, especially if it's just #1 or so... but I'd be that if you got the o-ring right, you probably got oil dripping down in weird places due to the sealant bolt not, well, 'not having sealant'? lol. Just remember, .... be careful putting the pulley back on, don't kink the front main seal...... And if you can, get a good quality q-tip and coat it again with some red-grease, as well as a tiny bit on the harmonic sleeve that rides on it. JUST A LIL on the sleeve, but get it moderate on the seal.
ALSO REMEMBER..... you can EASILY get all the oil out of that bolt hole that get's sealant, 93! NO problem, ...just use a lil alcohol and dry it out good with a qtip, IT'S NOT that deep of a bolt hole. THEN; Put sealant only on the threads of the bolt, and just around 2/3rds of the threads, starting at just behind the first thread from the tip and NOT SUPER THICK, lol... It's a bolt, it fits in there pretty tight.... just needs sealant to keep the oil from cruising back out the VERY TIGHT but not AIR TIGHT thread channels.


