
250000_yota's '98 T100 Build (Scuba Steve!)
 Aug 28, 2012 | 03:58 PM
#22
Thread Starter
Registered User
Joined: Sep 2007
Posts: 919
Likes: 0
From: Longmont, CO

Last edited by 250000_yota; Aug 28, 2012 at 10:36 PM.
Aug 28, 2012 | 10:43 PM
#23
Thread Starter
Registered User
Joined: Sep 2007
Posts: 919
Likes: 0
From: Longmont, CO
Thank you Blake,for making me question myself. I double checked. According to the FSM, my shaft is correctly installed. It is suppos to have the slip joint at the lower portion of the shaft. I'm assuming that has something to do with the fact that my rear driveshaft is a country mile long, being a extra cab truck. But thank you for the insight. I learned something tonight.
Last edited by 250000_yota; Aug 28, 2012 at 10:52 PM.
Sep 6, 2012 | 08:59 AM
#25
Thread Starter
Registered User
Joined: Sep 2007
Posts: 919
Likes: 0
From: Longmont, CO
You know, to be honest, I agree with you on the parts being kinda hard to find, but after a while, I got used to it and it became kind of fun. That's one of the reasons I put some of the details into my build up thread here, so if people see something I did they liked, they don't gotta look as hard as I did...
Oct 11, 2012 | 07:18 PM
#26
Thread Starter
Registered User
Joined: Sep 2007
Posts: 919
Likes: 0
From: Longmont, CO
Haven't had time to update lately, but I'll see if I can cover all the bases.
This first one was actually done before the sliders, but I didn't have a chance to photograph while I was elbows deep in wheel bearing grease. I cleaned my hubs, replaced the wheel bearings with trail gear wheel bearing kits, and installed a set of powerslot rotors. Now, a word to anyone buying the trail gear kit, the seals will NOT work. They are for a pickup, which has a smaller seal surface. I didn't realize this, and thankfully I had a set of new wheel seals laying around.
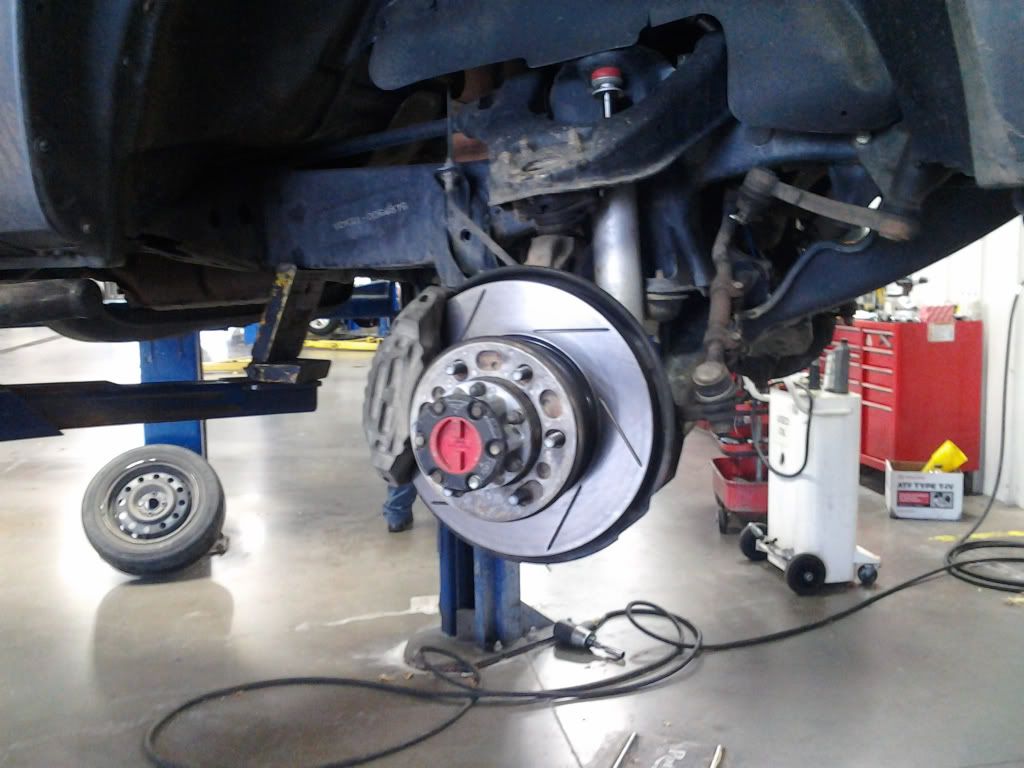
Now, I know I'm going to get flamed for the direction of rotation, but that's how they were labeled. I even called powerslots technical support, who said that it actually didn't matter which direction the slots faced. I just put them on the way they were labeled. This photo was also taken about two months after I installed them.
Then, today (10/11/12), I installed a set of spidertrax 1.5 inch wheel spacers, and a set of 17" Tacoma wheels with a used set of big-o a/t's to save my Duratracs from being destroyed this winter with my new found long distance drive to work.
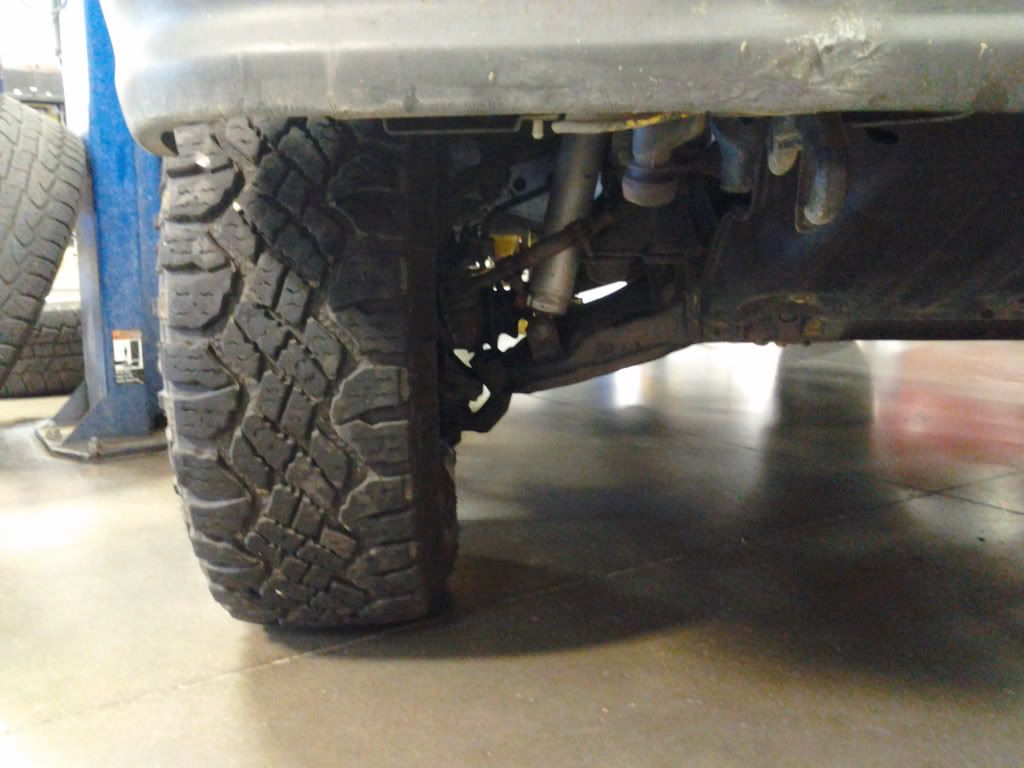
Here's the truck per spacer and with my Duratracs...
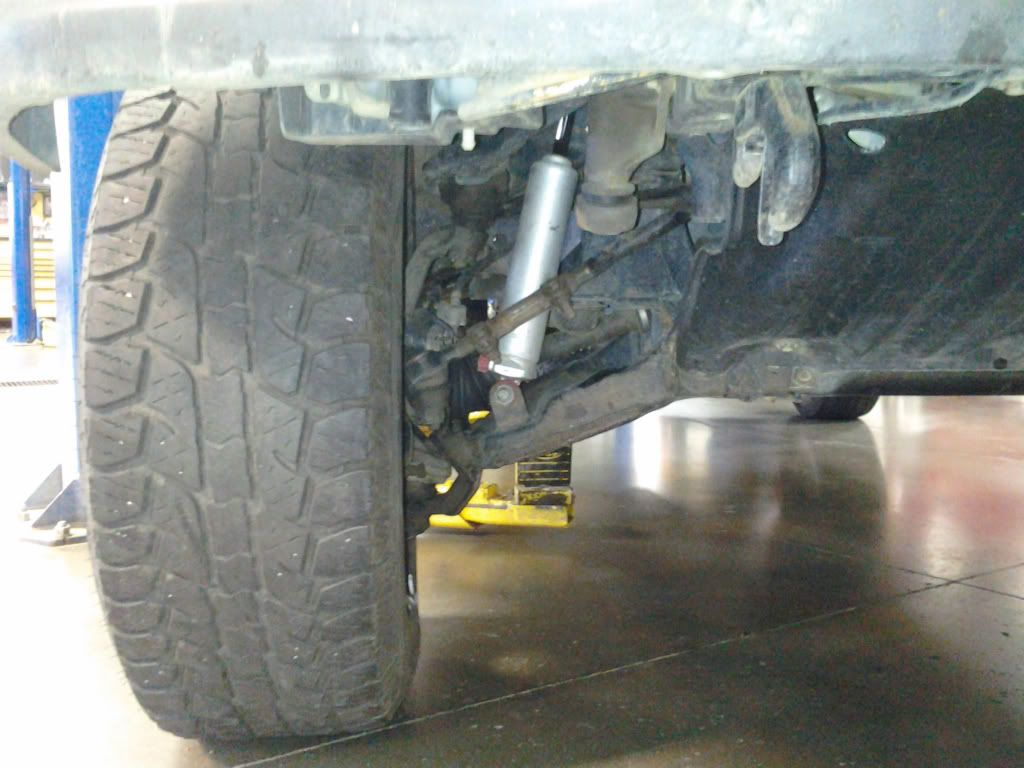
And here's with the spacers and the new wheels.
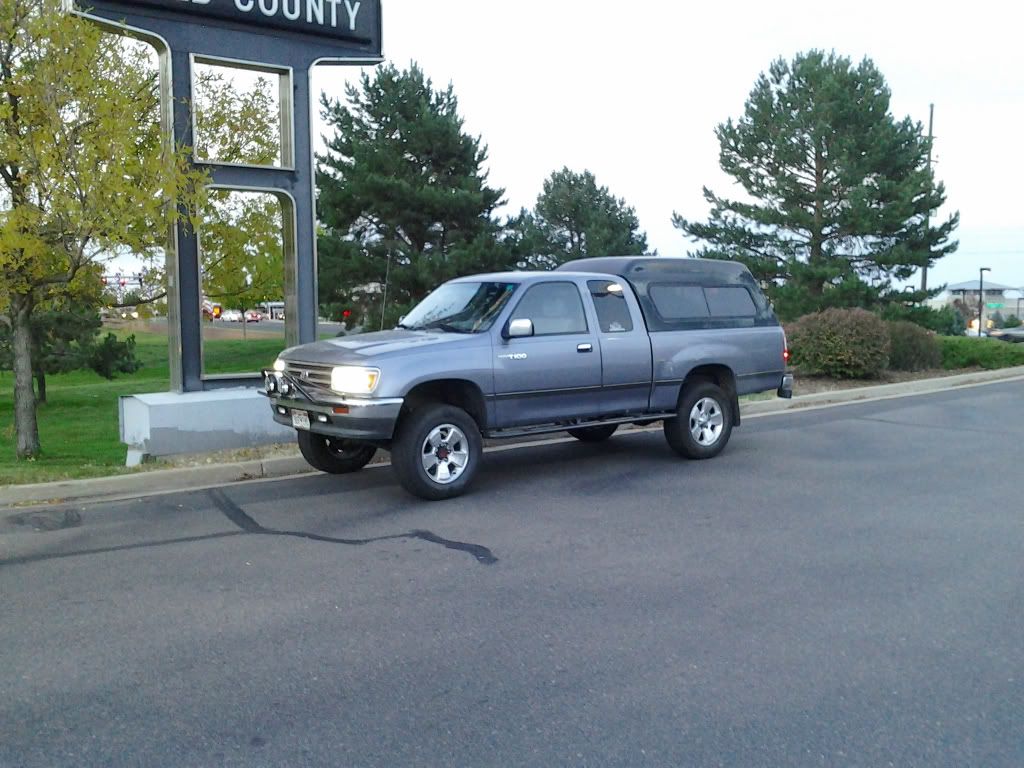
And here's my truck with the new wheels on.
This first one was actually done before the sliders, but I didn't have a chance to photograph while I was elbows deep in wheel bearing grease. I cleaned my hubs, replaced the wheel bearings with trail gear wheel bearing kits, and installed a set of powerslot rotors. Now, a word to anyone buying the trail gear kit, the seals will NOT work. They are for a pickup, which has a smaller seal surface. I didn't realize this, and thankfully I had a set of new wheel seals laying around.
Now, I know I'm going to get flamed for the direction of rotation, but that's how they were labeled. I even called powerslots technical support, who said that it actually didn't matter which direction the slots faced. I just put them on the way they were labeled. This photo was also taken about two months after I installed them.
Then, today (10/11/12), I installed a set of spidertrax 1.5 inch wheel spacers, and a set of 17" Tacoma wheels with a used set of big-o a/t's to save my Duratracs from being destroyed this winter with my new found long distance drive to work.
Here's the truck per spacer and with my Duratracs...
And here's with the spacers and the new wheels.
And here's my truck with the new wheels on.
Nov 5, 2012 | 02:41 PM
#27
Thread Starter
Registered User
Joined: Sep 2007
Posts: 919
Likes: 0
From: Longmont, CO
11/04/12
I had been pondering a scangauge II for the truck, as a way to try and get a little better mileage out of the truck with my new job being 35 miles from home. In doing so, I talked about it with my little brother, 98_3RZ. He passed the word along, and low and behold, I opened one up as a birthday present!
Like the box says, install is a simple as picking a spot, then plugging it into the OBD port.
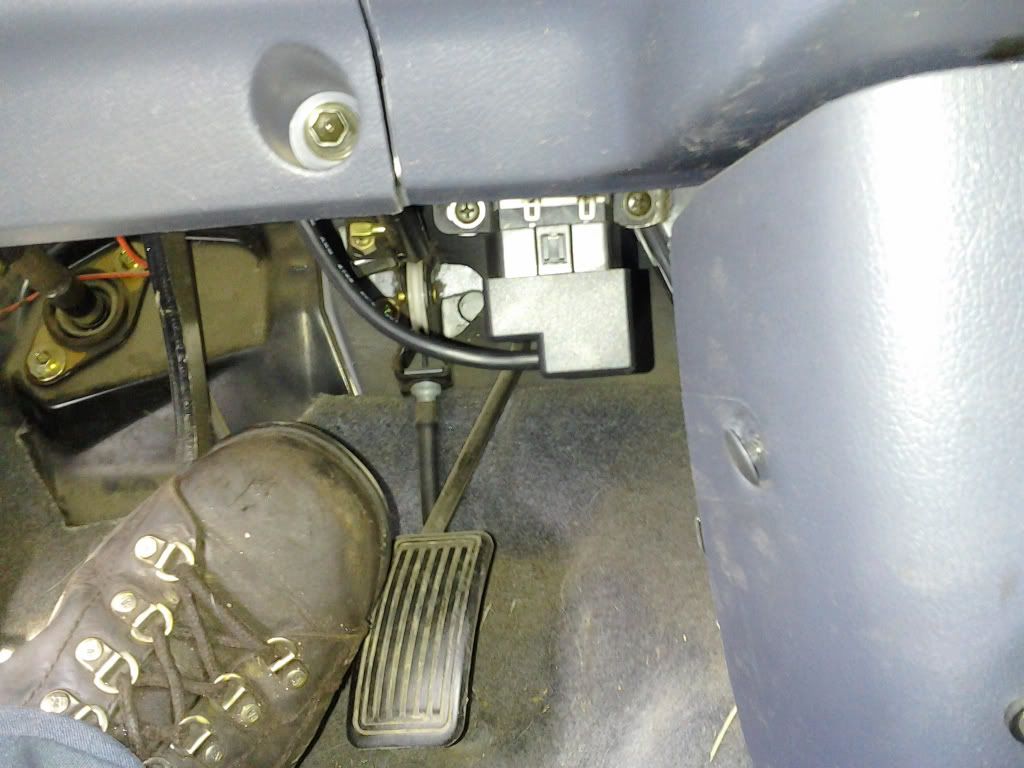
I chose to mount it to the steering column.
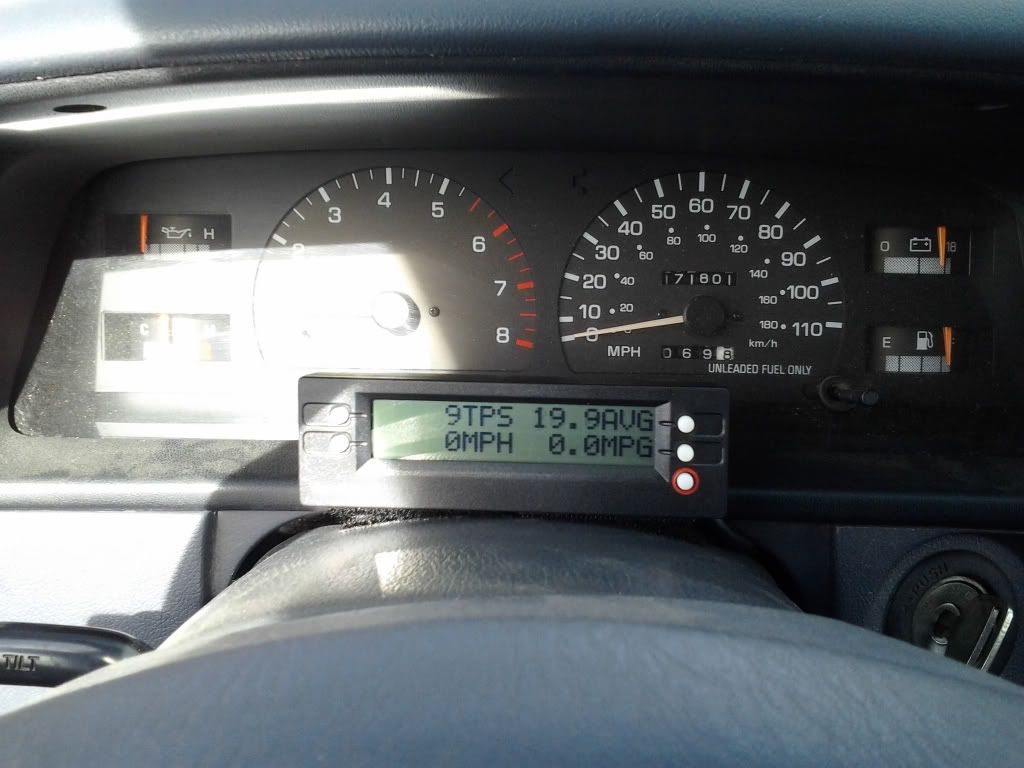
Another bonus is that it also can show a corrected speedo, as mine is a little off from the slightly larger 265/75R16's.
I had been pondering a scangauge II for the truck, as a way to try and get a little better mileage out of the truck with my new job being 35 miles from home. In doing so, I talked about it with my little brother, 98_3RZ. He passed the word along, and low and behold, I opened one up as a birthday present!
Like the box says, install is a simple as picking a spot, then plugging it into the OBD port.
I chose to mount it to the steering column.
Another bonus is that it also can show a corrected speedo, as mine is a little off from the slightly larger 265/75R16's.

 Dec 18, 2012 | 05:20 PM
#29
Registered User
Joined: Mar 2011
Posts: 505
Likes: 1
From: Socal
Great looking truck those Duratracs rock, I love mine.
What kind of mileage are you getting? I have never gotten better than 16 and that was on a 55mph highway one time. But I have an automatic with 4:88s on 33s.
Im also looking into the HD SKOs but I think I am going to end up making my own. Can you post a picture or 2 of the welds to the frame? Dropped off any rocks on to them yet? Ive got a couple friends who are convinced I need .250 wall square tube for the legs and main tube.
last thing, I find my self wanting better brakes. Did the rotors help at all?
Last edited by Zpd426; Dec 18, 2012 at 05:22 PM.
Jan 21, 2013 | 11:24 AM
#30
Thread Starter
Registered User
Joined: Sep 2007
Posts: 919
Likes: 0
From: Longmont, CO
Sorry Z I just now so your post. Haven't checked the build in a while.
For mileage I'm getting between 16-18, with the hubs unlocked. I will say that nothing has helped my mileage more than the scangauge. I'm able to monitor my self by watching throttle position, instant and average mpgs and when I start pushing the skinny a little too much. Mine truck is a 5 speed with 4.10s and 265/75r16s though. Are you accounting for the regearing when you check your mileage?
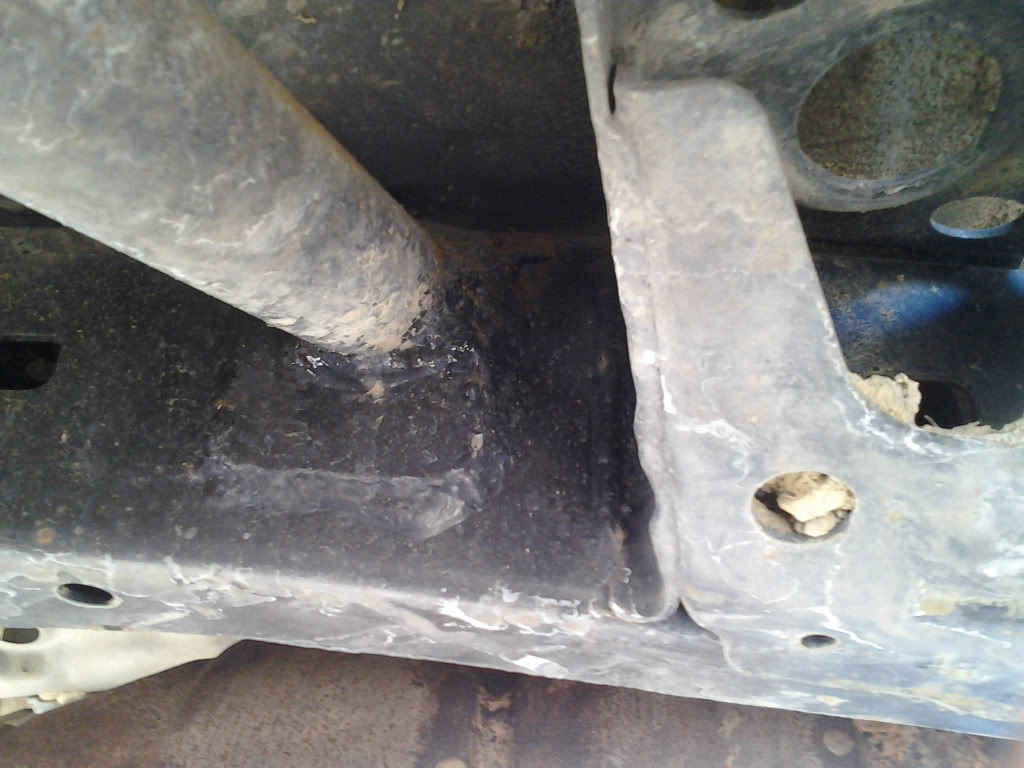
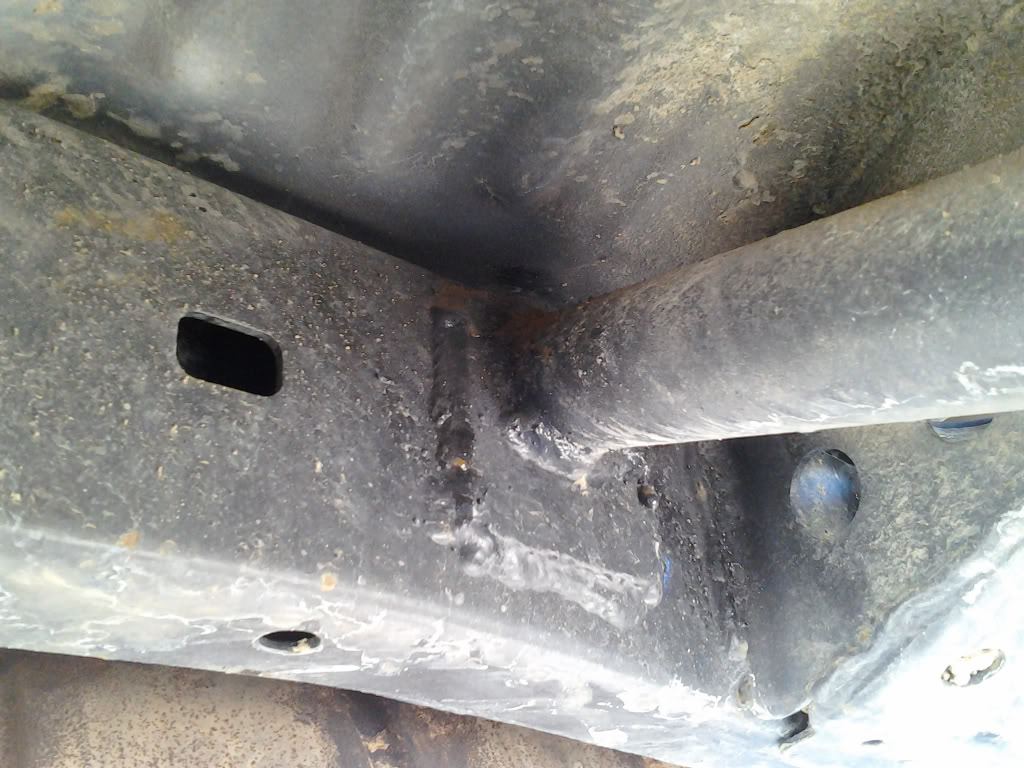
On the sliders, ill post a pic in just a little bit. Gotta run out to the truck. I can't quite member the tubing diameter and thickness, but I have had the truck completely off the ground on one side with my hi lift already, without any bending or cracking. Here they are. First two pictures are of the first mount, closest to the body mount. The last is the rear 3.
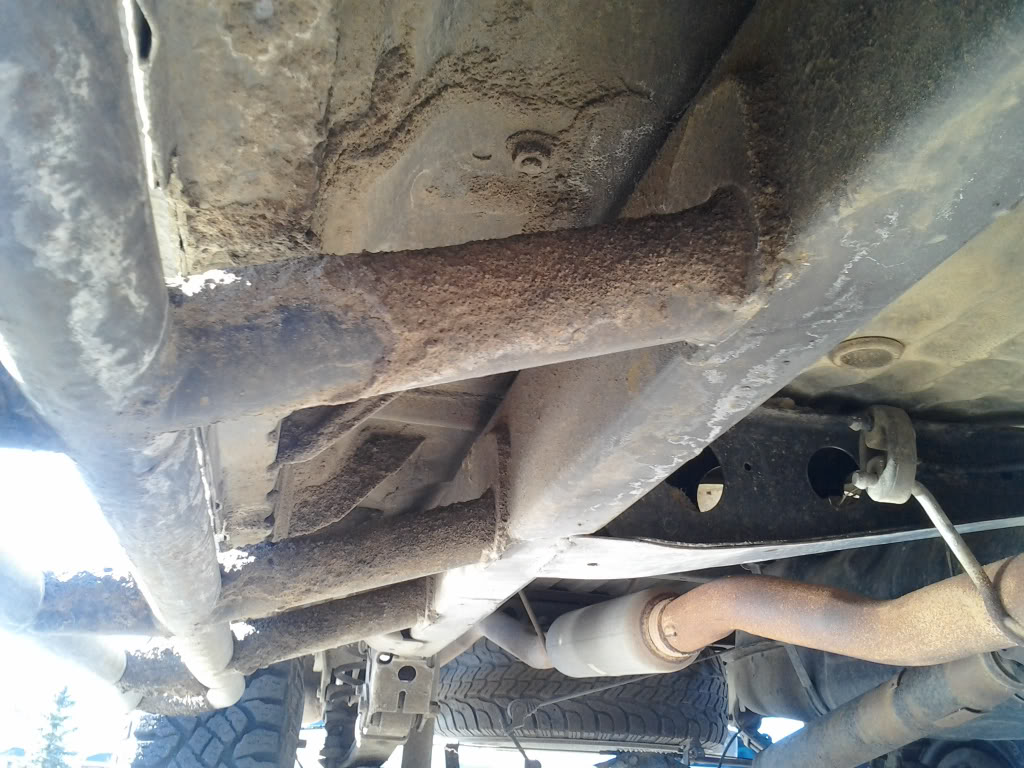
As for the brakes, I did see an improvement in repeated stops and mountain driving, where your constantly on and off the brakes. The brakes seem to fade much less than the old factory rotors., so I would definitely call that an improvement.
For mileage I'm getting between 16-18, with the hubs unlocked. I will say that nothing has helped my mileage more than the scangauge. I'm able to monitor my self by watching throttle position, instant and average mpgs and
when I start pushing the skinny a little too much. Mine truck is a 5 speed with 4.10s and 265/75r16s though. Are you accounting for the regearing when you check your mileage? On the sliders, ill post a pic in just a little bit. Gotta run out to the truck. I can't quite member the tubing diameter and thickness, but I have had the truck completely off the ground on one side with my hi lift already, without any bending or cracking. Here they are. First two pictures are of the first mount, closest to the body mount. The last is the rear 3.
As for the brakes, I did see an improvement in repeated stops and mountain driving, where your constantly on and off the brakes. The brakes seem to fade much less than the old factory rotors., so I would definitely call that an improvement.
Last edited by 250000_yota; Mar 5, 2014 at 06:54 AM.
Jan 24, 2013 | 10:09 AM
#32
Thread Starter
Registered User
Joined: Sep 2007
Posts: 919
Likes: 0
From: Longmont, CO
So seein no I've been so good about updating, I figured I'd go over the latest.
Sometime in December, I was down in boulder hanging out with my little brother. There is a nice ledge just outside his shop that he likes to pop up on. I figured, if he can so can I! I locked the hubs, dropped to low, and started to climb. As just about everyone on here will attest, they know how their truck acts and feels, and they can kinda tell when something is not right. I got that feeling as the truck popped up onto the rail ties that this ledge is made out of, but once safely back down, I didn't think twice about it.
Fast forward to Christmas Day, heading to my parents house about 20 minutes south of Longmont in Lafayette. Since it had snowed a decent bit, and iced over the surface streets, I had it in 4wd to get there. With the hubs locked and in or out of 4wd, you could hear a faint popping noise, accompanied by a light vibration. For the next couple of weeks, anytime the hubs were locked, you could hear it, and it started to get louder. By mid-January, I'd had enough, so I pulled it onto my alignment rack at work to determine the source. Idling in 4wd 1st gear, you could see the front pinion "pop" upwards every 3-4 turns of the drive shaft. Something was definitely unhappy inside.
Lucky for me, I did have a spare front diff out of the old '90 in the first post at the top of the page. I brought it to work, and pulled the cover to check it out. Surprisingly, with nearly 300k on it, the bearings looked brand new, with plenty of preload, and the backlash measured at the tight side of specification at .005! I cleaned it up and prepped the diff to swap my long side A.D.D. Axle tube.
I was in too big of a hurry to get the truck back out of the shop, so I don't have any pictures of the removal and swap, but the one pic I do have speaks for itself.
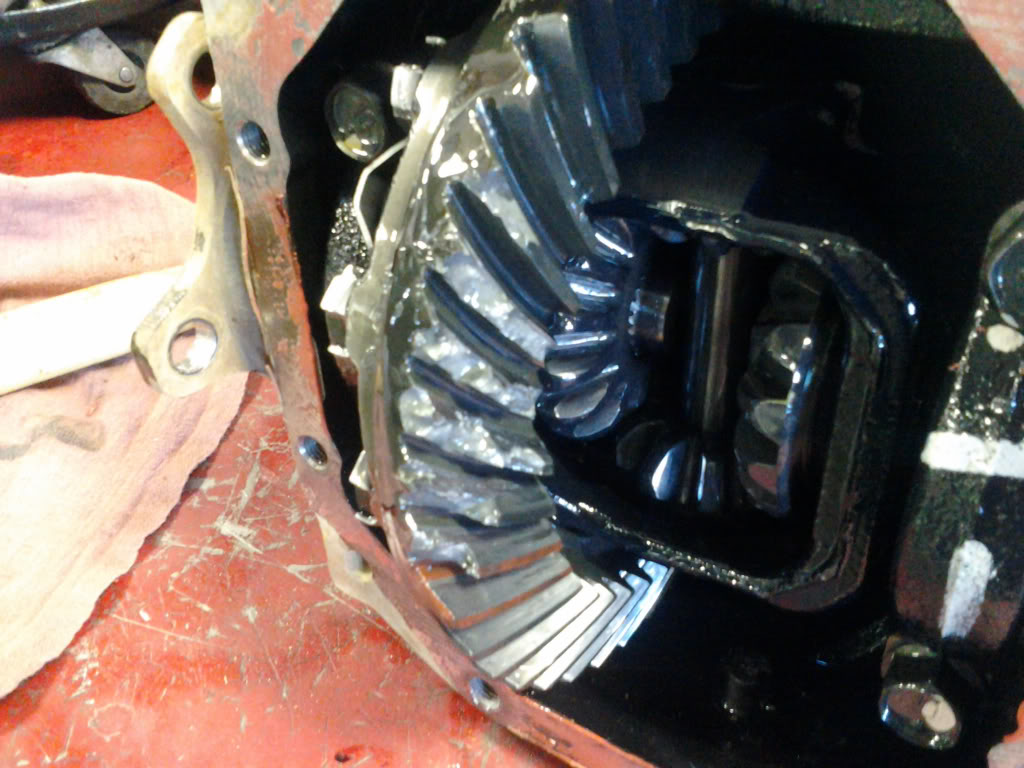
6 teeth! And this diff was still pulling the front of my truck around, with what I would call minimum complaint!
Now, while waiting for the silicone to dry, I also installed a Downey off-road idler arm brace procured when my little brothers master tech traded in his T100.
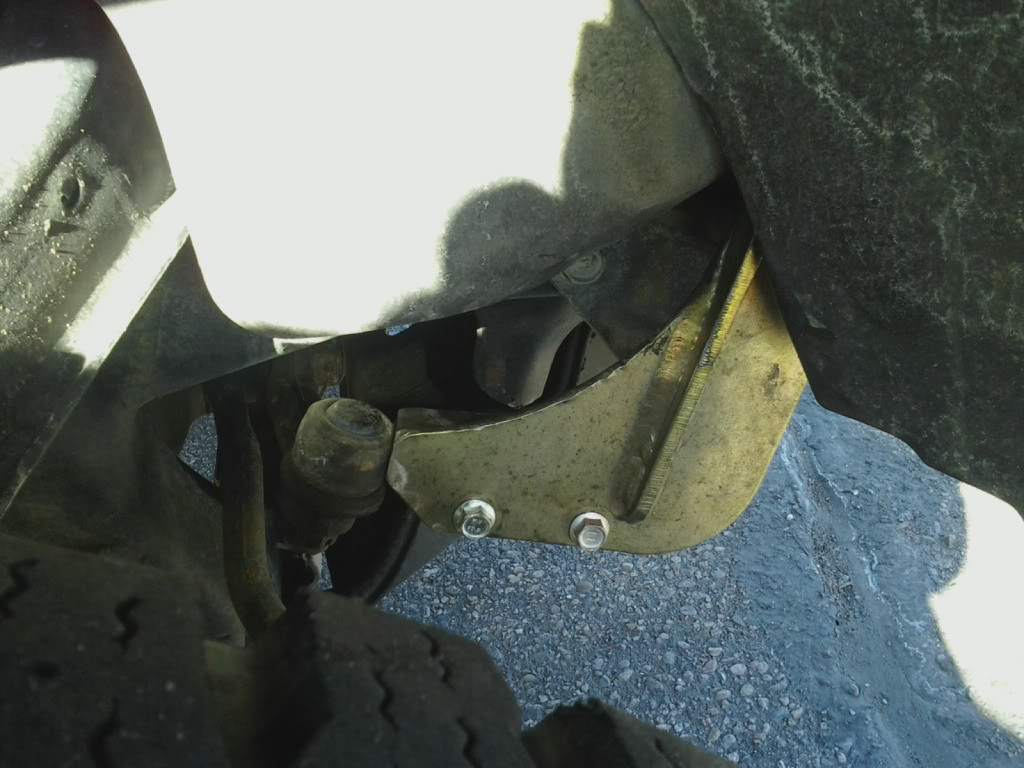
I did have to grind a small relief for the bolts on the lower arm, I'm assuming due to my SDORI brass idler arm bushings. No big deal though.
Sometime in December, I was down in boulder hanging out with my little brother. There is a nice ledge just outside his shop that he likes to pop up on. I figured, if he can so can I! I locked the hubs, dropped to low, and started to climb. As just about everyone on here will attest, they know how their truck acts and feels, and they can kinda tell when something is not right. I got that feeling as the truck popped up onto the rail ties that this ledge is made out of, but once safely back down, I didn't think twice about it.
Fast forward to Christmas Day, heading to my parents house about 20 minutes south of Longmont in Lafayette. Since it had snowed a decent bit, and iced over the surface streets, I had it in 4wd to get there. With the hubs locked and in or out of 4wd, you could hear a faint popping noise, accompanied by a light vibration. For the next couple of weeks, anytime the hubs were locked, you could hear it, and it started to get louder. By mid-January, I'd had enough, so I pulled it onto my alignment rack at work to determine the source. Idling in 4wd 1st gear, you could see the front pinion "pop" upwards every 3-4 turns of the drive shaft. Something was definitely unhappy inside.
Lucky for me, I did have a spare front diff out of the old '90 in the first post at the top of the page. I brought it to work, and pulled the cover to check it out. Surprisingly, with nearly 300k on it, the bearings looked brand new, with plenty of preload, and the backlash measured at the tight side of specification at .005! I cleaned it up and prepped the diff to swap my long side A.D.D. Axle tube.
I was in too big of a hurry to get the truck back out of the shop, so I don't have any pictures of the removal and swap, but the one pic I do have speaks for itself.
6 teeth! And this diff was still pulling the front of my truck around, with what I would call minimum complaint!
Now, while waiting for the silicone to dry, I also installed a Downey off-road idler arm brace procured when my little brothers master tech traded in his T100.
I did have to grind a small relief for the bolts on the lower arm, I'm assuming due to my SDORI brass idler arm bushings. No big deal though.
Last edited by 250000_yota; Mar 5, 2014 at 06:58 AM.
Feb 11, 2013 | 06:12 PM
#35
Thread Starter
Registered User
Joined: Sep 2007
Posts: 919
Likes: 0
From: Longmont, CO
I bought the light bar. It is from Off Road Warehouse. One word of caution, It took forever to get the bar. Close to 2 months to be exact, and their customer service department sucks major  but other than that I like it alot. The bar may be for sale in the near future if plans hold out though, so I will keep you guys posted.
Here is the bar on ORW's website.
http://www.offroadwarehouse.com/prod.../T100/sfID1/61
but other than that I like it alot. The bar may be for sale in the near future if plans hold out though, so I will keep you guys posted. Here is the bar on ORW's website.
http://www.offroadwarehouse.com/prod.../T100/sfID1/61
Feb 11, 2013 | 06:26 PM
#36
Registered User
Joined: Sep 2012
Posts: 40
Likes: 0
appreciate the feedback! by the way it sounds im better off making one in less time and 150 dollars less! got any other pics or measurements? i took basic measurements but math isn't my forte. ittl give me something to do while my funds are low (:
Feb 22, 2013 | 11:18 AM
#40
Thread Starter
Registered User
Joined: Sep 2007
Posts: 919
Likes: 0
From: Longmont, CO
Sorry. Haven't had a chance till today to measure my bar. Here is what I've got.
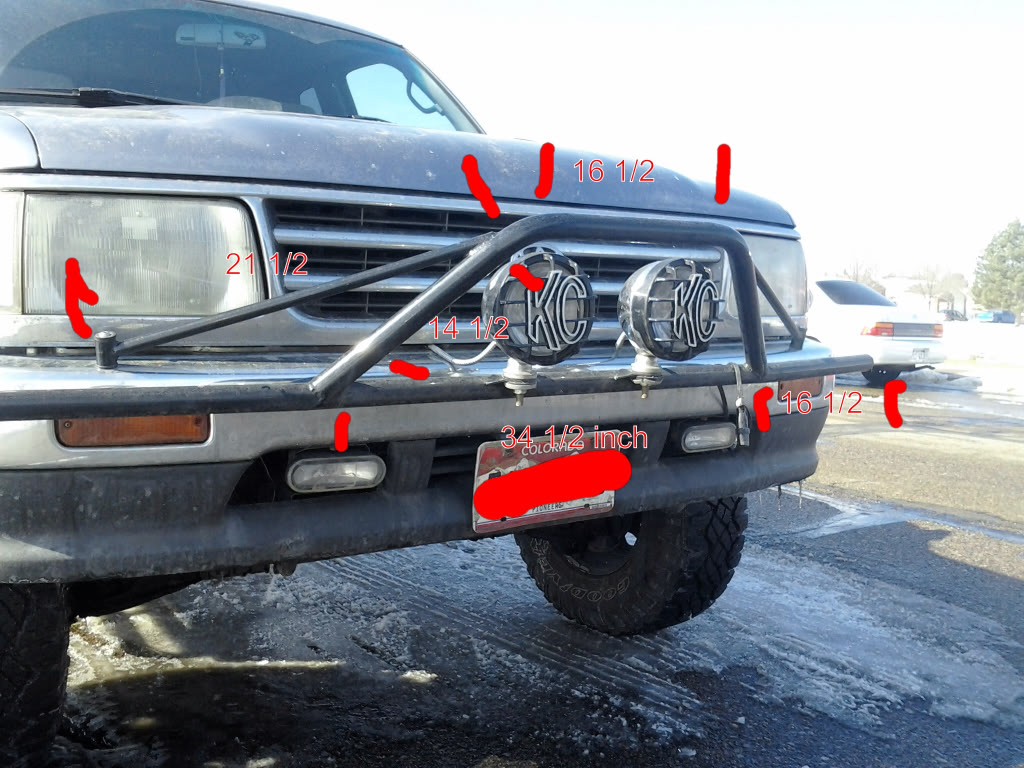
Just note, the 34 1/2 should actually be 34 1/4. That is measured between the center of each of the welds for the top bar. The measurements from their out are also from the center of the welds.
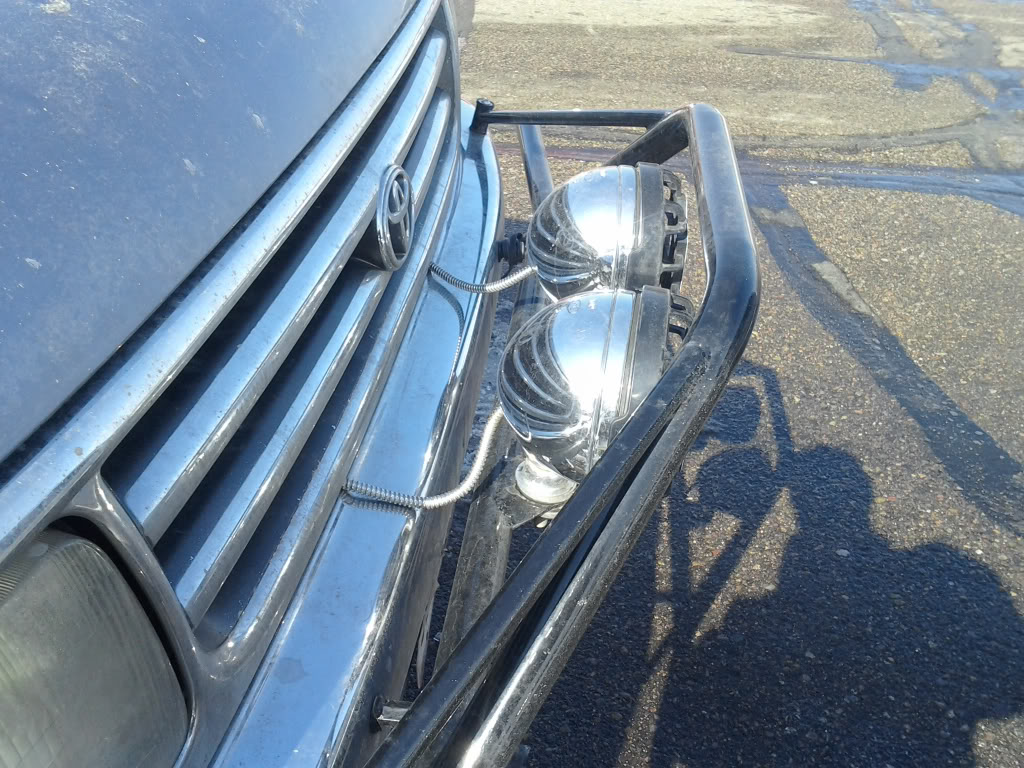
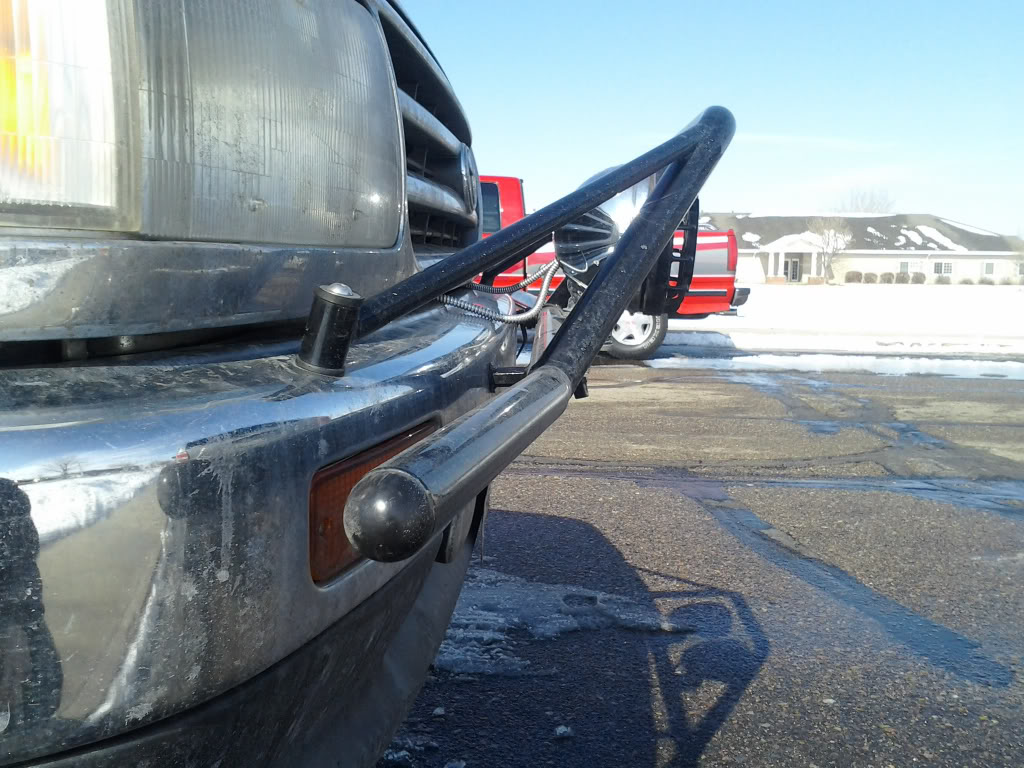
These last two kinda show the angles a little better. If you have any questions let me know.
Just note, the 34 1/2 should actually be 34 1/4. That is measured between the center of each of the welds for the top bar. The measurements from their out are also from the center of the welds.
These last two kinda show the angles a little better. If you have any questions let me know.


