Numbchux's '03 Taco yard truck build
 07-02-2020, 11:20 AM
#1
Registered User
Thread Starter

Numbchux's '03 Taco yard truck build
Touch of back story. I have old, decrepit cars and I have 22 acres of wooded land. I've been watching for a UTV for trail clearing/maintenance and moving firewood, but they're so G.D. expensive. Occasionally I have to pull an engine in the yard, or move a car that doesn't have any suspension on it (I actually hung the rear of an SVX with no drivetrain or rear suspension from the front bumper on my 4runner to move it across the yard, kinda sketchy).
I'm Facebook friends with the owner of SJR Lifts (makes lifts for Subarus). He's constantly parting cars out in his yard, he posted this picture of this ghetto winch boom truck he built out of a cheap Ford Explorer:

And the gears started turning. I've been looking for an elocker rear for my 4runner for awhile, and haven't found anyone selling one separately, but being in the rust belt, I do see Taco's with broken frames fairly regularly.
Cue, this gem:
24x,xxx miles on it, 5-speed, 3.4, 4WD, TRD, blown brake lines, broken frame (back of the cab is dented from the bed leaning on it). PO bought it for almost $11k at a dealer with 198k on it 7 years ago, there's a receipt for a major service (diff, and tcase oils, all belts, water pump, front brakes, ball joints etc.) to the tune of almost $2k at 225k, and a receipt for the bedliner, almost $500. Sold it to me for $1k....I almost feel bad.
Plan is, both trucks in the garage, both axles out. Taco elocker axle under the 4Runner. Weld the diff in the 4Runner and put it under the Taco. Patch the frame on the taco, bed off and for sale (if it doesn't sell...maybe I'll make a trailer out of it), fenders, grill, brushgaurd, lights all for sale. Fuel tank, pump, sender, charcoal canister, etc. out and for sale. Install a plastic marine gas tank with inline pump to prevent debris and bad gas.
I recently picked up a set of Duratrac's and 4th gen 4runner wheels for my 4runner. 33" Procomp Xterrains on the Taco:

Hammer until they fit. Build a boom (thinking an old boat trailer would be a nice sturdy "A" frame as a start), mount a cheap winch behind the cab. Disable the ADD. Profit
I need to get a few other projects checked off the list before I really dig into this one, but I'll be doing research in the mean time.
I'm Facebook friends with the owner of SJR Lifts (makes lifts for Subarus). He's constantly parting cars out in his yard, he posted this picture of this ghetto winch boom truck he built out of a cheap Ford Explorer:
And the gears started turning. I've been looking for an elocker rear for my 4runner for awhile, and haven't found anyone selling one separately, but being in the rust belt, I do see Taco's with broken frames fairly regularly.
Cue, this gem:

24x,xxx miles on it, 5-speed, 3.4, 4WD, TRD, blown brake lines, broken frame (back of the cab is dented from the bed leaning on it). PO bought it for almost $11k at a dealer with 198k on it 7 years ago, there's a receipt for a major service (diff, and tcase oils, all belts, water pump, front brakes, ball joints etc.) to the tune of almost $2k at 225k, and a receipt for the bedliner, almost $500. Sold it to me for $1k....I almost feel bad.
Plan is, both trucks in the garage, both axles out. Taco elocker axle under the 4Runner. Weld the diff in the 4Runner and put it under the Taco. Patch the frame on the taco, bed off and for sale (if it doesn't sell...maybe I'll make a trailer out of it), fenders, grill, brushgaurd, lights all for sale. Fuel tank, pump, sender, charcoal canister, etc. out and for sale. Install a plastic marine gas tank with inline pump to prevent debris and bad gas.
I recently picked up a set of Duratrac's and 4th gen 4runner wheels for my 4runner. 33" Procomp Xterrains on the Taco:
Hammer until they fit. Build a boom (thinking an old boat trailer would be a nice sturdy "A" frame as a start), mount a cheap winch behind the cab. Disable the ADD. Profit
I need to get a few other projects checked off the list before I really dig into this one, but I'll be doing research in the mean time.
Last edited by Numbchux; 07-04-2020 at 07:18 AM.
 08-26-2021, 08:29 AM
#2
Registered User
Thread Starter
If anybody cares....
Life has been crazy since I bought this, so it's pretty low on the list. But, we're having an offroad/farm/etc. weekend bachelor party for a friend in just over 2 weeks. We're camping over labor day weekend, so I have about 10 evenings (I usually can get about 2 hours after the kids go to bed) and maybe some time this weekend to patch the frame, replumb the brakes. Hopefully fix the elocker (or, at least lock it), and put some sort of lights in the front, as well (I sold the stock light assemblies, but I don't plan to use it on the road, so just some LEDs).
The structural 2x4:
Numbchux, on Flickr
Last night, I got it up in the air and supported. I cut the front leaf spring bolts out, and cut some of the nasty lower sections of the frame out.
Life has been crazy since I bought this, so it's pretty low on the list. But, we're having an offroad/farm/etc. weekend bachelor party for a friend in just over 2 weeks. We're camping over labor day weekend, so I have about 10 evenings (I usually can get about 2 hours after the kids go to bed) and maybe some time this weekend to patch the frame, replumb the brakes. Hopefully fix the elocker (or, at least lock it), and put some sort of lights in the front, as well (I sold the stock light assemblies, but I don't plan to use it on the road, so just some LEDs).
The structural 2x4:
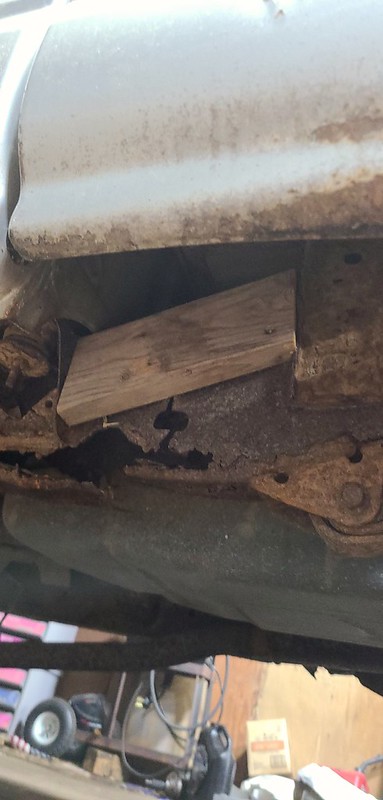
Last night, I got it up in the air and supported. I cut the front leaf spring bolts out, and cut some of the nasty lower sections of the frame out.
Last edited by Numbchux; 08-26-2021 at 08:32 AM.
09-01-2021, 06:56 AM
#3
Registered User
Thread Starter
Cut out the nasty:
by Numbchux, on Flickr
Welded in the Safe T Cap on the RH side:
by Numbchux, on Flickr
Planning to weld the other one in tonight.
LSPV and fittings near it are just a ball of rust and leaking fluid. Going to bypass that. Going to cut both lines back, cap the reference line to the front circuit, and plumb the other one right to the hose to the axle. No valve, no street driving, no problem. Hopefully the fitting comes out of the hose....
Also bought an inline fuel pump, and I'm going to plumb it to a 6 gallon marine fuel tank in the bed. Eventually going to use a quick disconnect so I can swap it to my Brat, so they both always have fresh fuel.

Welded in the Safe T Cap on the RH side:

Planning to weld the other one in tonight.
LSPV and fittings near it are just a ball of rust and leaking fluid. Going to bypass that. Going to cut both lines back, cap the reference line to the front circuit, and plumb the other one right to the hose to the axle. No valve, no street driving, no problem. Hopefully the fitting comes out of the hose....
Also bought an inline fuel pump, and I'm going to plumb it to a 6 gallon marine fuel tank in the bed. Eventually going to use a quick disconnect so I can swap it to my Brat, so they both always have fresh fuel.
Last edited by Numbchux; 09-02-2021 at 04:51 PM.
09-02-2021, 04:59 PM
#5
Registered User
Thread Starter
LH cap welded in last night. I lifted the truck off the jack stands (under the caps, at the back of the cab) from the trailer hitch. From all the way back there, there was some flex, especially on the LH side. Probably should do a center section (in front of what I did) on the LH side, as there are many holes on the inside of that section. But I'm not going to worry about that for this trip.
Next up is brakes and fuel. I think it really comes down to wheel cylinders, if I can't get the bleeders out, that might really kill my timeline. If the hard line comes out of the rear hose in one piece, and the bleeders don't break, I don't think I'll have any trouble. But, if I have to pull drums to replace wheel cylinders, and replumb the axle.....yikes.
I've been keeping it all doused in PB blaster for several days. I'm going to work on lines fuel tomorrow (going to help a friend rewire his Saab Sonnet tonight as he's scrambling to get it ready for the Put In Bay vintage races in a few weeks). And give it a good coating of fluid film while we go camping this weekend (not quite as good a penetrant, but won't dry out while we're gone).
09-09-2021, 10:22 AM
#6
Registered User
Thread Starter
All 4 bleeders came out in one piece! Thank Toyota for using 10mm bleeders. I'm used to Subarus that so often use 6 or 7mm, and I think a larger center hole, as they break off so easily when they get this rusty.
Bypassed the LSPV. I didn't like any of the write ups that I found, so I spent a considerable amount of time yesterday (exacerbated by the fact that I have it parked in the garage in a strange way to leave room to work on the frame) tracing the lines. The 3 ports on the LSPV, one goes to the hose that goes down to the axle. Of the other 2, the upper one is the pressure supply for the rears (which gets routed right to the hose to bypass the valve), and the lower is the reference from the front circuit, this is the line that needs to be deleted. It goes to an elbow fitting on the frame, which is where people seem to most commonly modify, but from there it goes up to a T fitting right under the master cylinder. This T should be replaced with a union. Done.
A manual valve should be plumbed in line with the rear circuit. This could be done in the back where the LSPV was, or next to the ABS pump, or probably right at the master (this is what I did on my '87 4Runner, not sure if it's a good idea to install it before the ABS pump). Being that I have no intent to drive this on the street, I'm going to try it without a prop valve. We'll see how it works.
Fuel system. All the mounts for the factory tank broke (shock!). While they could be repaired, a small, easily removable, plastic tank makes more sense. So I plan to run a marine tank. I grabbed a cheap inline fuel pump (this one is used on many '80s Fords), a low pressure filter, and some fittings in the plumbing section of the hardware store...

Hose pulls from the tank in the bed, and runs down between the bed and cab (I will be taking the bed off in the future, so this part is temporary), to the pre filter. The return line from the engine Ts in between the filter and pump. This runs the risk of getting the fuel too hot, and the only way for any air to escape is through the injectors. But I think for my uses, it should be fine.
After some work on the grinding wheel, I got some universal poly leaf spring bushings to fit in one side. I need to buy a couple bolts, and I should be able to put it on the ground tonight.
Bypassed the LSPV. I didn't like any of the write ups that I found, so I spent a considerable amount of time yesterday (exacerbated by the fact that I have it parked in the garage in a strange way to leave room to work on the frame) tracing the lines. The 3 ports on the LSPV, one goes to the hose that goes down to the axle. Of the other 2, the upper one is the pressure supply for the rears (which gets routed right to the hose to bypass the valve), and the lower is the reference from the front circuit, this is the line that needs to be deleted. It goes to an elbow fitting on the frame, which is where people seem to most commonly modify, but from there it goes up to a T fitting right under the master cylinder. This T should be replaced with a union. Done.
A manual valve should be plumbed in line with the rear circuit. This could be done in the back where the LSPV was, or next to the ABS pump, or probably right at the master (this is what I did on my '87 4Runner, not sure if it's a good idea to install it before the ABS pump). Being that I have no intent to drive this on the street, I'm going to try it without a prop valve. We'll see how it works.
Fuel system. All the mounts for the factory tank broke (shock!). While they could be repaired, a small, easily removable, plastic tank makes more sense. So I plan to run a marine tank. I grabbed a cheap inline fuel pump (this one is used on many '80s Fords), a low pressure filter, and some fittings in the plumbing section of the hardware store...
Hose pulls from the tank in the bed, and runs down between the bed and cab (I will be taking the bed off in the future, so this part is temporary), to the pre filter. The return line from the engine Ts in between the filter and pump. This runs the risk of getting the fuel too hot, and the only way for any air to escape is through the injectors. But I think for my uses, it should be fine.
After some work on the grinding wheel, I got some universal poly leaf spring bushings to fit in one side. I need to buy a couple bolts, and I should be able to put it on the ground tonight.
09-14-2021, 12:20 PM
#7
Registered User
Thread Starter
I did it! I got the front of the leaf springs mounted with some new, slightly better sized hardware (really should have been 9/16x4.5, or 14 x 120, but some 1/2x5 and big washers will do for this). Sprayed some implement paint on the bare steel. And swapped the 33" XTerrains on it.
My son was kind enough to "help" me wire new lights onto my trailer:

by Numbchux, on Flickr
Literally drove the truck out of the garage, and onto the trailer:

by Numbchux, on Flickr
But it performed excellently. Didn't get any exhaust on it, so I didn't bring it to the offroad park (although, they weren't doing any sound testing, even on the couple 2 stroke dirt bikes in our group that were questionable, so it might not have been an issue). But I brought it to the farm, where it did awesome. The trails were pretty dry, so traction wasn't an issue, so I didn't need the locker.
by https://www.flickr.com/photos/48523836@N06/, on Flickr

by Numbchux, on Flickr
My son was kind enough to "help" me wire new lights onto my trailer:
by Numbchux, on Flickr
Literally drove the truck out of the garage, and onto the trailer:
by Numbchux, on Flickr
But it performed excellently. Didn't get any exhaust on it, so I didn't bring it to the offroad park (although, they weren't doing any sound testing, even on the couple 2 stroke dirt bikes in our group that were questionable, so it might not have been an issue). But I brought it to the farm, where it did awesome. The trails were pretty dry, so traction wasn't an issue, so I didn't need the locker.
by Numbchux, on Flickr
Last edited by Numbchux; 09-14-2021 at 12:25 PM.
Trending Topics
07-27-2022, 11:42 AM
#8
Registered User
Thread Starter
Been pulling stumps, hauling brush and more. But it's time for the next phase.
Sold the bed. Bought a boat trailer for scrap money.
by Numbchux, on Flickr
Removed all the boat trailer parts. Narrowed it by 4", put the tongue inside the frame.
by Numbchux, on Flickr
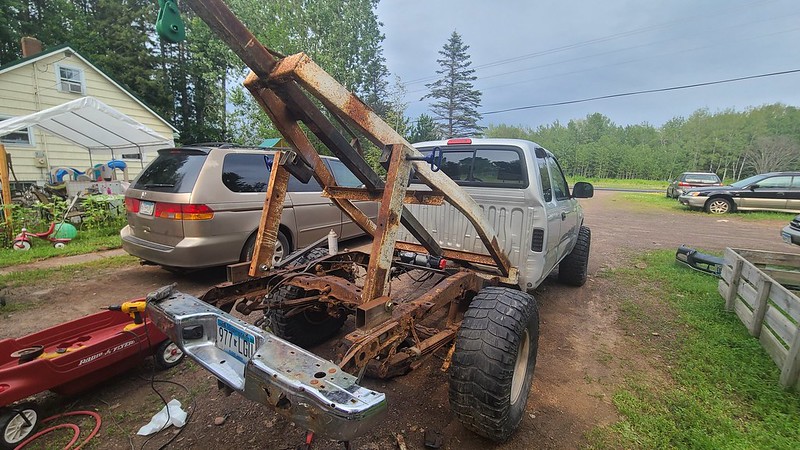
And the first mockup:
by Numbchux, on Flickr
by Numbchux, on Flickr
Need to buy some steel, and work on the winch mount and fuel tank mount before I can really mount the boom. It'll be adjustable for angle, this being essentially the lowest setting, and I'll get another square tube so the arm can telescope like an engine hoist.
Sold the bed. Bought a boat trailer for scrap money.
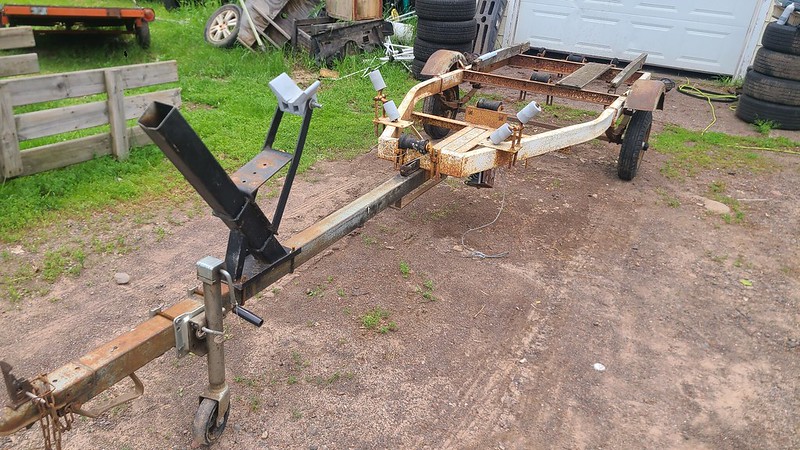
Removed all the boat trailer parts. Narrowed it by 4", put the tongue inside the frame.

And the first mockup:

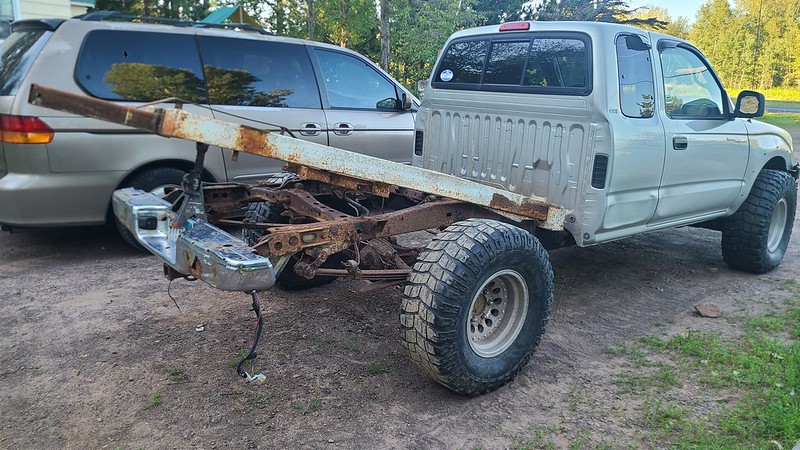
Need to buy some steel, and work on the winch mount and fuel tank mount before I can really mount the boom. It'll be adjustable for angle, this being essentially the lowest setting, and I'll get another square tube so the arm can telescope like an engine hoist.
 10-05-2022, 07:40 AM
#10
Registered User
Thread Starter
Yesterday was International Taco day, so I worked on my taco.
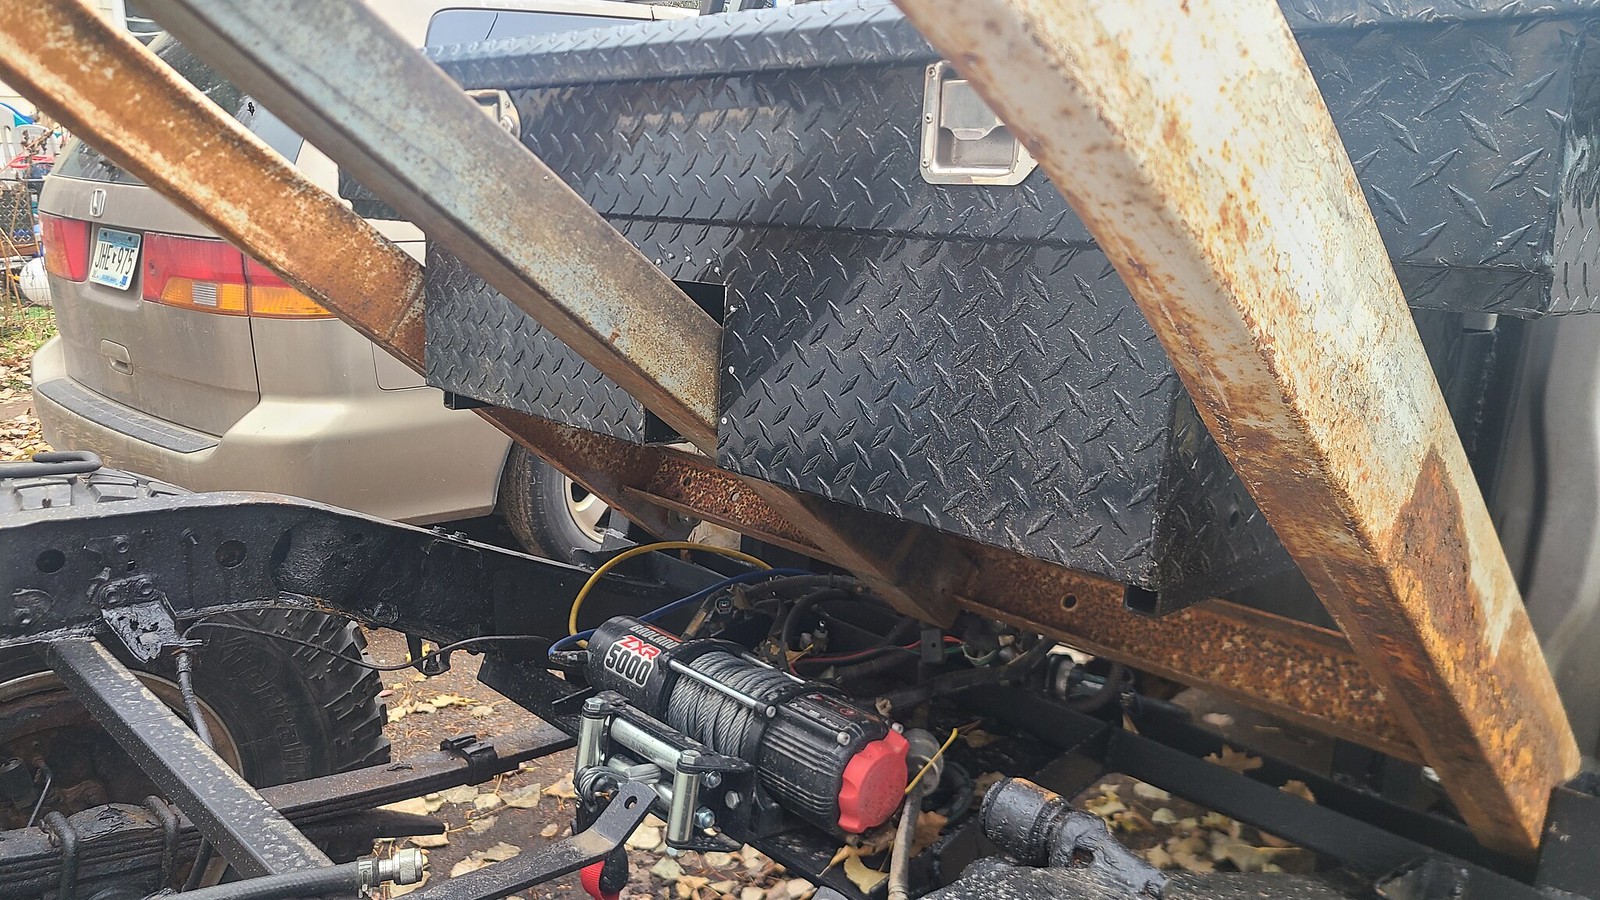
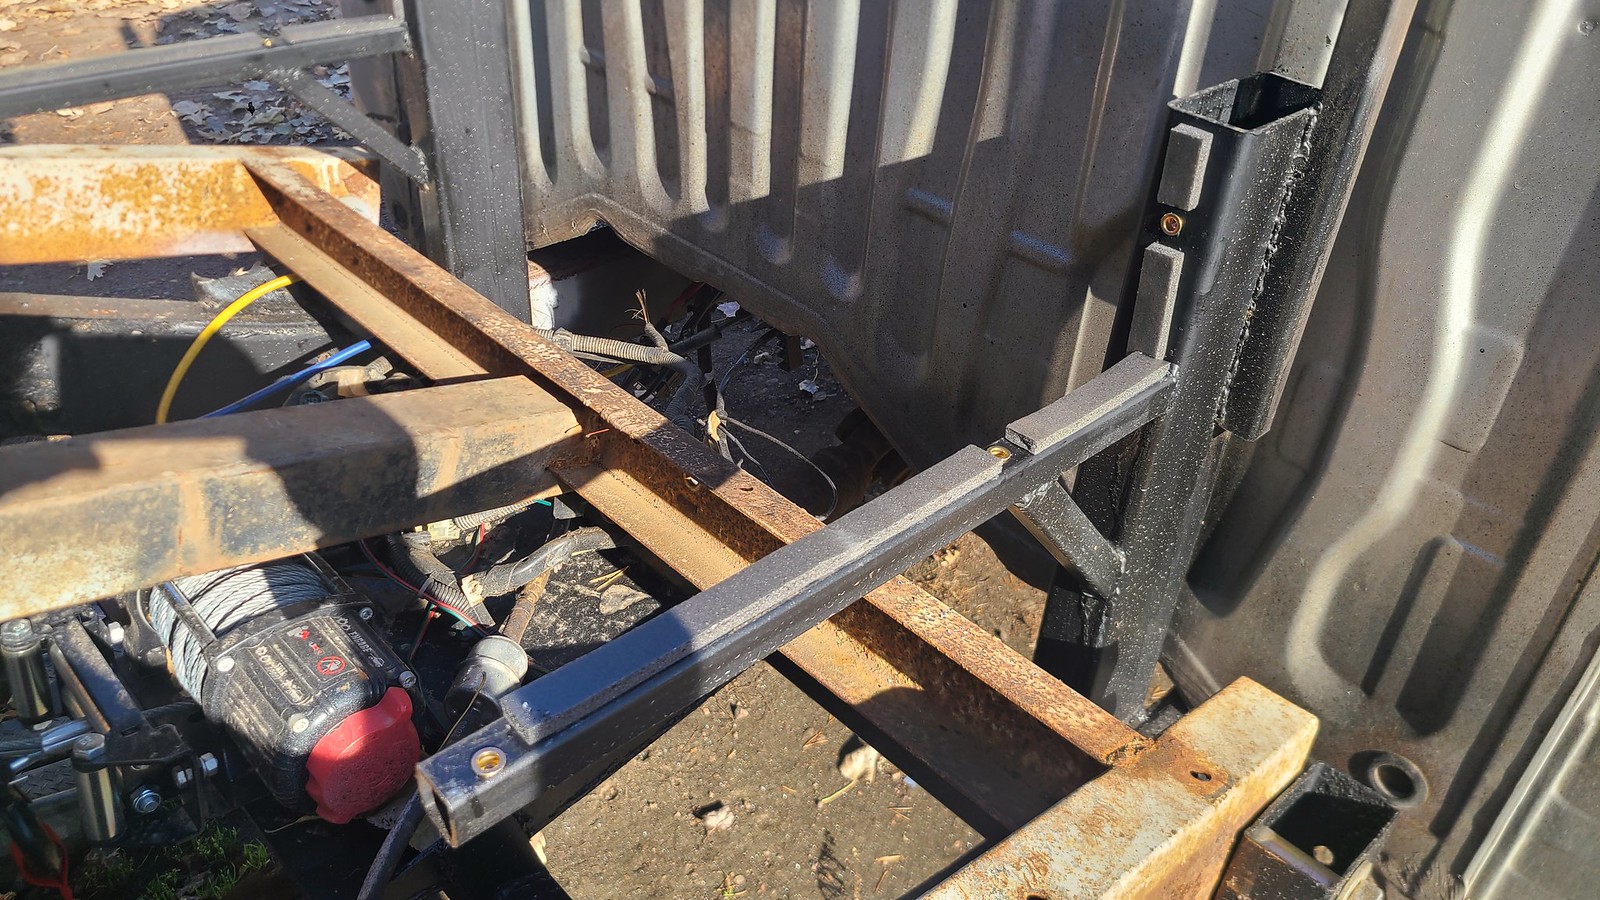
The truck came with this bed toolbox, which I wanted to mount so I still have some storage onboard (straps, chain, chainsaw, winch remote, etc.)
2x4 box tube welded to the frame, with 1x1 base sticking forward from it, with a 1x1 gusset. This hangs entirely above the boom, so it can still be removed. I also cut a notch in the bottom of the box for the center section of the boom to recess into it.

2022-10-05_08-34-47 by Numbchux, on Flickr
Next is to build a headache rack from more 1x1 off that 2x4. Then remove the toolbox, winch, gas tank and boom so I can apply a quart of POR15.
I also have either rebuild the diff lock motor or put a freeze plug in the hole in the rear axle before winter (and probably change the gear oil, as it's been open for 2 months....oops)
The truck came with this bed toolbox, which I wanted to mount so I still have some storage onboard (straps, chain, chainsaw, winch remote, etc.)
2x4 box tube welded to the frame, with 1x1 base sticking forward from it, with a 1x1 gusset. This hangs entirely above the boom, so it can still be removed. I also cut a notch in the bottom of the box for the center section of the boom to recess into it.
2022-10-05_08-34-47 by Numbchux, on Flickr
Next is to build a headache rack from more 1x1 off that 2x4. Then remove the toolbox, winch, gas tank and boom so I can apply a quart of POR15.
I also have either rebuild the diff lock motor or put a freeze plug in the hole in the rear axle before winter (and probably change the gear oil, as it's been open for 2 months....oops)
10-12-2022, 01:58 PM
#11
Registered User
Thread Starter
Disassembled, sandblasted, painted.
I love POR15 products, and planned to use that for the bulk of this part. But, there are several cavities and boxed brackets in the frame back there that I knew were going to be hard to get inside. I was looking at getting an undercoating gun with applicator wand for spraying inside frames, but they're kind of expensive, and I saw several reviews saying they don't play nice with POR15. Many said the same about the Harbor Freight HVLP gun, as well, and it works fantastically for me....but that was cheap enough that it was worth trying.
I had the Eastwood aeresol wand and prep spray (for cleaning said wand) from using their Internal Exhaust Coating on the manifolds for the 1UZ in my 4Runner. So I decided a couple cans of their Rust Encapsulator would make more sense. Worked great with the applicator wand, I was easily able to coat the inside of the tubing that I added, as well as all those little sections. Then I used my HVLP gun to spray POR15 on the rest.
by Numbchux, on Flickr
Unfortunately, it turns out the rust that I sandblasted off the rear axle was holding the gear oil in. So some epoxy will be in it's immediate future, and some welding before it goes in the 4Runner. But overall I'm very pleased.
I love POR15 products, and planned to use that for the bulk of this part. But, there are several cavities and boxed brackets in the frame back there that I knew were going to be hard to get inside. I was looking at getting an undercoating gun with applicator wand for spraying inside frames, but they're kind of expensive, and I saw several reviews saying they don't play nice with POR15. Many said the same about the Harbor Freight HVLP gun, as well, and it works fantastically for me....but that was cheap enough that it was worth trying.
I had the Eastwood aeresol wand and prep spray (for cleaning said wand) from using their Internal Exhaust Coating on the manifolds for the 1UZ in my 4Runner. So I decided a couple cans of their Rust Encapsulator would make more sense. Worked great with the applicator wand, I was easily able to coat the inside of the tubing that I added, as well as all those little sections. Then I used my HVLP gun to spray POR15 on the rest.

Unfortunately, it turns out the rust that I sandblasted off the rear axle was holding the gear oil in. So some epoxy will be in it's immediate future, and some welding before it goes in the 4Runner. But overall I'm very pleased.
10-26-2022, 11:02 AM
#12
Registered User
Thread Starter
Making a panel for the notch in the toolbox. My daughter helped me with the cardboard template:

by Numbchux, on Flickr
Cut from 20g steel, bent, painted, riveted and glued/sealed in place:
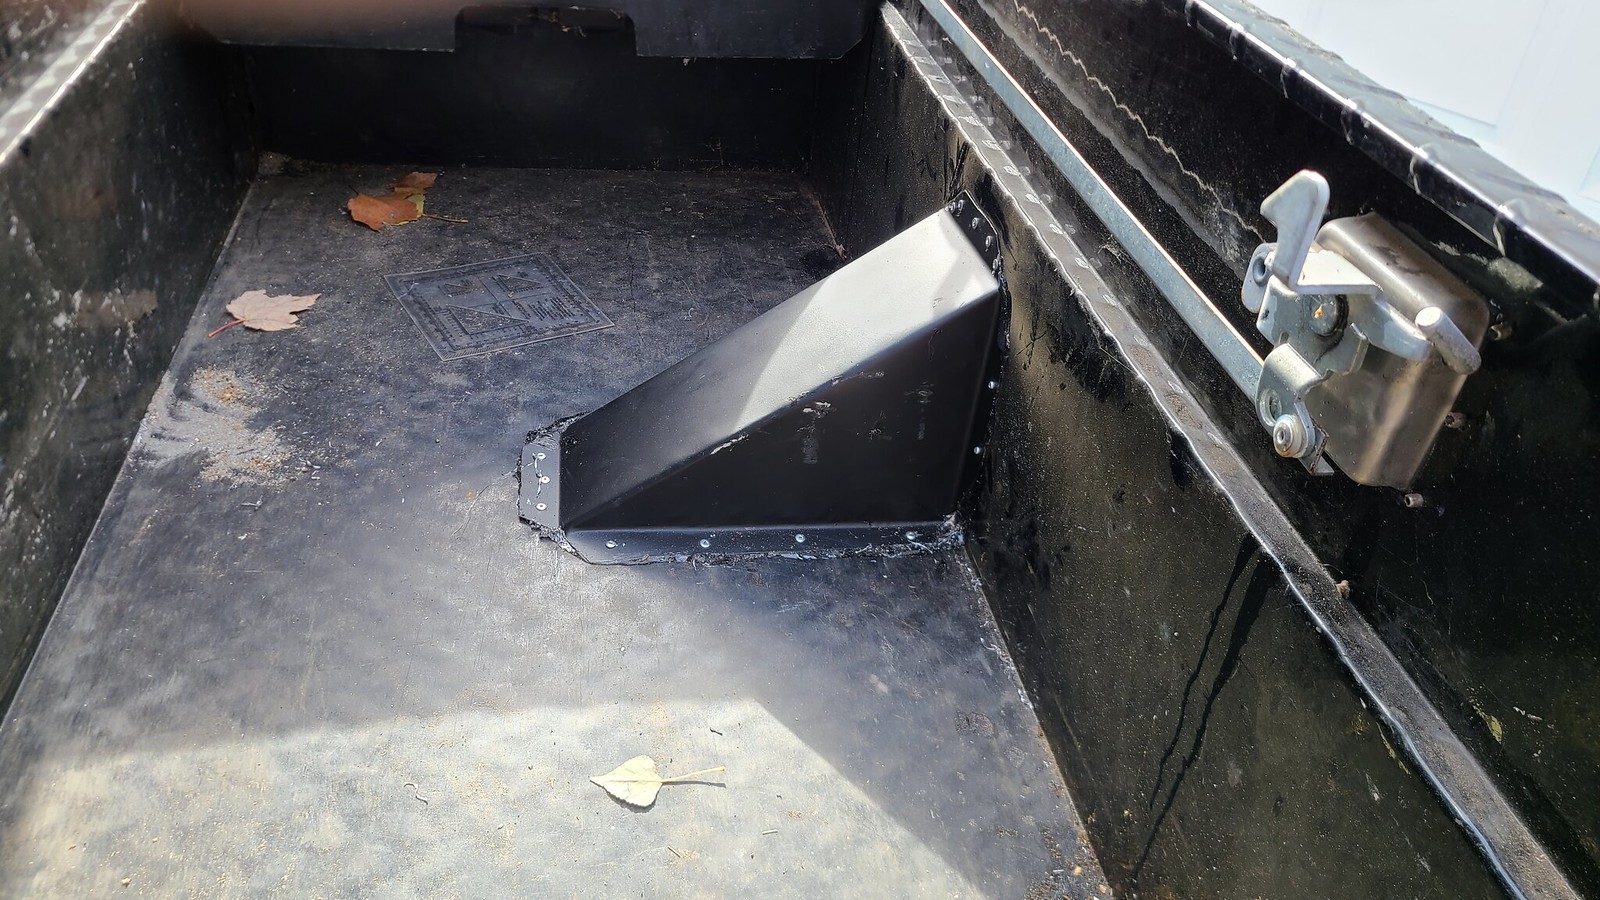
by Numbchux, on Flickr
Put the boom back on, and set the toolbox in place:
by Numbchux, on Flickr
Plenty of room for chainsaw, straps, tools, etc., and doesn't block the back window.
Welded up a few pinholes in the axle "cover" (not removable). Began rebuilding the elocker actuator (gutted it and sandblasted the cases). Once that's done I can put gear oil in the axle and see if it still leaks.
by Numbchux, on Flickr
Cut from 20g steel, bent, painted, riveted and glued/sealed in place:
by Numbchux, on Flickr
Put the boom back on, and set the toolbox in place:
by Numbchux, on Flickr
Plenty of room for chainsaw, straps, tools, etc., and doesn't block the back window.
Welded up a few pinholes in the axle "cover" (not removable). Began rebuilding the elocker actuator (gutted it and sandblasted the cases). Once that's done I can put gear oil in the axle and see if it still leaks.
11-05-2022, 05:35 AM
#13
Registered User
Thread Starter
Some closed cell foam rubber and rivnuts. And the toolbox is bolted down.
by Numbchux, on Flickr
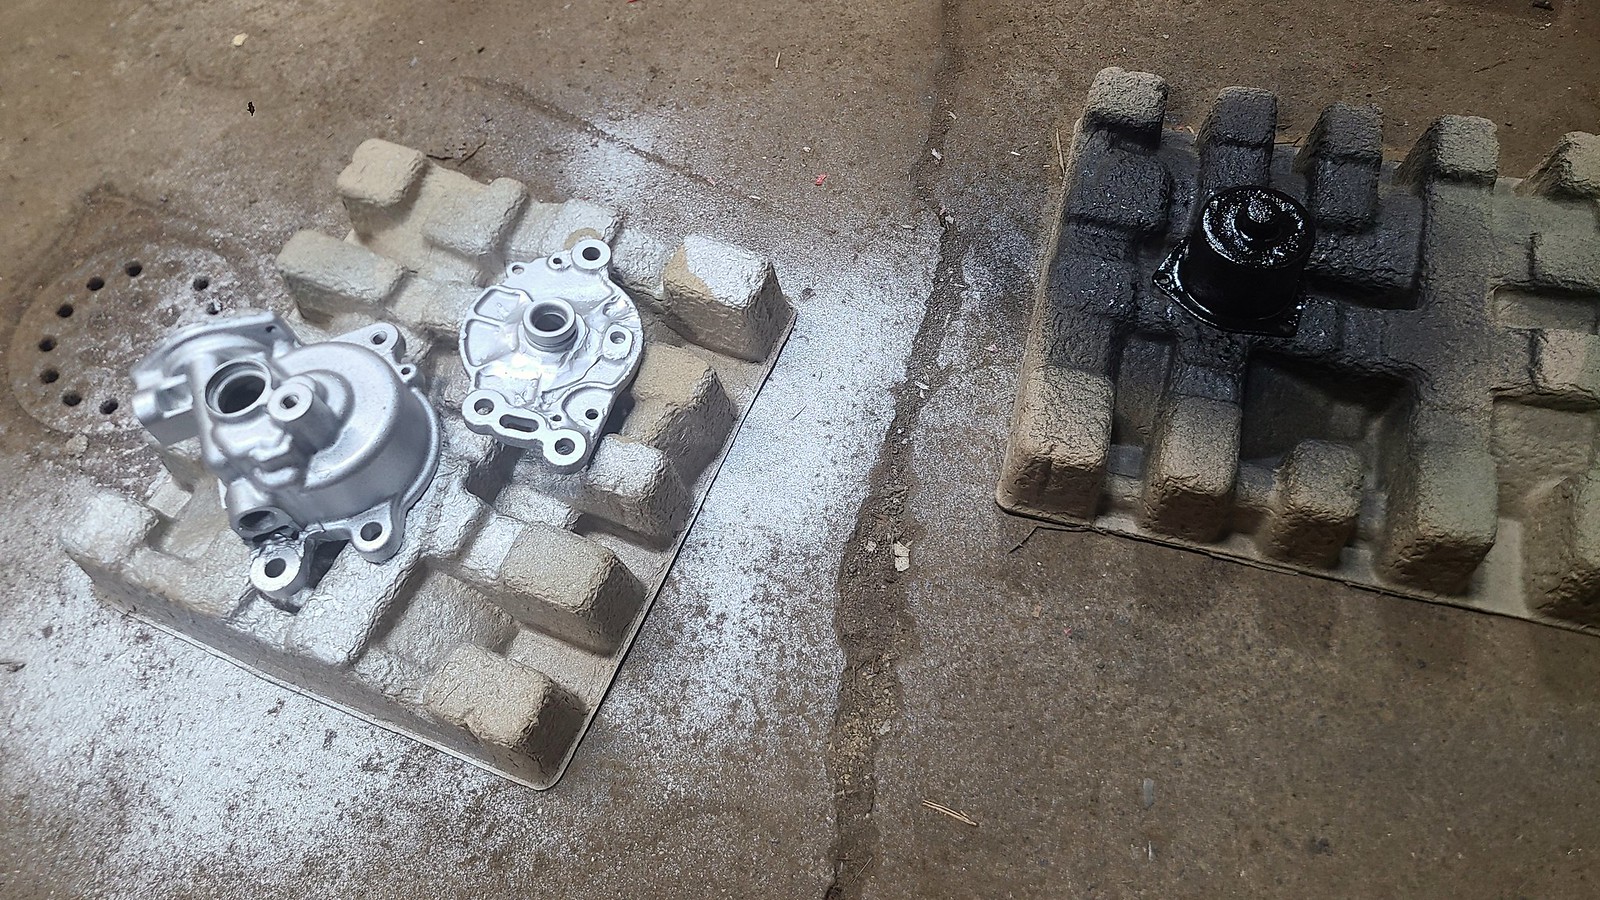
I've been working on rebuilding the elocker motor. The housing was badly corroded/cracked, so I ended up using more than a little JB weld to close it up. Stopped by my local hydraulic shop for an Oring to seal up the case halves. Some new bolts at the hardware store. Welded a nut onto the stub of the broken off bolt and got it out. It all went pretty well. I need a bearing, and somehow I managed to loose the springs behind the motor brushes....
But first, a little gloss black tractor and implement paint on the steel cap, and aluminum engine enamel on the housings, and it looks pretty good.
by Numbchux, on Flickr
I've been working on rebuilding the elocker motor. The housing was badly corroded/cracked, so I ended up using more than a little JB weld to close it up. Stopped by my local hydraulic shop for an Oring to seal up the case halves. Some new bolts at the hardware store. Welded a nut onto the stub of the broken off bolt and got it out. It all went pretty well. I need a bearing, and somehow I managed to loose the springs behind the motor brushes....
But first, a little gloss black tractor and implement paint on the steel cap, and aluminum engine enamel on the housings, and it looks pretty good.
 11-09-2022, 08:49 AM
#14
Registered User
Thread Starter
Elocker actuator rebuilt.
by Numbchux, on Flickr
It turns when out of the axle housing, but once installed, it doesn't seem to unlock the diff. Might be indexed wrong (there are internal limit switches in the motor, so if things aren't lined up correctly, it won't travel far enough). But, the diff is locked, and the gear oil stays in the diff, which were my main objectives. So, I'll worry about the rest some other time.
With that done, and the toolbox mounted, I improved the hanger for the pulley on the end of the boom, and set off into the woods. We bought our property (about 23 mostly-wooded acres), it was August, and the woods were pretty dense. Over the course of the first winter, we discovered 3 engines pretty deep out in the woods. With this truck functional, I was able to blaze trail out there, and haul them out.
Here's a complete Mercruiser 6-cylinder (I suspect Iron Duke 3.0). I got the scale out and lifted it again, and it was 502lbs
by Numbchux, on Flickr
Then a SBC short block, and some sort of GM transverse V6 short block. Got those all out and loaded on the trailer, hopefully I can make a scrap run this week.
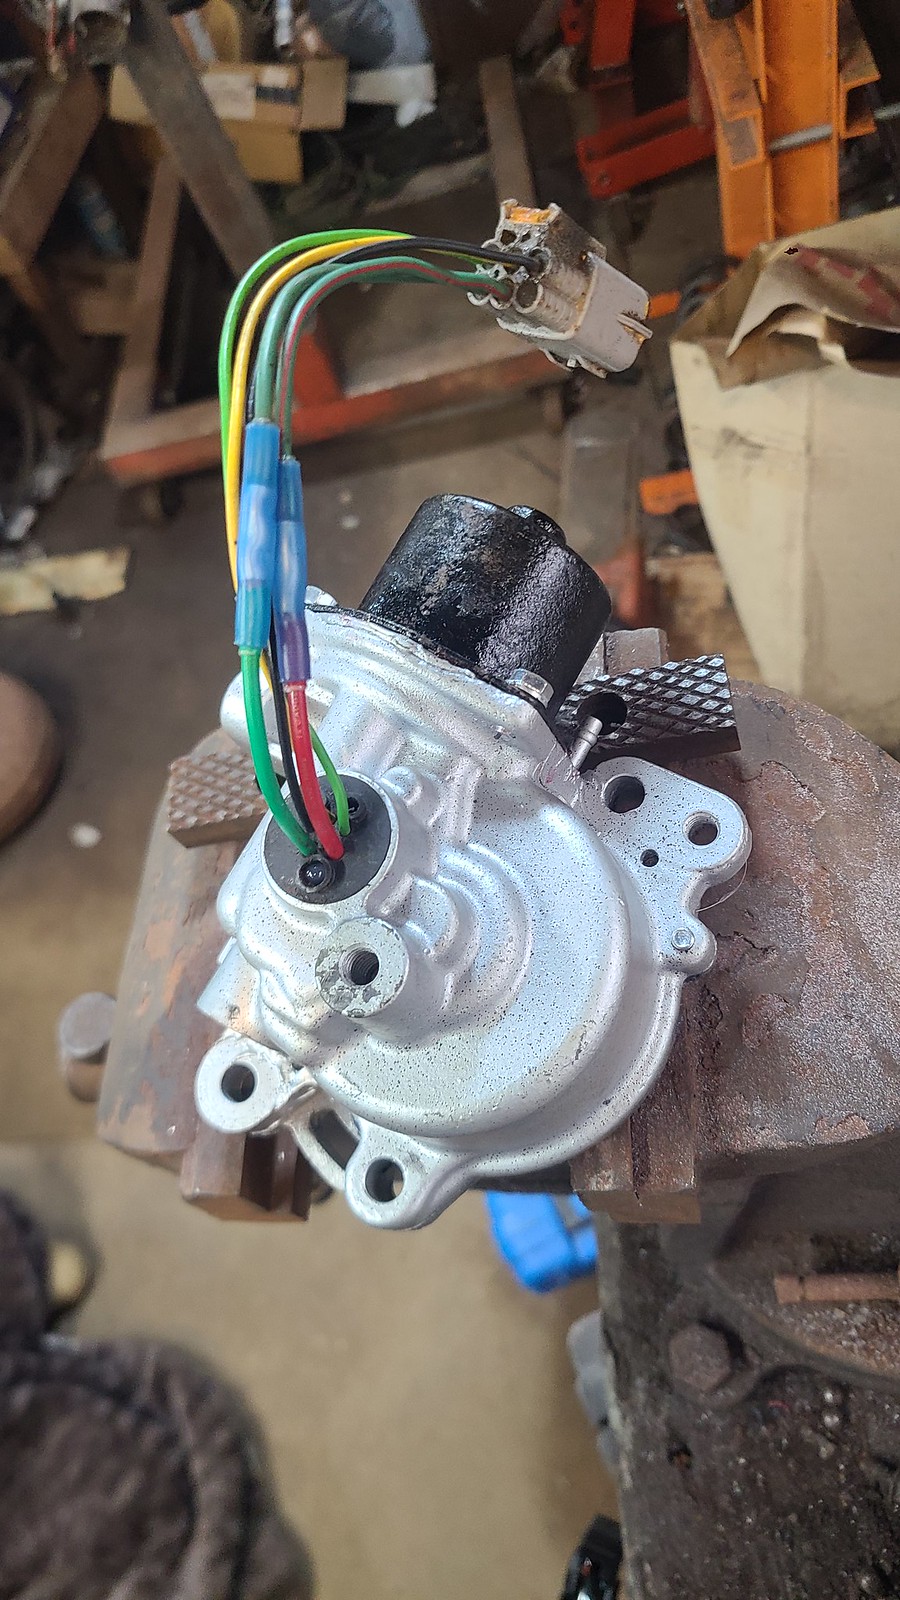
It turns when out of the axle housing, but once installed, it doesn't seem to unlock the diff. Might be indexed wrong (there are internal limit switches in the motor, so if things aren't lined up correctly, it won't travel far enough). But, the diff is locked, and the gear oil stays in the diff, which were my main objectives. So, I'll worry about the rest some other time.
With that done, and the toolbox mounted, I improved the hanger for the pulley on the end of the boom, and set off into the woods. We bought our property (about 23 mostly-wooded acres), it was August, and the woods were pretty dense. Over the course of the first winter, we discovered 3 engines pretty deep out in the woods. With this truck functional, I was able to blaze trail out there, and haul them out.
Here's a complete Mercruiser 6-cylinder (I suspect Iron Duke 3.0). I got the scale out and lifted it again, and it was 502lbs

Then a SBC short block, and some sort of GM transverse V6 short block. Got those all out and loaded on the trailer, hopefully I can make a scrap run this week.

Thread
Thread Starter
Forum
Replies
Last Post
Crgrey42
95.5-2004 Tacomas & 96-2002 4Runners (Build-Up Section)
1
08-10-2015 04:23 AM
Emurunner
95.5-2004 Tacomas & 96-2002 4Runners
12
03-04-2005 06:22 PM


