
mmml4's 1999 4Runner Rebuild/Build-Up Thread
 Jan 22, 2012 | 07:32 PM
#61
Thread Starter
Registered User
Joined: Oct 2008
Posts: 98
Likes: 0
From: Alabama
I think I would like the exhaust to turn out just in front of the rear tire but I don't don't know what that would look or sound like. A friend of my son's has a Borla muffler that sounds pretty good on his V6 Isuzu Trooper. I would like to see some pics of an exhaust that turns out in front of the rear tire. Like just about every other part of this project I guess I will play it by ear and see what happens. I sure would like to drive it soon!!!!!!! Thanks to all for the positive feedback.
Last edited by mmml4; Jan 22, 2012 at 07:34 PM.
Jan 23, 2012 | 07:00 PM
#62
Thread Starter
Registered User
Joined: Oct 2008
Posts: 98
Likes: 0
From: Alabama
A little more progress. After I make sure the axle is still centered up with the frame rails I will cut the short side of the panhard and weld it together using an 8" long 1/4" wall piece of tubing I made from some solid round stock.
The bracket looks a little long to me, wish I had measured the stock bracket. Hope I can tie all of this together and it not look like crap.


The bracket looks a little long to me, wish I had measured the stock bracket. Hope I can tie all of this together and it not look like crap.


 Feb 13, 2012 | 07:00 PM
#65
Thread Starter
Registered User
Joined: Oct 2008
Posts: 98
Likes: 0
From: Alabama
Hey stockwell45 I read your build thread, good looking truck and I really like that color. How much lift do you have and what are the specs on the shocks on the rear?
I think I am going to end up with about 6" of lift (more than I wanted) and I'm having a hard time selecting a shock. I have the 5125's on the front and would like to stick with Bilstein on the rear.
I think I am going to end up with about 6" of lift (more than I wanted) and I'm having a hard time selecting a shock. I have the 5125's on the front and would like to stick with Bilstein on the rear.
Feb 13, 2012 | 08:39 PM
#66
Hey stockwell45 I read your build thread, good looking truck and I really like that color. How much lift do you have and what are the specs on the shocks on the rear?
I think I am going to end up with about 6" of lift (more than I wanted) and I'm having a hard time selecting a shock. I have the 5125's on the front and would like to stick with Bilstein on the rear.
I think I am going to end up with about 6" of lift (more than I wanted) and I'm having a hard time selecting a shock. I have the 5125's on the front and would like to stick with Bilstein on the rear.
Thanks, with the suspension and body lift together it is at about 4.5"
My rear shocks are the Bilstein 5125's. Not quite sure on their length, according to Wabfab.org where I bought them they are ideal for a 4runner with 3" of lift. Great shock, I have no complaints on them. It seems to be the choice shock for the 3rd gen guys as far as what I have seen. Maybe you could pick up some for the rear of your rig, and if you don't like them I have no doubt you would easily be able to sell them here or on T4R.com.
Its nice to see someone who has SAS'ed their 3rd gen who doesn't want to take it sky high. Yours is definitely one of my favorites!
EDIT: Just emailed WabFab about the length of my shocks, they are 15" collapsed. Hope that helps you out.
Last edited by stockwell45; Feb 14, 2012 at 01:39 PM.
Apr 16, 2012 | 06:31 PM
#68
Thread Starter
Registered User
Joined: Oct 2008
Posts: 98
Likes: 0
From: Alabama
Started on my front bumper, not too crazy about the square tubing but that's what I got for now. Started with a 32" wide Budbuilt winch plate. Still needs some more gussets and tubing. Thoughts and comments welcome.


 Aug 2, 2012 | 09:19 AM
#72
Registered User
Joined: May 2003
Posts: 149
Likes: 0
From: NorTah
Dang. I've been missing out on this build. It has turned out amazing. I've no longer got my 4runner that I was planning to do a similar build, but I am plannig to get into something in the next couple weeks and start gathering parts to throw the 80 axles under.
So on the rear, did the 4runner upper shock mount positions line up with the shock mounts on the 80 series axle? I always hated the position of the 4runner uppers in the rear--so hard to get at! Or did those get cut out anyway to make way for the upper link mount/xmember?
Again, nice job on getting those axles in there. It really looks like it turned out great.
Have you gotten the chance to drive it around a bit yet? How does it drive?
Last edited by theferg; Aug 2, 2012 at 09:25 AM.
Aug 3, 2012 | 03:43 PM
#73
Thread Starter
Registered User
Joined: Oct 2008
Posts: 98
Likes: 0
From: Alabama
Thanks for all the kind words, it really helps to keep me going on this project. This month is the begining of the sixth year on this rebuild/build after my daughter wrecked it and sometimes with all the other stuff I have to deal with, remodeling an entire house, building a 30x30 garage, yard work and keeping everyones vehicles maintained not to mention working 6 and 7 days a week it is difficult to find time to work on it.
It rides really good but it has too much body roll even with the rear anti sway bar in. I think in the future I will use the Rock Jock anti rock swaybar kit in the front but I haven't done any research. There are two sets of railroad tracks on my way to work and the 4runner is very smooth going across them. I do need some more weight to load the suspension some more, that will be taken care of with sliders, rear bumper, winch, 4x4 tranny and transmission crossmember. I think somewhere I stated 6" of lift, well thats going to be more like 4" thank goodness.
Being a Toyota purist I am bent on using as much stock parts as possible. In the rear I am using the Land Cruiser anti sway bar, bolts right up to where the factory bar did, I did have to fab some longer swaybar links. The Bilstein shocks in the rear bolt right up where the old ones did. Yes the mount are hard to get to but I had no rust which made it not too bad.
All of the original coil bucket and shock mounts were left intact allthough I made my own coil buckets the factory ones are still there. I wanted to have the tranny in this summer but it may be this fall. I had intended to drive it in
2wd while I repaired my sons 97 that he ran into a telephone pole but the 2wd drive shaft was damaged in the wreck and it has a bad vibration so I did not drive it much after getting the Land Cruiser rear end in.
Last edited by mmml4; Aug 3, 2012 at 03:46 PM.
 Sep 17, 2012 | 02:21 PM
#75
Thread Starter
Registered User
Joined: Oct 2008
Posts: 98
Likes: 0
From: Alabama
Started the transmission swap hope it doesn't take forever like everything else has. I am putting an A343F from a 97 Land Cruiser in place of the A340E. If I am successful I will be 4wd at last.

Empty tunnel.

Side by side comparison.

The oil cooler lines are routed over to the drivers side using 12 mm tubing instead of 10mm. Going to take the fittings out of the 2wd tranny and put them in the LC tranny and use my existing 10 mm hard lines.
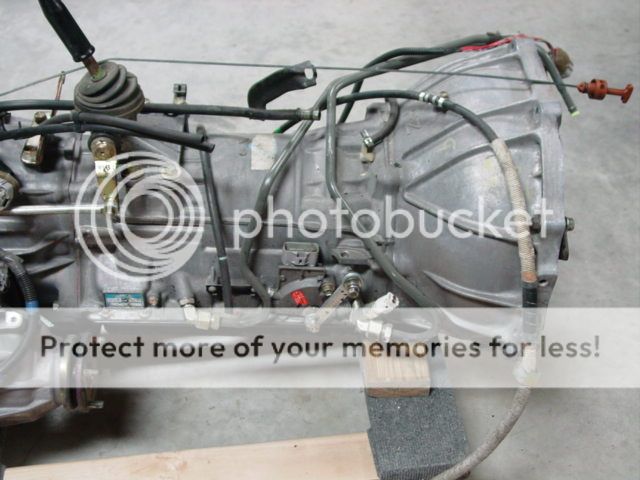
The transfer case has its own wiring harness so that means I just need to get a pin out of the connector and build my controls to match.

Other observations,
* Swap kick down cables, LC tranny 's is not long enough.
* Looks like the park/neutral switch has the same connector and is in the same location.
* Same for the solenoid valve connector.
* The speed sensor is in a slightly different location but appears to use the same connector.
* The main shifter linkage is on the passenger side, looks like I will have to modify my shifter to come down on the passenger side as well.
* The 1FZ bellhousing on the LC tranny is about 40mm longer than the 5VZ bellhousing. I think this means that I will have to swap out the front pump, torque converter and I don't know what else.
Empty tunnel.
Side by side comparison.
The oil cooler lines are routed over to the drivers side using 12 mm tubing instead of 10mm. Going to take the fittings out of the 2wd tranny and put them in the LC tranny and use my existing 10 mm hard lines.
The transfer case has its own wiring harness so that means I just need to get a pin out of the connector and build my controls to match.
Other observations,
* Swap kick down cables, LC tranny 's is not long enough.
* Looks like the park/neutral switch has the same connector and is in the same location.
* Same for the solenoid valve connector.
* The speed sensor is in a slightly different location but appears to use the same connector.
* The main shifter linkage is on the passenger side, looks like I will have to modify my shifter to come down on the passenger side as well.
* The 1FZ bellhousing on the LC tranny is about 40mm longer than the 5VZ bellhousing. I think this means that I will have to swap out the front pump, torque converter and I don't know what else.
Sep 17, 2012 | 02:27 PM
#76
Thread Starter
Registered User
Joined: Oct 2008
Posts: 98
Likes: 0
From: Alabama
Here is the 4runner tranny minus the bellhousing, torque converter, oil pump and overdrive assembly,

and the LC tranny,

Here are the overdrive assemblies, the one on the left is the 4runner and the other is the LC,

3 hours later, wala


Well if nothing else we know it will all bolt together, the real test will come soon I hope. I forgot to take pictures of putting the oil pump in, dammit it sucks getting old.
Just to clarify, I did have to swap the oil pump and the overdrive assembly because the LC shafts were longer than the 4runner shafts.
and the LC tranny,
Here are the overdrive assemblies, the one on the left is the 4runner and the other is the LC,
3 hours later, wala
Well if nothing else we know it will all bolt together, the real test will come soon I hope. I forgot to take pictures of putting the oil pump in, dammit it sucks getting old.
Just to clarify, I did have to swap the oil pump and the overdrive assembly because the LC shafts were longer than the 4runner shafts.
Sep 17, 2012 | 02:32 PM
#77
Thread Starter
Registered User
Joined: Oct 2008
Posts: 98
Likes: 0
From: Alabama
Made a little progress and yes it looks even worse in person. I figure enough seam sealer, paint and undercoating and all will be good. That was a real pain in the ass I must say. Still got to weld it out from below.
Going to replace the rear main seal on the engine and the front pump seal on the tranny before I go back in with it.
I also found the parts I need to control the transfercase, a nice Land Cruiser man in Idaho has a 97 parts truck. He has the wiring harness and relay.


I still got to fit the seat mount back in, yeah more fun.
Going to replace the rear main seal on the engine and the front pump seal on the tranny before I go back in with it.
I also found the parts I need to control the transfercase, a nice Land Cruiser man in Idaho has a 97 parts truck. He has the wiring harness and relay.
I still got to fit the seat mount back in, yeah more fun.
 Nov 2, 2012 | 05:50 PM
#80
Thread Starter
Registered User
Joined: Oct 2008
Posts: 98
Likes: 0
From: Alabama
Here is my version of a transmission crossmember. All the black dots are where 14 or 16mm bolts will be, not sure which size yet. This was fabricated out of 2"x3"x3/16" wall tubing. I had to cut 28" of tubing down to 2-5/8" to fit inside the 2"x3" tubing.


The pieces that the red handled clamps are holding up will be welded to the top of my lower link frame brackets. This will allow me to bolt the crossmember in and stiffen the lower link bracket mounting plates.

The pieces that the red handled clamps are holding up will be welded to the top of my lower link frame brackets. This will allow me to bolt the crossmember in and stiffen the lower link bracket mounting plates.
Last edited by mmml4; Nov 2, 2012 at 05:59 PM.


