habanero's 1996 4Runner Build-Up Thread
#1462
Contributing Member
Thread Starter
Hey RW, hope you feel better, what a thing to deal with on vacation! Glad you're doing good despite a messed up head. 

#1463
Contributing Member
Thread Starter
Removing rear door panel:
Is a lot like removing the front one.
Panel:

Push in middle and it'll come out, there's two, one on either side, nearer the top of the panel. You see them with the middles popped out because I did that to put them back in:


Is a lot like removing the front one.
Panel:

Push in middle and it'll come out, there's two, one on either side, nearer the top of the panel. You see them with the middles popped out because I did that to put them back in:


Last edited by habanero; 07-03-2017 at 04:31 AM.
#1464
Contributing Member
Thread Starter
Unscrew the door handle bolt, move forwards and out. Leave it hang, once the panel is free twist the panel to get the handle through the hole:

The arm rest pops straight up, it's held in by two metal clips:

Under the arm rest is two screws. Unscrew them:


The arm rest pops straight up, it's held in by two metal clips:

Under the arm rest is two screws. Unscrew them:

Last edited by habanero; 07-03-2017 at 04:32 AM.
#1465
Contributing Member
Thread Starter
Here is a picture of the 7 plastic clips you are popping the lower half of the door panel off of. Actually there's only 6 there, one stayed in the door. They're the red things. They make a special tool, I gently pried until they popped off. If any stay with the door get them out carefully and put them on the panel for when it's time to pop the panel back on:

Reach behind the panel and unplug the window switch. I took it off because I plugged it back in so it could be used with the door panel off while I awaited parts- there's a catch front and rear:

Twist the loose panel sideways to get the door latch through the panel and you should be left with this (except the door handle will be loose and the window switch not there because it'll still be in the panel:

Now I've gotta put the kid to bed and then the fun begins.

Reach behind the panel and unplug the window switch. I took it off because I plugged it back in so it could be used with the door panel off while I awaited parts- there's a catch front and rear:

Twist the loose panel sideways to get the door latch through the panel and you should be left with this (except the door handle will be loose and the window switch not there because it'll still be in the panel:

Now I've gotta put the kid to bed and then the fun begins.
Last edited by habanero; 07-03-2017 at 04:33 AM.
#1466
Contributing Member
Thread Starter
Alright, we've got the door panel off. Bear with me, this next part is kind of lengthy.
#1467
Contributing Member
Thread Starter
96 4Runner, lots of miles.
Door lock actuator repair and a how-too for the door handle while we're at it.
As you may remember, last week I pulled the non-functioning right rear door lock module. I had power to it and it sort of worked, but not enough to actuate the lock button. Out of that darned curiosity I went ahead and pried the case open carefully (it is sealed shut) and found to my surprise a hobby motor. After doing some research I found out that others have done this too and even provided part numbers, which I found here: http://forum.ih8mud.com/100-series-c...placement.html
so thanks a bazillion to the contributors to it as there was great information including part numbers!
One Ebay search later on part # FC 280PT-22125 and I bought 4 of these little buggers for 19.95 shipped. Make sure they have a collar, mine came from MOPS Electric.
EDIT 9/30/2017 :
The MOPS electric motors I installed are still working great at over 295,000 miles
octanejunkie over at T4R found an ebay listing for a single motor, also MOPS, http://www.ebay.com/itm/271583579344
and gtdan at T4R found a set on Amazon that list the motor as Mabuchi or Nichibo in manufacture and a replacement for those brands in the description, looks like single motor,
So, here we go....
Last edited by habanero; 09-30-2017 at 03:51 AM.
#1468
Contributing Member
Thread Starter
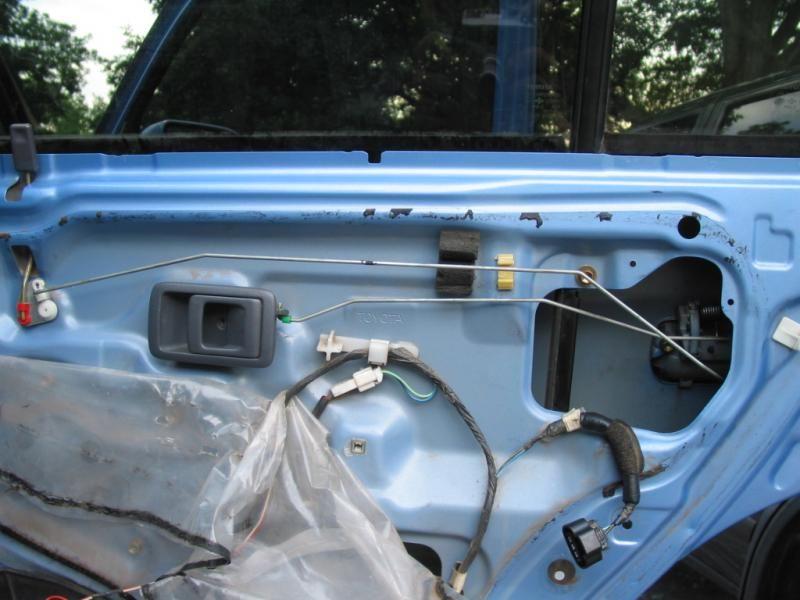
Panelless door. Pull back the plastic where you'll need access to stuff like the module.

Flip the white keeper up and pull out the rod:

I used a screwdriver to pry up 17 year old plastic just enough to release the door lock and door handle rods:


Flip the white keeper up and pull out the rod:

I used a screwdriver to pry up 17 year old plastic just enough to release the door lock and door handle rods:

Last edited by habanero; 07-03-2017 at 04:33 AM.
#1469
Contributing Member
Thread Starter
I was unable to remove the keepers for the white plastic track thingy without breaking them so zip ties are what I used when I put it all back together. There are two keepers where you see red zips:

Unplug the lock module:

And this is what you've got so far:


Unplug the lock module:

And this is what you've got so far:
Last edited by habanero; 07-03-2017 at 04:34 AM.
#1470
Contributing Member
Thread Starter
Flip up the greenish keeper for the door lock:

The keepers are kind of neat. Flip up, pull out.


The keepers are kind of neat. Flip up, pull out.

Last edited by habanero; 07-03-2017 at 04:35 AM.
#1471
Contributing Member
Thread Starter
T30 torx to unbolt the door latch:

Unbolt outside door latch w/10mm here:

And here:


Unbolt outside door latch w/10mm here:

And here:

Last edited by habanero; 07-03-2017 at 04:41 AM.
#1472
Contributing Member
Thread Starter
To get the outside handle off lift up:

to clear the tabs along the bottom:

And jigsaw puzzle it out of the hole. It does come out, without force. Really.:


to clear the tabs along the bottom:

And jigsaw puzzle it out of the hole. It does come out, without force. Really.:

Last edited by habanero; 07-03-2017 at 04:42 AM.
#1473
Contributing Member
Thread Starter
Now it's just hanging by the keeper. Lift the keeper up and push the rod out. I had to gently use a pair of pliers to get it out:

Here's the backside for those interested:


Here's the backside for those interested:

Last edited by habanero; 07-03-2017 at 04:42 AM.
#1474
Contributing Member
Thread Starter
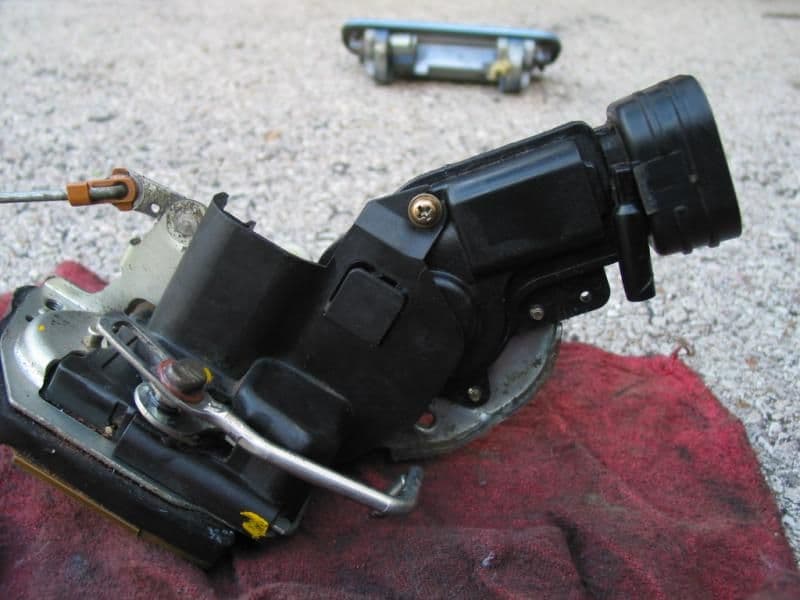
Unscrew single screw on this side:

the plastic cover is held on by that single screw and this tab:

And also this tab:

Unscrew the two screws on the other side:

the plastic cover is held on by that single screw and this tab:

And also this tab:

Unscrew the two screws on the other side:

Last edited by habanero; 07-03-2017 at 04:44 AM.
#1475
Contributing Member
Thread Starter
Pay attention to the white piece that slides up and down and joins the lock module to the latch:

It goes on a certain way.

It goes on a certain way.
Last edited by habanero; 07-03-2017 at 04:46 AM.
#1476
Contributing Member
Thread Starter
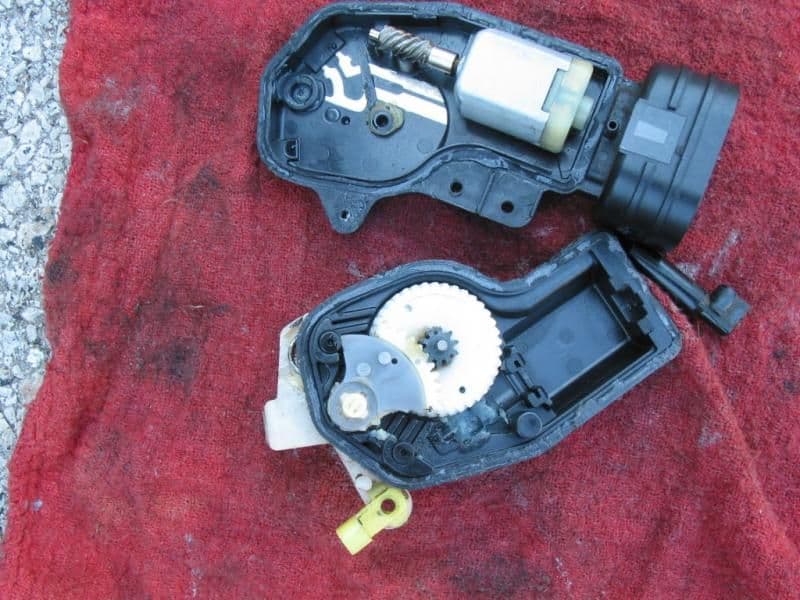
So here's the lock module pried open once again.

To unplug the motor pull straight up. The screw drive slides right off and fits over the collar of the new motor. I used JB Weld to tack the module back together, so far so good. I thought about putting a couple of screws in instead, but it's pretty tight in there. That little plastic bit at the bottom is a vent, it just slides on the outside of the module.
EDIT: Ended up with JB Weld and a couple o' zip ties for insurance, been working great for a year now. EDIT: Almost 7 years now.
If it helps anyone (and I haven't confirmed this) these motors are supposedly in the mirror actuators too.
Last edited by habanero; 03-20-2020 at 04:02 PM.
#1477
Contributing Member
Thread Starter
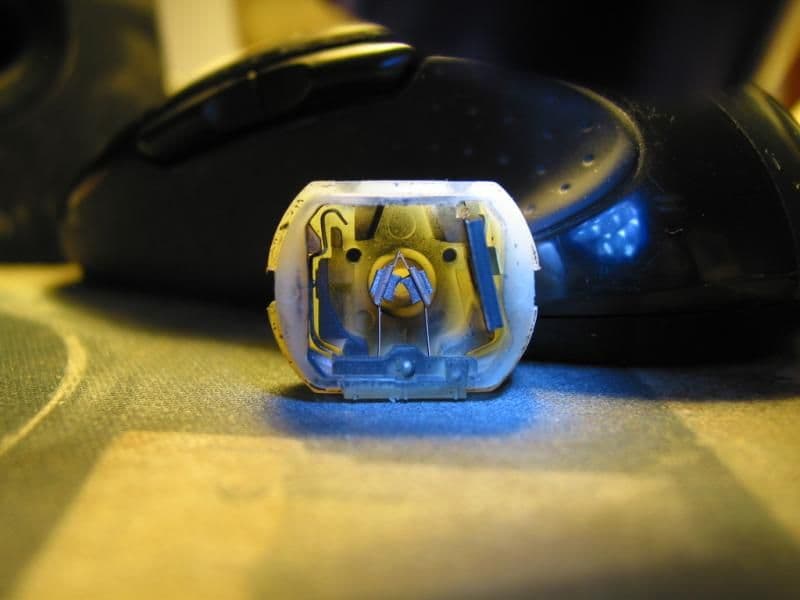
When I get a chance I'll pull open the old motor, just to see what's what. 


Edit: pics of the old motor




And this pic shows the shaft you need, kind of short with a collar:



Edit: pics of the old motor


And this pic shows the shaft you need, kind of short with a collar:

Last edited by habanero; 07-03-2017 at 04:47 AM.
#1478
Contributing Member
Thread Starter
Fixed the left front door lock module today, more involved than the rear but still pretty easy. This time I used a small screw driver and hammer to get the module open, that was a little easier. I just had to make sure not to drive it in too far because I didn't want to damage the gears or screw drive.
#1480
Contributing Member
Thread Starter
Good morning! You're right, easy and cheap. The fix, not me. 


