habanero's 1996 4Runner Build-Up Thread
 06-26-2021, 05:57 PM
#4181
Contributing Member
Thread Starter
96 4Runner 317,033 miles
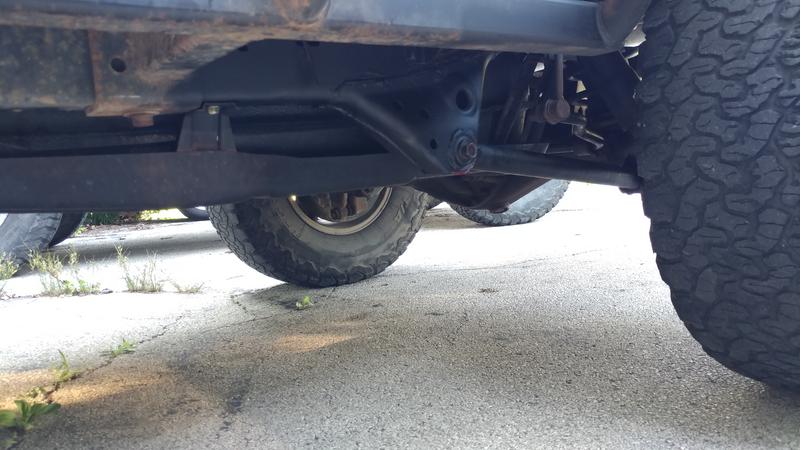
Repairing the rear lower control arm mounts...
I had some nice washers so we went with Kitty's idea and my husband welded the right side today.
I've also trimmed the edges of the bushings so they aren't so square, made sure the contact surface of the mount is smooth (Steve at Sonoran's direction), cleaned out and re-greased the sleeve yet again.
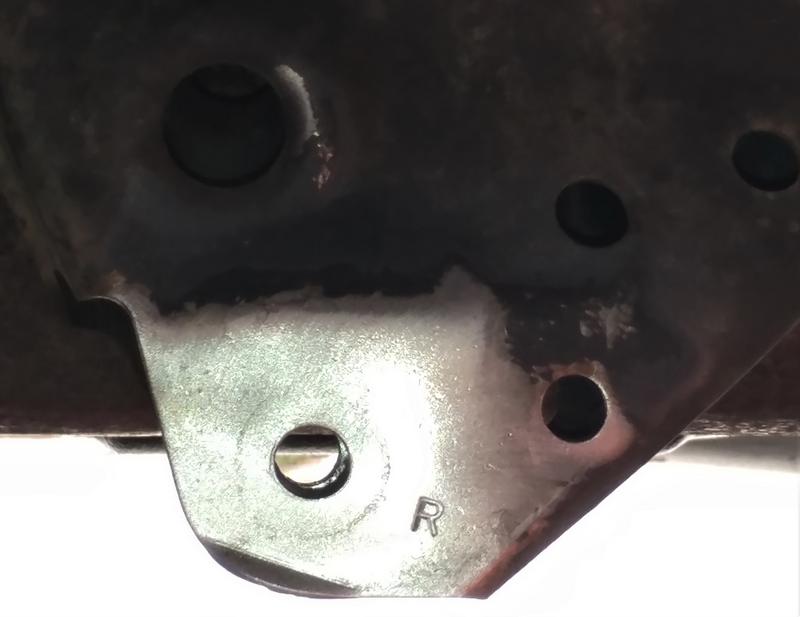
The washers were trimmed to accommodate the flare at the edge of the mount, the bolt held them in place for the welding.
It's cleaned up, the paint's drying, it's raining, no testing for today.
I talked to Steve over at Sonoran Steel (real nice guy) about using the oem bushings with his links, it looks like that can happen with the use of a set-screw. There is far less bushing material in contact with the mount, that seems like it would be more gentle on the mount. I'll stick with the poly for now at least, and go from there.
I'm hoping to finish up the right side between rainstorms tomorrow.
----------------------------
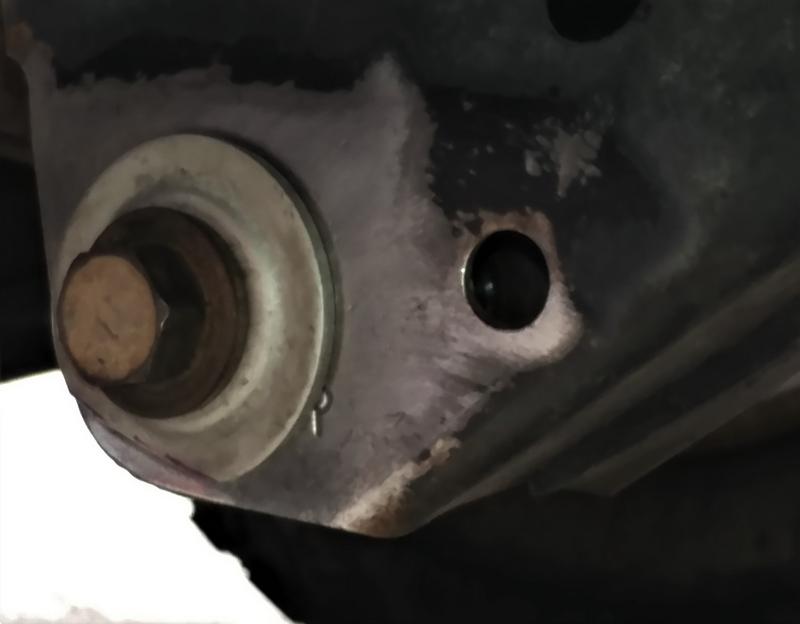
A new day, got everything put back together. I bolted the front of the arm up first, then used a jack to lift the rear axle to make the rear bolt hole line up. Because I wanted the arm to move a little closer to the axle I raised the opposite side. If I wanted it further away I'd raise the same side. It usually takes me a few minutes to get it at the right spot. I still have to put a torque wrench to it, 107 ft lbs for both ends.
Repairing the rear lower control arm mounts...
I had some nice washers so we went with Kitty's idea and my husband welded the right side today.
I've also trimmed the edges of the bushings so they aren't so square, made sure the contact surface of the mount is smooth (Steve at Sonoran's direction), cleaned out and re-greased the sleeve yet again.
The washers were trimmed to accommodate the flare at the edge of the mount, the bolt held them in place for the welding.
It's cleaned up, the paint's drying, it's raining, no testing for today.
I talked to Steve over at Sonoran Steel (real nice guy) about using the oem bushings with his links, it looks like that can happen with the use of a set-screw. There is far less bushing material in contact with the mount, that seems like it would be more gentle on the mount. I'll stick with the poly for now at least, and go from there.
I'm hoping to finish up the right side between rainstorms tomorrow.
----------------------------
A new day, got everything put back together. I bolted the front of the arm up first, then used a jack to lift the rear axle to make the rear bolt hole line up. Because I wanted the arm to move a little closer to the axle I raised the opposite side. If I wanted it further away I'd raise the same side. It usually takes me a few minutes to get it at the right spot. I still have to put a torque wrench to it, 107 ft lbs for both ends.
Last edited by habanero; 06-27-2021 at 08:24 AM.

The following 2 users liked this post by habanero:
chuckles89 (06-28-2021),
Kitty's 4Runner (07-02-2021)
07-05-2021, 04:43 PM
#4182
Contributing Member
Thread Starter
96 4Runner 317,xxx miles
Dropped the gas tank today...
Remove the gas tank skid. There's one bolt next to the rear tank strap on the frame side, one further up the frame, two at the front of the tank skid (but DO NOT unbolt the one front center yet- or the front of the tank will come down), and one on the other side next to the tank strap.
Under the left rear seat there is a spade-shaped black metal cover. Three phillips screws. Unscrew them.
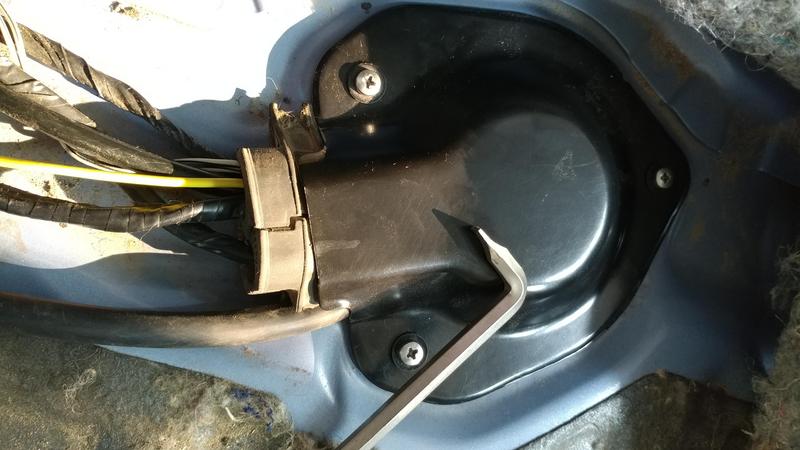
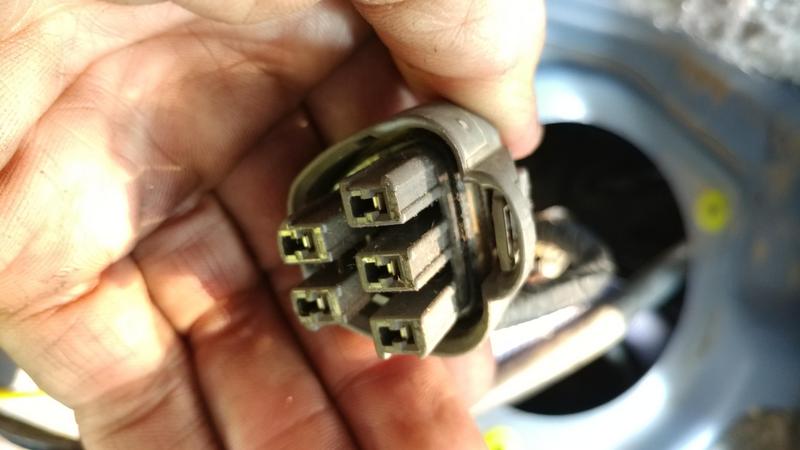
In the hole you'll see the fuel pump plug. Squeeze the tab and pull straight up. I use the tool in the above pic to pry the plug up as you pull.
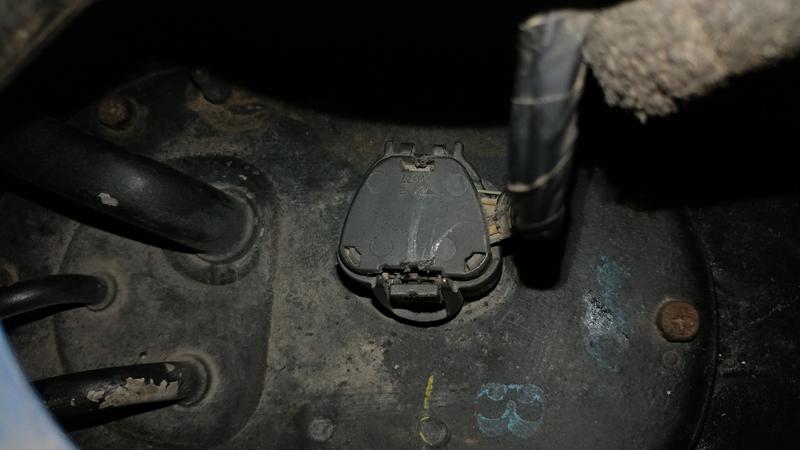
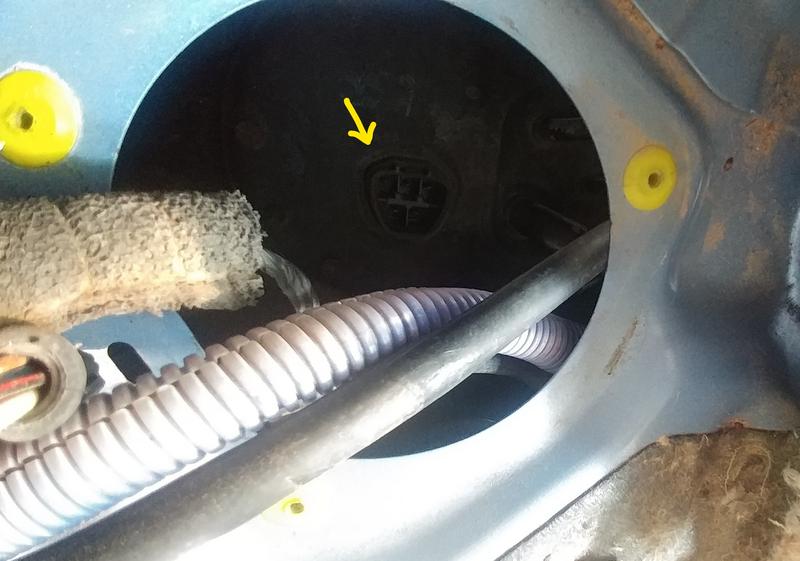
This is what you're working with.
Dropped the gas tank today...
Remove the gas tank skid. There's one bolt next to the rear tank strap on the frame side, one further up the frame, two at the front of the tank skid (but DO NOT unbolt the one front center yet- or the front of the tank will come down), and one on the other side next to the tank strap.
Under the left rear seat there is a spade-shaped black metal cover. Three phillips screws. Unscrew them.
In the hole you'll see the fuel pump plug. Squeeze the tab and pull straight up. I use the tool in the above pic to pry the plug up as you pull.
This is what you're working with.
07-05-2021, 04:44 PM
#4183
Contributing Member
Thread Starter
Next, undo the screw clamp for the fuel fill tube and pull off the metal fill tube.
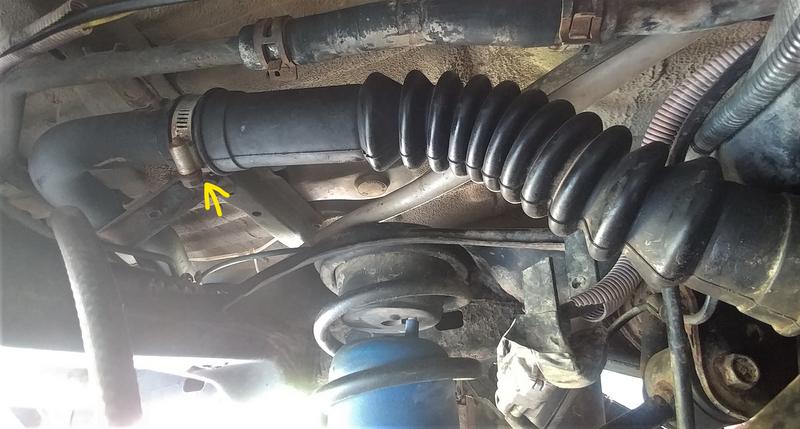
Undo one of the spring clamps for the vent hose. Do the section at the top of the tank, pull the hose off the metal tube.
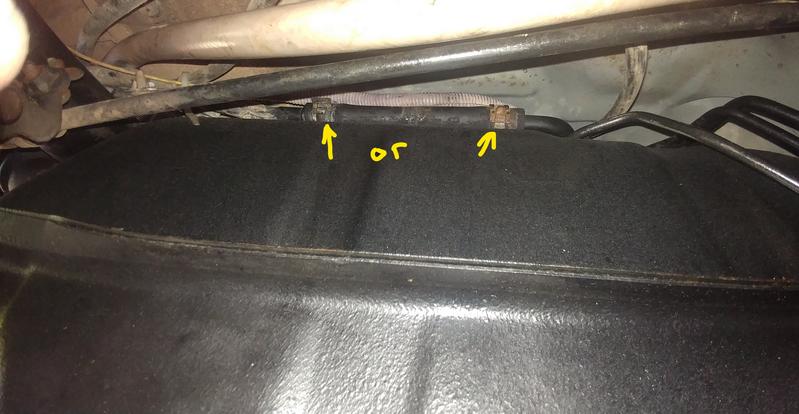
There are three lines coming off the front top of the tank. One is the pressure line that requires a 14mm (line wrench if you've got it) and a 17mm wrench to hold the other side in place- arrow top left.
It is a pressure line, gas could spray out. Be aware. Be safe.
Next you have 2 remaining lines off the front top of the tank- other 2 arrows. They are secured with clamps. I undid one on the tank side and one on the other side, to make keeping them straight a lot easier.
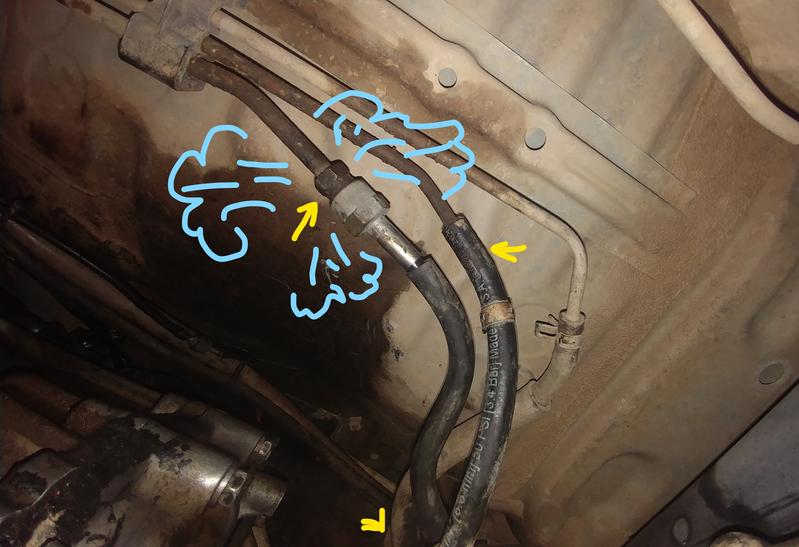
Undo one of the spring clamps for the vent hose. Do the section at the top of the tank, pull the hose off the metal tube.
There are three lines coming off the front top of the tank. One is the pressure line that requires a 14mm (line wrench if you've got it) and a 17mm wrench to hold the other side in place- arrow top left.
It is a pressure line, gas could spray out. Be aware. Be safe.
Next you have 2 remaining lines off the front top of the tank- other 2 arrows. They are secured with clamps. I undid one on the tank side and one on the other side, to make keeping them straight a lot easier.
Last edited by habanero; 07-05-2021 at 05:03 PM.
The following users liked this post:
old87yota (07-12-2021)
07-05-2021, 04:44 PM
#4184
Contributing Member
Thread Starter
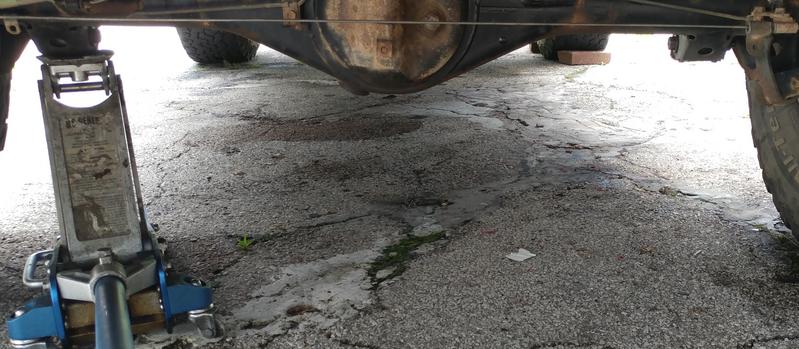
I supported the tank using the two harbor freight transmission jacks. One would have been okay, but there is around 14 gallons of gas in there, so, both jacks. Once of the tank was secure I removed the pin that held the tank strap, then the the bolt on the frame side to entirely remove the tank strap and get it out of the way.
Last of all I removed the front center bolt that holds the front of the tank (circle}. The arrows shows where the skid bolts are.
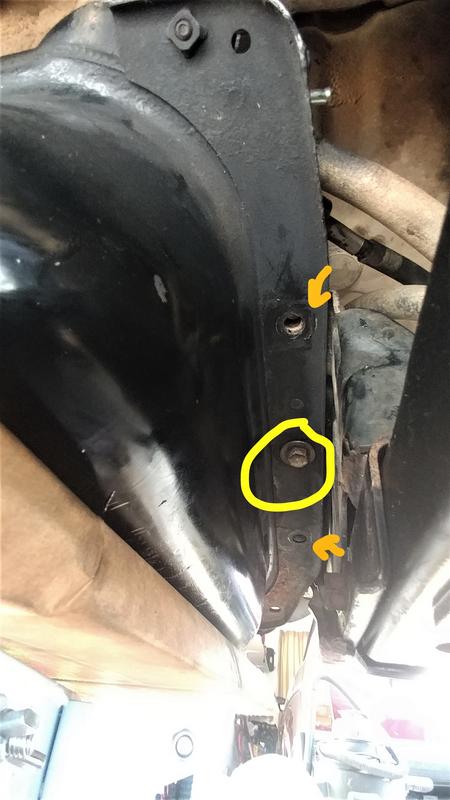
And down it came, watching the various lines as I lowered it.

I jacked up one side of the truck by the frame so that the gas tank on the transmission jacks could clear the frame and come out from under the truck.
Last of all I removed the front center bolt that holds the front of the tank (circle}. The arrows shows where the skid bolts are.
And down it came, watching the various lines as I lowered it.
I jacked up one side of the truck by the frame so that the gas tank on the transmission jacks could clear the frame and come out from under the truck.
Last edited by habanero; 07-05-2021 at 05:23 PM.
07-05-2021, 06:03 PM
#4185
Contributing Member
Thread Starter
96 Toyota 4Runner 317,xxx miles
Once the tank was out of the way my wonderful husbandio (19th anniversary on the 4th!) welded up the modified washers to the front rear lower control arm mount.
Same as the right side, I sanded the inner side of the mount so the poly has a smooth surface. Paint, grease, torque to 107 ft lbs.
Once the tank was out of the way my wonderful husbandio (19th anniversary on the 4th!) welded up the modified washers to the front rear lower control arm mount.
Same as the right side, I sanded the inner side of the mount so the poly has a smooth surface. Paint, grease, torque to 107 ft lbs.
The following 2 users liked this post by habanero:
75w90mantraN (07-10-2021),
old87yota (07-12-2021)
The following users liked this post:
habanero (07-07-2021)
The following users liked this post:
habanero (07-07-2021)
07-07-2021, 12:59 PM
#4188
Contributing Member
Thread Starter
Fingers crossed the fix does the job!
Tires going on Monday...pics then.
Last edited by habanero; 07-07-2021 at 01:04 PM.
The following users liked this post:
habanero (07-09-2021)
07-09-2021, 04:14 PM
#4190
Contributing Member
Thread Starter
Not much going on here otherwise.
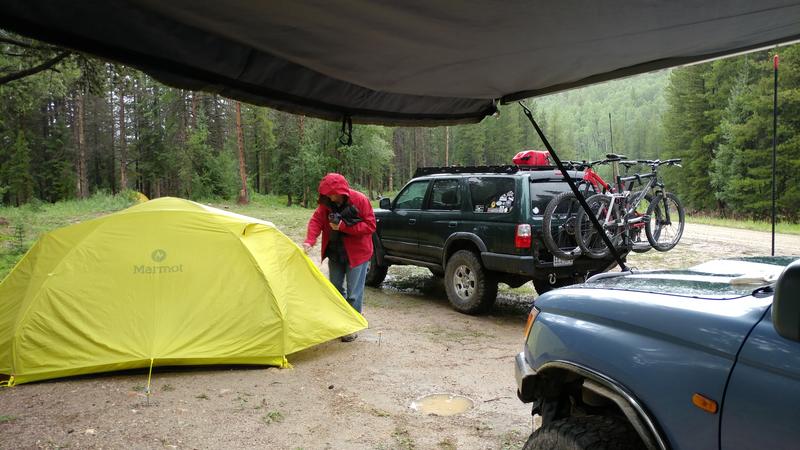
Put a dropper seatpost on the 2016 Niner Rip9 (mountain bike) today just so I don't have to pull the seatpost off to put it in the truck. It's been annoying to try to get the right height when it's time to slide the post back in. Now I won't have to move it, just push the lever and up it'll go.
The Rip9 has a short seatpost tube- 162mm max. I don't have particularly short legs- collar to seat rail 250mm. It had to be externally routed because I have 2x front chain ring- the front derailleur shifter was taking up the internal cable routing spot. It's a medium frame, it fits in the truck no problem with the seat lowered.
PNW Cascade 30.9 x 125mm fit the bill and I liked the way the external cable is routed at the post collar instead of up at the top as some are.
Also ended up pulling the rear aux. back-up lights apart and applying silicone. The warranty replacement light got moisture in it right away. The other one had been fine, but I guess it didn't want to be left out.
A layer of silicone on both sides of the rubber gasket should hopefully do the trick.
07-12-2021, 07:41 AM
#4191
Registered User
Congratulations on the dropper too! I never thought I needed one, but I don't think I could ever go back to to downhills with a seat all the way up. I can't count the number of times I've been fine and my buddy has had his seat buck him off, but I guess it depends on the trail too. I've always been a fan of the Rip9. It looks like a fun bike. Are you still using top tube adapters with a full suspension? I got a cannondale Habit about a year and a half ago and have been using the adapters, but never been happy with it. I'm really close to going to a tray. I've seen the Thule t2 in person and it looks like a really nice system, plus you can add two more trays when my kids bikes don't fit in the back of the 4runner anymore, but the price is not cheap... still looking for used ones.
The tray would also be nice on the bumper of a travel trailer if we ever find one of those too.
The tray would also be nice on the bumper of a travel trailer if we ever find one of those too.
07-12-2021, 09:55 AM
#4192
Contributing Member
Thread Starter
Congratulations on the dropper too! I never thought I needed one, but I don't think I could ever go back to to downhills with a seat all the way up. I can't count the number of times I've been fine and my buddy has had his seat buck him off, but I guess it depends on the trail too. I've always been a fan of the Rip9. It looks like a fun bike. Are you still using top tube adapters with a full suspension? I got a cannondale Habit about a year and a half ago and have been using the adapters, but never been happy with it. I'm really close to going to a tray. I've seen the Thule t2 in person and it looks like a really nice system, plus you can add two more trays when my kids bikes don't fit in the back of the 4runner anymore, but the price is not cheap... still looking for used ones.
The tray would also be nice on the bumper of a travel trailer if we ever find one of those too.
The tray would also be nice on the bumper of a travel trailer if we ever find one of those too.
If I put the Rip9 on the Thule Parkway (hanging) I use the top tube adapter, if I'm by myself the bike fits inside the truck. Lately we use the Husband's truck with its ISI carrier when we take both bikes. I don't want to know what it cost him, but it's been the best so far when wheeling and it's very quick to load/unload. The wheel hoops are easily adjustable so whatever bike we're taking works.
I really liked my tray-style carrier, One Up and Thule are the favored tray-style around here. Mine was a Sport Works- they were later bought by Thule. With the truck's rear tire carrier I wouldn't be able to use the first tray and I wouldn't be able to open the hatch without pulling the carrier off. It's also got a terrible departure angle as it sticks straight out. Other than that it was decent. Crossing fingers you find what you want used and priced well!
Okay, I just looked up the website....whoa bananas it's a good thing I didn't know the price of the ISI!! The dollar conversion helps a little with the heart attack...that first number made me hide in the closet!!
http://www.isi-carriers.com/purchase.html
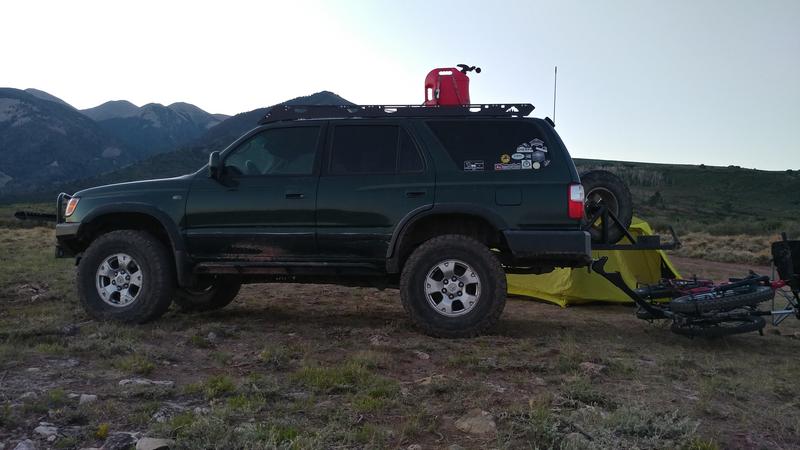
How I roll these days
and
Ignore the leggies....
 07-12-2021, 07:27 PM
#4193
Contributing Member
Thread Starter
96 4Runner 317,xxx I'll look at the miles laters, am so tired
EDIT 1/2024: having run these for a couple and a half years now..I don't like them as much as the 285/75r16, will be going back to the 285s once these have worn out, that or pizza cutters, depending on what's available when it's time.
LT295/75r16 BFG AT KO2
The other set made it 50,000 miles (dang close) and just started getting iffy on wet pavement. I've been pleased with the resistance to sidewall abuse (the deep gouges and no flats!) and the on-road traction, getting another set of KO2s seemed reasonable to me.
The pic was taken at the parking lot of an Ace Hardware picking up the last piece for my awning pole storage thingy.
We replaced the more than 20 year old vinyl guttering on the front of the house with aluminum so I had a spare 2x3" vinyl downspout that got repurposed into an out-of-the-way storage place for my extra awning poles.
Also the tech that installed my tires said my brake pads were very thin so I stopped by advance auto on my way home and picked up a set for the 231mm WL tundra calipers because that's what's on my truck. Will install them tomorrow. He didn't say anything about the stick-stick-stick-stick shift, but I did tell them to only touch the tall one and they'd be fine.
Last edited by habanero; 01-15-2024 at 03:08 AM.
The following users liked this post:
chuckles89 (07-13-2021)
07-13-2021, 05:40 AM
#4194
Registered User

Wheeling with bikes on a rack has always been a problem. I used the style that has two arms poking back, hang the bikes from the top tube off it. Of course, top tubes aren't very good for hanging bikes form any more, and also - the bikes just got beat up on the rack. With only two bikes, you had to spend a bunch of time carefully positioning them so they didn't directly chew into each other, and even then they get jostled around in the rack, just not good.
Looked around and didn't find anything that would work, none of the normal racks would hold the bikes high enough to wheel very hard at all. You could use a high adapter dropper, turned upside down, to raise the rack, but then you can't open the rear tire carrier and hatch without unbolting the rack and removing it, Which is a considerable PITA to do every evening at camp.
So I had something pictured in my head that would work, and kept on looking until I ran across ISI. Bingo! It's modular, you pick multiple parts to piece together the rack. The part that goes in the receiver has multiple options for height and length - to ensure that it fits under the swingout, and reaches back just far enough to clear the spare tire. And the beam that attaches to it has a choice in angles - flatter for less departure angle, or steep for more. And then some choices on wheel trays (roadie, MTB, fat tires). And along with the modular part - it's easy to replace parts if something gets bent. The wheel trays just slide onto plain square tubes with bolt locks to hold them in place. The plain square tubes that reach out from the center to the wheel trays are just secured into the beam and easily replaceable.
Super sturdy, non rattly, once you have the wheel trays positioned right to fit the bike wheelbases, and arranged to fit them both on (handlebars and seats not touching) then it's super easy to load bikes on. And it only touches the frame in one small spot with a soft padded hook. So they don't get chewed up. And it really does keep the bikes way up and out of the way when wheeling.
I did lightly tag a wheel tray on last year's trip, but only when doing a difficult rated trail (Rose Garden Hill near Moab):
But it's mild steel, I just easily bent it back by hand.
Looked around and didn't find anything that would work, none of the normal racks would hold the bikes high enough to wheel very hard at all. You could use a high adapter dropper, turned upside down, to raise the rack, but then you can't open the rear tire carrier and hatch without unbolting the rack and removing it, Which is a considerable PITA to do every evening at camp.
So I had something pictured in my head that would work, and kept on looking until I ran across ISI. Bingo! It's modular, you pick multiple parts to piece together the rack. The part that goes in the receiver has multiple options for height and length - to ensure that it fits under the swingout, and reaches back just far enough to clear the spare tire. And the beam that attaches to it has a choice in angles - flatter for less departure angle, or steep for more. And then some choices on wheel trays (roadie, MTB, fat tires). And along with the modular part - it's easy to replace parts if something gets bent. The wheel trays just slide onto plain square tubes with bolt locks to hold them in place. The plain square tubes that reach out from the center to the wheel trays are just secured into the beam and easily replaceable.
Super sturdy, non rattly, once you have the wheel trays positioned right to fit the bike wheelbases, and arranged to fit them both on (handlebars and seats not touching) then it's super easy to load bikes on. And it only touches the frame in one small spot with a soft padded hook. So they don't get chewed up. And it really does keep the bikes way up and out of the way when wheeling.

I did lightly tag a wheel tray on last year's trip, but only when doing a difficult rated trail (Rose Garden Hill near Moab):

But it's mild steel, I just easily bent it back by hand.
07-13-2021, 10:50 AM
#4196
Contributing Member
Thread Starter
I am glad to see you're still coming by for a visit anyway.
 07-13-2021, 11:24 AM
#4197
Contributing Member
Thread Starter
96 4Runner 317,090 miles
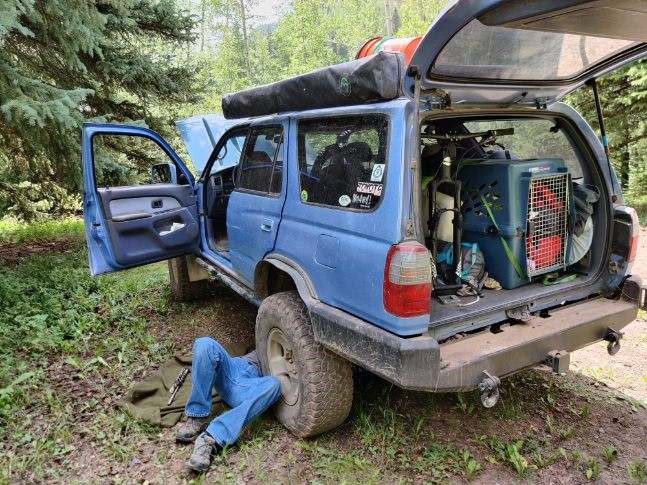
Front brake pads for Tundra WL calipers. Pretty simple. Having the speed bleeders were nice. Pads were pretty much ready for replacement at 87,000 miles, used Wagner thermoquiet #976..
My biggest mistake here is not having the rotors turned (machined). Hopefully it doesn't bite me in the butt later.
Heh, that had better be my biggest mistake, being that they're brakes and all.
Came with pads, only 2 keepers, and 2 anti-rattle clips.
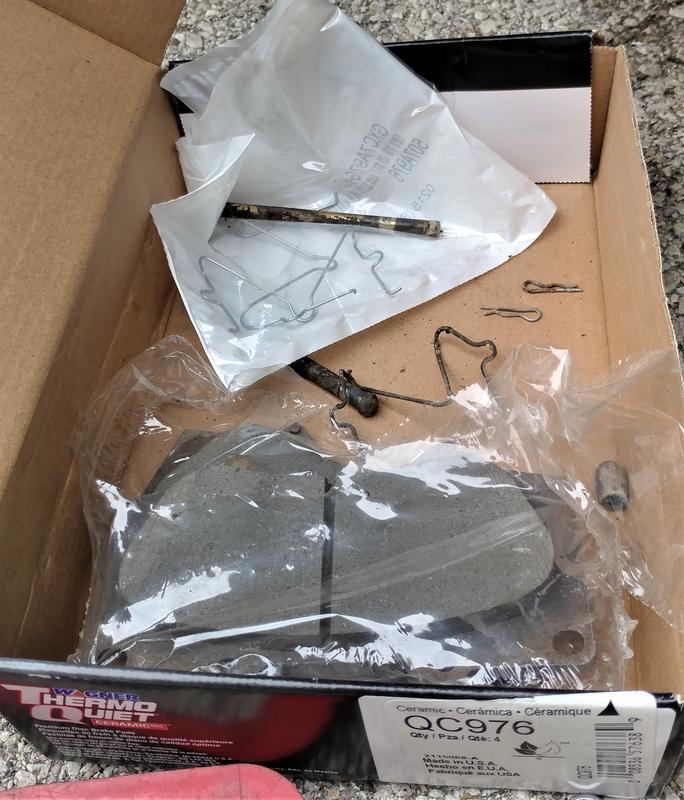
How the anti-rattle goes...
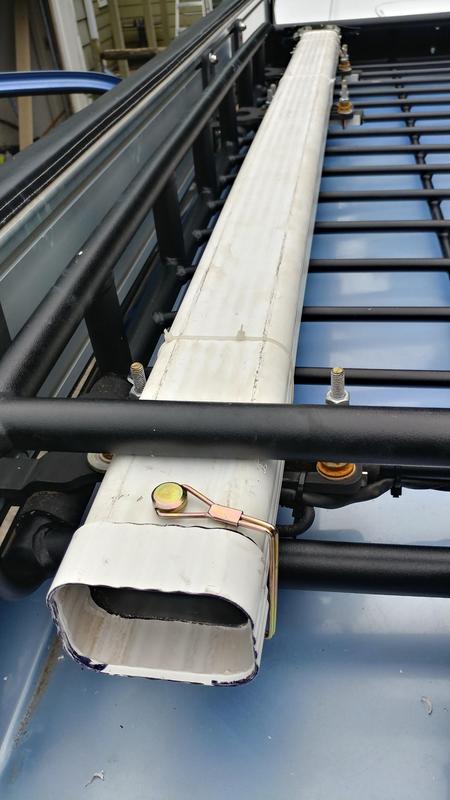
I also finished my awning extra legs storage that fits between the awning bracket bolts very nicely.
One end I cut to fit under the fairing, then used flashing, zipties, small screws and some caulk to cover. It's not pretty, but it's mostly under a fairing with a rubber pad to keep scratches away from the roof basket.
the cap is just a connector with a bit of downspout cut to hold a rubber cap. A hole was drilled through to put a keeper in.
Goes right in
and cap and keep and done. At some point I might hit it with some paint, but it's not easy to see sitting up there just behind the awning, on the awning bracket. It's a fairly snug fit, and I zip-tied it go the rack too.
It was nearly free and goes in a place nothing else really fits in and moves those poles outta the cabin.
Front brake pads for Tundra WL calipers. Pretty simple. Having the speed bleeders were nice. Pads were pretty much ready for replacement at 87,000 miles, used Wagner thermoquiet #976..
My biggest mistake here is not having the rotors turned (machined). Hopefully it doesn't bite me in the butt later.
Heh, that had better be my biggest mistake, being that they're brakes and all.
Came with pads, only 2 keepers, and 2 anti-rattle clips.
How the anti-rattle goes...
I also finished my awning extra legs storage that fits between the awning bracket bolts very nicely.
One end I cut to fit under the fairing, then used flashing, zipties, small screws and some caulk to cover. It's not pretty, but it's mostly under a fairing with a rubber pad to keep scratches away from the roof basket.
the cap is just a connector with a bit of downspout cut to hold a rubber cap. A hole was drilled through to put a keeper in.
Goes right in
and cap and keep and done. At some point I might hit it with some paint, but it's not easy to see sitting up there just behind the awning, on the awning bracket. It's a fairly snug fit, and I zip-tied it go the rack too.
It was nearly free and goes in a place nothing else really fits in and moves those poles outta the cabin.
Last edited by habanero; 07-13-2021 at 11:28 AM.
The following users liked this post:
chuckles89 (07-14-2021)
07-31-2021, 07:44 AM
#4198
Contributing Member
Thread Starter
96 4Runner 320,xxx miles
EDIT: It turned out Marlin sent the wrong seal for the coupler housing. The fit was fine and didn't give me pause, but apparently not fine enough. I didn't find out until they sent a new transmission with the proper seal. The two looked different, and the second one worked as it was supposed to. Later inquiry confirmed the first seal was not the correct one. Really annoying, and not my favorite job for the driveway, plus destroying a really well-rebuilt trans, but mistakes happen. In retrospect I could not have kept up on the oil transfer rate.
Live, learn, spend some extra dough, wear some extra Red Line.
Home. Had an issue with the taco box that caused transmission sadness. Researching for a solution.
Basically, at 70-75mph 5th gear highway speeds the taco box robbed the transmission of its oil and spit it out of the box.
Serious amounts of no bueno, a nasty lesson, and another bout of pulling things apart.
We did two 9 hour days of driving below 60mph and 4th gear to get home and there was no discernible fluid loss.
Until the issue is resolved a repair can't happen. I'm talking with Marlin Crawler for ideas and will be looking through the forums. If anyone has any ideas.
Per Marlin's suggestions I will be checking the oil slinger in the taco box and the seal on the coupler housing when I can muster up some oomph.
Heck, at least I can probably pull this stuff apart in my sleep by now.
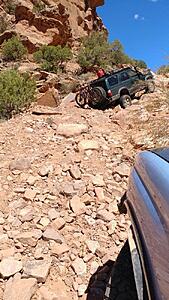
For what it's worth, the taco box was AWESOME where control wins the day. On Elephant hill, down Rose Garden Hill.
Also, we saw a mountain lion. From the trucks so it was an acceptable sighting.
EDIT: It turned out Marlin sent the wrong seal for the coupler housing. The fit was fine and didn't give me pause, but apparently not fine enough. I didn't find out until they sent a new transmission with the proper seal. The two looked different, and the second one worked as it was supposed to. Later inquiry confirmed the first seal was not the correct one. Really annoying, and not my favorite job for the driveway, plus destroying a really well-rebuilt trans, but mistakes happen. In retrospect I could not have kept up on the oil transfer rate.
Live, learn, spend some extra dough, wear some extra Red Line.
Home. Had an issue with the taco box that caused transmission sadness. Researching for a solution.
Basically, at 70-75mph 5th gear highway speeds the taco box robbed the transmission of its oil and spit it out of the box.
Serious amounts of no bueno, a nasty lesson, and another bout of pulling things apart.
We did two 9 hour days of driving below 60mph and 4th gear to get home and there was no discernible fluid loss.
Until the issue is resolved a repair can't happen. I'm talking with Marlin Crawler for ideas and will be looking through the forums. If anyone has any ideas.
Per Marlin's suggestions I will be checking the oil slinger in the taco box and the seal on the coupler housing when I can muster up some oomph.
Heck, at least I can probably pull this stuff apart in my sleep by now.
For what it's worth, the taco box was AWESOME where control wins the day. On Elephant hill, down Rose Garden Hill.
Also, we saw a mountain lion. From the trucks so it was an acceptable sighting.
Last edited by habanero; 01-15-2024 at 03:23 AM.
08-01-2021, 08:22 AM
#4199
Registered User
It was a more interesting drive back from the front range of Colorado.
The trans ran dry enough that it was making some noise in gears 1/2/3/5, but not in 4th (damaged layshaft bearings or the bearing between the input and output shafts?). It quieted down again with some added oil, but driving back mostly in 4th seemed prudent.
So we went on a tour of small rural Colorado, Kansas, and Missouri towns.
We did try a short section of I-70, I didn't think it would be too bad since there are two lanes and people could pass (we were holding it down to roughly 60 mph). But lol, no. Discarded that idea quickly after seeing how quickly those semi's were arriving in the rear mirror. Much less tense on the smaller highways where we were mostly going the speed limit.
08-02-2021, 08:57 AM
#4200
Thats weird. I havent heard any issues like this with the Tacoboxes. But then again, very few of us still frequent the forums. most of the people use the facebook groups, which to me, are like a wild west wasteland for trying to find good info. Hopefully you can get this figured out. Is the trans a marlin unit or your stocker?
EDIT: Also, while youre there digging into things........ https://www.pirate4x4.com/threads/to...-swap.2000978/
EDIT: Also, while youre there digging into things........ https://www.pirate4x4.com/threads/to...-swap.2000978/
Last edited by space-junk; 08-02-2021 at 09:06 AM.


