
habanero's 1996 4Runner Build-Up Thread
 Oct 27, 2017 | 02:56 PM
#3381
Registered User


Joined: Jan 2011
Posts: 695
Likes: 103
From: exo-reality -wave if you see me; Front Range, CO
Two time photo op!
[QUOTE=habanero;52380602]Thanks coopster- you're back! You read what you want to read (or have time for). 
Our trucks were pictured together on another posting, up on Imogene, so he's had his day. [/QUOT
Well looky here!
I went to the front page because my xc90 is having issues, and thought I'd see what other thought about 04 Land Cruisers. And lo and behold,
If I'm not mistaken....
https://www.yotatech.com/articles/spare-parts-toyota/
Our trucks were pictured together on another posting, up on Imogene, so he's had his day.
[/QUOTWell looky here!
I went to the front page because my xc90 is having issues, and thought I'd see what other thought about 04 Land Cruisers. And lo and behold,
If I'm not mistaken....
https://www.yotatech.com/articles/spare-parts-toyota/
Oct 28, 2017 | 08:12 AM
#3382
Thread Starter
Contributing Member

Joined: Sep 2005
Posts: 8,247
Likes: 497
From: mo
[QUOTE=coopster;52380676]
That's the pic- the 2016 trip pre-front bumpers. They've been mining what I put in the album. Stuff has been showing up here and on facebook too.
I don't mind the pic use, but do wish they'd gotten my gender right. I make a rotten looking kinda lumpy guy.
Thanks coopster- you're back! You read what you want to read (or have time for).
Our trucks were pictured together on another posting, up on Imogene, so he's had his day.[/QUOT
Well looky here!
I went to the front page because my xc90 is having issues, and thought I'd see what other thought about 04 Land Cruisers. And lo and behold,
If I'm not mistaken....
https://www.yotatech.com/articles/spare-parts-toyota/
Our trucks were pictured together on another posting, up on Imogene, so he's had his day.
[/QUOTWell looky here!
I went to the front page because my xc90 is having issues, and thought I'd see what other thought about 04 Land Cruisers. And lo and behold,
If I'm not mistaken....
https://www.yotatech.com/articles/spare-parts-toyota/
I don't mind the pic use, but do wish they'd gotten my gender right. I make a rotten looking kinda lumpy guy.
Oct 28, 2017 | 10:33 AM
#3383
i'll see if I can get them to fix that, i don't think i can edit the front page story stuff
Oct 29, 2017 | 06:08 AM
#3385
Thread Starter
Contributing Member
Joined: Sep 2005
Posts: 8,247
Likes: 497
From: mo
 Betting we're not built the same kind o' lumpy.
Oct 29, 2017 | 07:09 PM
Betting we're not built the same kind o' lumpy.
Oct 29, 2017 | 07:09 PM
#3386
Thread Starter
Contributing Member
Joined: Sep 2005
Posts: 8,247
Likes: 497
From: mo
96 4Runner 296,806 miles
P0420 popped up during another long drive today. The hubby used the Torque pro app to read the CEL and erased it. It didn't come back for the last hundred miles of the trip. This is the second P0420, the first was in May when I was picking up the front bumpers and same thing. Erased it and it didn't come back til now. Last time was with the old maf, this time is with the new one. O2 sensors are reasonably new (will be double checking dates). Cat is around 4 years old- a Walker. Not overly concerned yet but am keeping an eye. Have noticed the rear o2 sensor has been showing higher volts than the front but am not sure what that means.
Front a/f sensor 242,xxx miles, 2012
rear o2 sensor 287,xxx miles, 9/2016
Fuel pump and injectors are oe, Maf is a 99+
If I ever get a chance I'll pull some plugs to see what they might say. Not too worried at this point, but like to be ahead of things whenever possible.
Other than that the 99's right headlight is acting like it have a bad ground according to the hubby. Need to find out where the ground for that light is.
Last edited by habanero; Oct 29, 2017 at 07:34 PM.
Oct 30, 2017 | 01:38 PM
#3387
Thread Starter
Contributing Member
Joined: Sep 2005
Posts: 8,247
Likes: 497
From: mo
Oct 31, 2017 | 06:06 AM
#3388

Registered User
Joined: Feb 2010
Posts: 748
Likes: 135
From: St. Louis MO
Not that there's anything wrong with that...
/Seinfeld
The 99's super dim headlight is fixed. Just a burnt out fuse on the passenger side headlight. If a fuse is burnt out on one headlight, it will still faintly glow. Probably getting fed some current from the other headlight based on the resistance of the bulb filament.
I've just been working on my 50+ year old car4 too much, when I saw a really dim light, my mind jumped straight to dodgy grounds.
Last edited by Jomoka; Oct 31, 2017 at 06:07 AM.
 Nov 1, 2017 | 01:29 PM
#3390
Thread Starter
Contributing Member
Joined: Sep 2005
Posts: 8,247
Likes: 497
From: mo
96 4Runner 296,924 miles
Upper a-arm bushings. You know how I said I'd borrow a write-up for the lower control arm bushings using the stock jack? Duh, upper a-arms don't have enough clearance to use it. Well enough, I took the a-arms and bushings to my favorite machinists over at Phase II.
That was a much better plan!
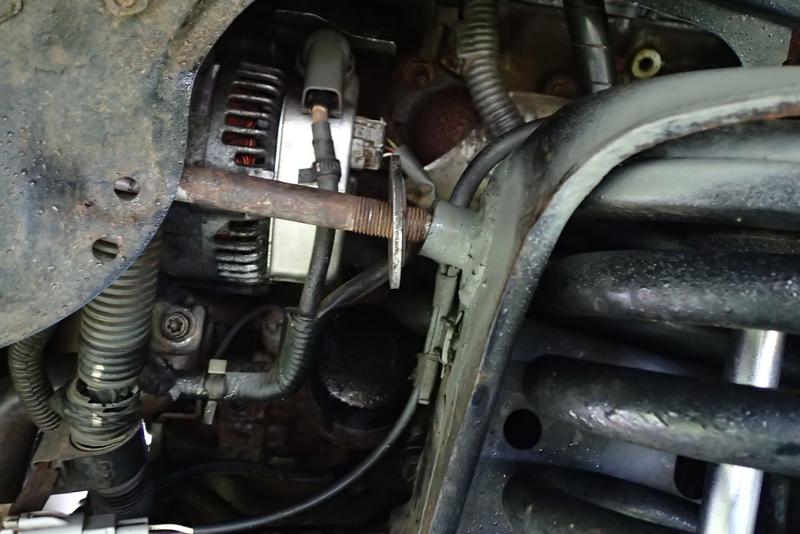
Anywho, getting the a-arms off is easy enough. It took me 15 minutes for one side including putting the truck on the jack stand and zizzing the wheel off.
There a is small bolt (10mm heads) here and there that hold brackets on the a-arm. Remove those.
I bought new upper ball joint boots (43324-39015 Upper Ball Joint Dust Cap)
so I could use a pickle fork to separate the ball joint bolt from the a-arm.
Remove the cotter pin from the ball joint bolt, loosen the castle nut (19mm) but leave it on. It will catch the spindle when you release the ball joint bolt. If you're using a ball joint press turn the nut upside down and screw on until near flush with the end of the bolt.

I'm not removing the ball joint from the spindle, just releasing it from the a-arm.
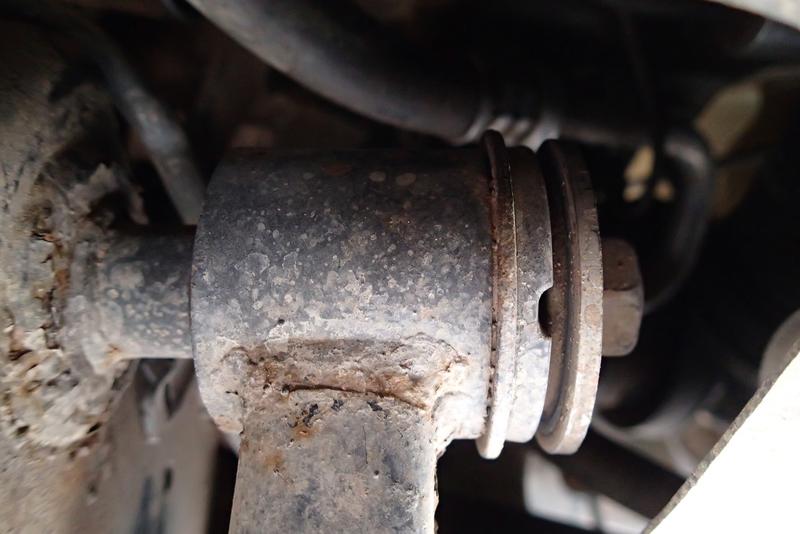
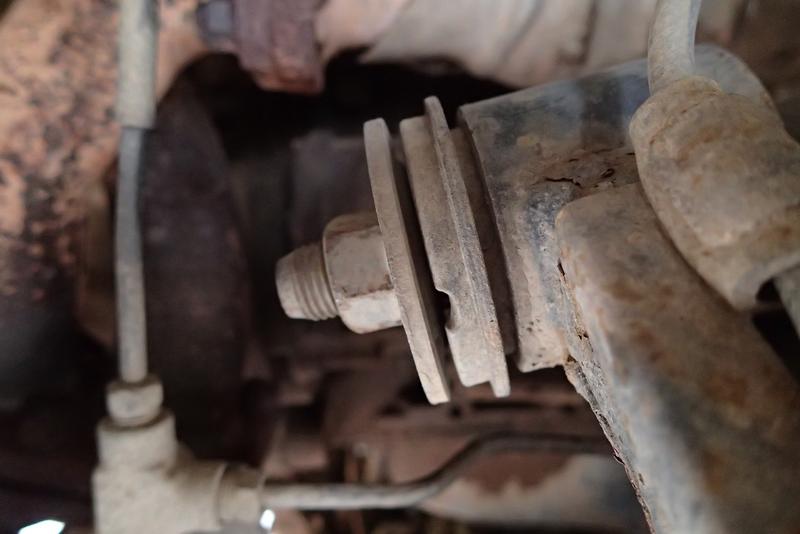
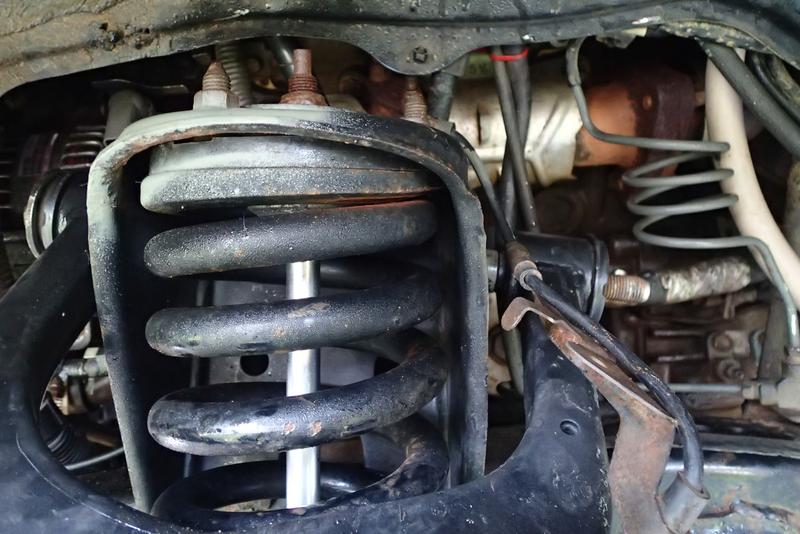
The a-arm is attached by a long bolt. Both the bolt head and nut are 19mm. You will need to use a wrench on the head on the forward side to hold it while loosening the nut on the aft side. Once it's loosened remove the ball joint bolt nut and the bolt from the a-arm. I'm using a bungee to hold the spindles sorta in place.
Go ahead and remove the nut and washer off the long a-arm bolt. It goes forward to remove it. I had to tug the fender skirt out of the way a little for clearance. It came easily enough and TA-DA! a-arm is free.
This bushing is in the appropriate place in the a-arm- it's the right front.
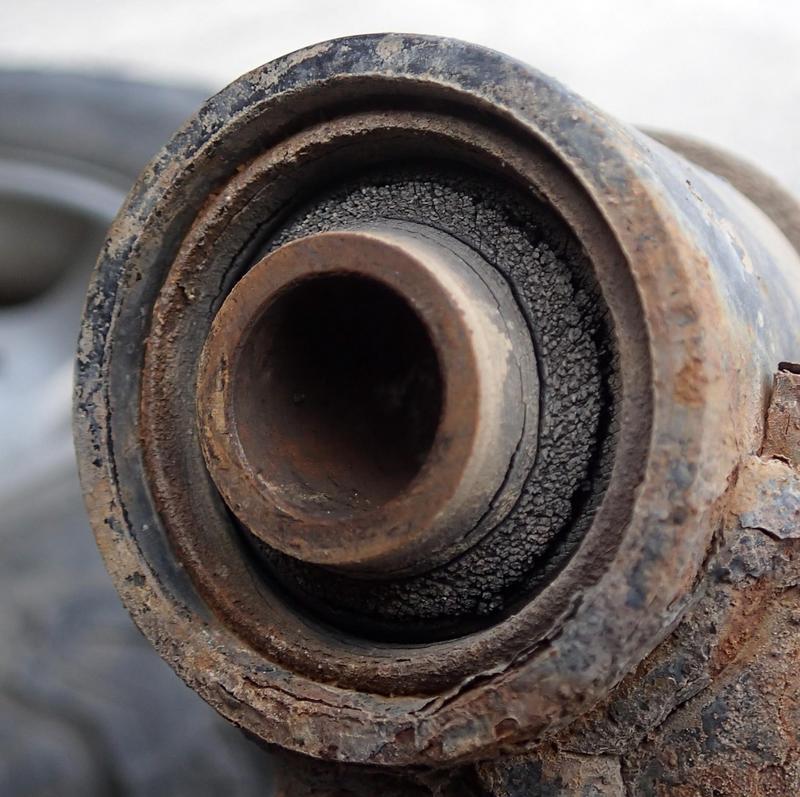
This one- the right rear- has worked its way out of the arm a bit-
and the inner side of the same bushing. The rubber is destroyed and the sleeve can be moved by hand. 22 years, pft!
The new bushings are in the a-arms ( 48632-35080 Upper Control Arm Bushing). I've cleaned them up and painted them, they are drying now.
Upper a-arm bushings. You know how I said I'd borrow a write-up for the lower control arm bushings using the stock jack? Duh, upper a-arms don't have enough clearance to use it. Well enough, I took the a-arms and bushings to my favorite machinists over at Phase II.
That was a much better plan!
Anywho, getting the a-arms off is easy enough. It took me 15 minutes for one side including putting the truck on the jack stand and zizzing the wheel off.
There a is small bolt (10mm heads) here and there that hold brackets on the a-arm. Remove those.
I bought new upper ball joint boots (43324-39015 Upper Ball Joint Dust Cap)
so I could use a pickle fork to separate the ball joint bolt from the a-arm.
Remove the cotter pin from the ball joint bolt, loosen the castle nut (19mm) but leave it on. It will catch the spindle when you release the ball joint bolt. If you're using a ball joint press turn the nut upside down and screw on until near flush with the end of the bolt.
I'm not removing the ball joint from the spindle, just releasing it from the a-arm.
The a-arm is attached by a long bolt. Both the bolt head and nut are 19mm. You will need to use a wrench on the head on the forward side to hold it while loosening the nut on the aft side. Once it's loosened remove the ball joint bolt nut and the bolt from the a-arm. I'm using a bungee to hold the spindles sorta in place.
Go ahead and remove the nut and washer off the long a-arm bolt. It goes forward to remove it. I had to tug the fender skirt out of the way a little for clearance. It came easily enough and TA-DA! a-arm is free.
This bushing is in the appropriate place in the a-arm- it's the right front.
This one- the right rear- has worked its way out of the arm a bit-
and the inner side of the same bushing. The rubber is destroyed and the sleeve can be moved by hand. 22 years, pft!
The new bushings are in the a-arms ( 48632-35080 Upper Control Arm Bushing). I've cleaned them up and painted them, they are drying now.
Last edited by habanero; Nov 1, 2017 at 01:31 PM.
Nov 2, 2017 | 07:15 AM
#3392
Thread Starter
Contributing Member
Joined: Sep 2005
Posts: 8,247
Likes: 497
From: mo
All buttoned up.
Couple of notes:
* Don't forget to be careful if you're going to use a pickle fork- sure, damage the boot, but try to preserve the ball joint housing. I nicked one so used a file (rag covering ball joint to prevent shaving contamination) to smooth it out so it didn't damage the new boot.
* Torque for upper ball joint bolt: 80 ft lbs
* Torque for upper a-arm bolt: 87 ft lbs
* Hole for the ball joint bolt is towards the rear, a-arms are marked left and right
* Don't forget to make sure the abs wiring and bracket is outside of the a-arm before install. It will tend to go where it ain't supposed to.
* Upper a-arms complete with bushings are about $350 (EB Toyota) the 4 bushings and presswork was about $210. If you can get them out yourself it's about $130. Dust caps are about $18 for the pair and include grease, cotter pin, castle nut and wire retainer.
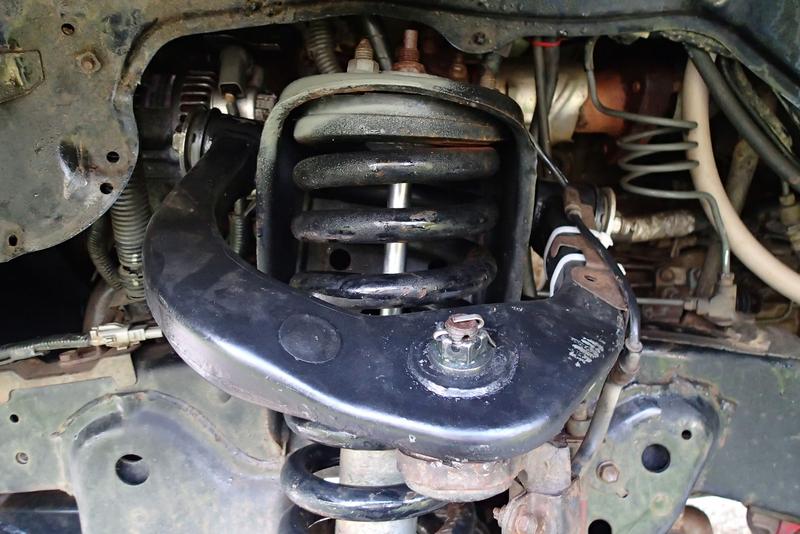
* The large a-arm bolt washers face outwards on either end.
What it will take. This is the right (passenger) a-arm. It is upside down in the picture.
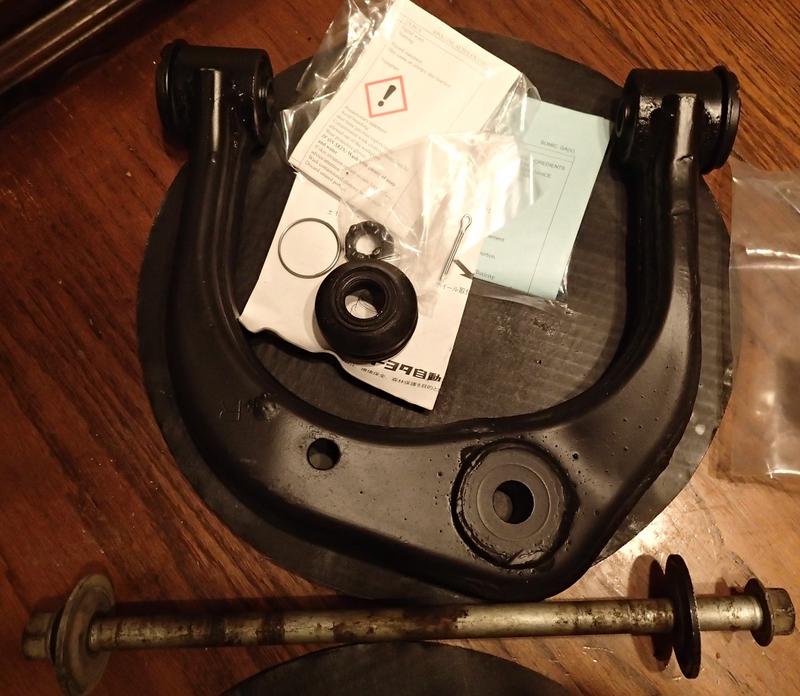

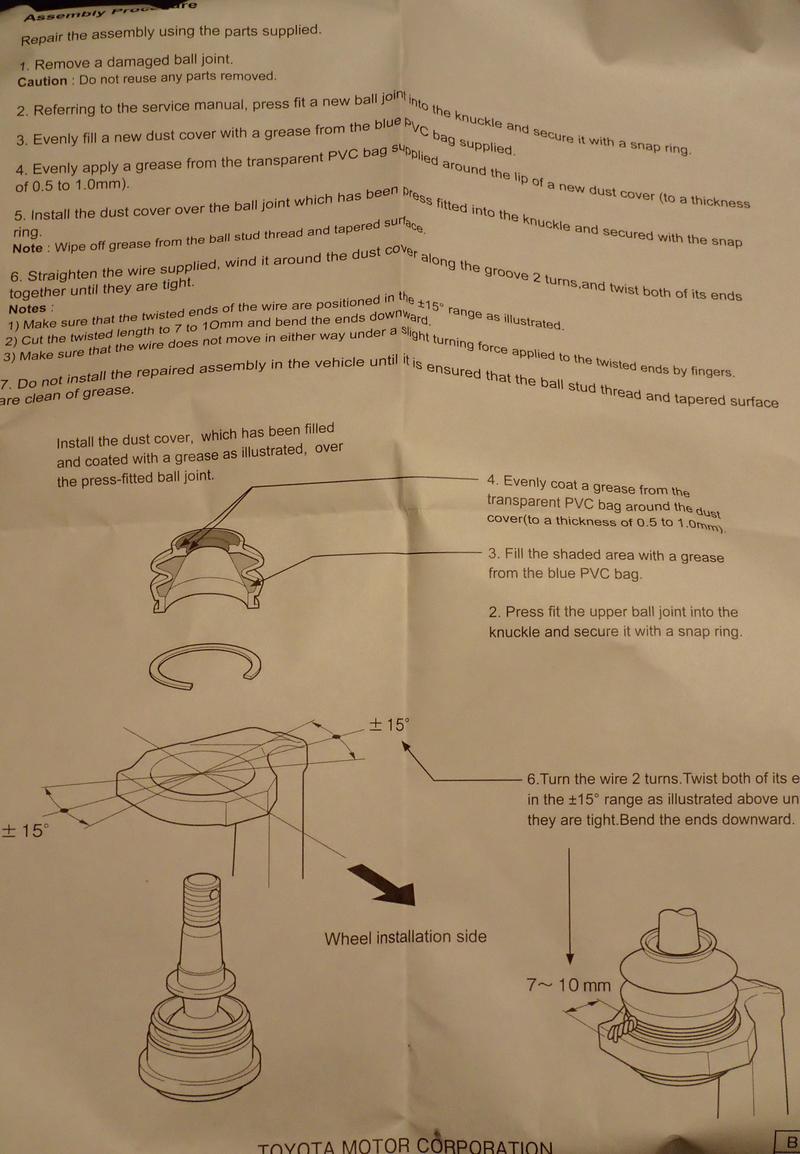
Ball joint boot instructions:
Couple of notes:
* Don't forget to be careful if you're going to use a pickle fork- sure, damage the boot, but try to preserve the ball joint housing. I nicked one so used a file (rag covering ball joint to prevent shaving contamination) to smooth it out so it didn't damage the new boot.
* Torque for upper ball joint bolt: 80 ft lbs
* Torque for upper a-arm bolt: 87 ft lbs
* Hole for the ball joint bolt is towards the rear, a-arms are marked left and right
* Don't forget to make sure the abs wiring and bracket is outside of the a-arm before install. It will tend to go where it ain't supposed to.
* Upper a-arms complete with bushings are about $350 (EB Toyota) the 4 bushings and presswork was about $210. If you can get them out yourself it's about $130. Dust caps are about $18 for the pair and include grease, cotter pin, castle nut and wire retainer.
* The large a-arm bolt washers face outwards on either end.
What it will take. This is the right (passenger) a-arm. It is upside down in the picture.
Ball joint boot instructions:
Nov 2, 2017 | 06:53 PM
#3393
Thread Starter
Contributing Member
Joined: Sep 2005
Posts: 8,247
Likes: 497
From: mo
It felt good on the short drive today....I'll get some highway time this weekend to see if the weirdness is gone. It certainly seems so. For Chuckles I'll also report on the balance beads now that the upper a-arm bushings are good.
Steve over at Sonoran Steel just let me know he has special Strongflex poly bushings for the upper and lower a-arms and the rear upper dogbone bushings for the 3rd gens 96-02. Too late for me though I will certainly at least consider them hopefully many many years and miles from now. Thought I'd post for anyone who might be interested since the availability was new to me-
http://www.sonoransteel.com/index.php?main_page=index&cPath=1_11
What Steve said:
"don't know if you know, but I have replacement bushings now that I have made in Poland and the poly is as soft as rubber and there is a grease grid by the sleeve so they will not squeak and keep the crud out."
Last edited by habanero; Nov 2, 2017 at 07:02 PM.
Nov 3, 2017 | 12:57 PM
#3394
dangit! that would have been a killer upgrade, hab! what about getting another set upf UCAs and building them, swapping them in and keeping the originals as spares? if money allows, of course.
Nov 3, 2017 | 07:35 PM
#3395
Thread Starter
Contributing Member
Joined: Sep 2005
Posts: 8,247
Likes: 497
From: mo
Hey, in another 20 years or so I'll be looking to change them out again....right? What's the likelyhood Steve will still be selling them then, when we we'll both be touching 70?
Geez....70! I cannot fathom that.
 That's not a cake, that's a flaming pillar of madness!
Nov 4, 2017 | 12:06 PM
That's not a cake, that's a flaming pillar of madness!
Nov 4, 2017 | 12:06 PM
#3396


 Nov 4, 2017 | 06:30 PM
#3398
Thread Starter
Contributing Member
Joined: Sep 2005
Posts: 8,247
Likes: 497
From: mo
If I'm still doing this at 70 I'll be a very happy woman. Also, I'll ship each of you a tiny slice of my cupcake. Does anyone know how to slice flares?
Nov 5, 2017 | 03:56 PM
#3399
Thread Starter
Contributing Member
Joined: Sep 2005
Posts: 8,247
Likes: 497
From: mo
Balance beads. Now that the a-arm bushings are replaced and I've gone a couple hundred miles I can say they aren't bad. Certainly imperfect compared to properly balanced tires. There are times when they are smooth as can be and times when they are not bad but noticeably not spot-on. BFG A/T KO2 LT285/75R16 with 6oz in each tire. Because I've knocked weights off and balancing is expensive I'm okay with them but I'm not sure if I'd do them again or not. Probably more yes than no.
Nov 5, 2017 | 05:11 PM
#3400
Balance beads. Now that the a-arm bushings are replaced and I've gone a couple hundred miles I can say they aren't bad. Certainly imperfect compared to properly balanced tires. There are times when they are smooth as can be and times when they are not bad but noticeably not spot-on. BFG A/T KO2 LT285/75R16 with 6oz in each tire. Because I've knocked weights off and balancing is expensive I'm okay with them but I'm not sure if I'd do them again or not. Probably more yes than no.


