
Baby Beast 2-1999 4Runner
 Aug 14, 2013 | 09:31 AM
#22
Thread Starter
Contributing Member
Joined: Apr 2004
Posts: 5,464
Likes: 6
From: Arvada, Colorado
Been plugging away at it slowly, but a lot of other crap kept getting in the way, so I haven't had as much time to work on it as I'd have liked.
Most of the time I've been spending doing finish weld/grind/weld/grind to smooth out the surfaces, as well as a lot of little fixes here and there.
Here is where I'm at right now. I'm getting a different latch as the 90 deg one is just too hard to use efficiently.
Still have a few braces to put in, and I need to do finish sanding which will take a long time.
Aug 14, 2013 | 09:32 AM
#23
Thread Starter
Contributing Member
Joined: Apr 2004
Posts: 5,464
Likes: 6
From: Arvada, Colorado
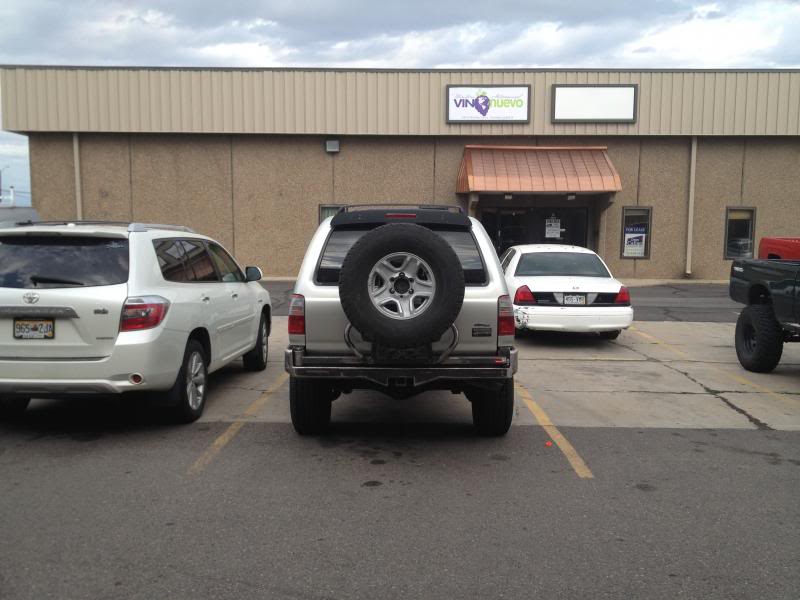
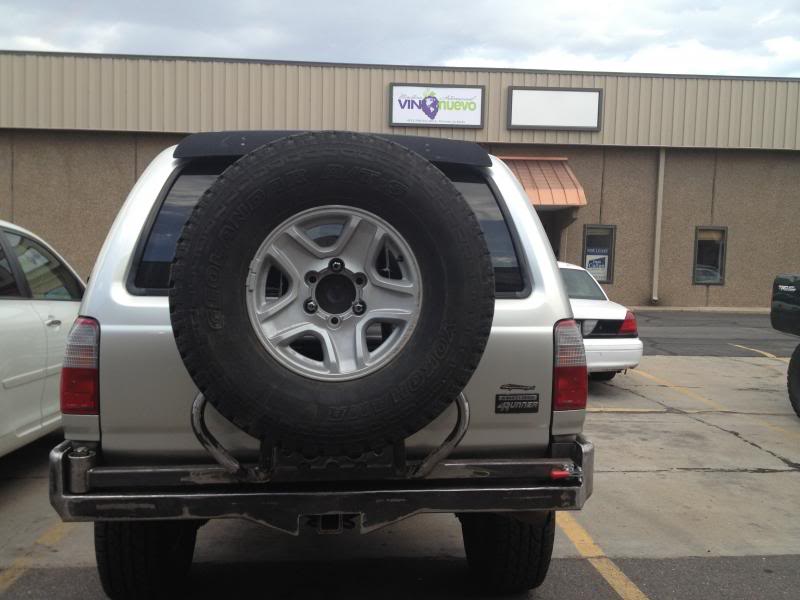
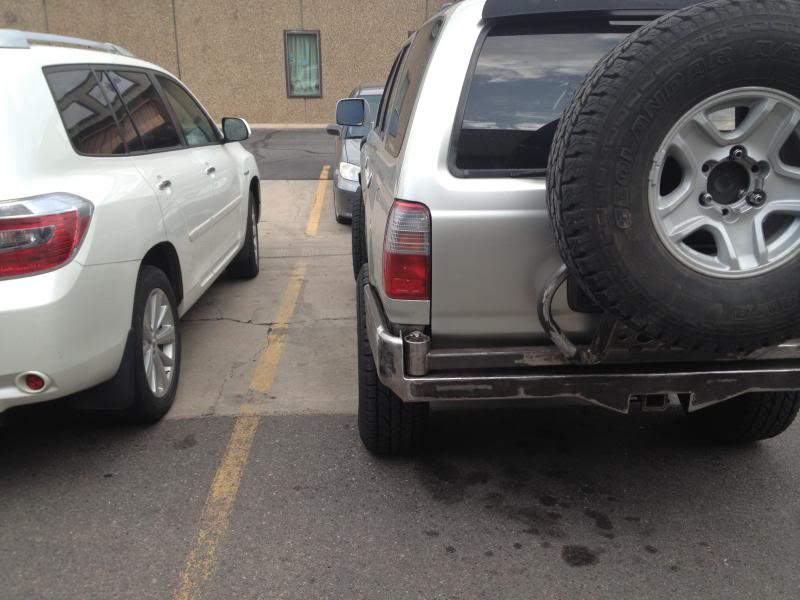
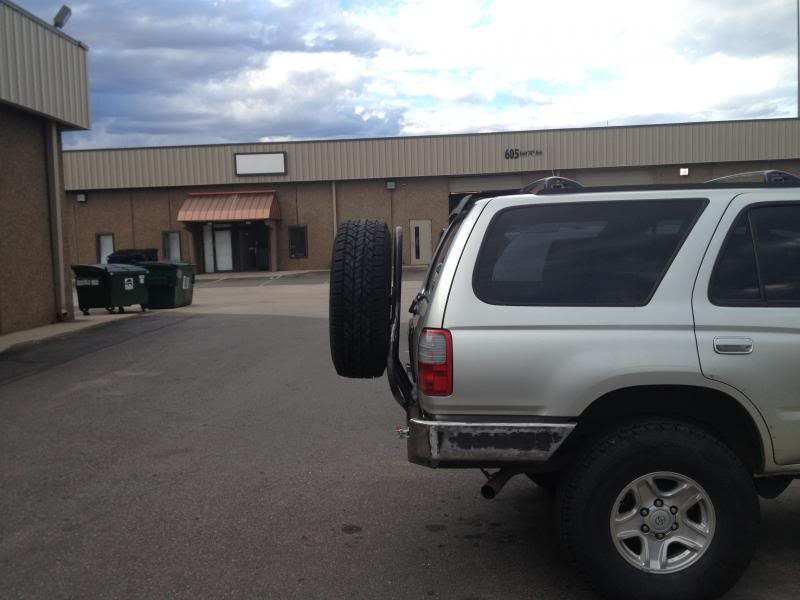
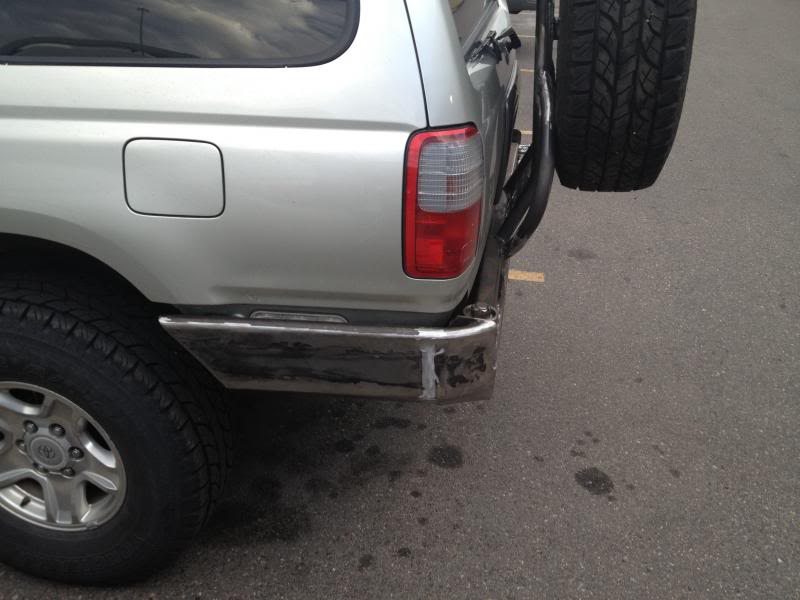
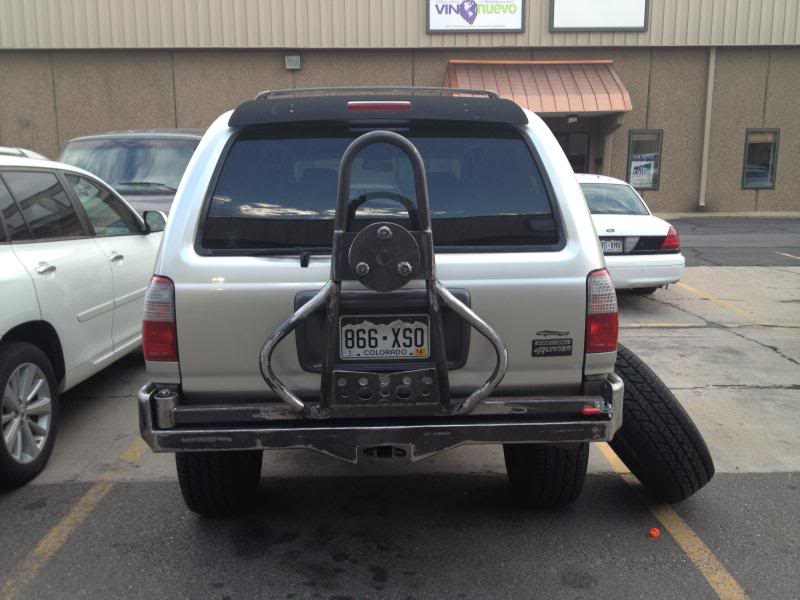
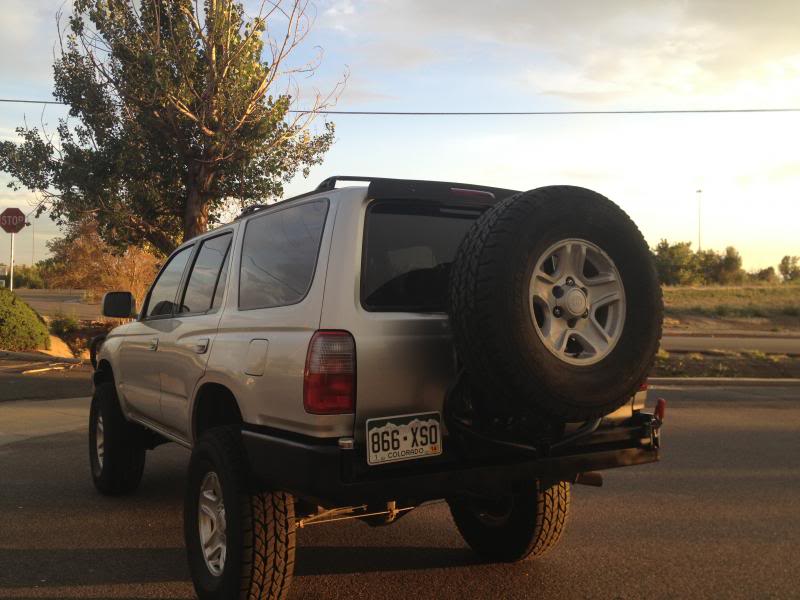
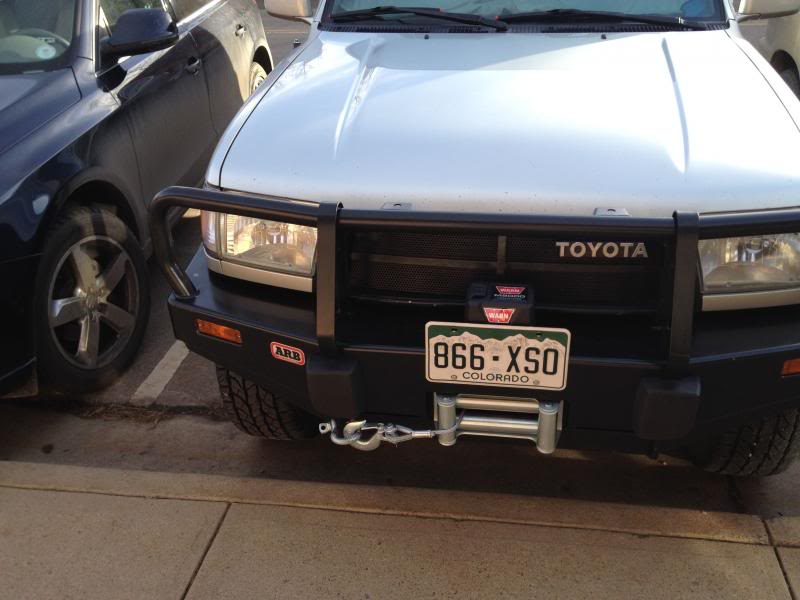
Some more progress as I move along. It is almost finished now
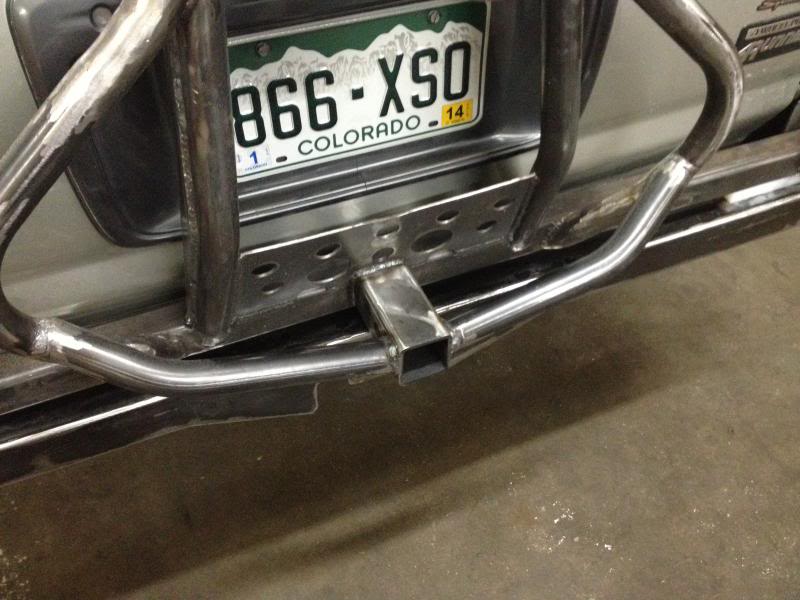
The hitch in the carrier is for a bike rack, or other hitch mounted rack that would be a pain to deal with if it was in the bumper hitch. Most of the time it will have a cap in it. I will build a rack that bolts into it for jerry cans as well, so that I can carry gas.
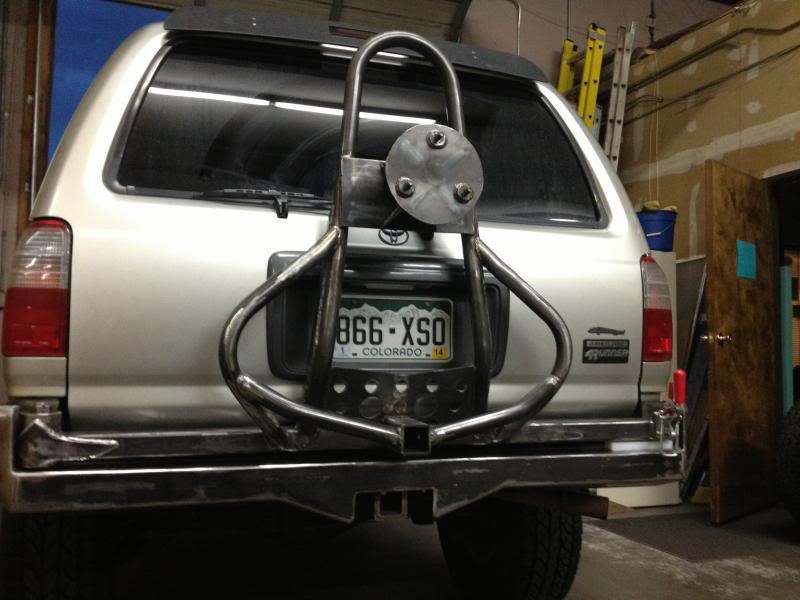
I braced the tire mount and the main hoop some more. The tire mount now has tube welded behind the plate as well, so that the entire structure is fully welded to the main hoop.

Lastly, I upgraded my latch to a 2k lb one from McMaster Carr, as well as I got the option for a secondary latch to keep the handle from rattling open on washboard roads.
The hitch in the carrier is for a bike rack, or other hitch mounted rack that would be a pain to deal with if it was in the bumper hitch. Most of the time it will have a cap in it. I will build a rack that bolts into it for jerry cans as well, so that I can carry gas.
I braced the tire mount and the main hoop some more. The tire mount now has tube welded behind the plate as well, so that the entire structure is fully welded to the main hoop.
Lastly, I upgraded my latch to a 2k lb one from McMaster Carr, as well as I got the option for a secondary latch to keep the handle from rattling open on washboard roads.

 Aug 19, 2013 | 09:18 AM
#26
Thread Starter
Contributing Member
Joined: Apr 2004
Posts: 5,464
Likes: 6
From: Arvada, Colorado
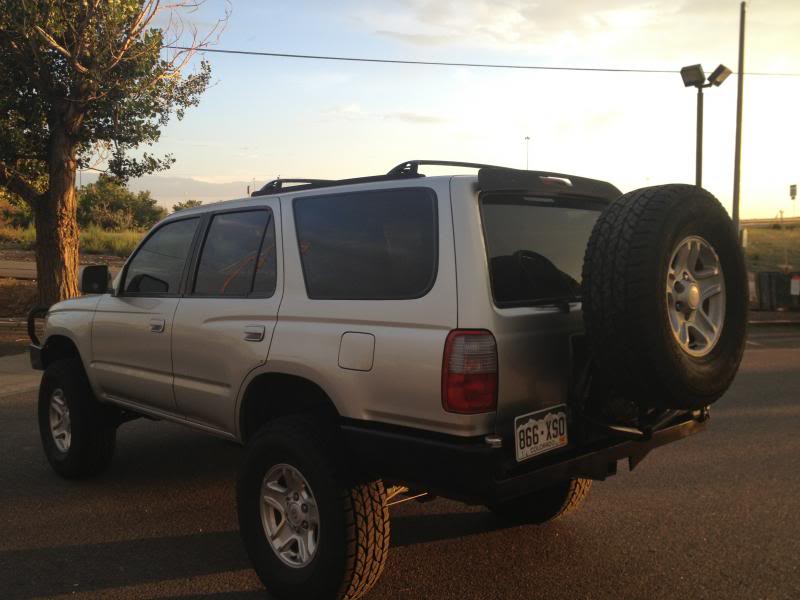
I finally got it done enough for now. I have a couple things to add down the road, but this is where it is at, and I need a break for a while. I painted it, but i think I'll add in a few things in a week or two and then get it powdercoated. The paint has already chipped in a few spots :mad:
On saturday I removed my old man emu rear springs, and installed a set of FJ80 fronts to regain the height loss in the rear from the weight of everything. It sits about perfect right now, just a very slight forward rake, which will sit level with a full load of camping or hunting gear, and not butt sag (I hope).
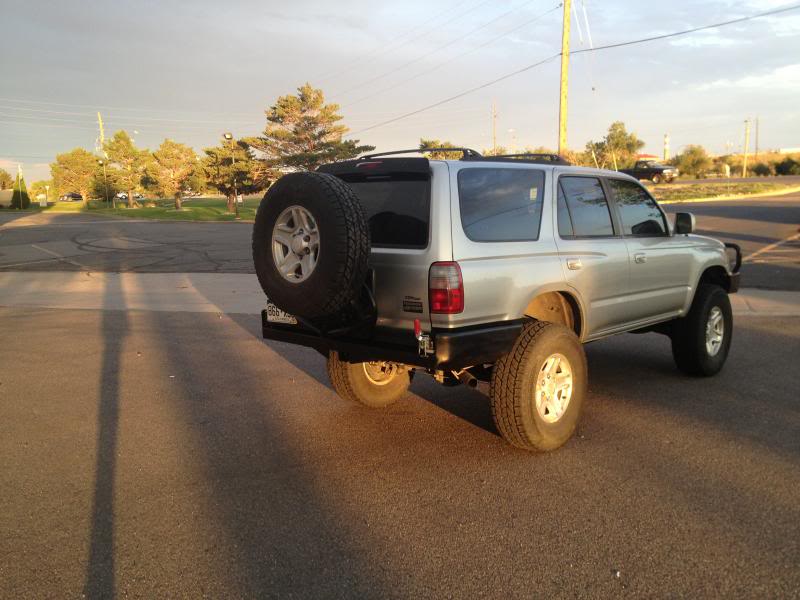
On saturday I removed my old man emu rear springs, and installed a set of FJ80 fronts to regain the height loss in the rear from the weight of everything. It sits about perfect right now, just a very slight forward rake, which will sit level with a full load of camping or hunting gear, and not butt sag (I hope).
Sep 4, 2013 | 12:53 PM
#27
Thread Starter
Contributing Member
Joined: Apr 2004
Posts: 5,464
Likes: 6
From: Arvada, Colorado
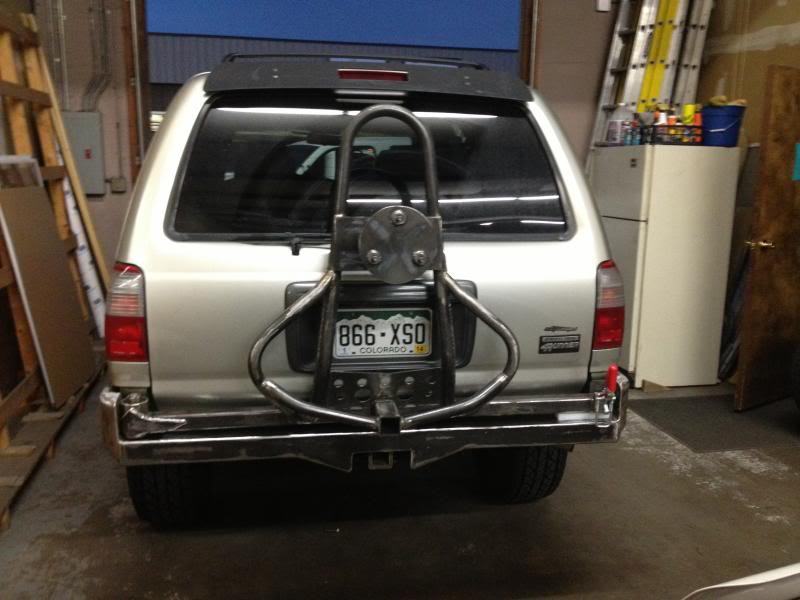
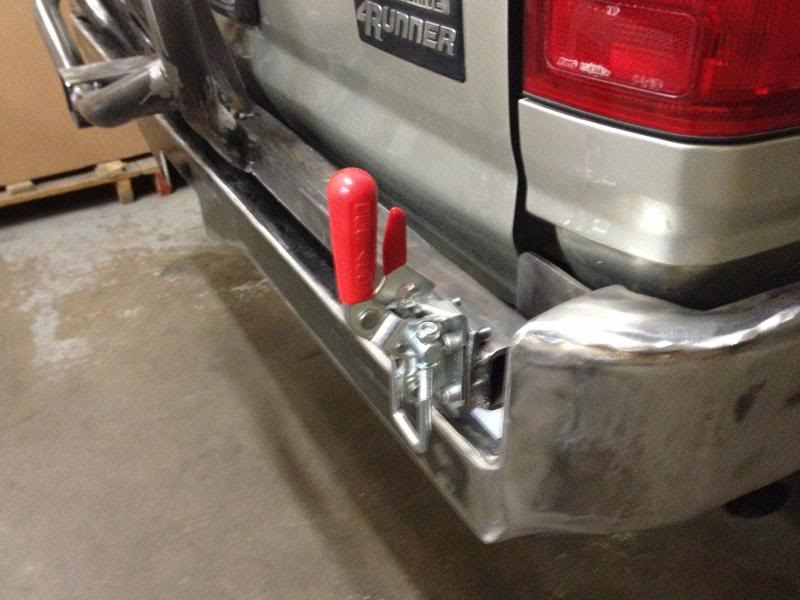
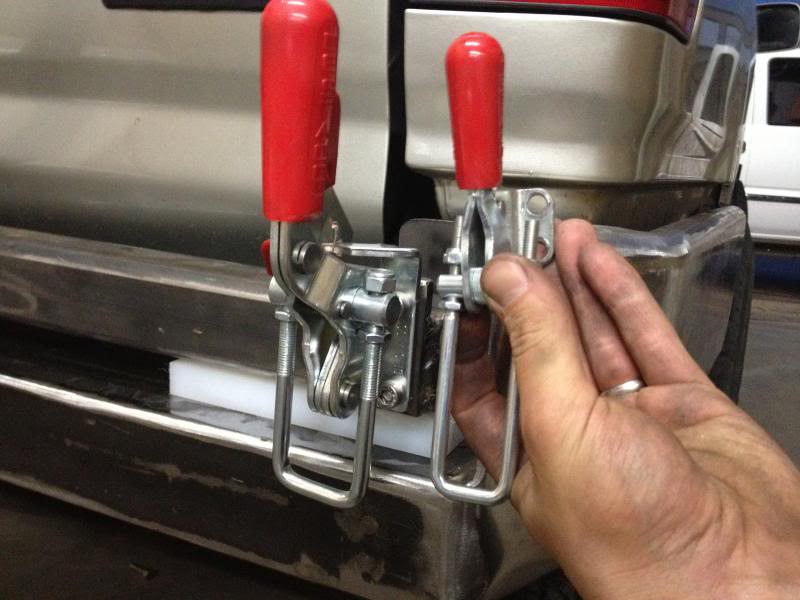
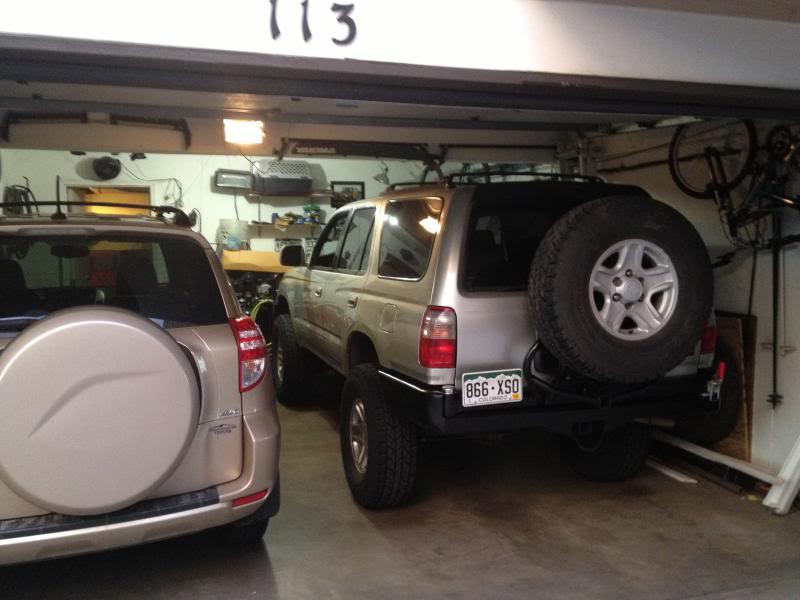
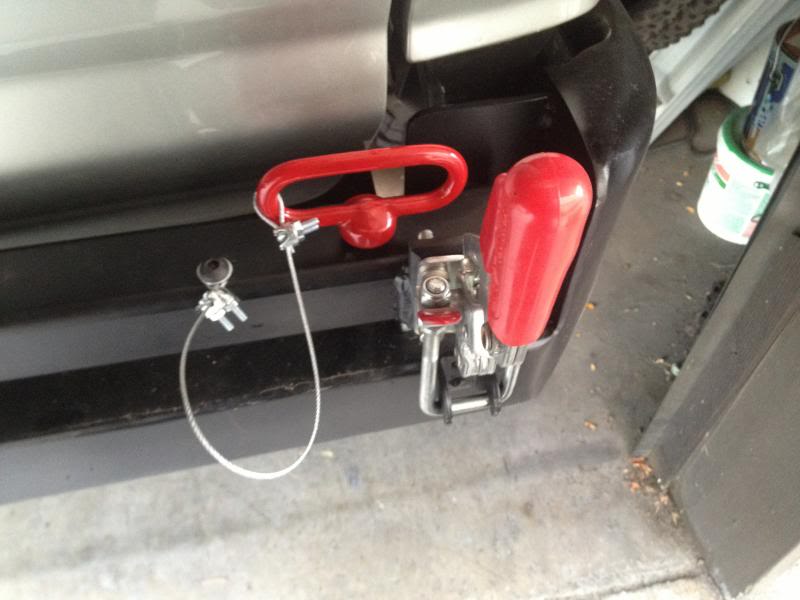
I added a safety pin just in case the latch fails. This also helps with movement on washboard roads, as the carrier slides back a bit, making releasing the latch difficult.
And, I finally got around to getting an extender for the bike rack and starting fitting all of that up to the carrier. Here are a couple shots of it closed and open.
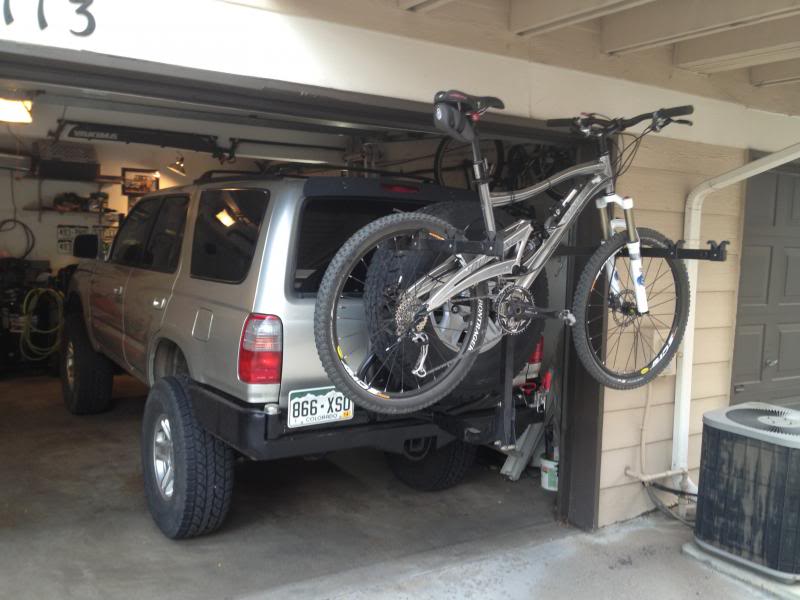
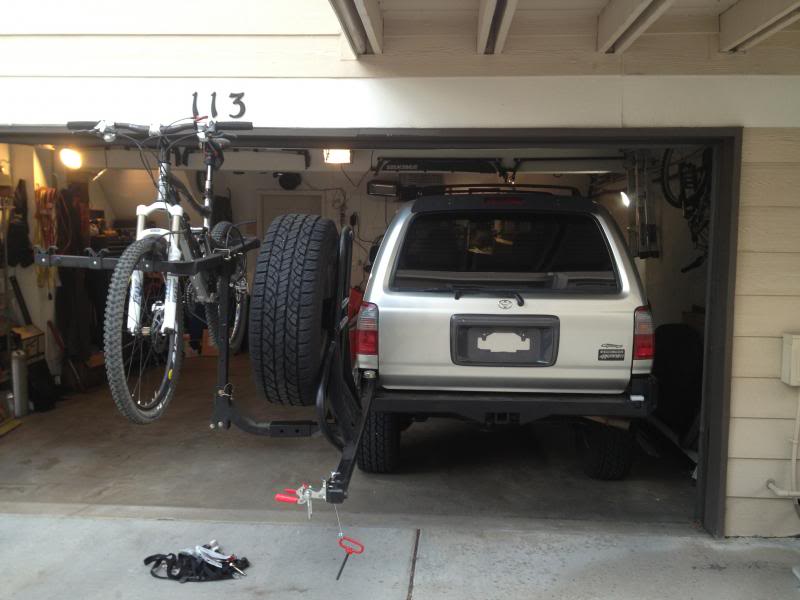
And, I finally got around to getting an extender for the bike rack and starting fitting all of that up to the carrier. Here are a couple shots of it closed and open.
Jul 2, 2014 | 10:38 AM
#30
Thread Starter
Contributing Member
Joined: Apr 2004
Posts: 5,464
Likes: 6
From: Arvada, Colorado
Been a little while, but I've made some more progress on the truck.
I found with the factory cup holders, the shifter did not allow for a full water bottle to be in the forward cup holder position. Fortunately, Marlin Crawler has a solution for that:
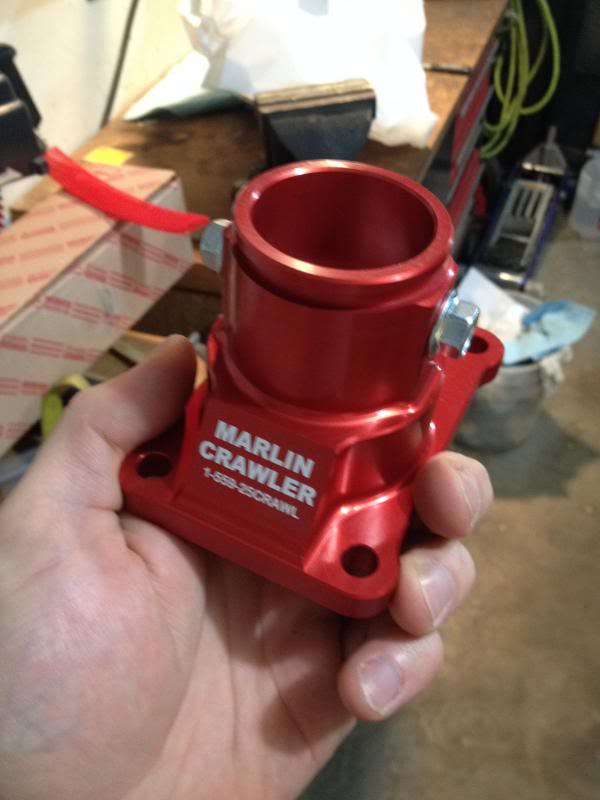
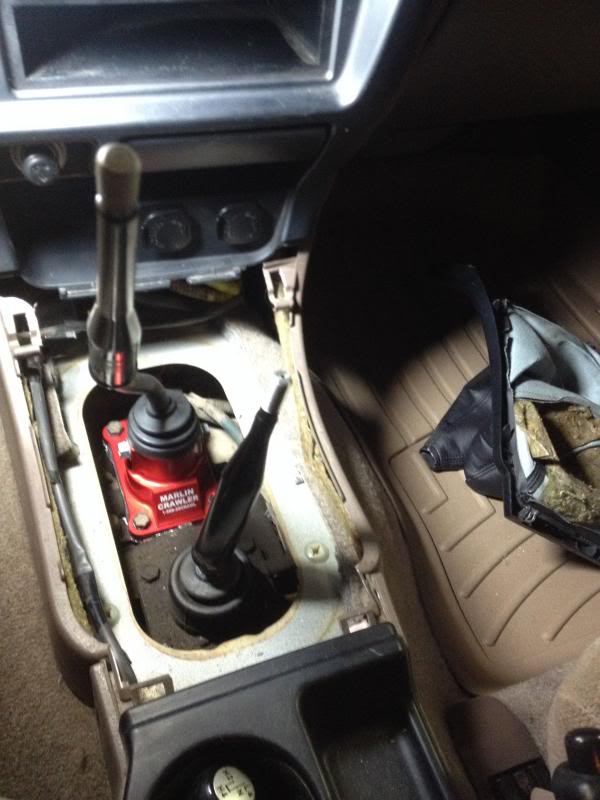
I very highly recommend this product. Really shortened the throw (as they claim), and it makes a huge difference in the usability of the center console area.
Second, I installed an M8000, and a set of Rigid Dually lights.
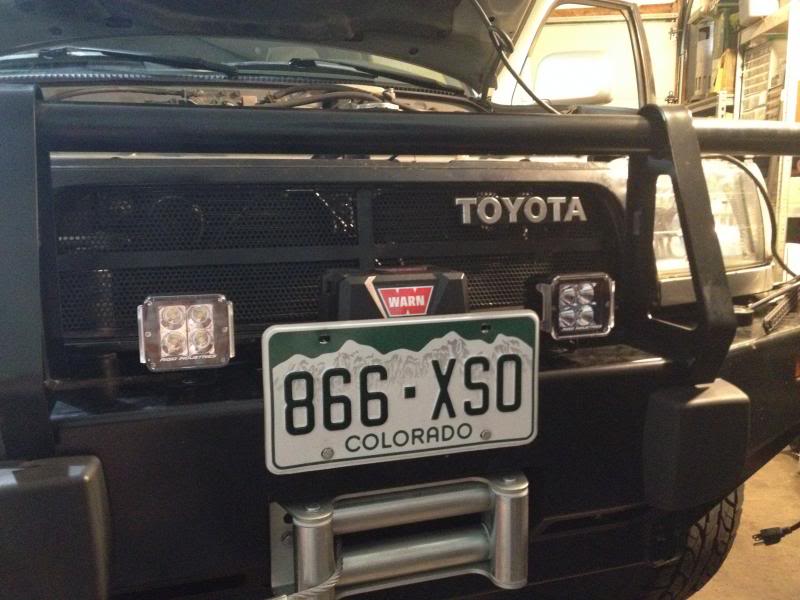
I have these wired to my high beams, so when the switch is on, they will turn off when I go to low beam. This way, I can use them out on the highway with ease, which is my primary use for them. I find the stock high beams to be lacking when out on long stretches of highway, especially in Utah. These improve the range quite a bit, and the color really helps to highlight the eyes of animals far in advance, which gives me more time for braking.
This spring, after several years of saving Amazon gift cards, I was able to get a fridge for my truck, something I've wanted for a very long time. To accommodate the fridge, I put in a shelf/slide system. I got many good suggestions from this site, but sadly, I am not wild about my first attempt:
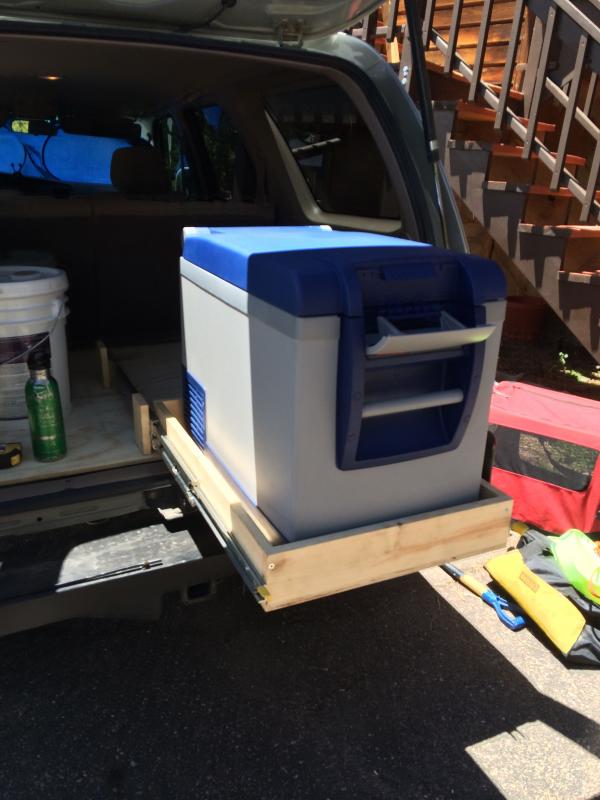
The idea was to make the truck able to both carry camping gear safely, and make it quick to pack/unpack.
While this does allow for everything to be safely strapped down, I find the hassle of getting this in and out of the truck to be a ROYAL pain. It takes 20 minutes just to get the whole thing in and assembled, and same for the reverse at the end of the trip.
I've had it out twice now, and while I like the overall idea, this just isn't cutting it. Besides, as it stands, I am still going to have to put things on the roof if I take more than one other person with me (my wife and I have to put our day packs in the backseat next to the dog).
I also used rather low grade plywood. This is not ideal, as it was warped, and very rough. I plan to make version two, once I have decided how best to correct the shortcomings of this design.
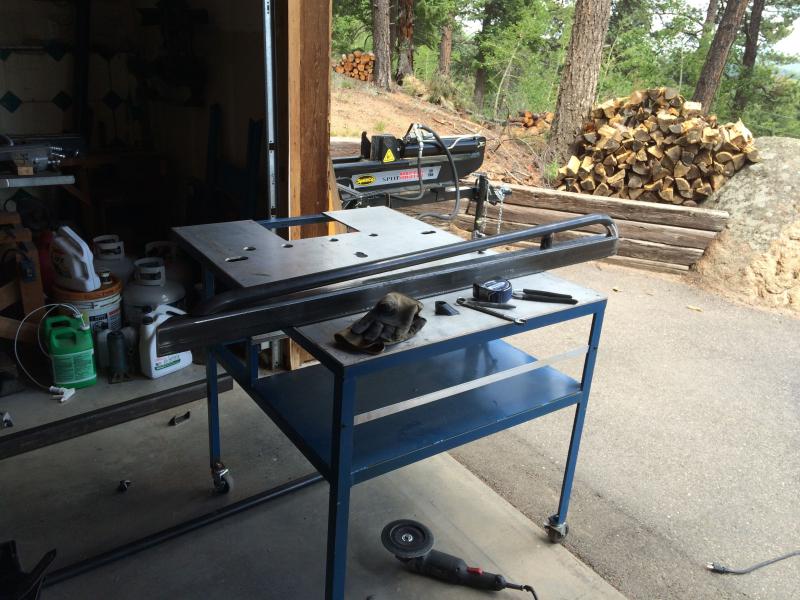
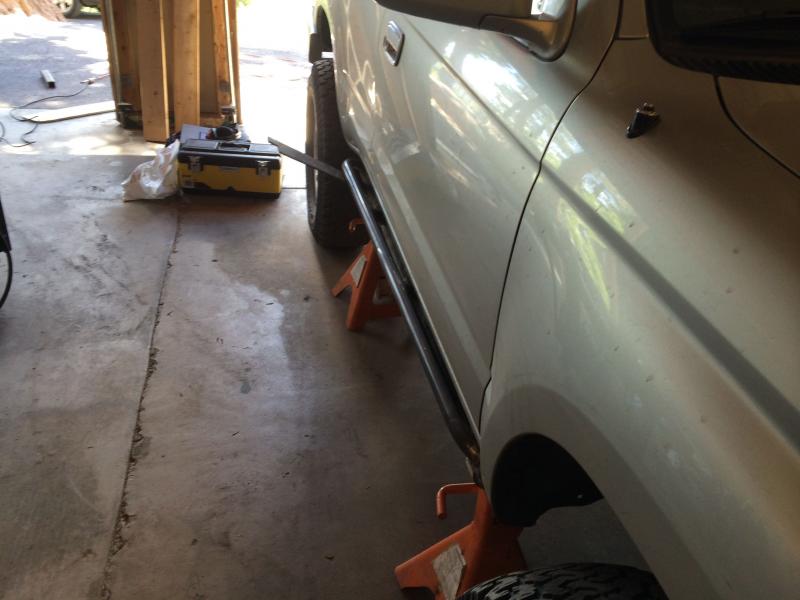
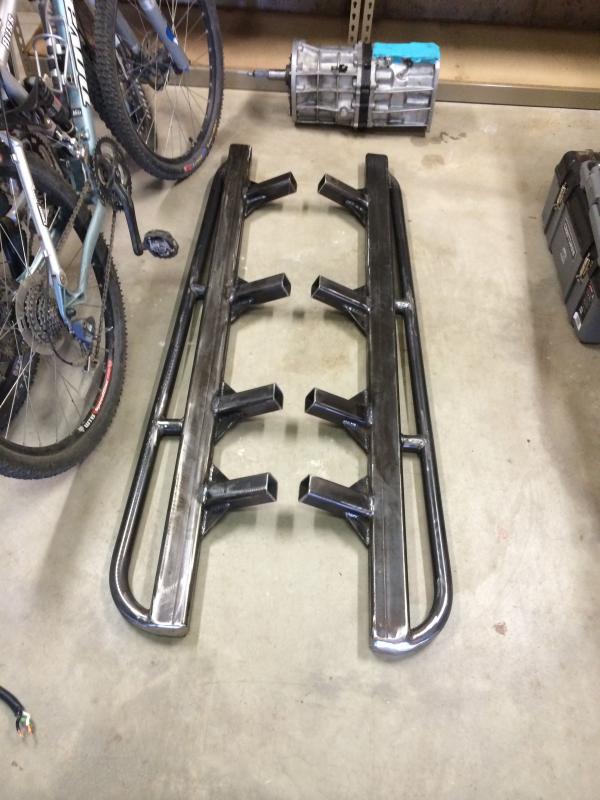
Lastly, I fabled some sliders up. They are at the powder coaters as of now. Very simple, and fairly low profile. I did not want them to stick out very far, as this truck is still a DD, and I also don't like the look of large sliders standing out. My old 4runner had every more tucked in sliders, and they work very well.
More on those when I get them back.
I found with the factory cup holders, the shifter did not allow for a full water bottle to be in the forward cup holder position. Fortunately, Marlin Crawler has a solution for that:
I very highly recommend this product. Really shortened the throw (as they claim), and it makes a huge difference in the usability of the center console area.
Second, I installed an M8000, and a set of Rigid Dually lights.
I have these wired to my high beams, so when the switch is on, they will turn off when I go to low beam. This way, I can use them out on the highway with ease, which is my primary use for them. I find the stock high beams to be lacking when out on long stretches of highway, especially in Utah. These improve the range quite a bit, and the color really helps to highlight the eyes of animals far in advance, which gives me more time for braking.
This spring, after several years of saving Amazon gift cards, I was able to get a fridge for my truck, something I've wanted for a very long time. To accommodate the fridge, I put in a shelf/slide system. I got many good suggestions from this site, but sadly, I am not wild about my first attempt:
The idea was to make the truck able to both carry camping gear safely, and make it quick to pack/unpack.
While this does allow for everything to be safely strapped down, I find the hassle of getting this in and out of the truck to be a ROYAL pain. It takes 20 minutes just to get the whole thing in and assembled, and same for the reverse at the end of the trip.
I've had it out twice now, and while I like the overall idea, this just isn't cutting it. Besides, as it stands, I am still going to have to put things on the roof if I take more than one other person with me (my wife and I have to put our day packs in the backseat next to the dog).
I also used rather low grade plywood. This is not ideal, as it was warped, and very rough. I plan to make version two, once I have decided how best to correct the shortcomings of this design.
Lastly, I fabled some sliders up. They are at the powder coaters as of now. Very simple, and fairly low profile. I did not want them to stick out very far, as this truck is still a DD, and I also don't like the look of large sliders standing out. My old 4runner had every more tucked in sliders, and they work very well.
More on those when I get them back.
Jul 2, 2014 | 11:48 AM
#31
Registered User
Joined: Jan 2011
Posts: 1,051
Likes: 0
From: Memphis, TN
This may sound ridiculous with all of your awesome fabrications and modifications, but do you have any additional pics of your grill? It doesn't look like the average Sitoshi (spelling?) type.
In any case, 4Runner oozes manliness! Great read
In any case, 4Runner oozes manliness! Great read
Jul 2, 2014 | 12:36 PM
#32
Thread Starter
Contributing Member
Joined: Apr 2004
Posts: 5,464
Likes: 6
From: Arvada, Colorado
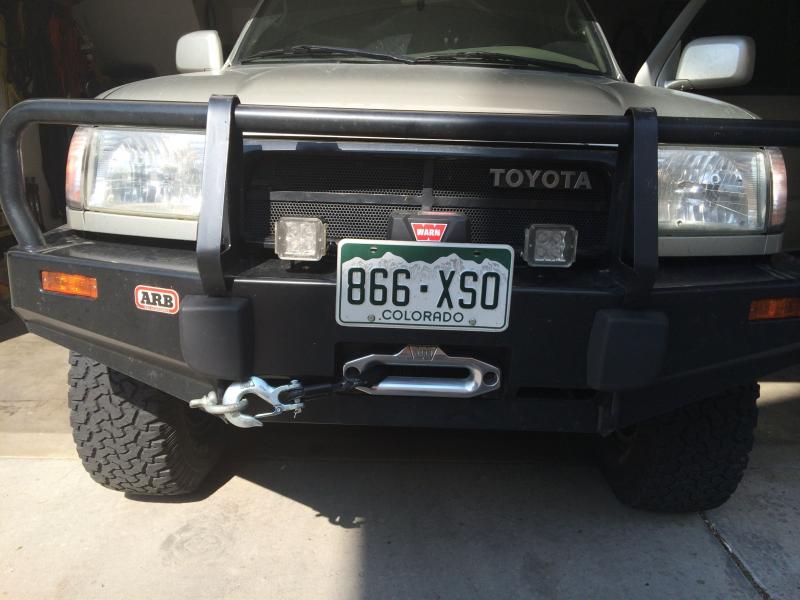
LOL, I get a lot of questions about that grill!
To answer, yes, it is a Satoshi style mod, except with a nod to the first gen 4runners. I loved my old first gen, so I kept some pieces of the old girl. I added the cross braces, and the first gen emblem to the grill.
If you notice, I have the "4Wheel Drive 4Runner" first gen badge on the back tailgate (along with the indications that the truck is abnormally aspirated ), and I have the first gen shifters on the trans and xfer case, though I realize I don't have any pictures of that.
I will take more pics, and post them up.
Cheers!
To answer, yes, it is a Satoshi style mod, except with a nod to the first gen 4runners. I loved my old first gen, so I kept some pieces of the old girl. I added the cross braces, and the first gen emblem to the grill.
If you notice, I have the "4Wheel Drive 4Runner" first gen badge on the back tailgate (along with the indications that the truck is abnormally aspirated
), and I have the first gen shifters on the trans and xfer case, though I realize I don't have any pictures of that.I will take more pics, and post them up.
Cheers!
Jul 3, 2014 | 08:12 AM
#33
Thread Starter
Contributing Member
Joined: Apr 2004
Posts: 5,464
Likes: 6
From: Arvada, Colorado
A couple of other modifications that I've found are really very useful, and may help others:
The first was my quest to stop the "wobble" in my front end. After lifting the truck, the steering wheel would vibrate horribly, especially on braking.
The PO had installed some crappy "lifetime" brake pads, which, as we all know, are perfect for warping rotors. So, I replaced the rotors, and pads, with OEM stuff. This fixed the braking problem, but not the wobble on the highway when driving normally.
So, naturally, the next thing I thought of was the rack. I replaced it with a Toyota rack, though I'm pretty sure they have these remanufactured these days. I also replaced the outer tie rods at this time, as the new rack comes with new inners. In addition, I bought a polyurethane bushing kit from Toytec lifts for the rack, and installed all of those at the same time.
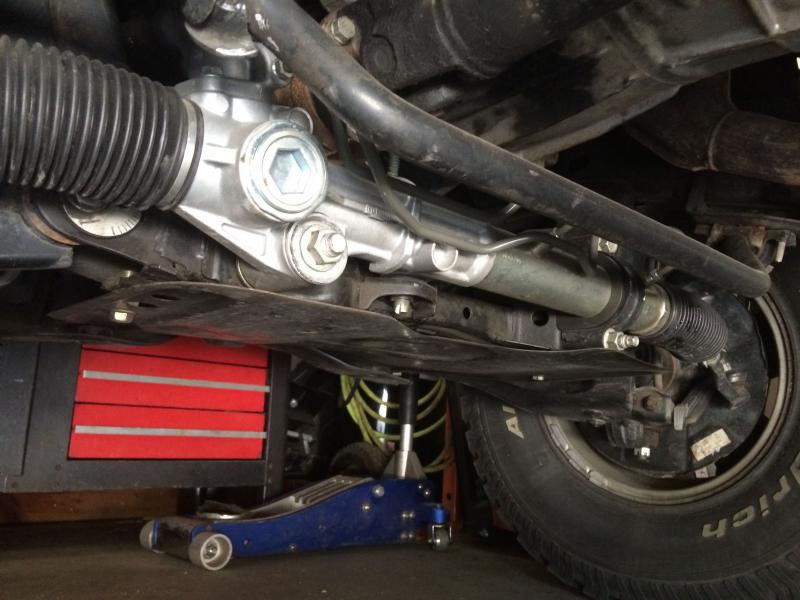
Not a very good picture, but the bushings are all poly now.
Anyway, the wobble was still there. After lots of reading, and a trip back to the alignment place, I found that my caster was at about 0, which is out of spec, and that this was a common problem with lifted 3rd gens (and it seems, newer tacos, as much of my reading centered around the 05+ taco's).
So, I started to look at upper control arms. I initially purchased a set of light racing arms, as they seemed perfect with their adjustability, stock style ball joint, and the price is pretty good. However, once I got them, I decided I didn't like the adjustability after all. The problem was, everything is held in place with a large nut and bolt, which seemed to me would need constant supervision to ensure that it didn't move. I didn't want to hassle with it, so I returned them. Instead, I went with the Icons.
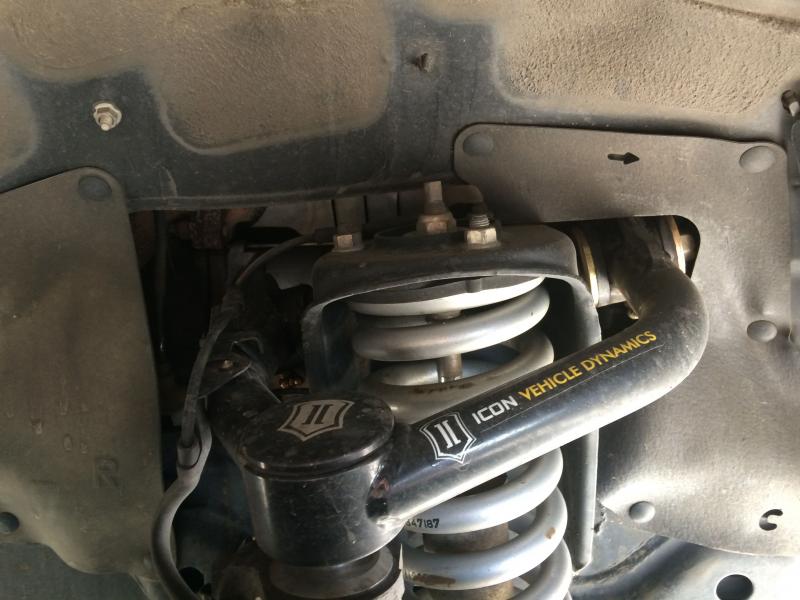
I chose these over other uniball style arms because of the ability to add the top cap (seen in the picture). In my reading, I noticed that many folks were concerned about dirt building up in the uniball and causing premature failure. The top is the place where dirt collects the most easily, so these seemed perfect with the caps providing protection and keeping dirt from accumulating in the well of the uniball. Time will tell if this works or not.
At the same time I did the upper arms, I also replaced the lower ball joints with OEM. They were not loose, but I've seen enough horror stories that I thought it was worth doing.
The upper arms have 2 deg of castor, enabling all alignment specs to be set to factory, and this, thankfully, fixed the wobble! The steering wheel is smooth and solid like it was when the truck was stock. Finally.
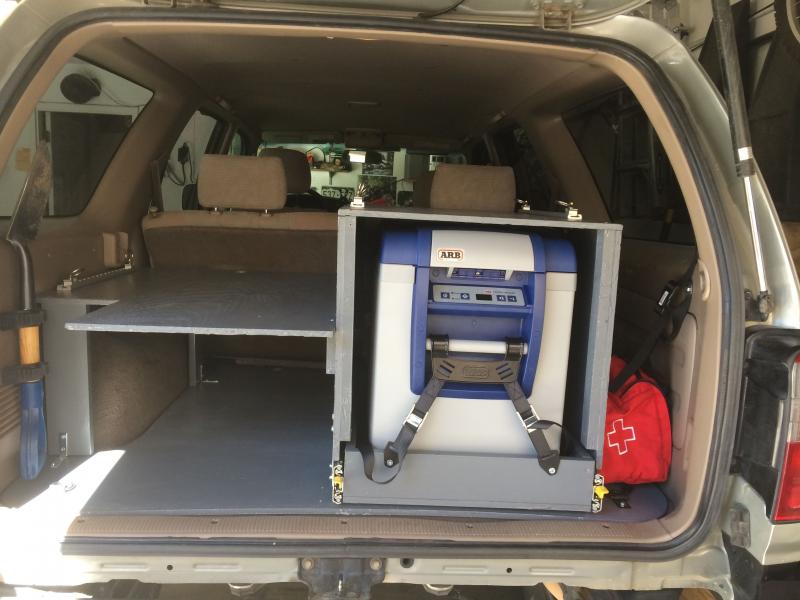
The second modification I found helpful I found online. This was for powering my fridge. Later model third gen 4runners started coming with a power outlet in the cargo area. However, this is accessory switched, and the fridge needs full time power. Someone online had the quick, cheap, thought of simply removing the relay under the hood, and putting a jumper on the hot leads:
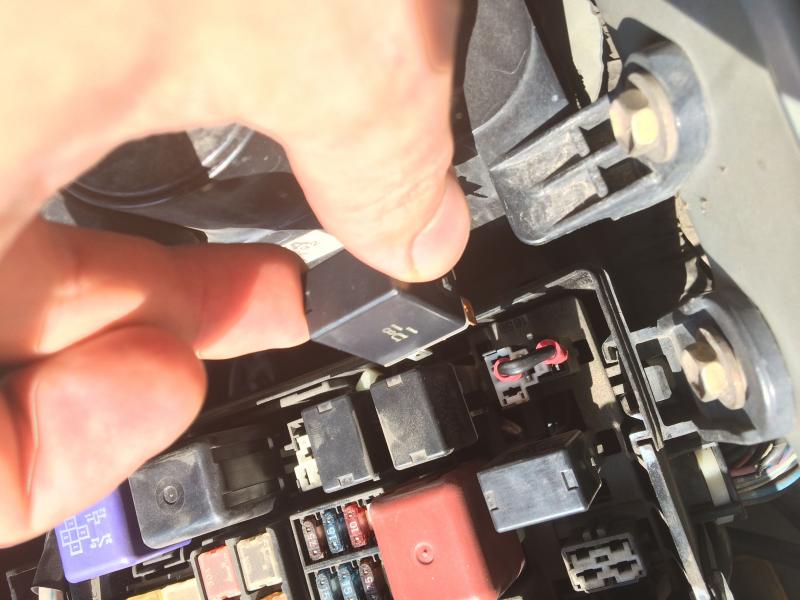
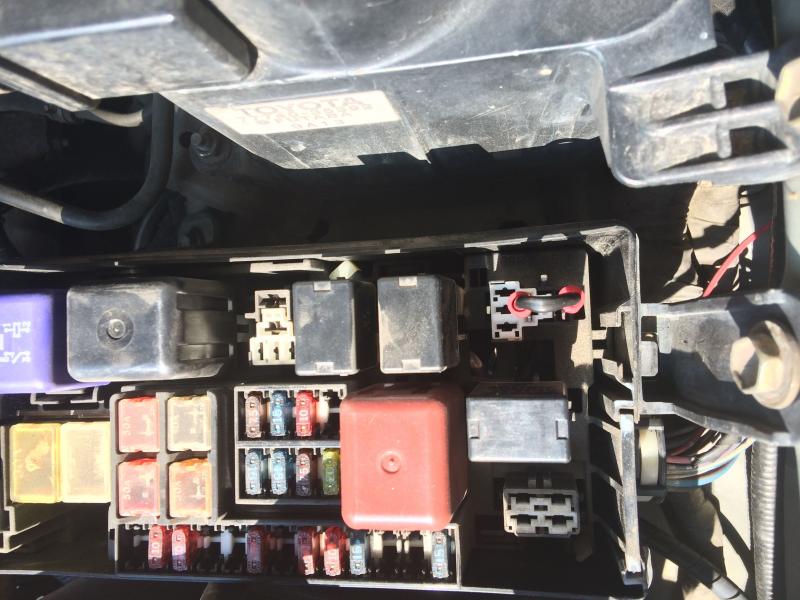
This works great. So far, I've only had the truck off for about 24 hours with the fridge on and keeping food cold, but there has been no issue with power drain. This ARB unit is very efficient.
The last mod is pretty basic, but we'll see. My M8000 came with steel cable. After seeing lots of info from Bill Burke, and talking to others, I decided to give synthetic line a go. I got the Warn Spydura rope, 100ft, so we'll see how well it does. I used the wire cable several times this past winter, and it was already kinked in several places. I have not used the synthetic line yet, but we'll see how it holds up over time compared to something like Viking or Masterpull.
The rope does fill the drum completely, though I think when wound under load, it will compress more. I also weighed the difference between the wire rope with roller fairlead, and the synthetic line and hawse, and it was about 22 lbs. More if you get a lightweight thimble instead of the hook. Still, not a huge weight savings, but certainly nicer to handle!
The first was my quest to stop the "wobble" in my front end. After lifting the truck, the steering wheel would vibrate horribly, especially on braking.
The PO had installed some crappy "lifetime" brake pads, which, as we all know, are perfect for warping rotors. So, I replaced the rotors, and pads, with OEM stuff. This fixed the braking problem, but not the wobble on the highway when driving normally.
So, naturally, the next thing I thought of was the rack. I replaced it with a Toyota rack, though I'm pretty sure they have these remanufactured these days. I also replaced the outer tie rods at this time, as the new rack comes with new inners. In addition, I bought a polyurethane bushing kit from Toytec lifts for the rack, and installed all of those at the same time.
Not a very good picture, but the bushings are all poly now.
Anyway, the wobble was still there. After lots of reading, and a trip back to the alignment place, I found that my caster was at about 0, which is out of spec, and that this was a common problem with lifted 3rd gens (and it seems, newer tacos, as much of my reading centered around the 05+ taco's).
So, I started to look at upper control arms. I initially purchased a set of light racing arms, as they seemed perfect with their adjustability, stock style ball joint, and the price is pretty good. However, once I got them, I decided I didn't like the adjustability after all. The problem was, everything is held in place with a large nut and bolt, which seemed to me would need constant supervision to ensure that it didn't move. I didn't want to hassle with it, so I returned them. Instead, I went with the Icons.
I chose these over other uniball style arms because of the ability to add the top cap (seen in the picture). In my reading, I noticed that many folks were concerned about dirt building up in the uniball and causing premature failure. The top is the place where dirt collects the most easily, so these seemed perfect with the caps providing protection and keeping dirt from accumulating in the well of the uniball. Time will tell if this works or not.
At the same time I did the upper arms, I also replaced the lower ball joints with OEM. They were not loose, but I've seen enough horror stories that I thought it was worth doing.
The upper arms have 2 deg of castor, enabling all alignment specs to be set to factory, and this, thankfully, fixed the wobble! The steering wheel is smooth and solid like it was when the truck was stock. Finally.
The second modification I found helpful I found online. This was for powering my fridge. Later model third gen 4runners started coming with a power outlet in the cargo area. However, this is accessory switched, and the fridge needs full time power. Someone online had the quick, cheap, thought of simply removing the relay under the hood, and putting a jumper on the hot leads:
This works great. So far, I've only had the truck off for about 24 hours with the fridge on and keeping food cold, but there has been no issue with power drain. This ARB unit is very efficient.
The last mod is pretty basic, but we'll see. My M8000 came with steel cable. After seeing lots of info from Bill Burke, and talking to others, I decided to give synthetic line a go. I got the Warn Spydura rope, 100ft, so we'll see how well it does. I used the wire cable several times this past winter, and it was already kinked in several places. I have not used the synthetic line yet, but we'll see how it holds up over time compared to something like Viking or Masterpull.
The rope does fill the drum completely, though I think when wound under load, it will compress more. I also weighed the difference between the wire rope with roller fairlead, and the synthetic line and hawse, and it was about 22 lbs. More if you get a lightweight thimble instead of the hook. Still, not a huge weight savings, but certainly nicer to handle!
Jul 3, 2014 | 08:12 AM
#34
Thread Starter
Contributing Member
Joined: Apr 2004
Posts: 5,464
Likes: 6
From: Arvada, Colorado
The last "fix" I don't have any shots of.
Like many IFS drivers, once the truck was lifted, the front CV boots tore. I, like other third gen 4runner/first gen taco owners, replaced the axles and had a bad, leaking passenger side diff seal.
I replaced with OEM remans, and put in probably 5 different seals, all to no avail. After reading online, I tried the Two Seal approach, essentially putting in two of the passenger side diff seals in, as there is plenty of room for them. This worked, and I no longer leak gear oil from the passenger side tube.
I know others have been able to get brand new axles, instead of remans, but, 1. they are pricey, and 2., it seems to be very difficult to get a hold of a new axle any more. Most dealers will tell you they don't exist. This fix seems to work well, and saves the hassle and expense of having to track down a new axle.
Apr 19, 2015 | 07:49 AM
#35
Thread Starter
Contributing Member
Joined: Apr 2004
Posts: 5,464
Likes: 6
From: Arvada, Colorado
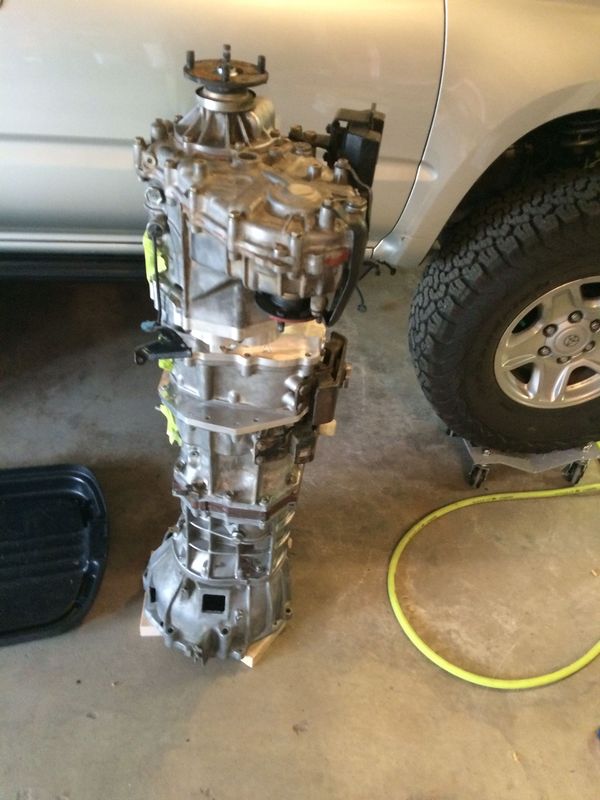
Installed Dual Cases in the truck. On this truck, I left both cases stock, which puts the final crawl ratio at 3.9x2.3x2.7x4.3 ~ 104:1. Plenty slow for this truck.
What I like about this modification is the ability to really go slowly through rough sections especially when fully loaded with gear. I love to go to eastern Utah, and many backroads out there are miles of fairly mild terrain for which stock low is great, punctuated by sections with sandstone ledges, washouts, or other obstacles which with the stock low, you end up bouncing through or up or down, which isn't always fun for my passengers, and can dislodge gear, and I always feel is rough on the steering components. The double low allows for much more control on descents, ascents and in addition, when going through something sketchy, allows me more control, and at least gives me the illusion of lessening the impacts on the truck.
In addition, the movement of the rear case backward shortens the rear driveshaft, which tucks it up more, and keeps it out of the rocks.
The downside: I lost my front cupholder. I only used it as a wallet/cell phone catch, so I have just resorted to the center console for those when not in my pockets.
Well, on with the pictures.
Pull the trans and t-case:
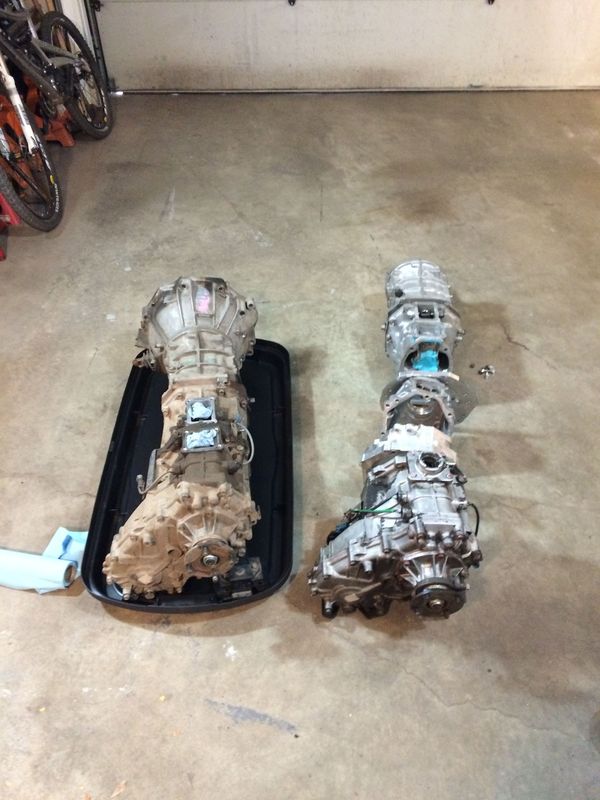
Adding the second tcase makes everything really long I had to pull the gas tank crossmember on the truck to get everything in:
Had a good time learning to use my new finger press break from Swag:
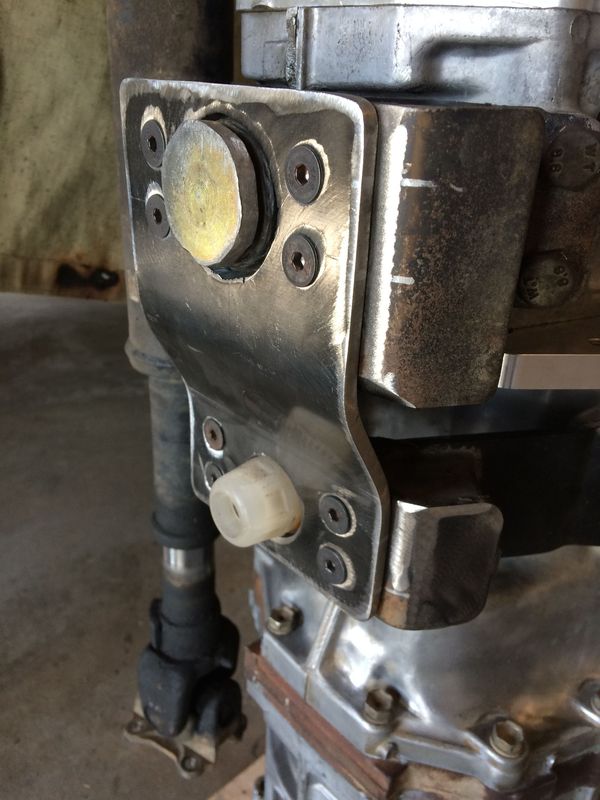
I decided to use dual mounts to prevent the crawl case from getting over torqued by the added weight.
Went geriatric and had a lot of trouble with puddle control (bad joke, sorry. I was struggling to get nice, consistent travel speed so the beads laid down symmetrically. Need more practice) But still managed to get everything together.
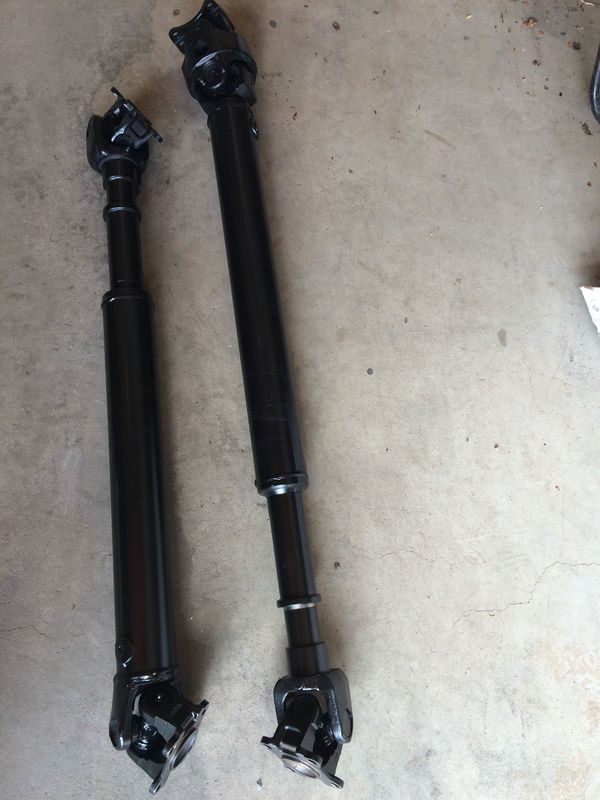
Had the drivelines fully rebuilt, and retubed to the new lengths. Thicker with new joints and a new set of splines on the rear shaft (they were shot, which was a real bummer, as that doubled the cost of the mods).
Also, brand new OEM clutch, pilot, and throwout bearing were installed, and the whole clutch system was drained and bled.
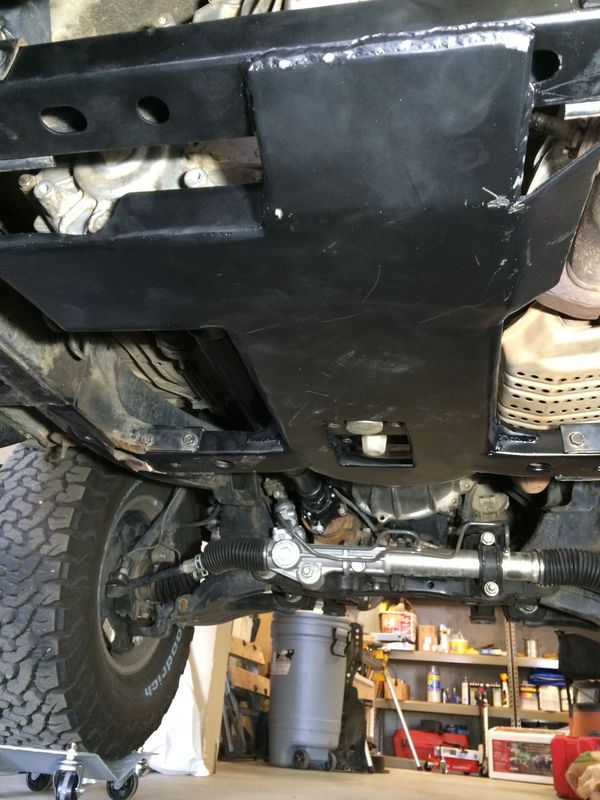
My motto: Grinders and Paint make Welders that Aint! Or at least in my case. I used the factory mounts for now. I was running short on time, and I also am not sure if I like the skid plate at all. I also did not want to pull fuel and brake lines off to get at the driver side frame to plate and weld at this time, so I kept it stock. Its all 3/16 and 1/4" plate, and it is tied in a the front and rear crossmembers, so the transfer cases and transmission are well shielded
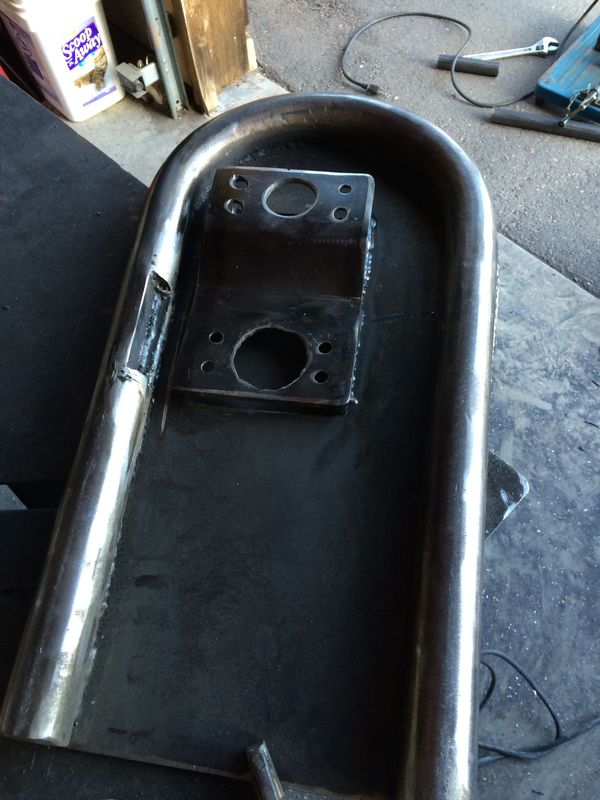
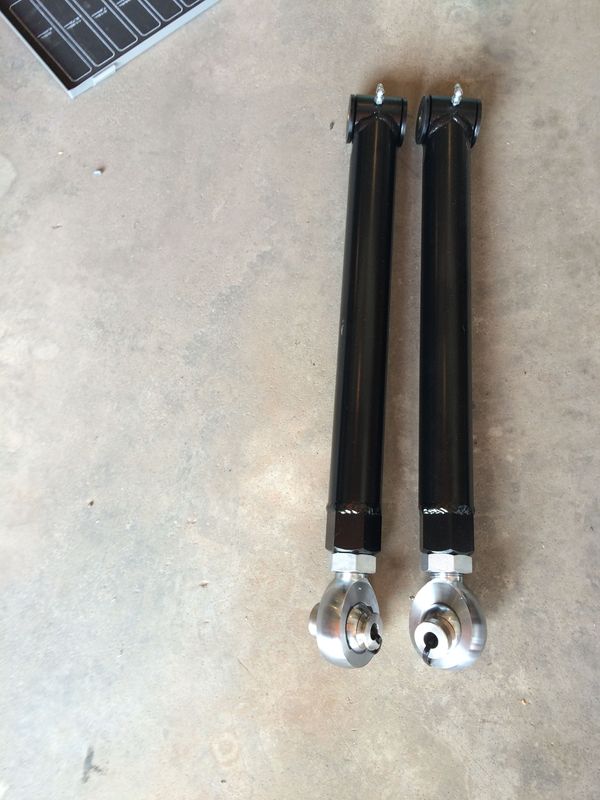
Got some new lower control arms for the rear (2" .250 wall DOM with 1.25" heims) for strength and to fix the pinion angle back to 1 or 2 degrees to get rid of any potential vibes: don't want that pinion bearing to crap out! Ran out of time, so bought, not built.
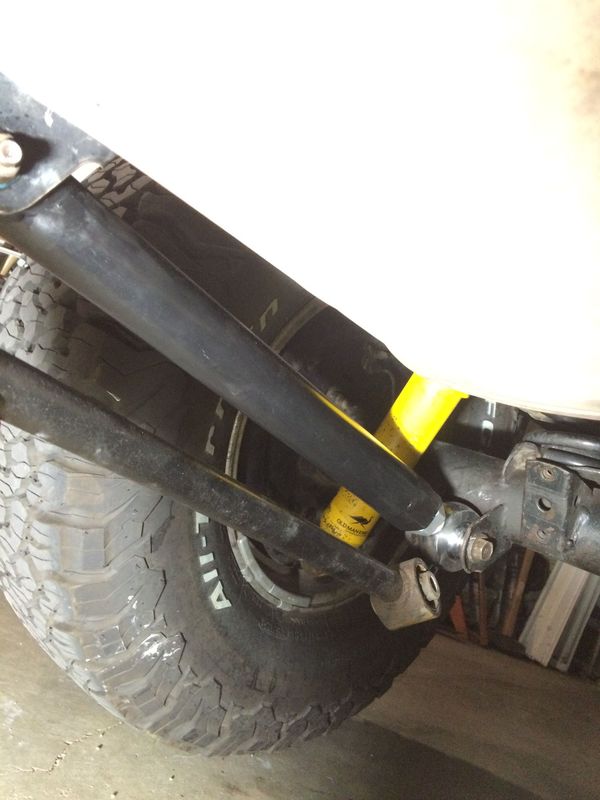
Got them installed:
And finally, I need to do a *little* more tweaking to get the shifter in the back just right, but its in, and functional:
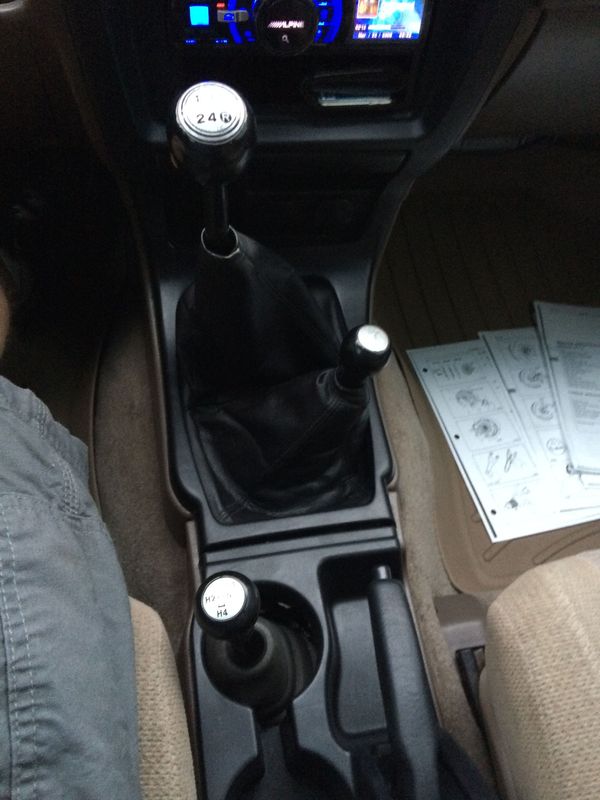
Mainly, when I put the truck on Cruise, I like to pull my leg back to change angles on long drives. The shifter hits my leg and is annoying. I plan to bend it a bit more and I will finish the console with a leather boot once everything is in place and to my satisfaction.
Now I can go nice and sloooowwww.
What I like about this modification is the ability to really go slowly through rough sections especially when fully loaded with gear. I love to go to eastern Utah, and many backroads out there are miles of fairly mild terrain for which stock low is great, punctuated by sections with sandstone ledges, washouts, or other obstacles which with the stock low, you end up bouncing through or up or down, which isn't always fun for my passengers, and can dislodge gear, and I always feel is rough on the steering components. The double low allows for much more control on descents, ascents and in addition, when going through something sketchy, allows me more control, and at least gives me the illusion of lessening the impacts on the truck.
In addition, the movement of the rear case backward shortens the rear driveshaft, which tucks it up more, and keeps it out of the rocks.
The downside: I lost my front cupholder. I only used it as a wallet/cell phone catch, so I have just resorted to the center console for those when not in my pockets.
Well, on with the pictures.
Pull the trans and t-case:
Adding the second tcase makes everything really long I had to pull the gas tank crossmember on the truck to get everything in:
Had a good time learning to use my new finger press break from Swag:
I decided to use dual mounts to prevent the crawl case from getting over torqued by the added weight.
Went geriatric and had a lot of trouble with puddle control (bad joke, sorry. I was struggling to get nice, consistent travel speed so the beads laid down symmetrically. Need more practice)
But still managed to get everything together.Had the drivelines fully rebuilt, and retubed to the new lengths. Thicker with new joints and a new set of splines on the rear shaft (they were shot, which was a real bummer, as that doubled the cost of the mods).
Also, brand new OEM clutch, pilot, and throwout bearing were installed, and the whole clutch system was drained and bled.
My motto: Grinders and Paint make Welders that Aint! Or at least in my case. I used the factory mounts for now. I was running short on time, and I also am not sure if I like the skid plate at all. I also did not want to pull fuel and brake lines off to get at the driver side frame to plate and weld at this time, so I kept it stock. Its all 3/16 and 1/4" plate, and it is tied in a the front and rear crossmembers, so the transfer cases and transmission are well shielded
Got some new lower control arms for the rear (2" .250 wall DOM with 1.25" heims) for strength and to fix the pinion angle back to 1 or 2 degrees to get rid of any potential vibes: don't want that pinion bearing to crap out! Ran out of time, so bought, not built.
Got them installed:
And finally, I need to do a *little* more tweaking to get the shifter in the back just right, but its in, and functional:
Mainly, when I put the truck on Cruise, I like to pull my leg back to change angles on long drives. The shifter hits my leg and is annoying. I plan to bend it a bit more and I will finish the console with a leather boot once everything is in place and to my satisfaction.
Now I can go nice and sloooowwww.
Apr 19, 2015 | 08:29 AM
#36
Contributing Member


Joined: Sep 2005
Posts: 8,246
Likes: 497
From: mo
Oh man! Don't know how I missed this build...all I can say is...is....is...WOW.
Bumper looks sweet, love the solution for the bike rack, low on the tire rack like it is- how's that extender working on the washboard w/ bikes on board?
Also a bit jealous of the extra t-case. That's going to be a nice on trail addition!
Bumper looks sweet, love the solution for the bike rack, low on the tire rack like it is- how's that extender working on the washboard w/ bikes on board?
Also a bit jealous of the extra t-case. That's going to be a nice on trail addition!
Apr 19, 2015 | 07:13 PM
#37
Thread Starter
Contributing Member
Joined: Apr 2004
Posts: 5,464
Likes: 6
From: Arvada, Colorado
Oh man! Don't know how I missed this build...all I can say is...is....is...WOW.
Bumper looks sweet, love the solution for the bike rack, low on the tire rack like it is- how's that extender working on the washboard w/ bikes on board?
Also a bit jealous of the extra t-case. That's going to be a nice on trail addition!
Bumper looks sweet, love the solution for the bike rack, low on the tire rack like it is- how's that extender working on the washboard w/ bikes on board?
Also a bit jealous of the extra t-case. That's going to be a nice on trail addition!
The extender works fine on the washboards. Its definitely a bit more wobbly with it though. Noticeable, but not bad.
On my brother's LandCruiser, I am going to put the swing arm in double shear, which should give the whole assembly with bikes more stability, as well as the tire by itself.
I'm hoping the extra case does well. I got spoiled by my old truck with dual cases.
Apr 20, 2015 | 12:47 AM
#38
Nice install on the cases.
Have you redone your fridge set up or just dealing with the wood and the time it takes to install?
Any issues with the synthetic rope? I have heard from a couple of guys i have gone on runs with that the winch drum has heated up to the point of damaging the rope on the inner two wraps.
I ask because i I know you make use of your winch i,am finally getting mine mounted and am on the fence about getting synthetic rope.
Apr 20, 2015 | 05:40 AM
#39
Thread Starter
Contributing Member
Joined: Apr 2004
Posts: 5,464
Likes: 6
From: Arvada, Colorado
Nice install on the cases.
Have you redone your fridge set up or just dealing with the wood and the time it takes to install?
Any issues with the synthetic rope? I have heard from a couple of guys i have gone on runs with that the winch drum has heated up to the point of damaging the rope on the inner two wraps.
I ask because i I know you make use of your winch i,am finally getting mine mounted and am on the fence about getting synthetic rope.
Have you redone your fridge set up or just dealing with the wood and the time it takes to install?
Any issues with the synthetic rope? I have heard from a couple of guys i have gone on runs with that the winch drum has heated up to the point of damaging the rope on the inner two wraps.
I ask because i I know you make use of your winch i,am finally getting mine mounted and am on the fence about getting synthetic rope.
. For now I am making do with the wood. It works fine, its just cumbersome. What I have been doing is assembling it a couple days before departure for a trip, and just running around town with it empty. Same on return. Empty the truck and then a day or two later, disassemble the cargo stuff. I have not had any issues with the rope, but I've only done short pulls with it: need to winch forward about 2 feet, then just respool, which does not heat the drum very much. However, I would check out Bill Burke's website, which I read a bunch on before getting the winch and switching to rope. He uses synthetic, though a different brand. He winches most weekends, and winches a lot, as that is his business. I figure, if it works for him, its probably going to work for me.
The inner wrap of the drum is a different weave or material. I'm not sure what it is, but it is much stiffer, a different color, and seems to have a coating on it. I don't know if that is common to all brands of synthetic line, or just the Warn.
However, I REALLY like it. It is much easier to use than the cable, though you do need to use care around rocks. The sleeve that comes with it works great, though I've only used it once. I just snugged up the winch line, slid the sleeve over the line where it was up against a rock, and winched. Sleeve protected the line perfectly.
Apr 20, 2015 | 04:31 PM
#40
Contributing Member
Joined: Sep 2005
Posts: 8,246
Likes: 497
From: mo


