
Low Profile Cargo Box 3rd Gen
 Oct 5, 2007 | 05:58 PM
#42
Thread Starter
Contributing Member
Joined: Aug 2006
Posts: 271
Likes: 2
From: Denver, CO
Not sure how well they will hold up yet, should be OK. They are rated at 200lbs per drawer. With the heavy steel and ball bearing construction I think they will be fine but 10 - 20k miles and some trail riding will probably tell a lot.
They are very easy to use. I wish I would have done this with my 2nd gen.
lol Show me a thread that doesn't wander. That'll be a day to mark in YT history. I wish I could say I've never done the same.
Last edited by glenyoshida; Oct 5, 2007 at 06:02 PM.
Oct 8, 2007 | 09:21 AM
#44
I was just admiring the set up that you help Ric out with. Outstanding work...
Ric said to contact you for some ideas on something similar for my '81 Trekker. With what you have come up with, I think you could help me out..Cogs are turning now
Ric said to contact you for some ideas on something similar for my '81 Trekker. With what you have come up with, I think you could help me out..Cogs are turning now
Oct 8, 2007 | 12:24 PM
#45
Thread Starter
Contributing Member
Joined: Aug 2006
Posts: 271
Likes: 2
From: Denver, CO
One thing I've been kicking around for a distant future 4Runner project, that might also work for your Trekker, is to add overhead storage similar to what you see in airplanes. That way you can still keep the head height were it's needed and gain a little extra storage. I think those little spaces can really start to add up.
Really rough sketch. Ugly drawing, but you get the idea.

Kind of a lot of work to get it to fit with the contours of the walls and roof but when you only have so much room to work with...
In my 4Runner I could make those overhead bins about 3.5" x 8" x 55". Some of the space is gone from the curve of the roof but there's still about 2145 cubic inches (1.25 cuft) available for things like non-perishable foods, fishing poles, or small items that you want to get at night without moving stuff around, whatever. Dry food wise there's easily enough room for a week or more of food.
Sorry I'm not of a whole lot of help here I'm just not that familiar with the Trekker.
BTW if anyone wants to beat me to this and pioneer the idea, you can use the 5 torx screws on each luggage rail to hold up the overhead bins. Well, you would need to get longer screws but at least it's an easy way to mount the thing securely.
Oct 8, 2007 | 12:33 PM
#47
Thanks, I really like Ric's cargo box. I'm envious of the mass amounts of storage. It was fun to work on and help out with.
I think Ric might have been just thinking of the low profile cargo box in this thread.
One thing I've been kicking around for a distant future 4Runner project, that might also work for your Trekker, is to add overhead storage similar to what you see in airplanes. That way you can still keep the head height were it's needed and gain a little extra storage. I think those little spaces can really start to add up.
Really rough sketch. Ugly drawing, but you get the idea.
Kind of a lot of work to get it to fit with the contours of the walls and roof but when you only have so much room to work with...
In my 4Runner I could make those overhead bins about 3.5" x 8" x 55". Some of the space is gone from the curve of the roof but there's still about 2145 cubic inches (1.25 cuft) available for things like non-perishable foods, fishing poles, or small items that you want to get at night without moving stuff around, whatever. Dry food wise there's easily enough room for a week or more of food.
Sorry I'm not of a whole lot of help here I'm just not that familiar with the Trekker.
BTW if anyone wants to beat me to this and pioneer the idea, you can use the 5 torx screws on each luggage rail to hold up the overhead bins. Well, you would need to get longer screws but at least it's an easy way to mount the thing securely.
You would be surprised at how many Toyota owners that I run into that are not that familar with the Trekker, they are suprised when they find out it was converted by Winnebago

Thanks for the ideas
 Oct 8, 2007 | 12:44 PM
#48
Getting it organized the first time is like playing tetris with the gear but like I said, I'm lazy, so I wouldn't be happy unless I could get it to fit in a way where everything is still easy and convenient to get to. Oh, I should qualify, it all fits but without the back seats like I have. Otherwise the the 48" Hi-lift, 8 lb fire extinguisher, pot, Coleman lantern, roll of shop paper towels, and director's chair have to go somewhere else.
 Oct 8, 2007 | 01:44 PM
#50
Contributing Member
Joined: Nov 2006
Posts: 1,434
Likes: 0
From: GSU/ATL/SD
better hope the wabbit doesn't see that 
and under the seats is too cliche, officer's first instinct to look there. if the sacks small enough crack open the sunroof and when the deflector pops out slide it under there, then close and voila!!
and under the seats is too cliche, officer's first instinct to look there. if the sacks small enough crack open the sunroof and when the deflector pops out slide it under there, then close and voila!!
Last edited by MillerPKA; Oct 8, 2007 at 01:48 PM.
Oct 8, 2007 | 01:52 PM
#51
Contributing Member

Joined: Apr 2007
Posts: 4,932
Likes: 1
From: DFW TEXAS BABY!
You sound as if you have experiance with this... lol
Oct 8, 2007 | 05:21 PM
#52
Contributing Member
Joined: Nov 2006
Posts: 1,434
Likes: 0
From: GSU/ATL/SD
i did once upon a time, it's the best place to hide it bar none...just don't try squeezing a bunch in there or you'll end up breaking something...okay back on topic i think this started with something like a cargo box or something 
Oct 22, 2007 | 09:52 PM
#53
Thread Starter
Contributing Member
Joined: Aug 2006
Posts: 271
Likes: 2
From: Denver, CO
Geez I didn't realize how many things are not really measurable. I started drawing the cargo box plans and kept running into things that have compounding curves or didn't have a good reference point to base from.
I gave up after trying a couple of different ways to draw it up. My lack of artistic ability didn't help either.
Sorry, I know this isn't much info but if you do end up making one and have a specific question I'll do my best to answer it.
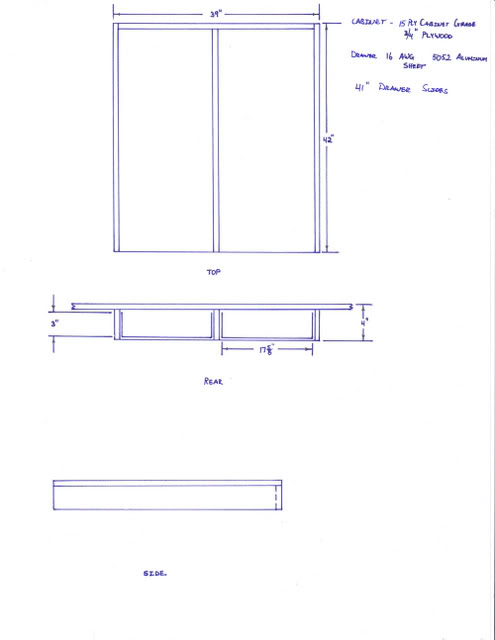
Below is the general dimensions for the cargo box and the drawers.
A couple of things that I think might help out:
You can go 39.0 inches wide for the box and it will still fit in between the wheel wells. If you want 3 inches of depth in the drawers you should make it at least 4 inches high for the thickness of the plywood and the space above and below the drawers. I used cardboard to make the hinged panel board and the cargo box top.
Downloadable Printable Version in PDF Format
I gave up after trying a couple of different ways to draw it up. My lack of artistic ability didn't help either.
Sorry, I know this isn't much info but if you do end up making one and have a specific question I'll do my best to answer it.
Below is the general dimensions for the cargo box and the drawers.
A couple of things that I think might help out:
You can go 39.0 inches wide for the box and it will still fit in between the wheel wells. If you want 3 inches of depth in the drawers you should make it at least 4 inches high for the thickness of the plywood and the space above and below the drawers. I used cardboard to make the hinged panel board and the cargo box top.
Downloadable Printable Version in PDF Format
Last edited by glenyoshida; Oct 28, 2007 at 04:01 AM.
Oct 23, 2007 | 06:19 AM
#54
Contributing Member
Joined: Apr 2007
Posts: 4,932
Likes: 1
From: DFW TEXAS BABY!
Hey that is a whole lot better than nothing! Now if you ever have to take the cago box out just be sure to take some pics from under it and of it from differnt angles. Since i won't have time until next year to build it anyways i should be able to fgiure it out by then.
Mar 19, 2008 | 10:24 PM
#56
Thread Starter
Contributing Member
Joined: Aug 2006
Posts: 271
Likes: 2
From: Denver, CO
If you use the same slides that I did, the stove would be no problem but I think the hi-lift might be a bit much unless you make your drawers in a way that won't vibrate when you are going down the road or trail.
I used 200 lbs slides and most companies rate the slides assuming a distributed load not a point load. I mention this in case you were planning on putting the hi-lift at the front of the drawer. If you used the same slides that I did I think your drawer slides might fail prematurely. It's not uncommon to have forces over two G's and that would make your 30 lb Hi-lift (assuming you have a 48" jack) generate forces of over 60 lbs on top of all the other gear in your drawer.
That said I have a lot of gear in my cargo box and it's probably carrying 100lbs and shows no signs of being overloaded. I hope this helps.
Last edited by glenyoshida; Mar 19, 2008 at 10:39 PM.
Mar 20, 2008 | 06:07 AM
#57
Contributing Member
Joined: Apr 2007
Posts: 4,932
Likes: 1
From: DFW TEXAS BABY!
It's quite funny, ever since i updated that "all mods that can be done thread" all these old mod threads have been being bumped.
But i do have a question that i don't remember being awnsered before. Since last i posted here i have made a slight design change but it is still the basic design you have.
I really would like to make it out of metal like you did, since it is lighter than wood and you get more "useable" space. How did you build that out of sheet metal like that??
I have done lots of wood working in my days (even though i am not "good", i can do just about anything with wood) but i don't have a clue where to start with metal working like that.
Where do you get the sheet metal? how do you cut/bend it? how do you attatch the pieces? How did you build that????? lol
Any tips would be great.
Mar 20, 2008 | 08:33 AM
#58
Thread Starter
Contributing Member
Joined: Aug 2006
Posts: 271
Likes: 2
From: Denver, CO
It's quite funny, ever since i updated that "all mods that can be done thread" all these old mod threads have been being bumped.
But i do have a question that i don't remember being answered before. Since last i posted here i have made a slight design change but it is still the basic design you have.
I really would like to make it out of metal like you did, since it is lighter than wood and you get more "useable" space. How did you build that out of sheet metal like that??
I have done lots of wood working in my days (even though i am not "good", i can do just about anything with wood) but i don't have a clue where to start with metal working like that.
Where do you get the sheet metal? how do you cut/bend it? how do you attach the pieces? How did you build that????? lol
Any tips would be great.
Yeah, the mods for a 3rd gen thread is a great idea! It's really a nice and fast way to find stuff. I've used it a few times already. Thanks for keeping it updated.
I got the metal from www.onlinemetals.com You might also be able to get it from a local metal supply house. I would definitely try to get it local first and pay them a few extra bucks to cut it to size for you. Onlinemetals is convenient but pricey.
I had two 24" x 48" pieces of 5052-H32 ALUMINUM SHEET.063" 5052 AL SHEET cut and sent to me. .063" is basically the same as 16 guage. I ran the sheet through my table saw to get the outer dimensions trimmed up. This is potentially very dangerous so if you are going to do like dummy and use a high powered wood saw to cut through aluminum saftey gear up and be smart about it. This was not one of my brightest decisions to do so.
Then I cut the corners out with a jig saw and filed them true. Once the corners were notched out like this:

I took it to a local sheet metal shop and had them bend the walls up in their brake for $40. A few places wanted $70 so I shopped around. You can buy a brake but when I looked into them they were going to be $500 and up for something able to do 16 AWG sheet. www.eastwood.com has them if you want to buy a brake.
After it was bent I TIG welded the corners together. I think you could rivet them also if you don't have access to a TIG.
I'd recommend starting the cargo box with the drawers first and building the cabinet around them. It's important to make sure the drawers are the same width from front to back or you may run into problems with the drawer slides binding up as you open and close the drawers. It's also nice to start with the drawers first because it'll make it easier to know just how wide to make the cabinet walls. Just set the slides on the outside of the drawer and then butt the cabinet walls against it to know how wide you should space the cabinet walls.
Mar 20, 2008 | 08:43 AM
#59
Contributing Member
Joined: Apr 2007
Posts: 4,932
Likes: 1
From: DFW TEXAS BABY!
Thanks for the info! that is a nice site but as you said pricy.
I know of a place a few mins from where i live there has moer metal shops then you can shake a stick at now that i think about it. A lot of them are small hispanic run shops that do great work for a reasonable cost. I will have to check there and see. Who knows i might be able to have them do the bending and cutting and welding (had them weld my mower once for like $5). That would be nice.
I know of a place a few mins from where i live there has moer metal shops then you can shake a stick at now that i think about it. A lot of them are small hispanic run shops that do great work for a reasonable cost. I will have to check there and see. Who knows i might be able to have them do the bending and cutting and welding (had them weld my mower once for like $5). That would be nice.
Jun 8, 2008 | 04:19 PM
#60

Registered User
Joined: May 2008
Posts: 26
Likes: 0
Another Cargo Box idea for ya geared toward expeditioning. I like to camp but don't like setting up and tearing down tents. I built this for my 2001 4Runner.
I got tired of loading and unloading my gear. I think this will help a lot. For reference, the aluminum drawers hold as much as a pair of cargo drawers made of just 3/4" ply that is 8 inches high and 20 inches deep.
The cargo box is low enough for a person about 6 foot and under to sit upright without touching.
Tah Dah! All done.

ring pull and slam latch

slides are rated at 200 lbs. Drawer is made from 1/16" inch aluminum welded at the corners to hold in liquids if they leak. Rubberized coating to help prevent things from sliding around.

42 inch drawer yo!
The blue sleeping mattress is open cell latex 2.75 inches thick. It's very comfortable and there are no worries about it deflating.

Edge to edge carpet

extra side storage on both sides

Preserved rear tie downs in case something needs to be ratcheted down. 1/8" x 2" steel flat bar going all the way under the box and bolted to the sides in case of a roll over.

I guess this might be a good spot for a future air compressor? It was nice to be able to keep the rear power port.

There's over 6 inches of depth under the hinged board. Again there are latches to keep stuff from flying in case of a roll over.

1/8" aluminum sheet on a piano hinge between the cargo box and the rear seat storage.

A little more storage for the full size axe or something.

Used a piece of 1/8" aluminum to bolt the front half of the box down. I used the existing seat belt bolts for this. Didn't even need to get longer bolts.

I didn't keep close track of the total cost but I'd guess that all the materials were probably about $225.
edit: I said I would report back with any problems after a few miles and trail runs and I'm happy to report that there are no major issues. It's holding up like a champ. If I had to build it again I'd make sure the slides hold the drawer open when it's fully extended. I thought these were supposed to do that but they don't. If I'm on a hill the drawers want to slide shut. Probably won't be hard to make a little brake for it but it doesn't bother me enough yet I guess.
I got tired of loading and unloading my gear. I think this will help a lot. For reference, the aluminum drawers hold as much as a pair of cargo drawers made of just 3/4" ply that is 8 inches high and 20 inches deep.
The cargo box is low enough for a person about 6 foot and under to sit upright without touching.
Tah Dah! All done.
ring pull and slam latch
slides are rated at 200 lbs. Drawer is made from 1/16" inch aluminum welded at the corners to hold in liquids if they leak. Rubberized coating to help prevent things from sliding around.
42 inch drawer yo!
The blue sleeping mattress is open cell latex 2.75 inches thick. It's very comfortable and there are no worries about it deflating.
Edge to edge carpet
extra side storage on both sides
Preserved rear tie downs in case something needs to be ratcheted down. 1/8" x 2" steel flat bar going all the way under the box and bolted to the sides in case of a roll over.
I guess this might be a good spot for a future air compressor? It was nice to be able to keep the rear power port.
There's over 6 inches of depth under the hinged board. Again there are latches to keep stuff from flying in case of a roll over.
1/8" aluminum sheet on a piano hinge between the cargo box and the rear seat storage.
A little more storage for the full size axe or something.
Used a piece of 1/8" aluminum to bolt the front half of the box down. I used the existing seat belt bolts for this. Didn't even need to get longer bolts.
I didn't keep close track of the total cost but I'd guess that all the materials were probably about $225.
edit: I said I would report back with any problems after a few miles and trail runs and I'm happy to report that there are no major issues. It's holding up like a champ. If I had to build it again I'd make sure the slides hold the drawer open when it's fully extended. I thought these were supposed to do that but they don't. If I'm on a hill the drawers want to slide shut. Probably won't be hard to make a little brake for it but it doesn't bother me enough yet I guess.


