

 Mar 30, 2016, 02:01 PM
Last edit by: IB Advertising
See related guides and technical advice from our community experts:
- Toyota Tacoma How to Change Serpentine Belt<br>Step by step instructions for do-it-yourself repairs.

How to: Change Drive Belts 3.4 L 5VZ-FE
Jul 15, 2010 | 08:42 PM
#1
Thread Starter
Registered User
Joined: Mar 2009
Posts: 389
Likes: 1
From: SLC, UT
How to: Change Drive Belts 3.4 L 5VZ-FE (Video & Explaination with Pics)
This thread aims at explaining through photographs and a video of how to change the drive belts on the 3.4 L 5VZ-FE engine. It is easy and I did it with the help of my brother in about 45 minutes. Although I did not replace mine when I took these photos, they should be sufficient to explain how to do it. I will explain in words and you can click on the link to see my video. I have done this 3 times. I am not a master mechanic but I have done some pretty labor intensive repairs including transmissions and timing belts.
Tools you will need:
1) 10 mm, 14 mm and 12 mm wrenches or Gear Wrenches - you don't have to have the geared ones but they are a great help
2) Ratchet and 10 mm, 12 mm and 14 mm sockets with a 3" extension
3) Belts (obviously) Gates or Mitsumi (Toyota Belts) are the best.
4) Coolant (Optional and you will see why)
First I removed the skid plate(s). Since mine is an 02' Sport I had 2 of them. I know that the older models only have one. There are 5 12 mm bolts in the front and if you have the rear, there are 4 12 mm bolts. Next I only loosened the 3 belts:
1) Alternator - I like to undo the alternator belt from the top and below. You can do it from the top but you can't see the adjustment bolt at all underneath. From the top it looks like this:

You loosen the bolt circled in red. It is a 14 mm and allows the alternator to swivel. Now from below (looking up):
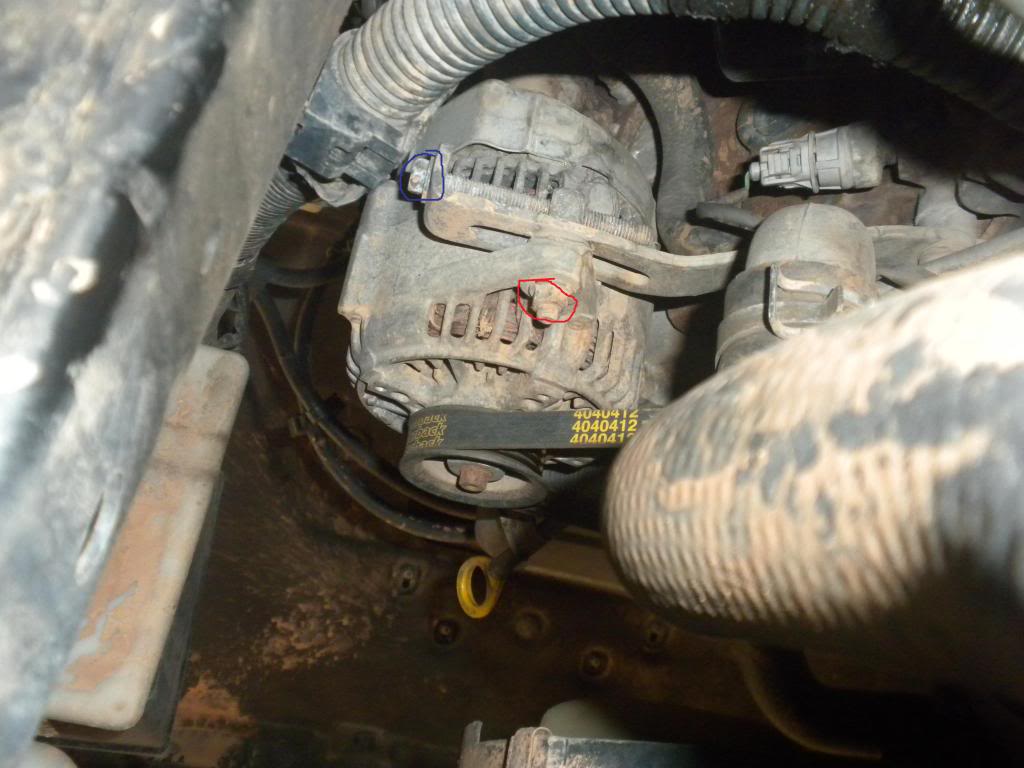
You loosen the 12 mm bolt circled in red and loosen the 12 mm adjusting bolt circled in blue. This will swivel your alternator toward the bottom of the truck. Once loose you can now do the A/C belt from below. Hence why you removed your skid plate(s):

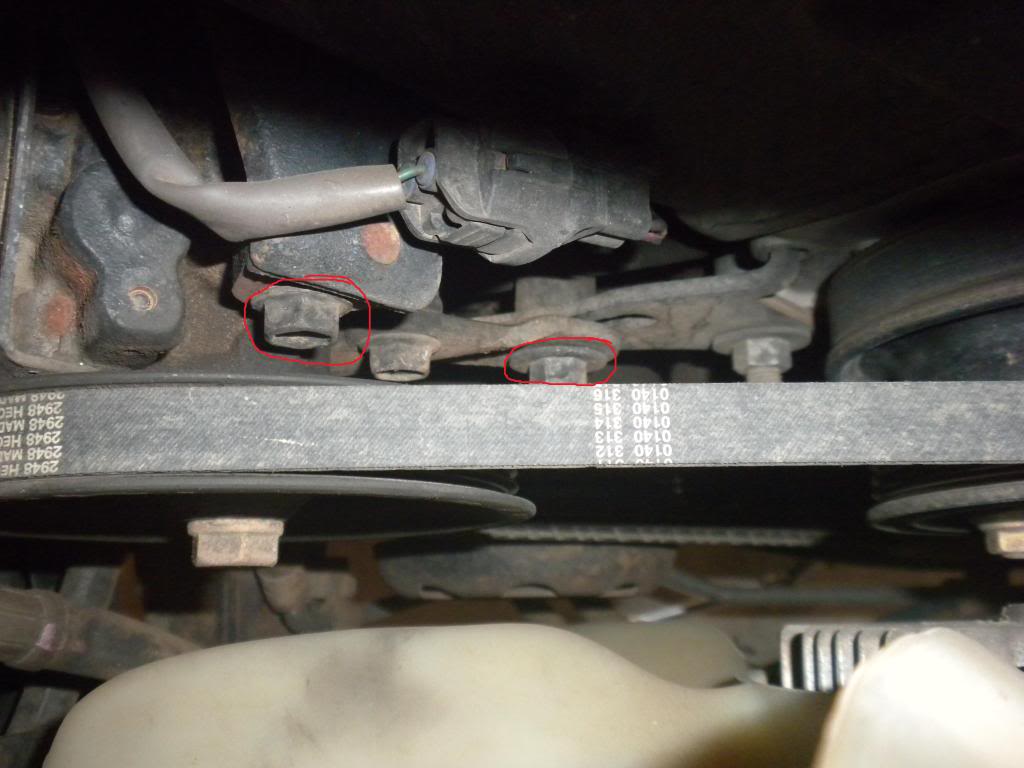
You loosen the 14 mm bolt in red and loosen the adjusting bolt in blue (above the front cross member). This is where the gear wrenches are nice. I was not able to get a good area for a ratchet. A gear wrench worked perfectly and I was able to do it quickly. The A/C should be loose now.
Now the PITA: Power Steering. This is the hardest one. Here you can now drain 1/2 gallon or so of coolant or you can choose not to remove the coolant at all. The upper radiator hose will just be in the way if you don't. I didn't remove it the 2nd time I did it and I was glad because I didn't have to refill the radiator. Saved about 15 minutes of time:
Loosen the 14 mm bolts circled in red with a wrench. You can't get a socket in there, if you do you are better than I am because I wasn't able to. The adjustment bolt is underneath to your right of the power steering return line (soft hose higher on the fluid reservoir). I couldn't get a picture of it and you can't see it. If you don't have gear wrenches and only a ratchet it will save you time to remove the air box. You can then use a ratchet. The gear wrench makes it nice because you can get it in there and ratchet the sucker until it comes nice and loose to get the belt off.
Next you will need to unbolt the fan with 4 nuts 10 mm in size with a wrench (again the gear wrenches come in handy here):
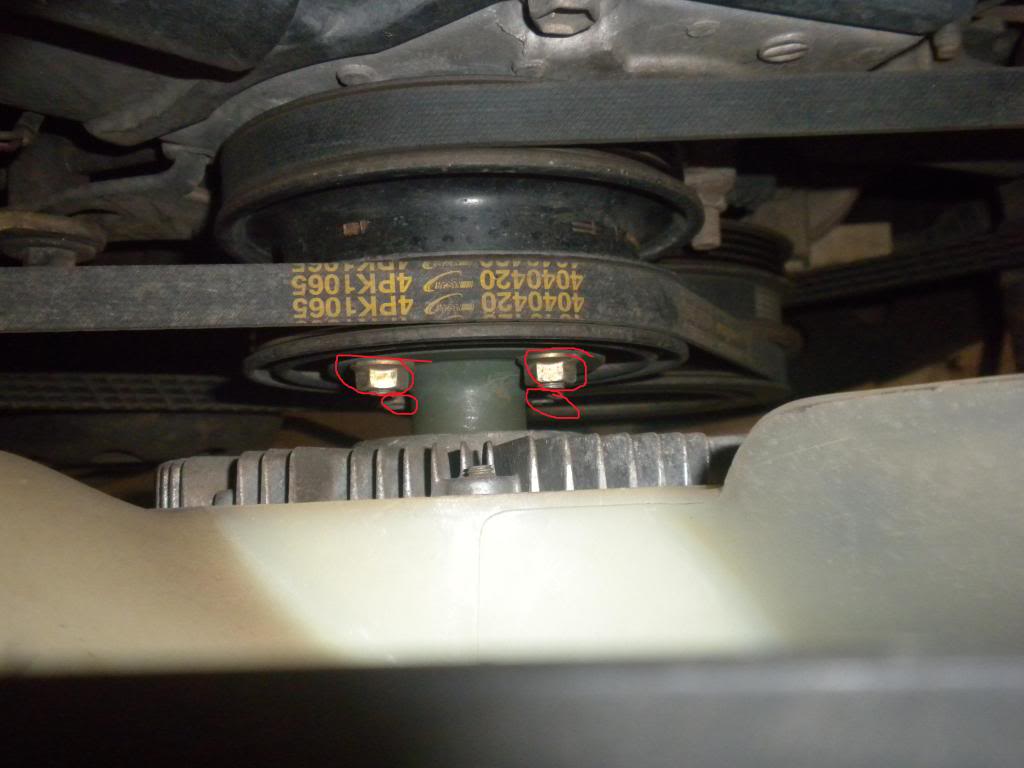
Loosen the nuts circled in red. The fan with the silver shaft should separate from the pulleys behind it. Looks can be deceiving here because there are actually 2 pulleys and the fan separated like this:
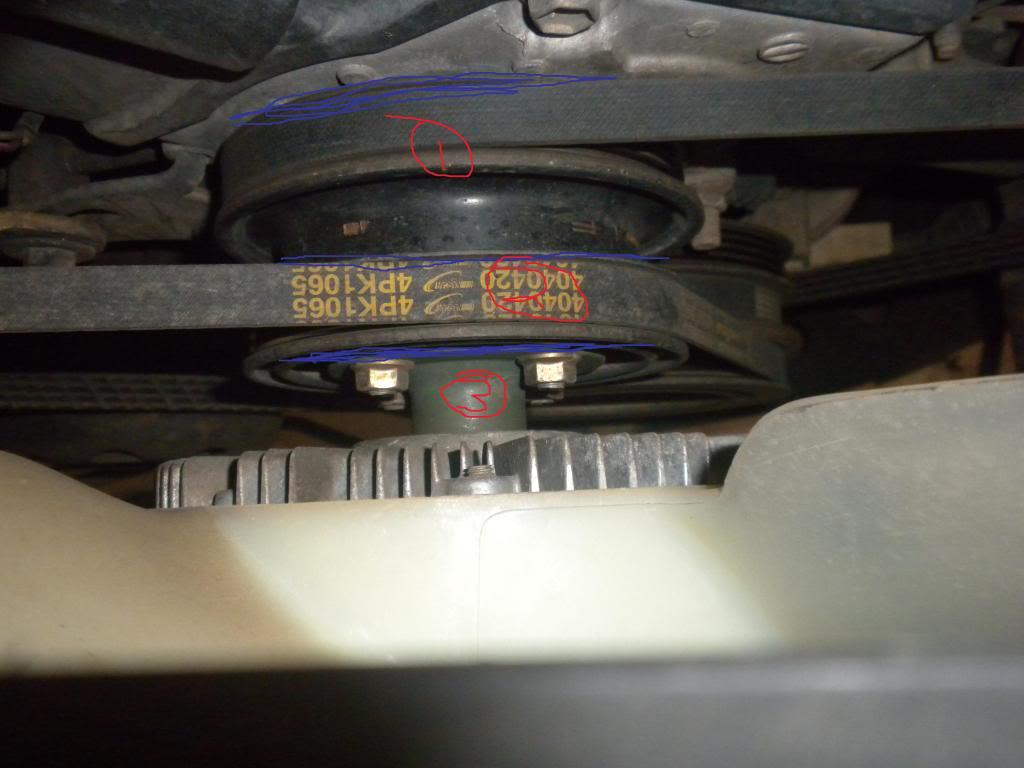
1 (in red) is the inner pulley with studs that go through the outer pulley (2 in red) and hold the fan on with the shaft for just the fan (3 in red). The blue lines show how they are going to separate.
Now, you can if you wish remove the 4 bolts (2 above and 2 below which are 10 mm) holding the fan shroud on. This allows for movement of the fan so you can slip the belts out between 2 (in red above) and 3 (in red above).
Remove all 3 belts and put new ones on. Installation order: 1: alternator, 2: A/C and 3: Power Steering. The Alternator and power steering belts are similar in length, so make sure you get the right one where it should go or you will end up taking off the belts and putting them on again (like me and my brother). The best thing to do is to put the fan (4 10 mm nuts) and shroud on (if you removed the 4 10 mm bolts) and then tighten the belts, if not you will fight those 2 pulleys that turn the fan.
Rest of installation is reverse order of removal.
Rules of deflection (how much movement up and down in a belt):
If pulley centers are > 6 inches apart: 1/4" to 1/2" deflection between the pulleys
If pulley centers are < 6 inches apart 1/4" deflection between the pulleys
The power steering needs to be about 1/4" deflection, if you don't, then it will squeal when you turn sharply in a parking lot. The alternator needs to be about 1/2" deflection. The A/C needs to be 1/4" deflection.
Video Link (Through YouTube): http://www.youtube.com/watch?v=Y8yF_gD-Mx0
Tools you will need:
1) 10 mm, 14 mm and 12 mm wrenches or Gear Wrenches - you don't have to have the geared ones but they are a great help
2) Ratchet and 10 mm, 12 mm and 14 mm sockets with a 3" extension
3) Belts (obviously) Gates or Mitsumi (Toyota Belts) are the best.
4) Coolant (Optional and you will see why)
First I removed the skid plate(s). Since mine is an 02' Sport I had 2 of them. I know that the older models only have one. There are 5 12 mm bolts in the front and if you have the rear, there are 4 12 mm bolts. Next I only loosened the 3 belts:
1) Alternator - I like to undo the alternator belt from the top and below. You can do it from the top but you can't see the adjustment bolt at all underneath. From the top it looks like this:
You loosen the bolt circled in red. It is a 14 mm and allows the alternator to swivel. Now from below (looking up):
You loosen the 12 mm bolt circled in red and loosen the 12 mm adjusting bolt circled in blue. This will swivel your alternator toward the bottom of the truck. Once loose you can now do the A/C belt from below. Hence why you removed your skid plate(s):
You loosen the 14 mm bolt in red and loosen the adjusting bolt in blue (above the front cross member). This is where the gear wrenches are nice. I was not able to get a good area for a ratchet. A gear wrench worked perfectly and I was able to do it quickly. The A/C should be loose now.
Now the PITA: Power Steering. This is the hardest one. Here you can now drain 1/2 gallon or so of coolant or you can choose not to remove the coolant at all. The upper radiator hose will just be in the way if you don't. I didn't remove it the 2nd time I did it and I was glad because I didn't have to refill the radiator. Saved about 15 minutes of time:
Loosen the 14 mm bolts circled in red with a wrench. You can't get a socket in there, if you do you are better than I am because I wasn't able to. The adjustment bolt is underneath to your right of the power steering return line (soft hose higher on the fluid reservoir). I couldn't get a picture of it and you can't see it. If you don't have gear wrenches and only a ratchet it will save you time to remove the air box. You can then use a ratchet. The gear wrench makes it nice because you can get it in there and ratchet the sucker until it comes nice and loose to get the belt off.
Next you will need to unbolt the fan with 4 nuts 10 mm in size with a wrench (again the gear wrenches come in handy here):
Loosen the nuts circled in red. The fan with the silver shaft should separate from the pulleys behind it. Looks can be deceiving here because there are actually 2 pulleys and the fan separated like this:
1 (in red) is the inner pulley with studs that go through the outer pulley (2 in red) and hold the fan on with the shaft for just the fan (3 in red). The blue lines show how they are going to separate.
Now, you can if you wish remove the 4 bolts (2 above and 2 below which are 10 mm) holding the fan shroud on. This allows for movement of the fan so you can slip the belts out between 2 (in red above) and 3 (in red above).
Remove all 3 belts and put new ones on. Installation order: 1: alternator, 2: A/C and 3: Power Steering. The Alternator and power steering belts are similar in length, so make sure you get the right one where it should go or you will end up taking off the belts and putting them on again (like me and my brother). The best thing to do is to put the fan (4 10 mm nuts) and shroud on (if you removed the 4 10 mm bolts) and then tighten the belts, if not you will fight those 2 pulleys that turn the fan.
Rest of installation is reverse order of removal.
Rules of deflection (how much movement up and down in a belt):
If pulley centers are > 6 inches apart: 1/4" to 1/2" deflection between the pulleys
If pulley centers are < 6 inches apart 1/4" deflection between the pulleys
The power steering needs to be about 1/4" deflection, if you don't, then it will squeal when you turn sharply in a parking lot. The alternator needs to be about 1/2" deflection. The A/C needs to be 1/4" deflection.
Video Link (Through YouTube): http://www.youtube.com/watch?v=Y8yF_gD-Mx0
Last edited by stir_fry_boy; Jul 16, 2010 at 07:37 AM.
 Jul 16, 2010 | 04:49 AM
#3
Registered User
Joined: Apr 2009
Posts: 25
Likes: 0
From: NYC-Baja
I've never had to remove the fan on any vehicle to change a belt including 4Runners. You just slip the belt over one blade at a time.
The only thing I don't like about the 5vze is the belt system. They should have gone with a single serpentine setup. If someone sold an aftermarket kit I'd buy it in a minute.
The only thing I don't like about the 5vze is the belt system. They should have gone with a single serpentine setup. If someone sold an aftermarket kit I'd buy it in a minute.
Jul 16, 2010 | 05:27 AM
#4
Registered User
Joined: Feb 2010
Posts: 570
Likes: 0
From: Outer Banks, NC
Good write up sfb. Since I taught my friend to do his in May, and he had never replace any drive belts before and did OK the first time, I thought I'd add my .02 cents here.
1. If you have never replaced drive belts before on any car, the 4 runner is a good one to learn on. Since you have to remove the upper radiator hose, I'd remove the fan shroud and radiator. It gives you more space to work in and let's you see how the belts work.
2. All three drive belts have an adjuster (see pic 2). If you do not have a belt tension gauge, you can mark the present location of both the alt and ps adjuster along the adjusting bracket with a sharpie before removing the belts. With the AC adjuster, you can "feel" the amount of tension on the adjuster before you loosen it to remove the belt. Remember, all pivot and mounting or idler bolts must be loosened BEFORE touching the adjustment bolts to remove the belts. Installation is the opposite.
3. Stubby wrenchs make this job a breeze. If you do not have the $$$ for the whole set, get one in a 12mm for the alt adjustment bolt and 14mm for the tight fitting ps adjustment bolt. Non flexing stubbys are cheaper.
http://www.amazon.com/Wrench-Metric-...286081&sr=1-58
4. Get nice quality belts such as Bando.
5. For PS, torque pivot bolts to 32ft/lb. For ALT, torque top to 32 or 36ft/lb (cannot remember) and the bottom pivot bolt to 25ft/lb. For AC, torque idler pulley bolt to 29ft/lb.
6. Check the belts for looseness/overtightning after 100 miles.
Jul 16, 2010 | 07:40 AM
#5
Thread Starter
Registered User
Joined: Mar 2009
Posts: 389
Likes: 1
From: SLC, UT
Good write up sfb. Since I taught my friend to do his in May, and he had never replace any drive belts before and did OK the first time, I thought I'd add my .02 cents here.
1. If you have never replaced drive belts before on any car, the 4 runner is a good one to learn on. Since you have to remove the upper radiator hose, I'd remove the fan shroud and radiator. It gives you more space to work in and let's you see how the belts work.
2. All three drive belts have an adjuster (see pic 2). If you do not have a belt tension gauge, you can mark the present location of both the alt and ps adjuster along the adjusting bracket with a sharpie before removing the belts. With the AC adjuster, you can "feel" the amount of tension on the adjuster before you loosen it to remove the belt. Remember, all pivot and mounting or idler bolts must be loosened BEFORE touching the adjustment bolts to remove the belts. Installation is the opposite.
3. Stubby wrenchs make this job a breeze. If you do not have the $$$ for the whole set, get one in a 12mm for the alt adjustment bolt and 14mm for the tight fitting ps adjustment bolt. Non flexing stubbys are cheaper.
http://www.amazon.com/Wrench-Metric-...286081&sr=1-58
4. Get nice quality belts such as Bando.
5. For PS, torque pivot bolts to 32ft/lb. For ALT, torque top to 32 or 36ft/lb (cannot remember) and the bottom pivot bolt to 25ft/lb. For AC, torque idler pulley bolt to 29ft/lb.
6. Check the belts for looseness/overtightning after 100 miles.
1. If you have never replaced drive belts before on any car, the 4 runner is a good one to learn on. Since you have to remove the upper radiator hose, I'd remove the fan shroud and radiator. It gives you more space to work in and let's you see how the belts work.
2. All three drive belts have an adjuster (see pic 2). If you do not have a belt tension gauge, you can mark the present location of both the alt and ps adjuster along the adjusting bracket with a sharpie before removing the belts. With the AC adjuster, you can "feel" the amount of tension on the adjuster before you loosen it to remove the belt. Remember, all pivot and mounting or idler bolts must be loosened BEFORE touching the adjustment bolts to remove the belts. Installation is the opposite.
3. Stubby wrenchs make this job a breeze. If you do not have the $$$ for the whole set, get one in a 12mm for the alt adjustment bolt and 14mm for the tight fitting ps adjustment bolt. Non flexing stubbys are cheaper.
http://www.amazon.com/Wrench-Metric-...286081&sr=1-58
4. Get nice quality belts such as Bando.
5. For PS, torque pivot bolts to 32ft/lb. For ALT, torque top to 32 or 36ft/lb (cannot remember) and the bottom pivot bolt to 25ft/lb. For AC, torque idler pulley bolt to 29ft/lb.
6. Check the belts for looseness/overtightning after 100 miles.
P.S. I have posted the video now.
Last edited by stir_fry_boy; Jul 16, 2010 at 07:43 AM.
Jul 16, 2010 | 08:49 AM
#6
Registered User
Joined: Feb 2010
Posts: 570
Likes: 0
From: Outer Banks, NC
stir_fry,
The video is quite good. Only if I had a voice like James Earl Jones would I try to narrarate an instructional video.
The stubby ratcheting wrenches are great to have for tight spaces. The Gearwrench brand is good (I have them, made by KD tools), but not quite as good as Snap On, Matco, etc since one has to move the wrench farther to make the ratchet engage. The less travel for the ratchet mechanism to engage, the more $$$ paid for the wrench.
I have never had luck with Gatorback belts. I had three pop on me in various Ford trucks.......
Jul 16, 2010 | 12:53 PM
#7
Thread Starter
Registered User
Joined: Mar 2009
Posts: 389
Likes: 1
From: SLC, UT
stir_fry,
The video is quite good. Only if I had a voice like James Earl Jones would I try to narrarate an instructional video.
The stubby ratcheting wrenches are great to have for tight spaces. The Gearwrench brand is good (I have them, made by KD tools), but not quite as good as Snap On, Matco, etc since one has to move the wrench farther to make the ratchet engage. The less travel for the ratchet mechanism to engage, the more $$$ paid for the wrench.
I have never had luck with Gatorback belts. I had three pop on me in various Ford trucks.......
The video is quite good. Only if I had a voice like James Earl Jones would I try to narrarate an instructional video.
The stubby ratcheting wrenches are great to have for tight spaces. The Gearwrench brand is good (I have them, made by KD tools), but not quite as good as Snap On, Matco, etc since one has to move the wrench farther to make the ratchet engage. The less travel for the ratchet mechanism to engage, the more $$$ paid for the wrench.
I have never had luck with Gatorback belts. I had three pop on me in various Ford trucks.......
I bought my gear wrenches at Sears. They warranty them for life just like any Craftsman tool. No questions asked, you just get a replacement.
These belts have 30K on them and I had to do them once I got my truck home the day I got it because the A/C belt had a rib missing so I just bought some and put them on. If I would have known what I know now.....
I didn't know they were crap until after I put them on, so I am leaving them. Gates, Bando and Mitsumi are a much higher quality belt, I agree.
Trending Topics
Jul 17, 2010 | 09:15 AM
#9
Registered User
Joined: Oct 2008
Posts: 887
Likes: 0
From: Valdosta, Ga
you should submit this to the tech writeup area
Jul 17, 2010 | 09:20 AM
#10
Registered User
Joined: Mar 2010
Posts: 301
Likes: 0
From: SoCal
Nice job! I know a lot of people think write ups for this easy stuff is dumb but you helped a lot of people out by doing it. I've done belts before so not a big deal to figure out but seeing it done makes it that much easier. I even saved your video to my drive for offline viewage. When you don't know how something is done it always seems much harder to do than it is. You made it way easy for first timers!
Jul 17, 2010 | 12:40 PM
#11
Registered User
Joined: Dec 2007
Posts: 364
Likes: 1
From: Mississippi
I absolutely don't think that writeups for 'easy stuff' is dumb! Such writeups help people who are learning to do this for the first time. I've also found that even if I know how to do something, teaching someone else to do it ALWAYS improves my own understanding of a task.
Jul 17, 2010 | 12:57 PM
#12
I absolutely don't think that writeups for 'easy stuff' is dumb! Such writeups help people who are learning to do this for the first time. I've also found that even if I know how to do something, teaching someone else to do it ALWAYS improves my own understanding of a task.
 Aug 18, 2010 | 10:05 AM
#14
Registered User
Joined: Aug 2010
Posts: 1
Likes: 0
From: north carolina
just need to say thanks for posting this stir_fry_boy.it was a big help for me. i just got my 4 runner and was going to change the belts and when i open the hood. i didnt see any adjustments. so i google this and your post poped up. it help me BIG TIME. job well done thanks.
Aug 18, 2010 | 05:48 PM
#15
Registered User
Joined: Dec 2007
Posts: 500
Likes: 0
From: Rochester, Washington
Nice job! I know a lot of people think write ups for this easy stuff is dumb but you helped a lot of people out by doing it. I've done belts before so not a big deal to figure out but seeing it done makes it that much easier. I even saved your video to my drive for offline viewage. When you don't know how something is done it always seems much harder to do than it is. You made it way easy for first timers!
 Aug 18, 2010 | 06:46 PM
#16
Registered User
iTrader: (1)
Joined: Feb 2007
Posts: 419
Likes: 0
From: Shelburne, VT previous: Everett, WA; Bellingham, WA
Definitely a good addition to the wrenching community. Many people who see this will wonder why they're being charged $75+parts to change their belts out!
As far as the changing over to a serpentine belt, I couldn't disagree more. I like that toyota, at this point in time, hadn't changed over. Sure a serpentine belt is cheaper for them to add to the system, but knowing that if your A/C belt fails, your alternator will be fine until you can get that other changed out. Can't say that for the S-belt (like in my corolla...)
As far as the changing over to a serpentine belt, I couldn't disagree more. I like that toyota, at this point in time, hadn't changed over. Sure a serpentine belt is cheaper for them to add to the system, but knowing that if your A/C belt fails, your alternator will be fine until you can get that other changed out. Can't say that for the S-belt (like in my corolla...)
Aug 18, 2010 | 07:09 PM
#17
Registered User
Joined: Feb 2010
Posts: 570
Likes: 0
From: Outer Banks, NC
Nuthuts96
The statement made by Nuthuts96, IMHO, is the biggest reason why posting how-to tutorials is great for Yotatech. Saving $$$, plus wrenching on one's own auto, is the best way to go. The dealers around these parts charge $250-$330 to change the belts. And once one learns to change the drive belts on the 4runner, you can tackle most any other autos with multiple drive belts with ease. Just have to know the torque settings for the bolts.
I forgot to add last month that the pivot bolt for the PS belt can be accessed through any of the openings on the pulley. Crank the engine over if it is blocked the first time.
Mar 6, 2011 | 04:00 PM
#18

Registered User
Joined: Jul 2010
Posts: 18
Likes: 0
thanks for the excellent write-up. saved me searching for the correct bolts. piece of cake. no need to remove fan shroud or fan. belts slip over the fan with ease.. who job 25 minutes 
funny thing was whoever did the alt belt before had the adjuster bolt not attached the bracket so it would actually pull on the alt.. they must have used a pry bar and then tightened the other two bolts down.. idiot fortunately the bolt was still there to correct!
funny thing was whoever did the alt belt before had the adjuster bolt not attached the bracket so it would actually pull on the alt.. they must have used a pry bar and then tightened the other two bolts down.. idiot
fortunately the bolt was still there to correct!


