
Gen 3 Auto Dimming Mirror Complete Install
 Jan 13, 2008 | 09:11 PM
#1


Gen 3 Auto Dimming Mirror Complete Install
I know several of you have been waiting for the final write up on my auto dimming mirror install. So without further adue ....
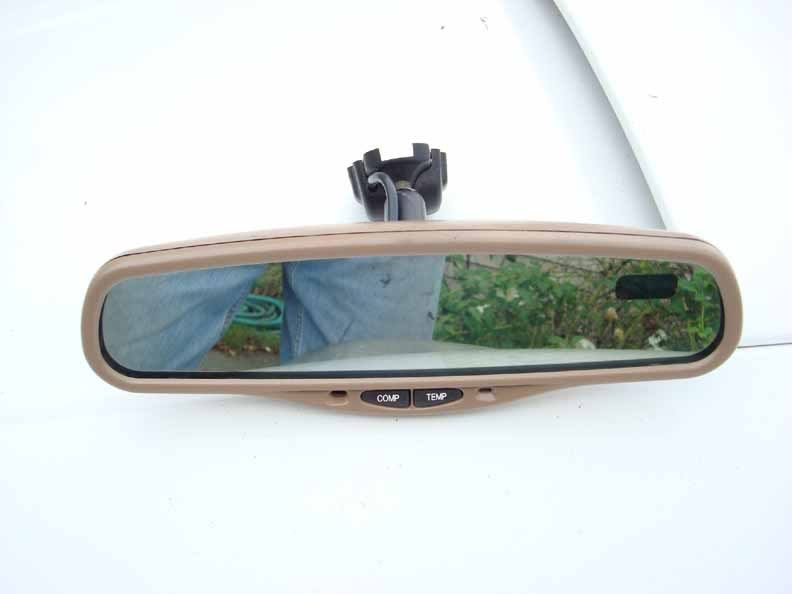
For those of you who do not drive a newer 4Runner now you can have the luxury of auto dimming rear view mirror with a combination compass and outside temperature reading.
As a disclaimer, do this upgrade/modification at your own risk. This installation/modification was done using described components that were not OEM Toyota parts but came from various manufacturers and suppliers. Most of the components were obtained from auto salvage yards.
Some background, I installed a Hilux Surf Field Monitoring Unit a few months ago and was really happy with the new addition that Toyota should have put in Gen 3's here in the US, but I had some issues with my unit and could not correct the inaccuracies of the Temperature sensor. The issue was in the circuit board and no adjustment to compensate for it. During one of my trips to the local bone yard looking for Limited pieces for another project (Limited to SR5 install) I noticed a mirror in a GMC Suburban. I found out that it was a model Gentex GNTX-177.
Seems Gentex and Donnally make almost all the electronic mirrors for most all auto manufacturers. I then removed the mirror and button mount. I also then spent the better part of an afternoon removing the entire wire harness for this mirror. You will need a #20 TORX bit driver to loosen the set screw in the mirror.
I also needed the sensor and on most GMC/Chevy trucks this will be found located on the center forward radiator support.
Some of these sensors are directly mounted to the center radiator pillar and others are on a plastic mount. This one just happened to be found on a plastic mount out of a 1998 Yukon.
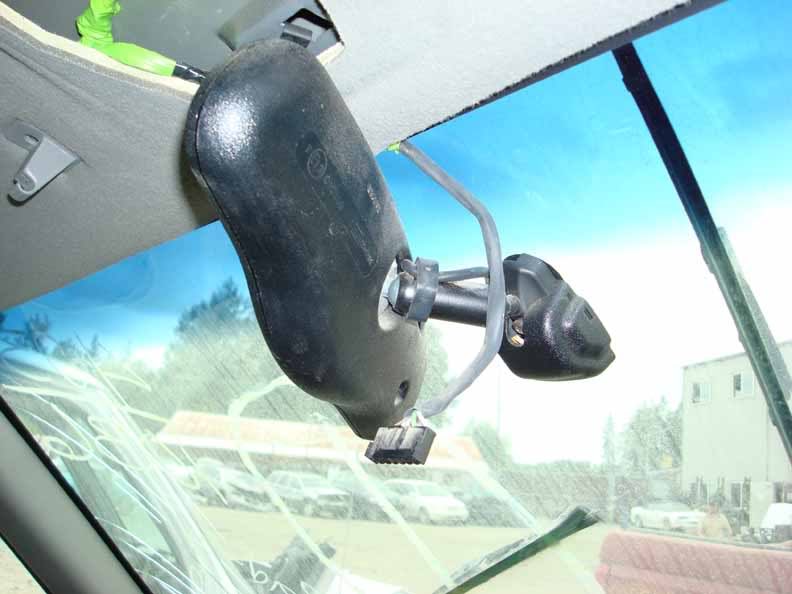
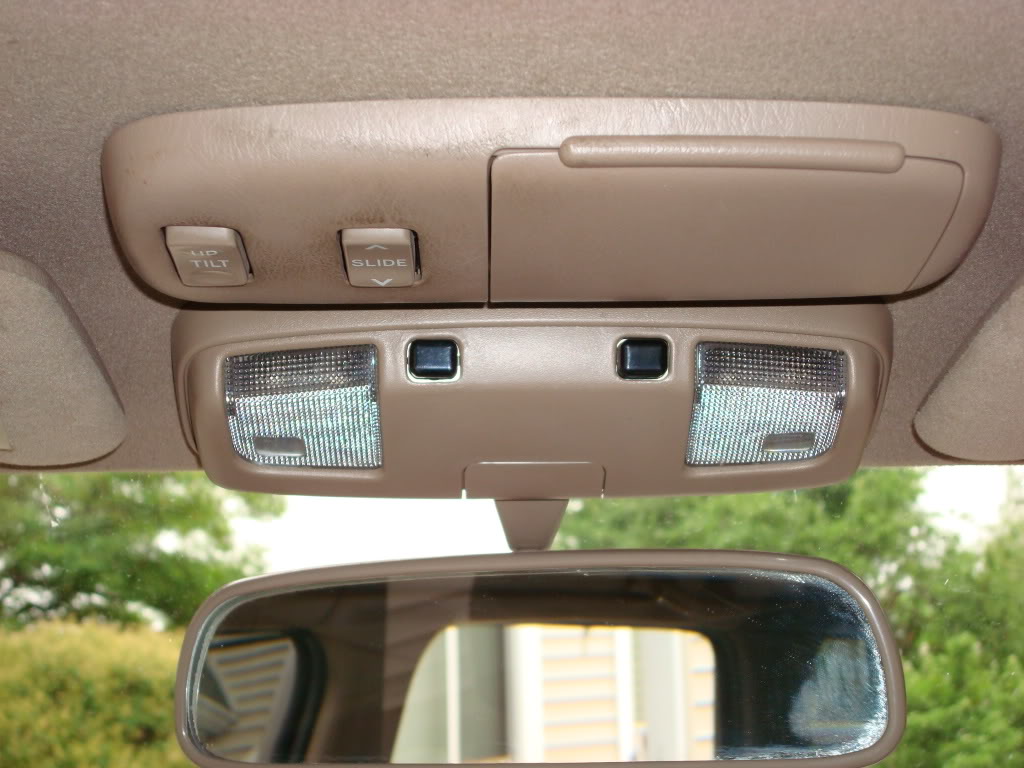
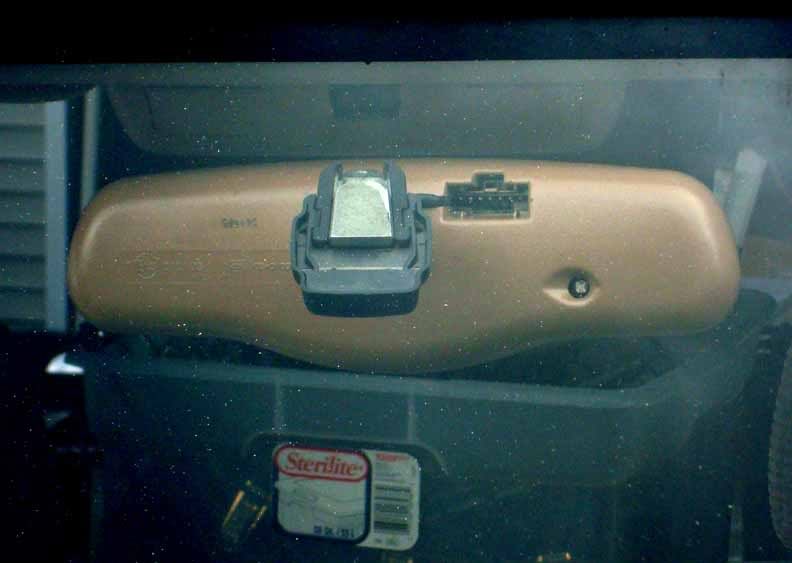
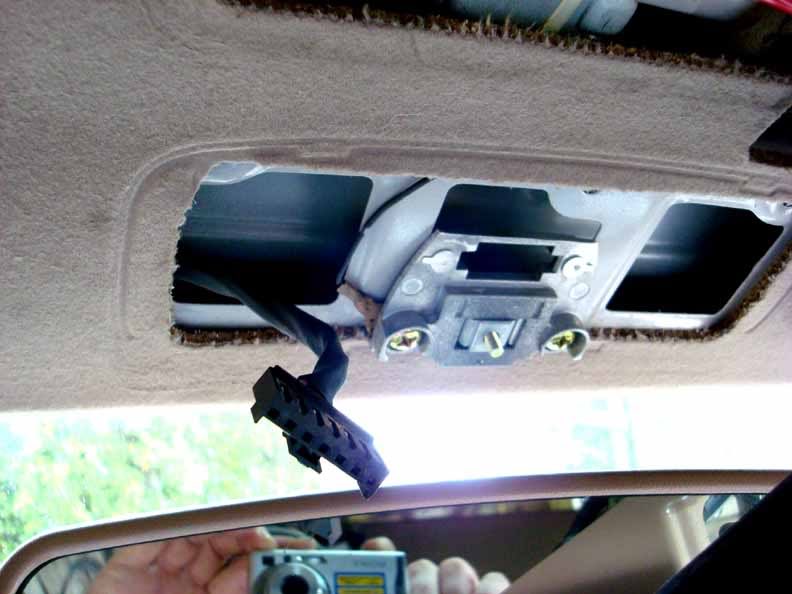
Step 1. I needed to remove the FMU and OEM (modified) mirror with mount from the overhead. Some of the later Gen 3 4runners have a similar looking overhead console so it should look a bit familiar and is removed in the same manner.
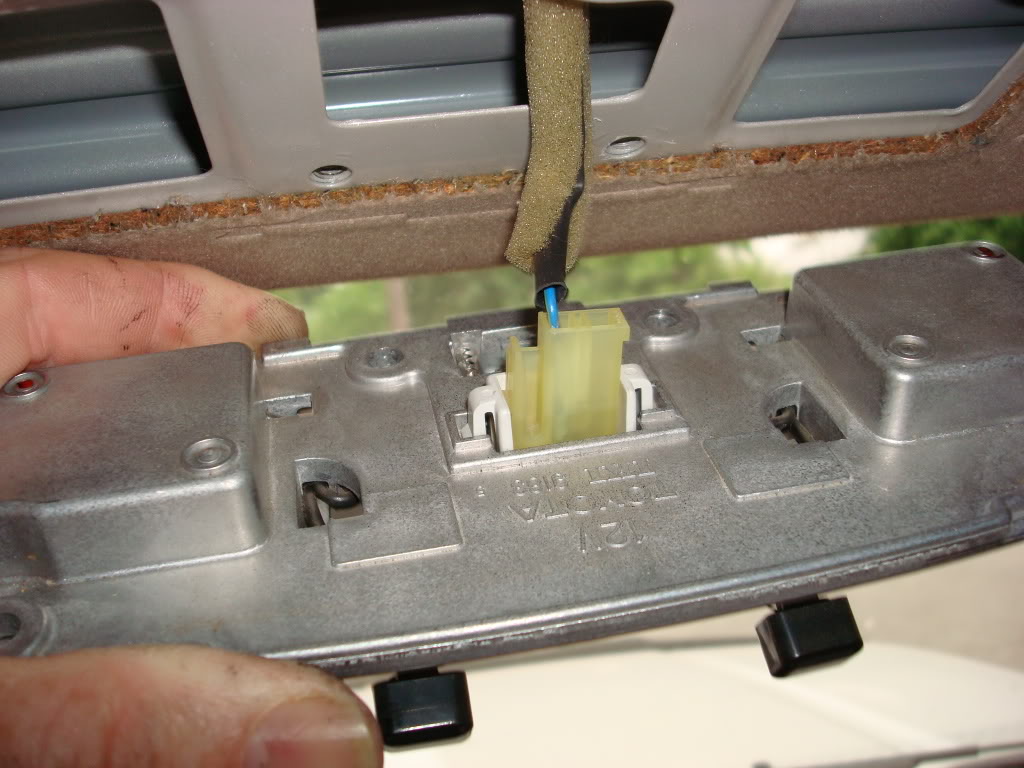
The FMU was pretty easy as I only had to remove one screw. For anyone else who is just removing their old OEM mirror, you will need to remove the plastic cover that just clips over the headliner mounted mirror. Most likely your overhead looks similar to this:
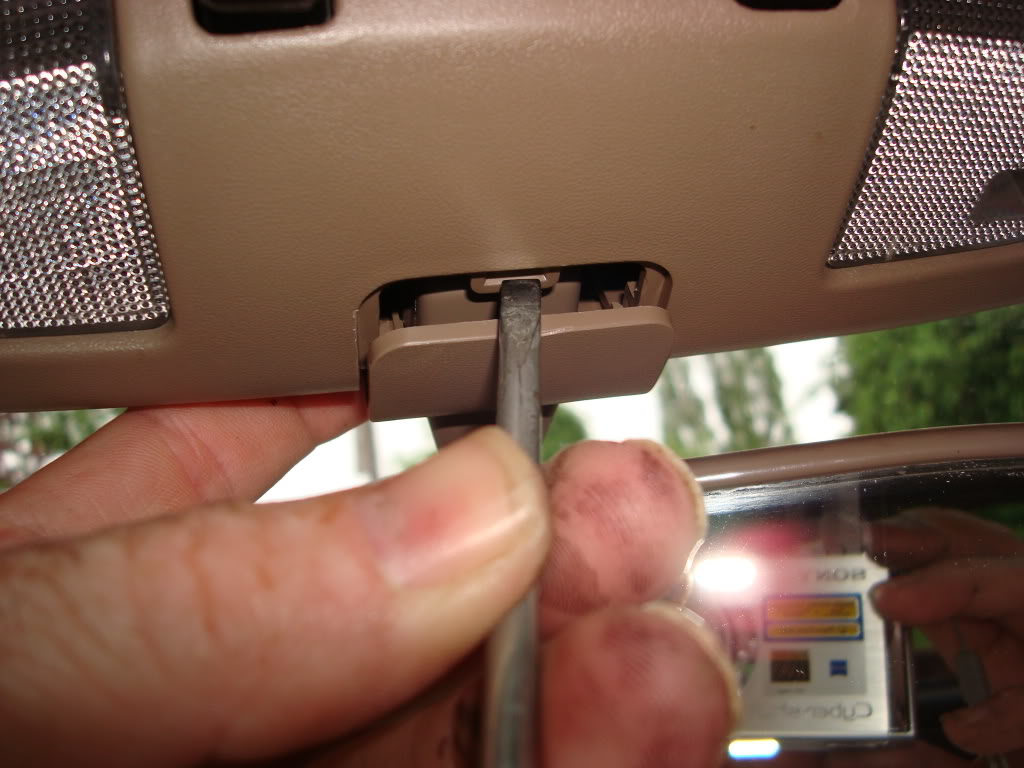
Simply remove the small collar that surrounds the base of the mirror and you will be able to pry off the outer cover as well
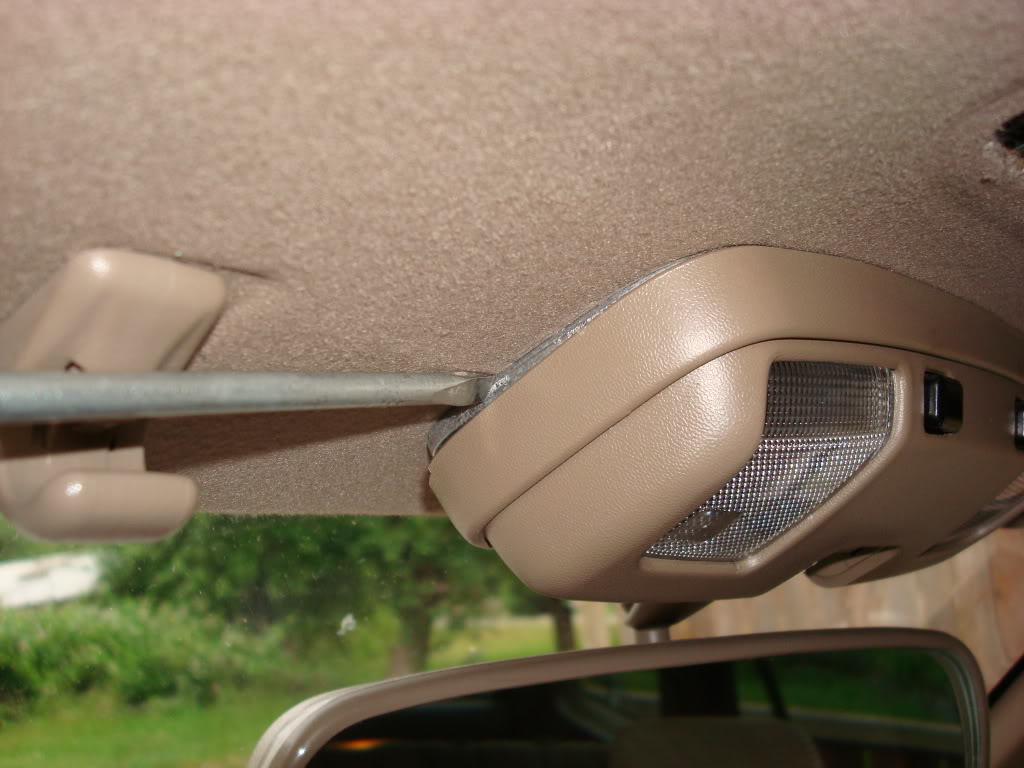
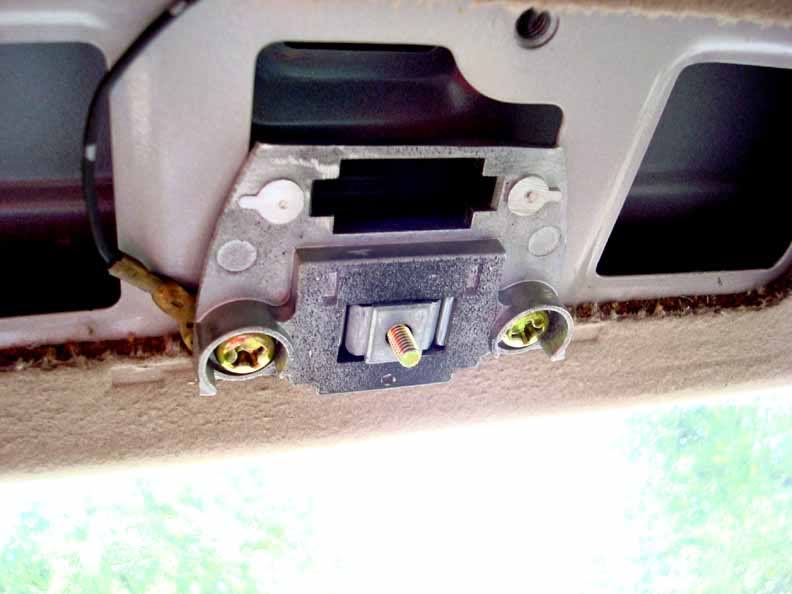
Once the cover is removed, unscrew the OEM mount. There are two screws that hold it in place. After you remove the mirror, you will be re-installing this mount as it also holds your map lights.
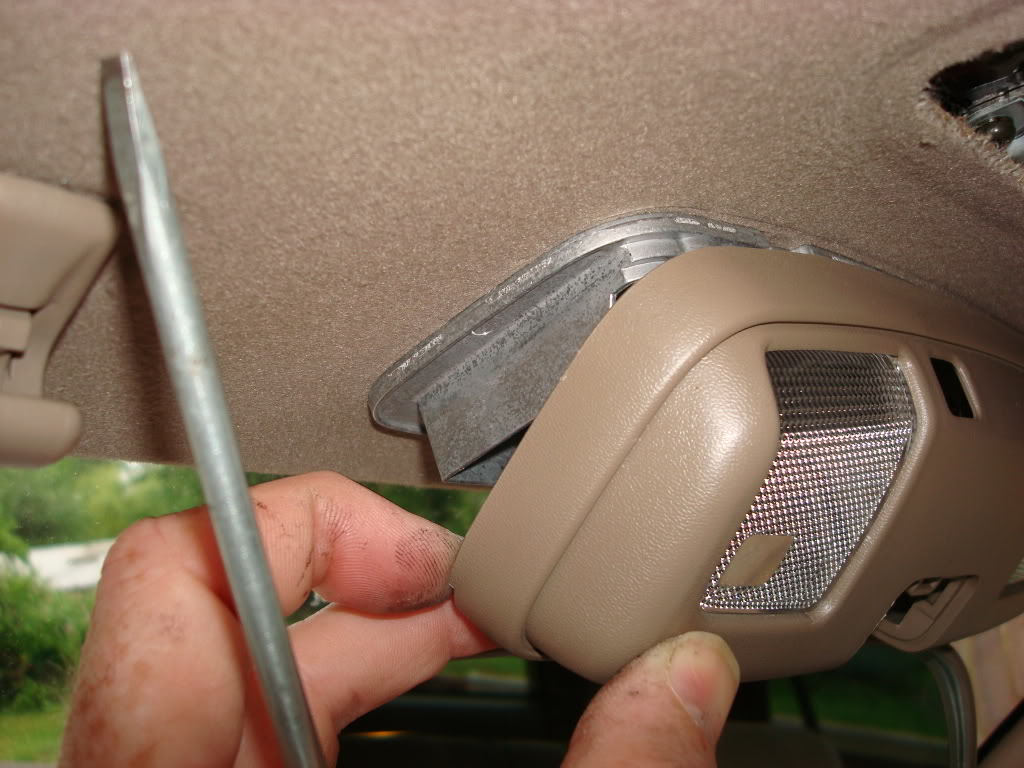
The OEM mirror is held in place by a roller clip with two spring clips. Remove the single screw and then the mirror will drop out. If you chose not to save these pieces then don't fuss if you drop them. I chose to put them back in place but its your call.
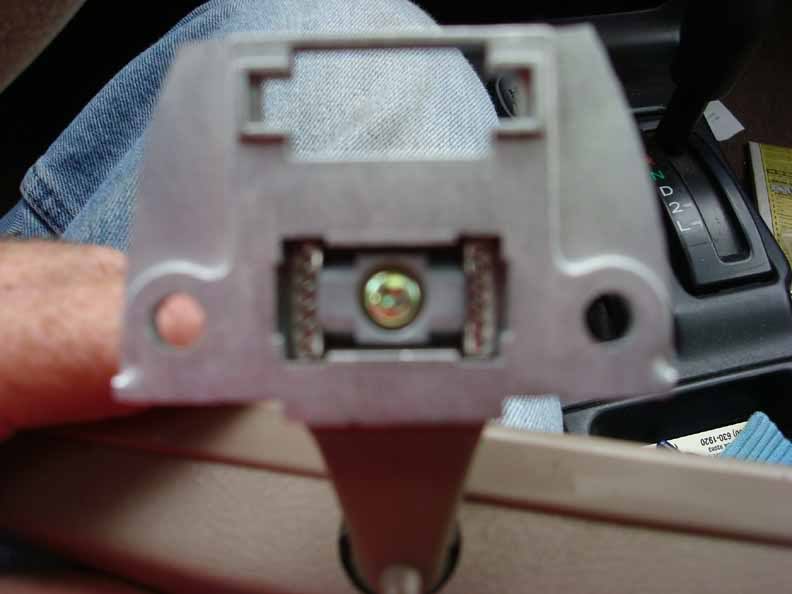
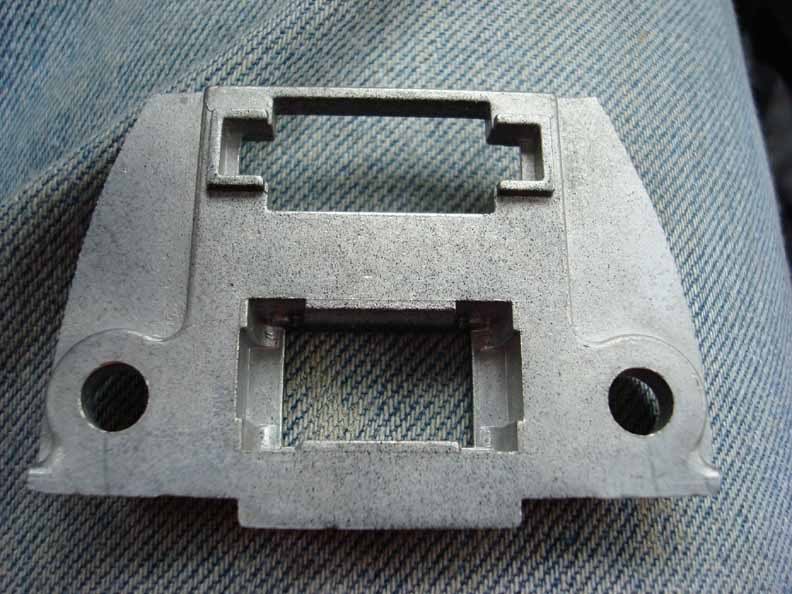
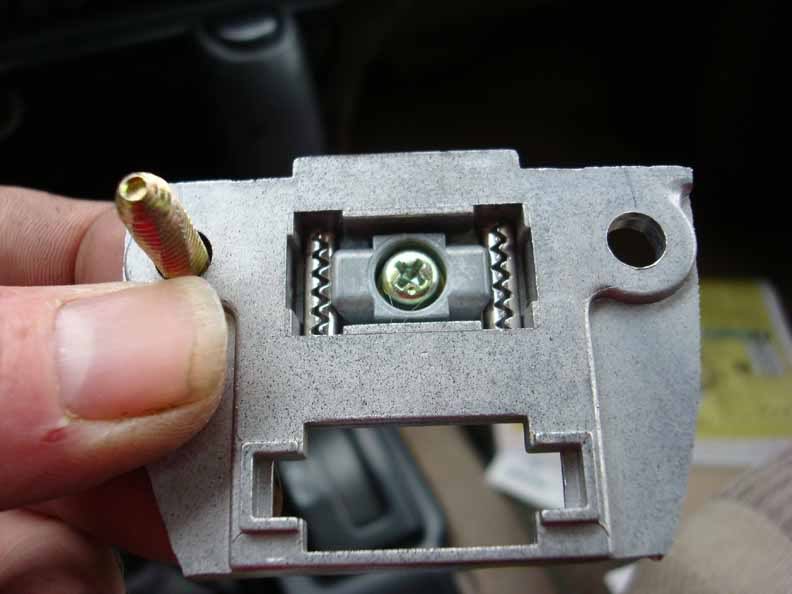
Remember, if you don't want to save the cam clamp and spring pins then you don't have to do this step in the above picture. I chose to keep them and show them in place with the first hold down screw in place ready to screw back in to the head liner. Your mount bracket will be much bigger as mine was modified for my FMU install. Here is the OEM bracket back in the headliner.
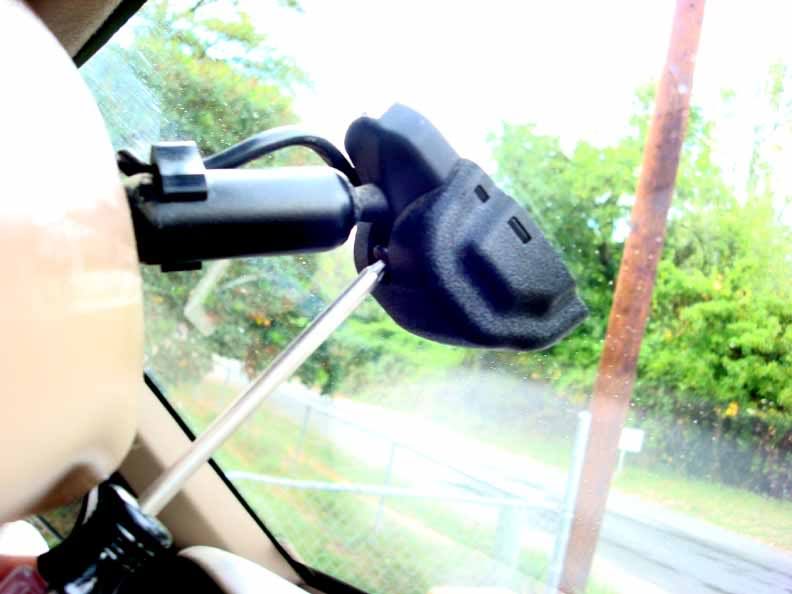
Take the GNTX-177 with the button installed and position it where you think it will be best suited to your needs.
While holding the mirror, you can either use a piece of tape or have a partner using a piece of tape on the outside note/mark where the button is located on the windshield.
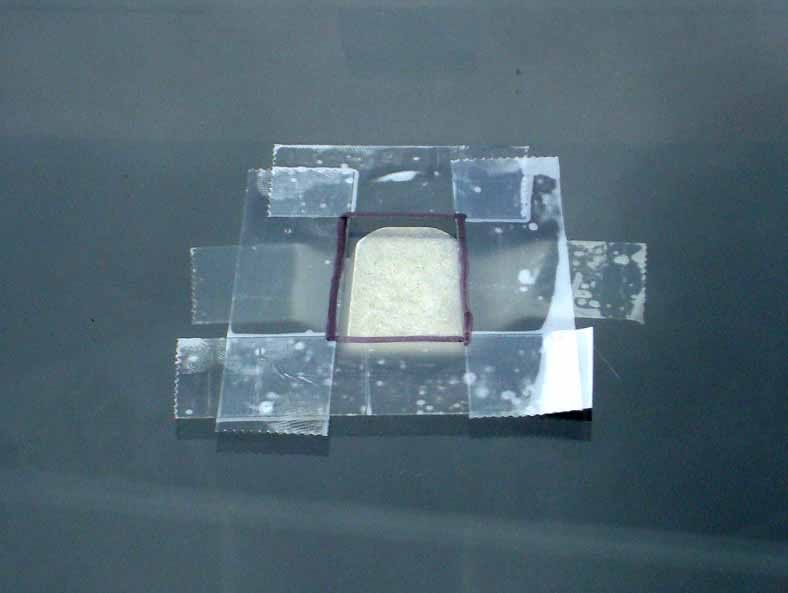
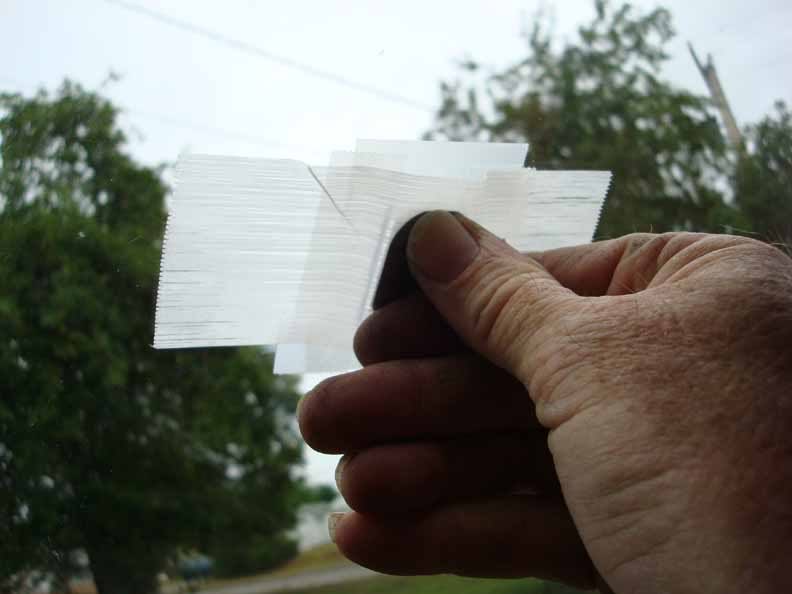
Next you will need to mark the location of where the button will be glued. I recommend you tape the button in place where you desire it on the inside of the glass. There is a centerline mark on the top edge of the windshield. It will look like a small black arrow point. Measure down from that spot to where you marked the location of the button. Place the button at that location and hold with tape. Next from the outside, lay down a tape outline on the edge of the button.
The next step is very critical. I used a very high quality mirror mounting adhesive. There are serveral available but I used Permatex. It was less then $4 at AutoZone.

Be sure to follow the directions EXACTLY! One other word of caution, ensure you are placing the button correctly, right side up and glue side to the glass. If you screw this up, you won't be able to mount your mirror, you won't be able to remove the button and if you try, you will probably break your windshield. There is a cleaner/primer pad in the kit. Throughly clean the spot that is outlined with the tape. Allow to dry thoughly.
Remove the button from the mirror mount and place on a large piece of heavy tape such as duct tape or reenfored packing tape. Apply a large dab of adhesive to the button about an 1/8 to 1/4".
Too much and it will ooze out from behind the button when pressed against the windshield, too little and you won't get a good bond.
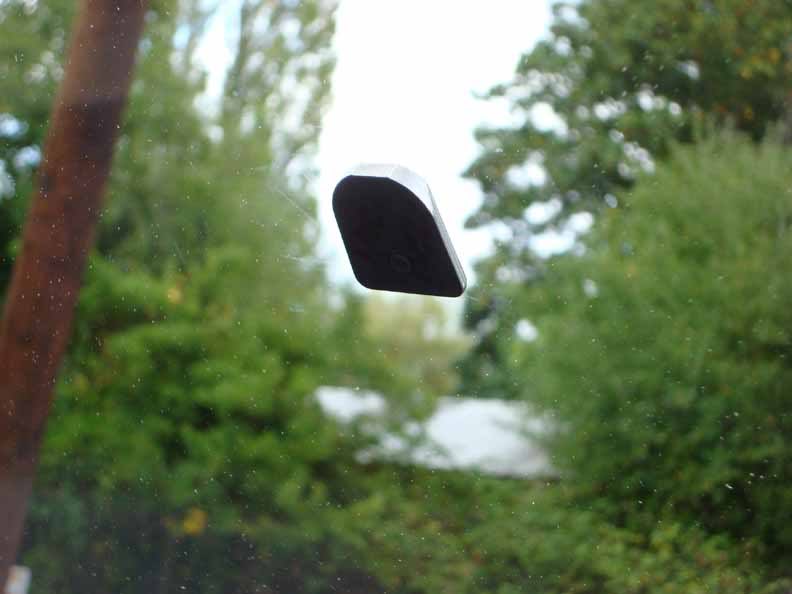
Remember which way is up and then align the button with the taped area on the windshield. Press firmly into position. You will be able to move it slightly but once you begin pressing on the button, don't pull back as you will create air under the button and the adhesive is setting while you are doing this.
You will need to keep pressure on the button for about a minute and then press the tape in place to help maintain the pressure against the windshield. The directions state you can attach the mirror after 15 minutes, I chose to let it set for at least 12 hours. I left mine for almost 24. Remove the tape and your set to go!
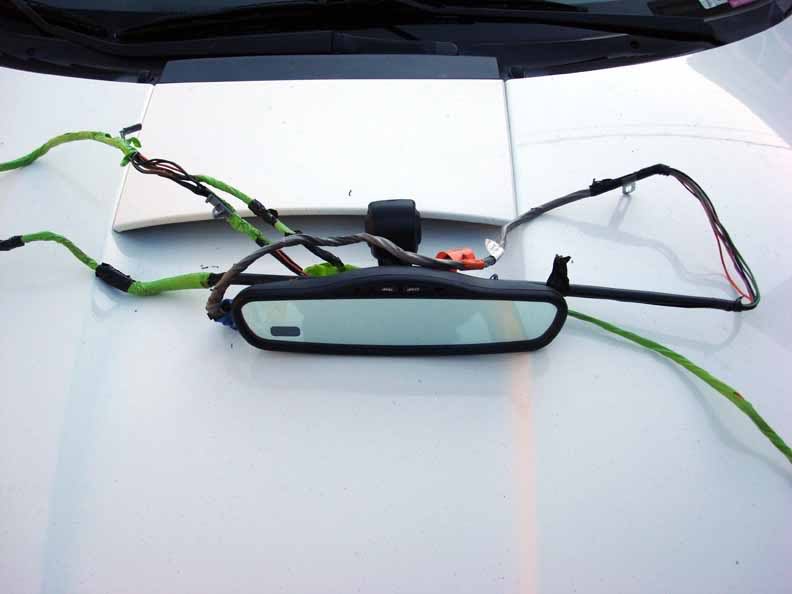
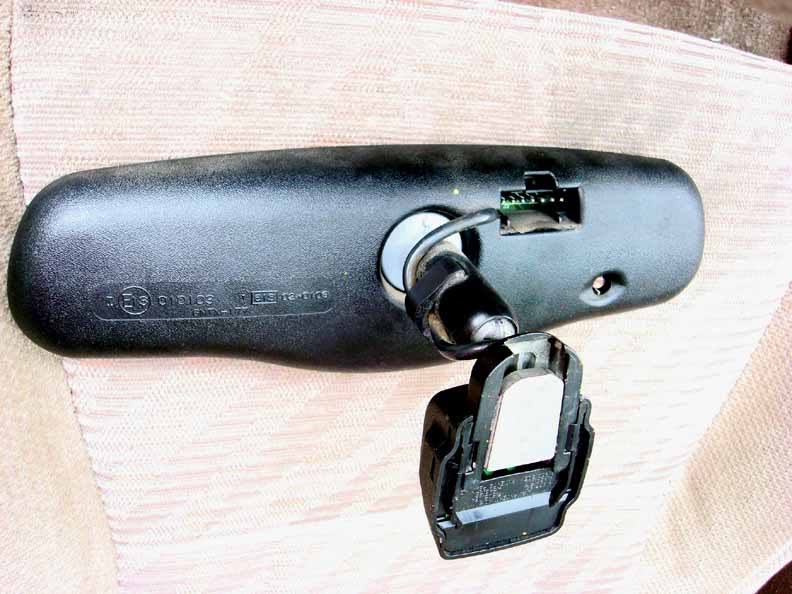
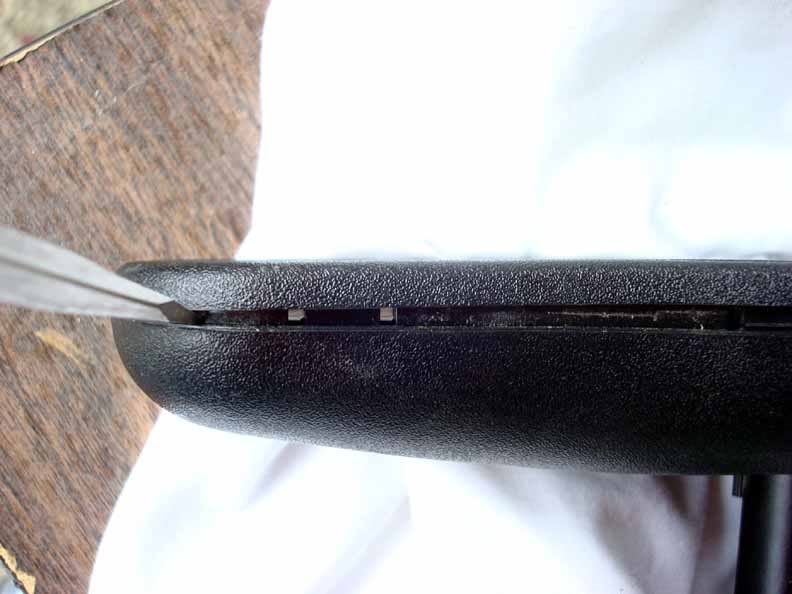
I decided to paint the housing of my mirror to match the FMU and other interior beige/tan plastic parts. You don't have to do this but it is really easy to do so it will look just like the OEM mirror removed. Take a small flat blade screw driver and starting on the top of the mirror about mid point, press the tip of the blade into the seam and give a gentle twist. The casing should spread out some and the clips should just pop open. Work your way around the entire mirror until you get all the internal clips.
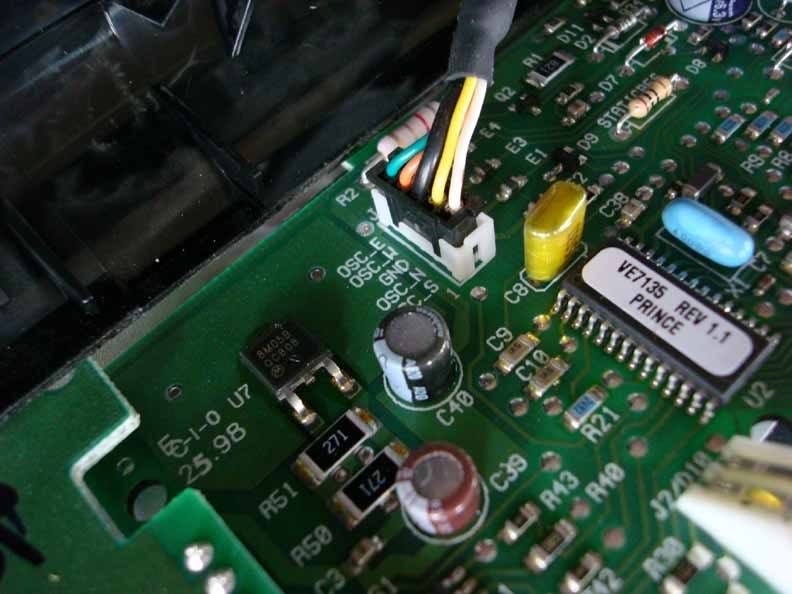
The mirror will come apart and you will have the interior exposed. Be careful and not pull too much on these pieces trying to remove them. There is a small connector going from the small cable that enters the back of the case and connects to the circuit board. Very gently, pull the connector out of the circuit board.
With this disconnected you can then place the mirror and electronics aside. Remove the lock bolt from the back of the mirror casing. It should be a 1/4 inch bolt. Slip the cable out of the case as well. I used alcohol to wipe down the case parts and bezel. After drying I then primered the pieces and then painted them with a plastics enamel paint designed for plastics. Set that aside for at least 24 hours.
Once completely dry, reassemble the mirror. Take care as getting the wire back in the correct spot was a bit tricky but I was able to press it back in the correct spot so the connector for the external inputs would plug in correctly to the back of the case. Ensure the sensors are placed correctly in the case and the circuit boards are seated properly. The case halves just snap together.
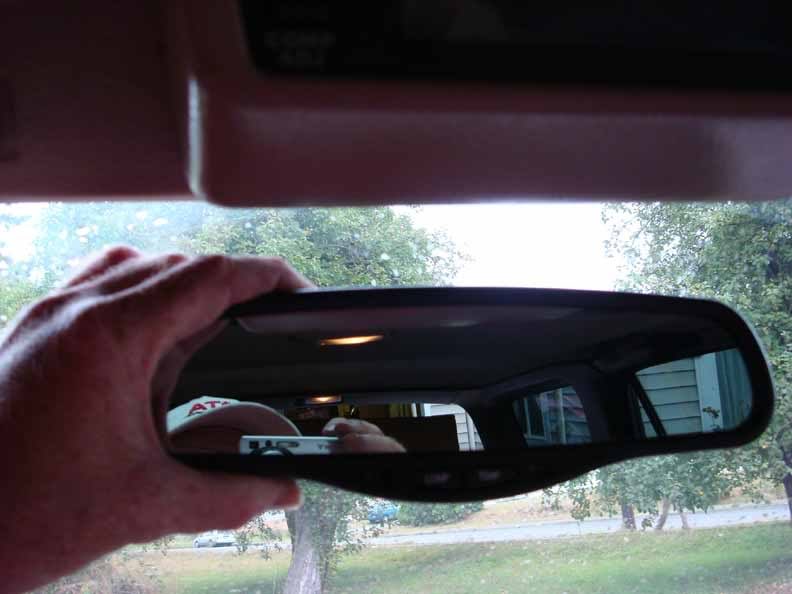
Slide the mirror onto the button and tighten the set screw. You will need a #25 Torx bit driver to remove the mirror from the button and then to install it.
Now you are ready to begin installation of the harness.
Before you begin routing the harness, you need to identify the two pink wires. Look at how they are inserted into the mirror end plug. Most likely if you obtained this from a wrecking yard the pink wires will be faded. The mirror connector should have seven wires or locations. Location #7 should be a Brown wire and location #1 will be pink (or faded to white). Remember, this mirror came out of a 1999 Surburban and the wiring diagram described is for this mirror. The wires are identified as follows:
1-Pink – Power from Ignition
2-Black - Ground
3-Lt. Green – Backup lamps (not used)
4-Gray – Auto dim for outside mirrors return (not used)
5-Pink – Auto dim for outside mirrors (not used)
6-Lt Green/Black (+ for temp sensor)
7-Brown (- for temp sensor)
I originally was going to use the reverse feature of this mirror (lt green) but was never able to totally figure out how or to what correct wire I needed to attach this wire to in order to make the mirror function when reverse is selected. After a short circuit I opted out of this feature and it actually dims just fine without a direct input to the mirror circuit. Gray #4 and Pink #5 will also not be used as the 4runner never had dimming outside mirrors.
If you want to save some issues and not get confused you can do what I started out doing but I had the harness routed before I realized the wires I really didn’t need. After identifying the 4 wires you will definitely need, cut apart the harness connector that DOES NOT connect to the mirror. You will have the metal pins for each wire on the ends when you finish. It makes it much easier to route the wires through the headliner and firewall. Next using a very small jewelers flat tip screw driver you can actually remove the unwanted wires from the mirror connector. The easiest method is just to route the entire harness through the roof liner and then just dead end the unused wires behind the dash. To do this just take each of the unused wires, cut them off, use a small piece of shrink tubing that extends approximately �” longer then the wire ends and heat shrink those ends.
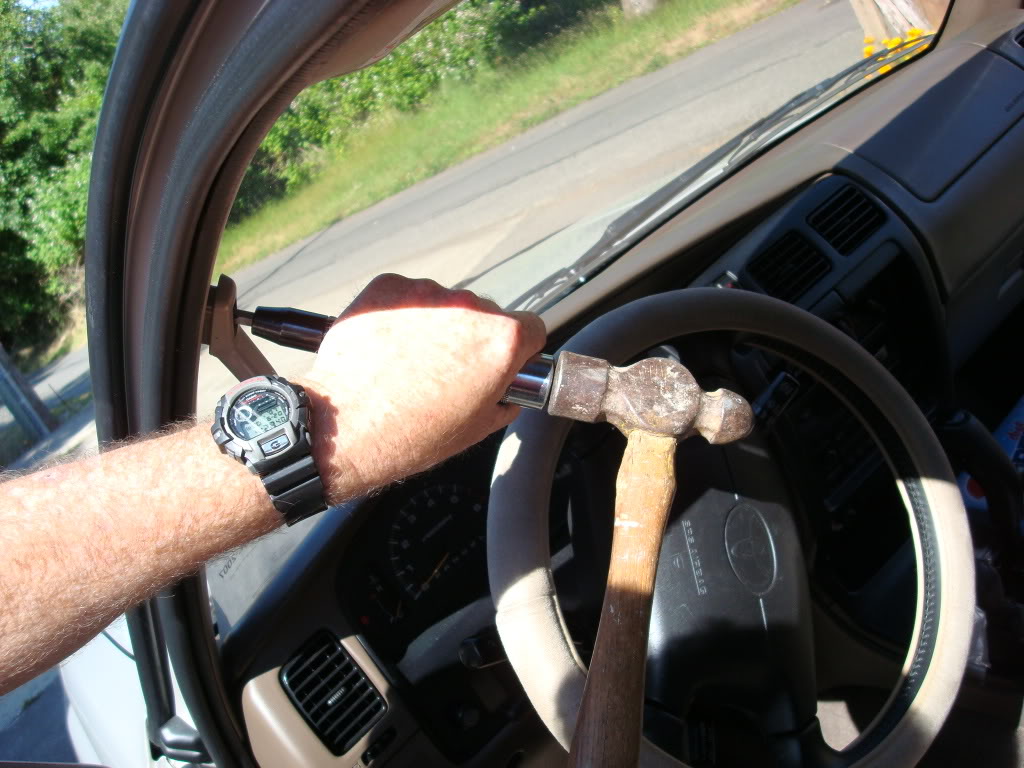
The next step will be a bit difficult, but you will need to route the harness through the roof liner. If you have never removed the corner ‘A’ pillars you will need an impact screw driver, ball pean hammer, a long punch, Phillips screw driver, small flat blade screw driver, metal coat hanger and some tape.
First thing to be removed will be the grab handle or also known as the “aww crap” handle. Use the small flat tip screw driver and pry off the screw mounting covers from each end of the handle.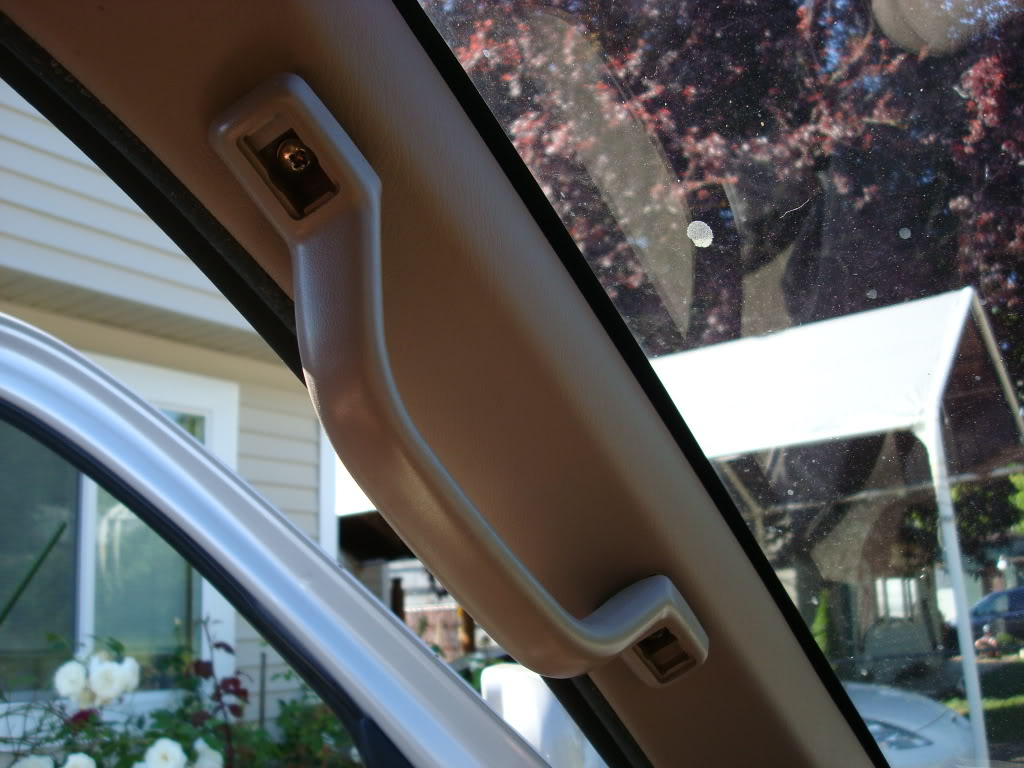
The factory uses a locktite substance and if these have n=ever been removed before will require you to use the ball pean hammer and impact screw driver. It is possible to remove them with a large say #3 phillips but you will strip out the head more likely then not. First remove the lower as it is most difficult then the upper. The lower required my using the impact and a rather long metal punch. A second pair of hands would be great!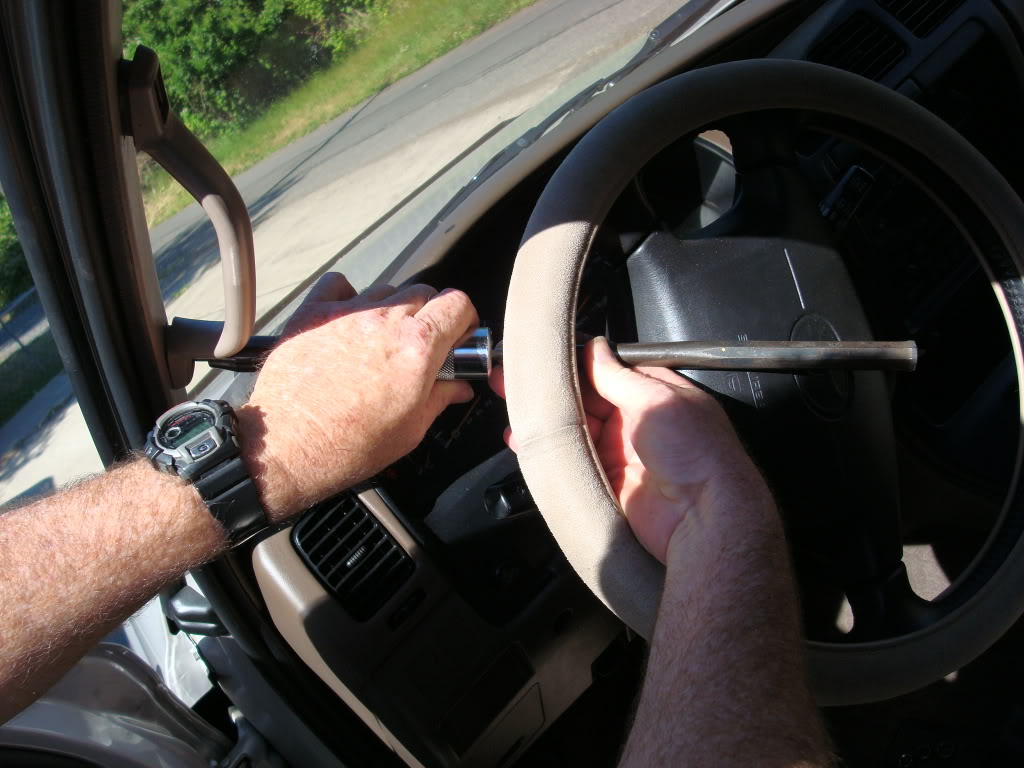
Remove the upper mount screw.
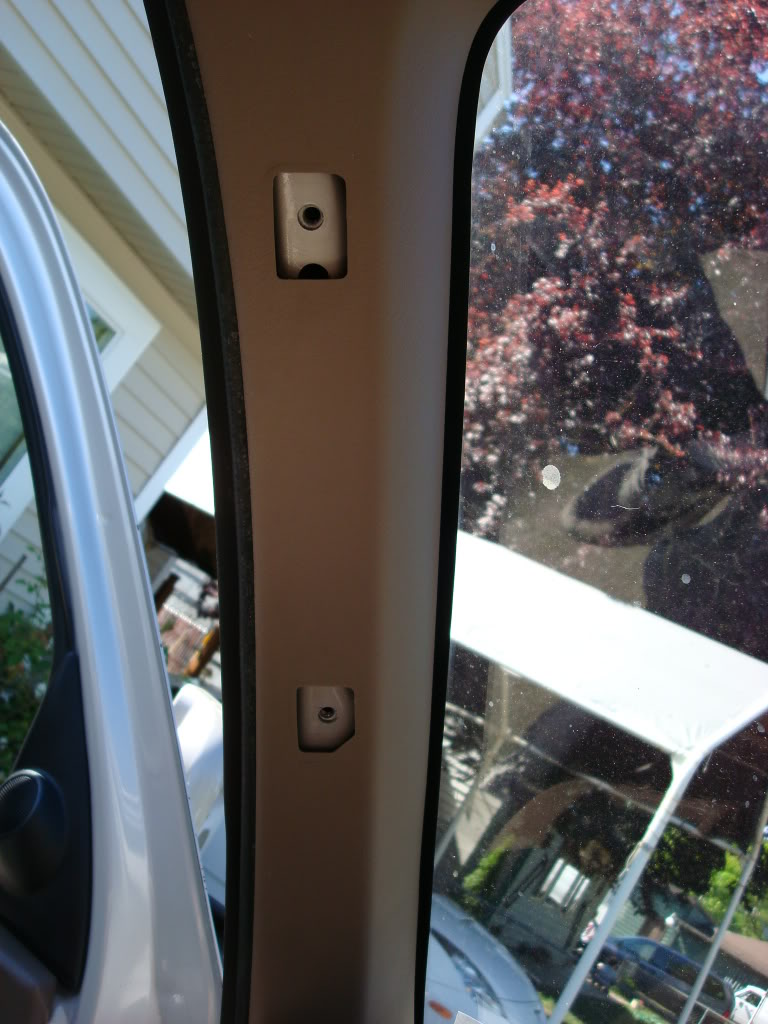
Grasp the ‘A’ pillar cover with your hand and pull it off. It is just clipped in place so it may take a bit of tugging, but it will just pop off. The cover will also be under the driver side headliner trim. Just slide it out from underneath. You should see some other OEM wires running along the pillar.
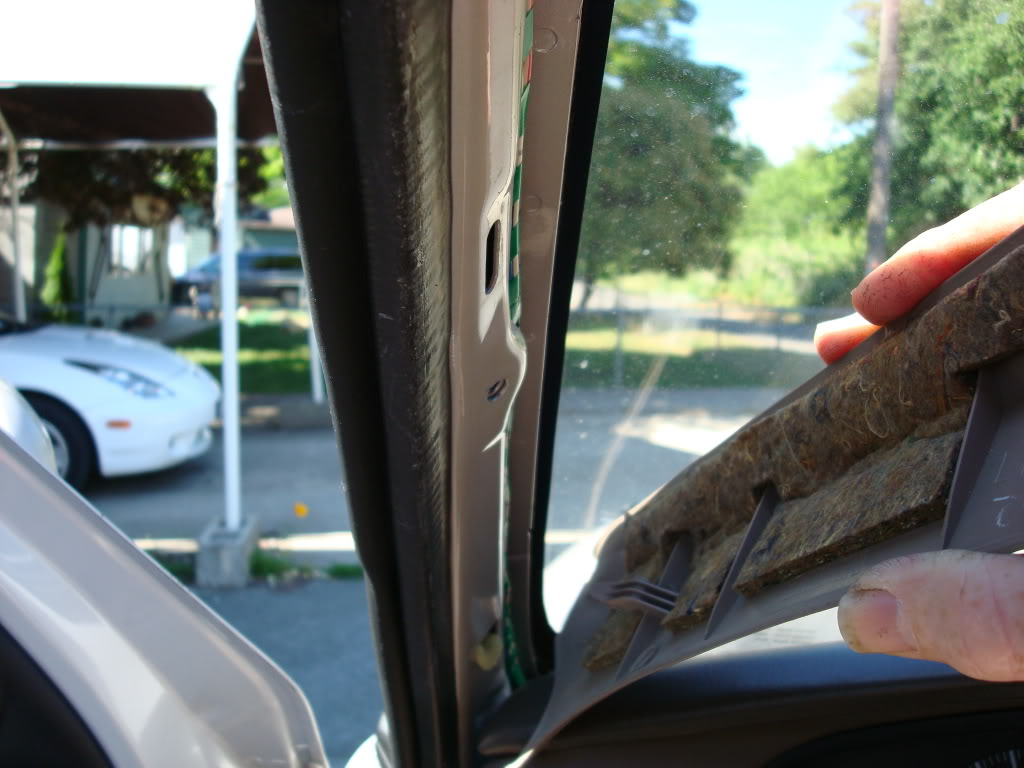
Remove the drivers side visor.
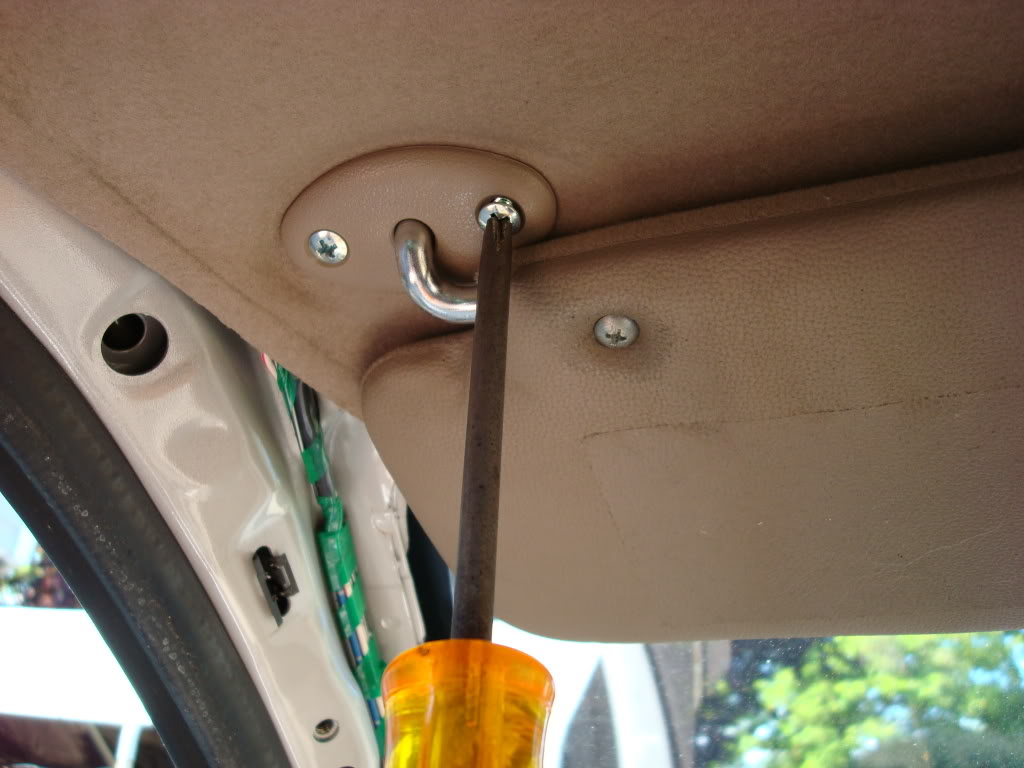
Now you will be able to pull down the headliner slightly to route the metal hanger above the headliner to the mirror opening.
I recommend that you bend a small loop end on the hanger with needle nose pliers. Helps the wire insertion through the head liner and avoid hang-ups when you pull it through. It may take a bit of work to get the wire where you want it and then be able to pull the end down. You will need to take the 4 wires from our harness, tape them in a line/group to the hanger wire loop then pull them back through the headliner over to the ‘A’ pillar.
Check to see how much wire you will need to connect to the mirror itself.
Route the connector end through the hole in the OEM mirror mount which will center the harness and keep it out of the way and then push the connector into the mirror. It will just snap into position with very little force.
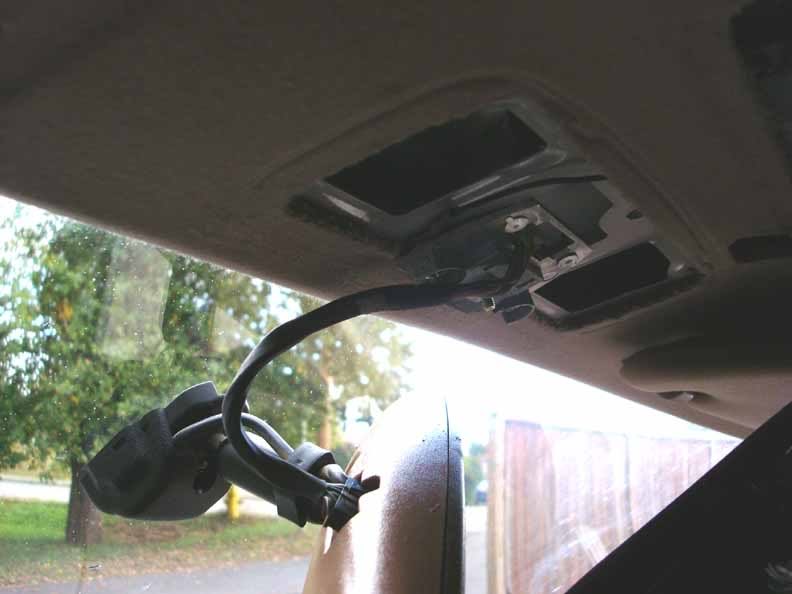
Pull the excess that is not needed after attaching the mirror connector towards the ‘A’ pillar.
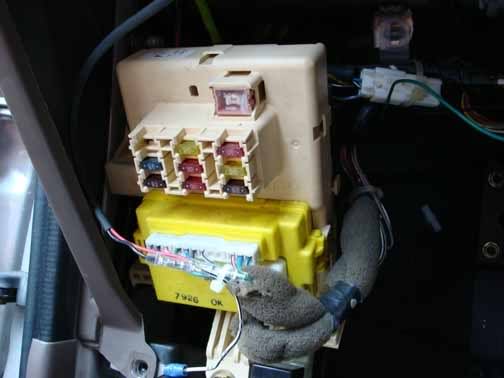
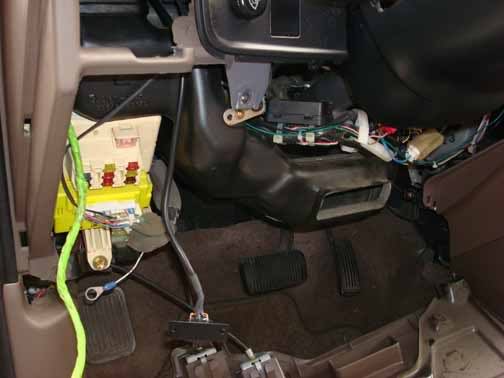
Remove the lower driver’s side dash covering. There will be several 10 mm bolts to be removed to allow the lower dash panel to be removed out of the way exposing the drivers side junction box. The hood release and gas cap opening levers and cables will still be attached. It is not necessary to remove those.
Tape the mirror harness wires together and route them down the ‘A’ pillar and down behind the dash. Pull out any excess. Use some electrician’s tape to hold the wires next to the ‘A’ pillar. I used short pieces and just taped them to the OEM wire bundle. You will actually have all 7 wires from the mirror now at the lower portion of the dash. If you did not remove the extra wires from the harness earlier, then dead end the #3,4 and 5 wires (Lt. GREEN, GRAY and second PINK) as described above. Route the Lt. GREEN/BLACK and BROWN wires through the firewall as these will be used for our temperature sensor.
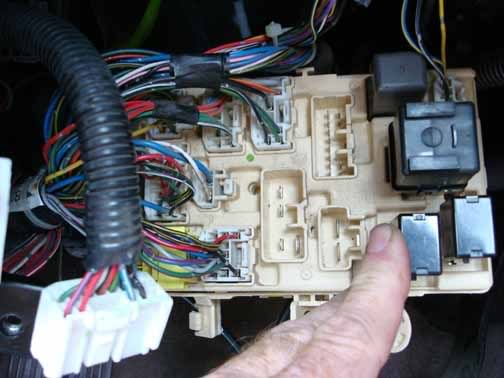
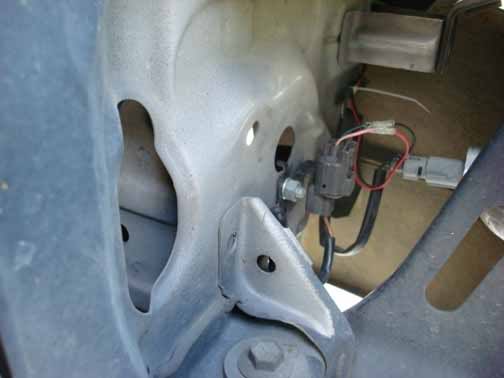
Next, remove the mounting screw holding the drivers J-box in place. You will need to get to the back of the J-box. To get to the back of the J-box you may need to remove the lower power connections.
Remove the connectors that are closest to you from the rear of the J-box. Don’t worry about location or putting the wrong connector back into the incorrect location as they are all keyed to prevent improper placement.
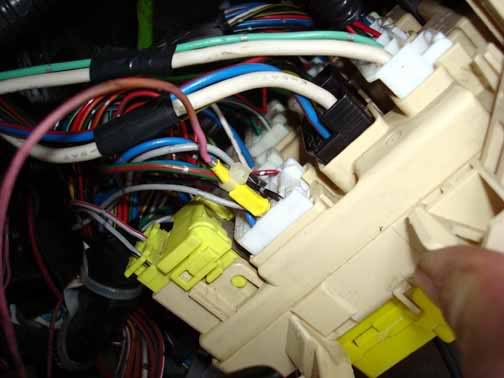
If you cut down the connector as described earlier, you should now have flat metal pins on each of the wire ends. Take the designated PINK wire which is the ignition power for our mirror and slip a 1 �” piece of shrink wrap around the connector leaving about �” of the flat pin exposed.

You will need to now insert the pink wire flat pin into the middle wire closest to you in connector 1B pin #3. this will be a gray wire between the upper wire Pin 1 (BLACK) and lower wire Pin 8 (BLUE)
There should be enough friction to hold the pin in place but I used a small nylon tie wrap to hold it firm.
Reinstall the connectors to the back of the driver’s J-box. Cut the pin off the end of the black wire from the mirror harness and crimp on either a loop or fork crimp. You will then attach this to any bolt down location near the J-box that is attached to the chassis/frame providing a solid ground point. I used the mounting bolt that secures the J-box in position.
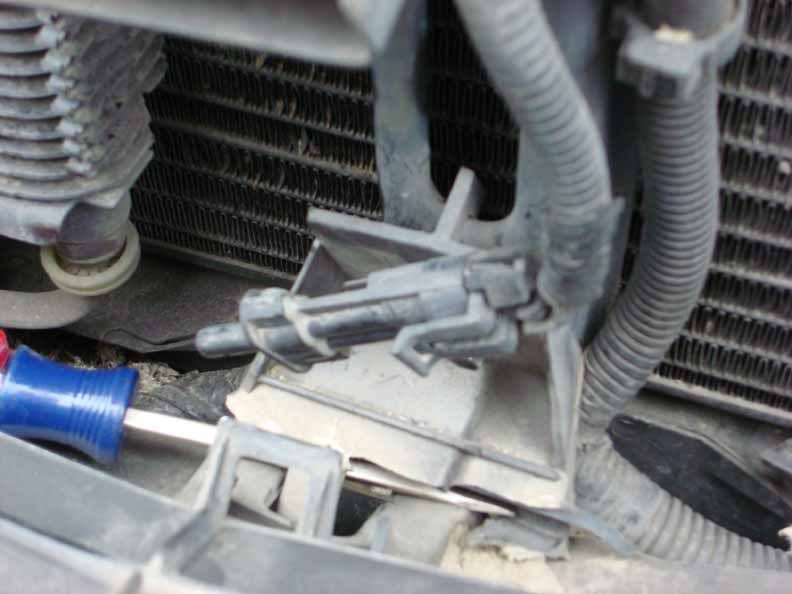
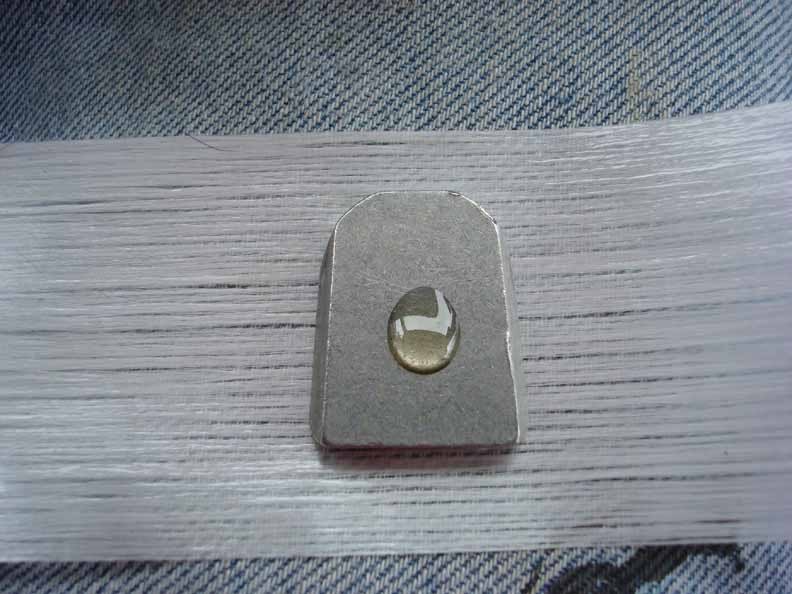
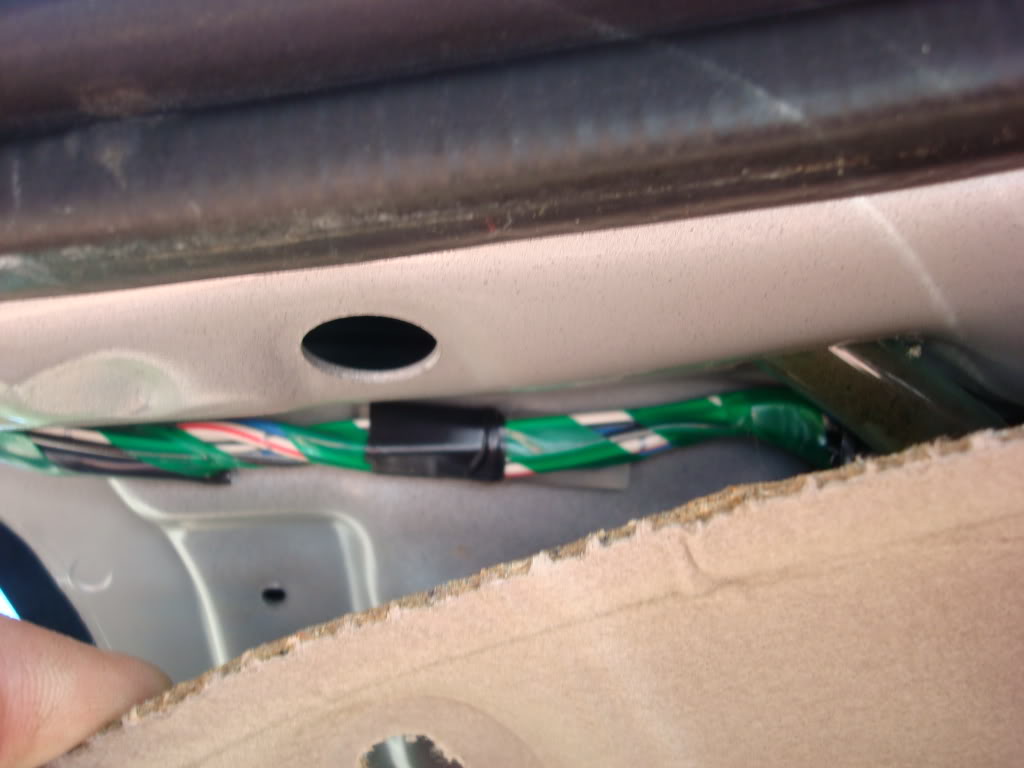
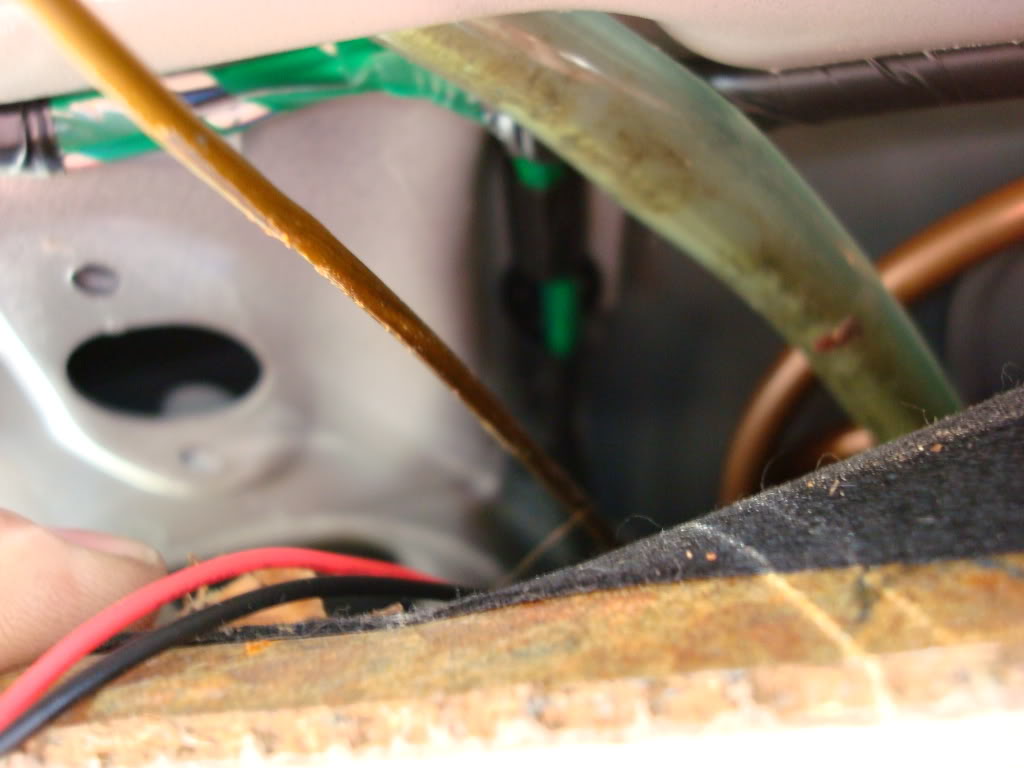
Next you will need to route the GREEN and BROWN wires that you pushed through the firewall along the fender securing them with nylon tie wraps.
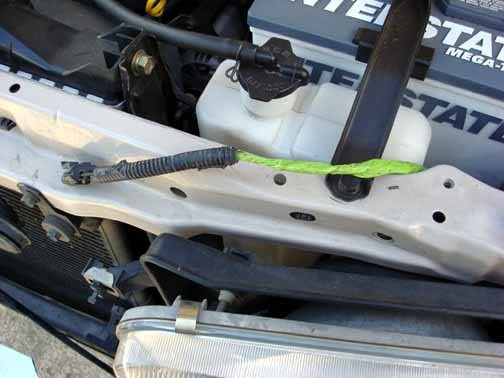
Route the pair down behind the headlight mounting location so it will be to the left and behind the bumper. Mount the sensor to the support using either a sheet metal screw or using an existing hole, a small bolt, nut and lock washer. This is what I did to save some removal of parts to get to the mounting area. This will shield it from direct wind and weather during driving and will shield it from radiator heat as well giving you a more true reading.
Once you have spliced the sensor leads to the sensor connector, plug in the sensor connector to the mounted sensor and the installation is complete. You should now be ready for a test.
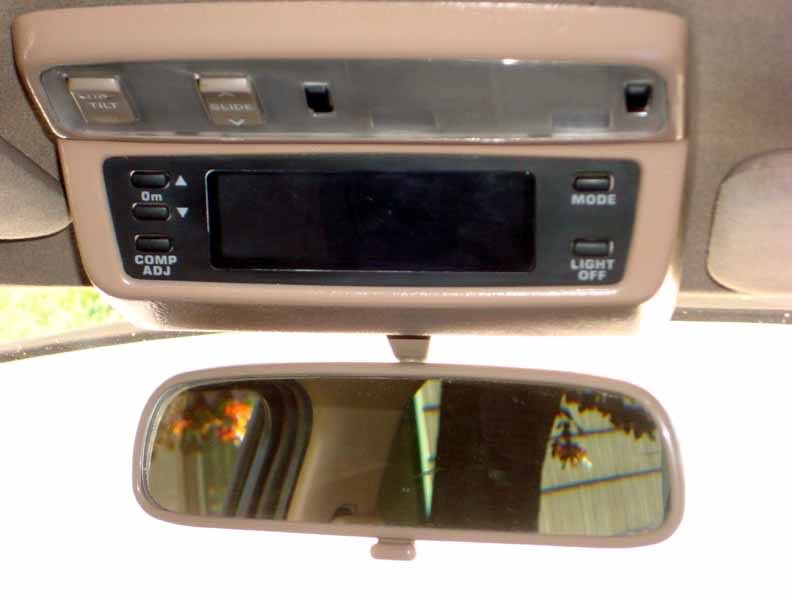
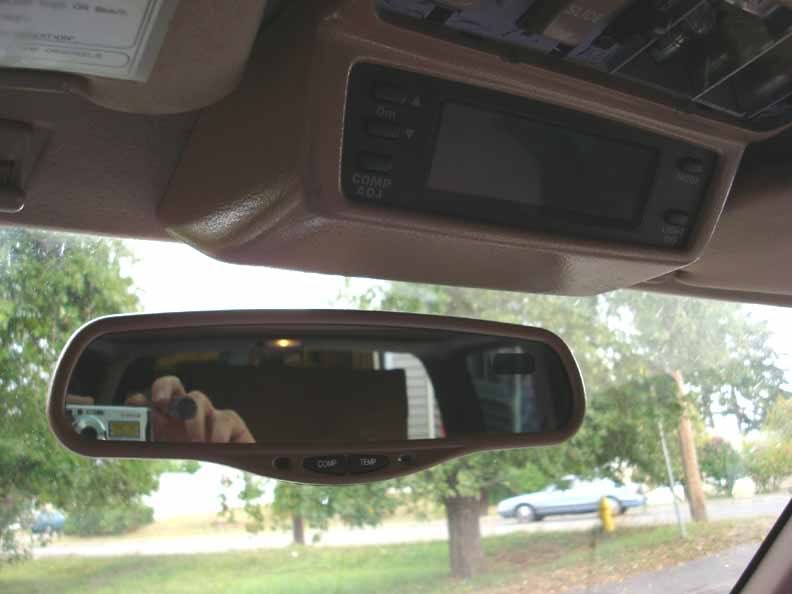
Turn the ignition switch to ON and the mirror should do a diagnostic check (*88) and then give you a read out of the temperature. Select either TEMP or COMP and you cans shift between direction or temperature.
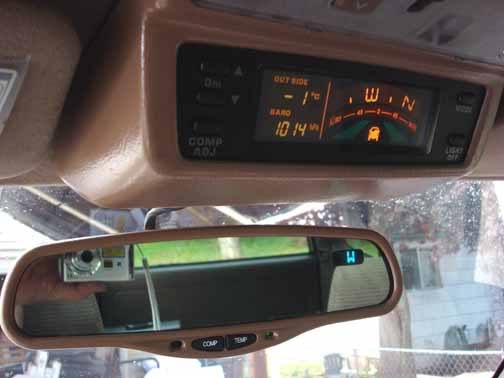
Another neat function of this mirror is when the outside air temp reached 38 decgrees the display will flash between the temp and ICE every couple of seconds for about 30 seconds then shows the current temp only. The display will also display ICE if you turn on the ignition for the first time and the air temp is 38 or less. Rather neat feature.
The first time you take the vehicle out in the night it takes only a few seconds and sometime less when a vehicle approaches from the rear. Once they pass or turn away the view from the rear view mirror will revert back to a clearer state within a matter of 10-15 seconds or depending on ambient light. The mirror has both a front looking and rear looking sensor so it will take into account light coming from the front and rear. Enjoy!
For those of you who do not drive a newer 4Runner now you can have the luxury of auto dimming rear view mirror with a combination compass and outside temperature reading.
As a disclaimer, do this upgrade/modification at your own risk. This installation/modification was done using described components that were not OEM Toyota parts but came from various manufacturers and suppliers. Most of the components were obtained from auto salvage yards.
Some background, I installed a Hilux Surf Field Monitoring Unit a few months ago and was really happy with the new addition that Toyota should have put in Gen 3's here in the US, but I had some issues with my unit and could not correct the inaccuracies of the Temperature sensor. The issue was in the circuit board and no adjustment to compensate for it. During one of my trips to the local bone yard looking for Limited pieces for another project (Limited to SR5 install) I noticed a mirror in a GMC Suburban. I found out that it was a model Gentex GNTX-177.
Seems Gentex and Donnally make almost all the electronic mirrors for most all auto manufacturers. I then removed the mirror and button mount. I also then spent the better part of an afternoon removing the entire wire harness for this mirror. You will need a #20 TORX bit driver to loosen the set screw in the mirror.
I also needed the sensor and on most GMC/Chevy trucks this will be found located on the center forward radiator support.
Some of these sensors are directly mounted to the center radiator pillar and others are on a plastic mount. This one just happened to be found on a plastic mount out of a 1998 Yukon.
Step 1. I needed to remove the FMU and OEM (modified) mirror with mount from the overhead. Some of the later Gen 3 4runners have a similar looking overhead console so it should look a bit familiar and is removed in the same manner.
The FMU was pretty easy as I only had to remove one screw. For anyone else who is just removing their old OEM mirror, you will need to remove the plastic cover that just clips over the headliner mounted mirror. Most likely your overhead looks similar to this:
Simply remove the small collar that surrounds the base of the mirror and you will be able to pry off the outer cover as well
Once the cover is removed, unscrew the OEM mount. There are two screws that hold it in place. After you remove the mirror, you will be re-installing this mount as it also holds your map lights.
The OEM mirror is held in place by a roller clip with two spring clips. Remove the single screw and then the mirror will drop out. If you chose not to save these pieces then don't fuss if you drop them. I chose to put them back in place but its your call.
Remember, if you don't want to save the cam clamp and spring pins then you don't have to do this step in the above picture. I chose to keep them and show them in place with the first hold down screw in place ready to screw back in to the head liner. Your mount bracket will be much bigger as mine was modified for my FMU install. Here is the OEM bracket back in the headliner.
Take the GNTX-177 with the button installed and position it where you think it will be best suited to your needs.
While holding the mirror, you can either use a piece of tape or have a partner using a piece of tape on the outside note/mark where the button is located on the windshield.
Next you will need to mark the location of where the button will be glued. I recommend you tape the button in place where you desire it on the inside of the glass. There is a centerline mark on the top edge of the windshield. It will look like a small black arrow point. Measure down from that spot to where you marked the location of the button. Place the button at that location and hold with tape. Next from the outside, lay down a tape outline on the edge of the button.
The next step is very critical. I used a very high quality mirror mounting adhesive. There are serveral available but I used Permatex. It was less then $4 at AutoZone.
Be sure to follow the directions EXACTLY! One other word of caution, ensure you are placing the button correctly, right side up and glue side to the glass. If you screw this up, you won't be able to mount your mirror, you won't be able to remove the button and if you try, you will probably break your windshield. There is a cleaner/primer pad in the kit. Throughly clean the spot that is outlined with the tape. Allow to dry thoughly.
Remove the button from the mirror mount and place on a large piece of heavy tape such as duct tape or reenfored packing tape. Apply a large dab of adhesive to the button about an 1/8 to 1/4".
Too much and it will ooze out from behind the button when pressed against the windshield, too little and you won't get a good bond.
Remember which way is up and then align the button with the taped area on the windshield. Press firmly into position. You will be able to move it slightly but once you begin pressing on the button, don't pull back as you will create air under the button and the adhesive is setting while you are doing this.
You will need to keep pressure on the button for about a minute and then press the tape in place to help maintain the pressure against the windshield. The directions state you can attach the mirror after 15 minutes, I chose to let it set for at least 12 hours. I left mine for almost 24. Remove the tape and your set to go!
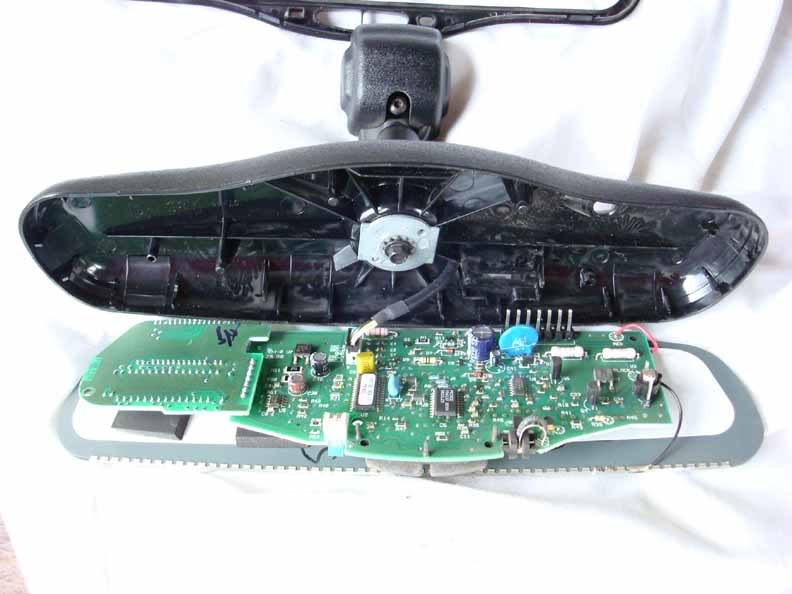
I decided to paint the housing of my mirror to match the FMU and other interior beige/tan plastic parts. You don't have to do this but it is really easy to do so it will look just like the OEM mirror removed. Take a small flat blade screw driver and starting on the top of the mirror about mid point, press the tip of the blade into the seam and give a gentle twist. The casing should spread out some and the clips should just pop open. Work your way around the entire mirror until you get all the internal clips.
The mirror will come apart and you will have the interior exposed. Be careful and not pull too much on these pieces trying to remove them. There is a small connector going from the small cable that enters the back of the case and connects to the circuit board. Very gently, pull the connector out of the circuit board.
With this disconnected you can then place the mirror and electronics aside. Remove the lock bolt from the back of the mirror casing. It should be a 1/4 inch bolt. Slip the cable out of the case as well. I used alcohol to wipe down the case parts and bezel. After drying I then primered the pieces and then painted them with a plastics enamel paint designed for plastics. Set that aside for at least 24 hours.
Once completely dry, reassemble the mirror. Take care as getting the wire back in the correct spot was a bit tricky but I was able to press it back in the correct spot so the connector for the external inputs would plug in correctly to the back of the case. Ensure the sensors are placed correctly in the case and the circuit boards are seated properly. The case halves just snap together.
Slide the mirror onto the button and tighten the set screw. You will need a #25 Torx bit driver to remove the mirror from the button and then to install it.
Now you are ready to begin installation of the harness.
Before you begin routing the harness, you need to identify the two pink wires. Look at how they are inserted into the mirror end plug. Most likely if you obtained this from a wrecking yard the pink wires will be faded. The mirror connector should have seven wires or locations. Location #7 should be a Brown wire and location #1 will be pink (or faded to white). Remember, this mirror came out of a 1999 Surburban and the wiring diagram described is for this mirror. The wires are identified as follows:
1-Pink – Power from Ignition
2-Black - Ground
3-Lt. Green – Backup lamps (not used)
4-Gray – Auto dim for outside mirrors return (not used)
5-Pink – Auto dim for outside mirrors (not used)
6-Lt Green/Black (+ for temp sensor)
7-Brown (- for temp sensor)
I originally was going to use the reverse feature of this mirror (lt green) but was never able to totally figure out how or to what correct wire I needed to attach this wire to in order to make the mirror function when reverse is selected. After a short circuit I opted out of this feature and it actually dims just fine without a direct input to the mirror circuit. Gray #4 and Pink #5 will also not be used as the 4runner never had dimming outside mirrors.
If you want to save some issues and not get confused you can do what I started out doing but I had the harness routed before I realized the wires I really didn’t need. After identifying the 4 wires you will definitely need, cut apart the harness connector that DOES NOT connect to the mirror. You will have the metal pins for each wire on the ends when you finish. It makes it much easier to route the wires through the headliner and firewall. Next using a very small jewelers flat tip screw driver you can actually remove the unwanted wires from the mirror connector. The easiest method is just to route the entire harness through the roof liner and then just dead end the unused wires behind the dash. To do this just take each of the unused wires, cut them off, use a small piece of shrink tubing that extends approximately �” longer then the wire ends and heat shrink those ends.
The next step will be a bit difficult, but you will need to route the harness through the roof liner. If you have never removed the corner ‘A’ pillars you will need an impact screw driver, ball pean hammer, a long punch, Phillips screw driver, small flat blade screw driver, metal coat hanger and some tape.
First thing to be removed will be the grab handle or also known as the “aww crap” handle. Use the small flat tip screw driver and pry off the screw mounting covers from each end of the handle.
The factory uses a locktite substance and if these have n=ever been removed before will require you to use the ball pean hammer and impact screw driver. It is possible to remove them with a large say #3 phillips but you will strip out the head more likely then not. First remove the lower as it is most difficult then the upper. The lower required my using the impact and a rather long metal punch. A second pair of hands would be great!
Remove the upper mount screw.
Grasp the ‘A’ pillar cover with your hand and pull it off. It is just clipped in place so it may take a bit of tugging, but it will just pop off. The cover will also be under the driver side headliner trim. Just slide it out from underneath. You should see some other OEM wires running along the pillar.
Remove the drivers side visor.
Now you will be able to pull down the headliner slightly to route the metal hanger above the headliner to the mirror opening.
I recommend that you bend a small loop end on the hanger with needle nose pliers. Helps the wire insertion through the head liner and avoid hang-ups when you pull it through. It may take a bit of work to get the wire where you want it and then be able to pull the end down. You will need to take the 4 wires from our harness, tape them in a line/group to the hanger wire loop then pull them back through the headliner over to the ‘A’ pillar.
Check to see how much wire you will need to connect to the mirror itself.
Route the connector end through the hole in the OEM mirror mount which will center the harness and keep it out of the way and then push the connector into the mirror. It will just snap into position with very little force.
Pull the excess that is not needed after attaching the mirror connector towards the ‘A’ pillar.
Remove the lower driver’s side dash covering. There will be several 10 mm bolts to be removed to allow the lower dash panel to be removed out of the way exposing the drivers side junction box. The hood release and gas cap opening levers and cables will still be attached. It is not necessary to remove those.
Tape the mirror harness wires together and route them down the ‘A’ pillar and down behind the dash. Pull out any excess. Use some electrician’s tape to hold the wires next to the ‘A’ pillar. I used short pieces and just taped them to the OEM wire bundle. You will actually have all 7 wires from the mirror now at the lower portion of the dash. If you did not remove the extra wires from the harness earlier, then dead end the #3,4 and 5 wires (Lt. GREEN, GRAY and second PINK) as described above. Route the Lt. GREEN/BLACK and BROWN wires through the firewall as these will be used for our temperature sensor.
Next, remove the mounting screw holding the drivers J-box in place. You will need to get to the back of the J-box. To get to the back of the J-box you may need to remove the lower power connections.
Remove the connectors that are closest to you from the rear of the J-box. Don’t worry about location or putting the wrong connector back into the incorrect location as they are all keyed to prevent improper placement.
If you cut down the connector as described earlier, you should now have flat metal pins on each of the wire ends. Take the designated PINK wire which is the ignition power for our mirror and slip a 1 �” piece of shrink wrap around the connector leaving about �” of the flat pin exposed.
You will need to now insert the pink wire flat pin into the middle wire closest to you in connector 1B pin #3. this will be a gray wire between the upper wire Pin 1 (BLACK) and lower wire Pin 8 (BLUE)
There should be enough friction to hold the pin in place but I used a small nylon tie wrap to hold it firm.
Reinstall the connectors to the back of the driver’s J-box. Cut the pin off the end of the black wire from the mirror harness and crimp on either a loop or fork crimp. You will then attach this to any bolt down location near the J-box that is attached to the chassis/frame providing a solid ground point. I used the mounting bolt that secures the J-box in position.
Next you will need to route the GREEN and BROWN wires that you pushed through the firewall along the fender securing them with nylon tie wraps.
Route the pair down behind the headlight mounting location so it will be to the left and behind the bumper. Mount the sensor to the support using either a sheet metal screw or using an existing hole, a small bolt, nut and lock washer. This is what I did to save some removal of parts to get to the mounting area. This will shield it from direct wind and weather during driving and will shield it from radiator heat as well giving you a more true reading.
Once you have spliced the sensor leads to the sensor connector, plug in the sensor connector to the mounted sensor and the installation is complete. You should now be ready for a test.
Turn the ignition switch to ON and the mirror should do a diagnostic check (*88) and then give you a read out of the temperature. Select either TEMP or COMP and you cans shift between direction or temperature.
Another neat function of this mirror is when the outside air temp reached 38 decgrees the display will flash between the temp and ICE every couple of seconds for about 30 seconds then shows the current temp only. The display will also display ICE if you turn on the ignition for the first time and the air temp is 38 or less. Rather neat feature.
The first time you take the vehicle out in the night it takes only a few seconds and sometime less when a vehicle approaches from the rear. Once they pass or turn away the view from the rear view mirror will revert back to a clearer state within a matter of 10-15 seconds or depending on ambient light. The mirror has both a front looking and rear looking sensor so it will take into account light coming from the front and rear. Enjoy!
Last edited by Ritzy4Runner; Jan 14, 2008 at 01:06 PM.
Jan 14, 2008 | 01:03 PM
#4
As for how much it cost, well in parts not much at all. Depends on the Yard you get the parts from. The first one I bought cost me less then $20, mirror and sensor. I purchased a second one for installation into my 2000 Celica and it cost me all of $10. So shop around and see what you can find. Most yards will charge around $25 for a mirror. Remember don't just check GMC vehicles, Ford and Chrysler vehicles also used the Gentex mirrors.
If you have any more questions, please feel free to ask. I have submitted this article to the Tech section so it should hopefully be there as well in a few days.
 Jan 15, 2008 | 07:12 AM
#7
This mirror is a whole lot more then just an auto dimming mirror. This is also a Compass and outside thermometer. I installed a JDM Field Monitoring Unit but the outside temperature readings were way off. I couldn't replace the interior circuit boards for the FMU to correct the issue so the readings even in Celsius were way off. When it was supposed to be reading say 10 C it was reading like -6 C. The problem was not with the sensor from what I could determine and getting a stock replacement was not going to happen, I tried. My lady lives in New Zealand so reading the temp in celsius was no problem for me, but I wanted to at least have it accurate. When I found the mirror on one of my wrecking yard hunts I thought, hey this could be the fix I need. All you need to do is get the mirror, the pigtail for the mirror, temp sensor and pigtail and use your own wire. I went to alot of trouble to remove the OEM harness for the mirror, but at the time I wanted to be sure I got everything I needed and not having any schematics of the mirror, sensor and capabilities of the mirror, I decided to get as much of it from the donor vehicle as I could. And believe me having that auto dimming feature is well worth it driving at night.
Trending Topics
Oct 23, 2008 | 02:45 PM
#11
Contributing Member
Joined: Mar 2003
Posts: 11,334
Likes: 0
From: COTKU,Ontario,Canada
Operation and Calibration instructions for auto dimming mirrors
Here is a link to the instructions for operation and calibration of these mirrors.
You can backwards link from there to a sales website for new ones as well.
http://www.mitocorp.com/html/nvs_com...operations.htm
Here is a link for some special brackets for certain toyota models to give you a factory quality install... price is very reasonable on these too...
http://www.mitocorp.com/html/nvs_special_brackets.htm
Another sales link with slightly cheaper prices and free access to the factory installation guide.
http://www.autoanything.com/mirrors/61A2075A0A0.aspx
1YAxz
Last edited by aviator; Jan 1, 2010 at 06:48 PM.
Oct 25, 2008 | 08:36 AM
#12
Registered User
Joined: May 2007
Posts: 2,175
Likes: 2
From: Denver metro area-CO
once again a stunningly well detailed mod writeup by Ritzy.
This is a project that I would not attempt myself-I would break stuff-but I can appreciate it all the same. Certainly it seems easy enough....
I like how you don't edit the informational extras out-who would have known your lady friend is from NZ?
Kind of makes for a better story and certainly more fun to follow along.
Thanks for saving folks a lot of time and frustration in trying to figure this type of thing out for themselves.
Oct 26, 2008 | 07:07 AM
#13
Registered User
Joined: Jan 2007
Posts: 126
Likes: 0
From: Raytown, MO and Pittsburg, KS
I have a buddie that worked at Cabellas and he got me one of the aftermarket Gentex mirrors that come with the brand new harness sensor and dimming mirror with the compass and outside temp feature. This new mirror set me back about 100 Bucks. I know that you got a good deal compared to me, but is there any way to calibrate your mirror? My mirror has a zone feature that is set depending on what zone you live, and also calibrates itself when you set the appropriate zone. When I set this feature, the mirror says calibrate and the instructions say that I should drive in a 90 ft circle for three rotations to properly calibrate the compass. I know that this means nothing to you but just thought that it might be useful if your mirror has this feature on it.
I also hope that you have better luck with the button that you have now glued to the windsheild. I first had my button come off twice, until I used light sand paper to create a better bond with the glass surface. Then my buddie folded down his visor too fast and hit the mirror popping it off with a large chunk off glass still on the button. I had to replace the windshield for this reason. What a pain in the butt! So with a new windsheild and a bodyshop replacing the mirror onto the glass, I now have a mirror again that is centered without any obstruction to either visor! All I can say is the mirror is an awesome feature to have, but was a pain in the butt for me.
I also hope that you have better luck with the button that you have now glued to the windsheild. I first had my button come off twice, until I used light sand paper to create a better bond with the glass surface. Then my buddie folded down his visor too fast and hit the mirror popping it off with a large chunk off glass still on the button. I had to replace the windshield for this reason. What a pain in the butt! So with a new windsheild and a bodyshop replacing the mirror onto the glass, I now have a mirror again that is centered without any obstruction to either visor! All I can say is the mirror is an awesome feature to have, but was a pain in the butt for me.
Oct 26, 2008 | 08:55 PM
#14
Sorry to hear you had such issues. I measured out where the mirror was supposed to go. the held it in position to check such things a interference. As for the install, I clean the glass throughly with alcohole and used the cleaning pad included with my adhesive. Temperature during install will also affect the adhesion properties. I have had mine installed for over a year now and no issues. Sorry you had the problems you did. It really is a nice accessory. Only wish I would have been able to make the reverse feature work. I may research the best hook in to make it work, the wire is still there, I just tucked it inside the bundle.
Nov 10, 2008 | 09:17 AM
#17
Contributing Member
Joined: Apr 2003
Posts: 847
Likes: 0
From: Boston
i bought a similar gentex mirror out of a 06 4runner for my 07 4runner but it didnt come with the harness. any idea where i can get one? i was forwarded to and called mitocorp.com but they have their own universal connectors for the gentex mirrors. i wonder if toyota would carry them.
Nov 10, 2008 | 09:35 AM
#18
Registered User
Joined: Nov 2007
Posts: 383
Likes: 0
From: north ridgeville ohio
i did this mod ( with out the temp sensor) a couple months ago. what a great mod i figured it had to have been done before or i would have posted. either way the compass and auto dim is awsome!
on a side note some gm cars have the mirror i have which is auto dimming and compass. you can tell the difference by this ... 3 wire or 5 wire the 3 wire is compass/autodimming the 5 wire is compass/auto dimm/temp
also if you use just the pig tail from the mirror you can wire it up without the whole harness FYI these morrirs also have a standard feature which if hooked up shuts off the autodimmer when in reverse!
great write up !
Nov 17, 2008 | 05:15 PM
#20
Contributing Member
Joined: Apr 2003
Posts: 847
Likes: 0
From: Boston
Ritzy, great writeup.
according to your writeup, which pins are 1 & 2? looking at the back of the mirror, do the numbers begin left to right or right to left? this is why i ask. here is the wiring diagram from a 2003 4runner which comes with the same compass/dimming mirror.
according to the first pic, pin #7 is +12V and #6 is ground. but the following pic says for male connectors, pin numbering is upper right to lower left.
i just bought a mirror out of a 06 4runner to put in my 07 4runner but only have the mirror, no 7-pin connector, no sensors, no wiring. according to your writeup, i will probably not have the temperature function. would i still be able to get the compass to work without the sensor wiring? since i dont have the 7-pin connector, what type of a connector would i use and where would i get it? radio shack? i would probably only need to wire connector pins 6 and 7 since i dont have a sensor to hook up but need to confirm if pins 6-7 are the last two pins going right to left?
edit: i was wrong, the toyota gentex mirror for 2003+ 4runners are only compass/dimming mirrors, no temp option.
Last edited by Amir904; Nov 19, 2008 at 06:18 AM.


