
Cadillac 1994 4notes horns
 Apr 12, 2016 | 10:03 AM
#1
Thread Starter
Registered User
Joined: Mar 2012
Posts: 70
Likes: 0
Cadillac 1994 4notes horns
I want to replace the stock horns on my 1998 4Runner by 4 Cadillac horns (4 notes) using the stock connection. My question is, I need to perform some changes or only attach two Cadillac horns per each stock horn using an splitter in each out stock? I will appreciate your help. Thanks
Apr 12, 2016 | 12:29 PM
#4
Thread Starter
Registered User
Joined: Mar 2012
Posts: 70
Likes: 0
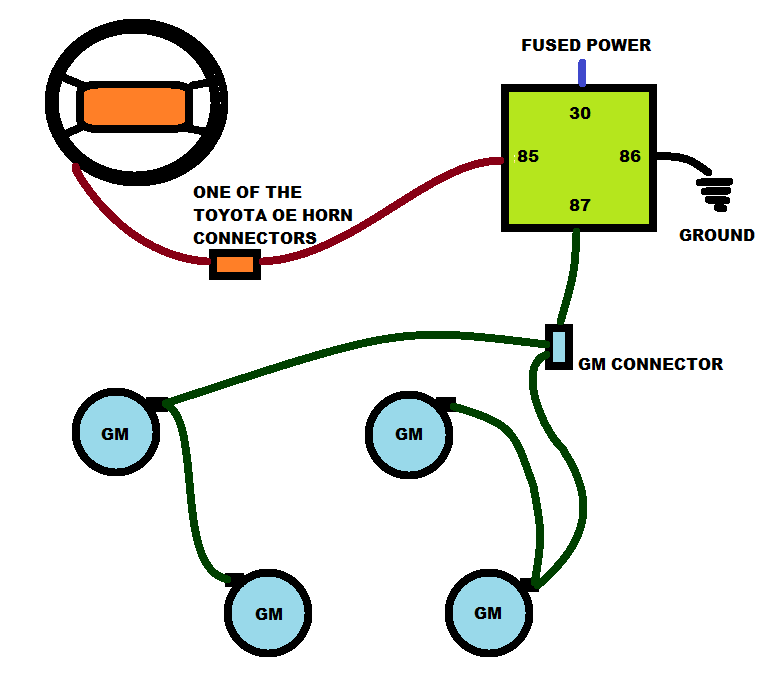
ok, as per the following diagram I have two questions:
1) the cables that connect my actual 4runner horns (the stock wires to horn) will be connected to the Relay 86 input (as per the diagram)?
2) Is necessary run another cable from the Relay 87 output to the other 2 cadillac horns or I could split one cable in 4 way?
Thanks in advance.
1) the cables that connect my actual 4runner horns (the stock wires to horn) will be connected to the Relay 86 input (as per the diagram)?
2) Is necessary run another cable from the Relay 87 output to the other 2 cadillac horns or I could split one cable in 4 way?
Thanks in advance.
Last edited by TheOriginal; Apr 12, 2016 at 01:29 PM.
Apr 12, 2016 | 06:11 PM
#6
Contributing Member


Joined: Sep 2005
Posts: 8,247
Likes: 497
From: mo
I am using 4 caddy horns, a 4 pin relay, one of the oe horn connector wires. On the other oe horn connector is an oe horn. Because I can.
https://www.yotatech.com/forums/f200...51/index6.html
Post 115 for some pics of horns. I can't find the wiring diagram any more, but I'll keep looking. Or re-do it if you really want me to.
I modified the brackets so they'd work in the stock-ish locations. For the others I was able to find holes that worked fine. The horns are heavier than stock, a little support where you bolt them would not be a bad idea.
Last edited by habanero; Apr 12, 2016 at 06:13 PM.
Apr 12, 2016 | 06:17 PM
#7
Thread Starter
Registered User
Joined: Mar 2012
Posts: 70
Likes: 0
I am using 4 caddy horns, a 4 pin relay, one of the oe horn connector wires. On the other oe horn connector is an oe horn. Because I can.
https://www.yotatech.com/forums/f200...51/index6.html
Post 115 for some pics of horns. I can't find the wiring diagram any more, but I'll keep looking. Or re-do it if you really want me to.
I modified the brackets so they'd work in the stock-ish locations. For the others I was able to find holes that worked fine. The horns are heavier than stock, a little support where you bolt them would not be a bad idea.
https://www.yotatech.com/forums/f200...51/index6.html
Post 115 for some pics of horns. I can't find the wiring diagram any more, but I'll keep looking. Or re-do it if you really want me to.
I modified the brackets so they'd work in the stock-ish locations. For the others I was able to find holes that worked fine. The horns are heavier than stock, a little support where you bolt them would not be a bad idea.
Trending Topics
Apr 12, 2016 | 06:33 PM
#8
Thread Starter
Registered User
Joined: Mar 2012
Posts: 70
Likes: 0
I am using 4 caddy horns, a 4 pin relay, one of the oe horn connector wires. On the other oe horn connector is an oe horn. Because I can.
https://www.yotatech.com/forums/f200...51/index6.html
Post 115 for some pics of horns. I can't find the wiring diagram any more, but I'll keep looking. Or re-do it if you really want me to.
I modified the brackets so they'd work in the stock-ish locations. For the others I was able to find holes that worked fine. The horns are heavier than stock, a little support where you bolt them would not be a bad idea.
https://www.yotatech.com/forums/f200...51/index6.html
Post 115 for some pics of horns. I can't find the wiring diagram any more, but I'll keep looking. Or re-do it if you really want me to.
I modified the brackets so they'd work in the stock-ish locations. For the others I was able to find holes that worked fine. The horns are heavier than stock, a little support where you bolt them would not be a bad idea.
Apr 13, 2016 | 05:55 AM
#9
Contributing Member
Joined: Sep 2005
Posts: 8,247
Likes: 497
From: mo
Caveat emptor....especially when it's free! I am not a mechanic nor electrician, but I serve a very tasty school lunch. 
I did this 6 years ago using caddy horns, repinning the gm connectors as needed. Works great.
I did this 6 years ago using caddy horns, repinning the gm connectors as needed. Works great.
Apr 13, 2016 | 07:15 AM
#10
Thread Starter
Registered User
Joined: Mar 2012
Posts: 70
Likes: 0
Thanks, this forum need more people like you! I appreciate your help.
 Apr 13, 2016 | 08:57 AM
#11
Thread Starter
Registered User
Joined: Mar 2012
Posts: 70
Likes: 0
Thanks,
Apr 13, 2016 | 11:34 AM
#12
Contributing Member
Joined: Sep 2005
Posts: 8,247
Likes: 497
From: mo
Apr 13, 2016 | 12:24 PM
#13
Thread Starter
Registered User
Joined: Mar 2012
Posts: 70
Likes: 0
Apr 13, 2016 | 04:34 PM
#14
Contributing Member
Joined: Sep 2005
Posts: 8,247
Likes: 497
From: mo
Looks good to me other than you won't have to use a ground wire from the horns, the bolt holding each horn onto the truck is its respective ground.
You can run the relay grounds (85) as you have them, to the battery, or ground to the body, whichever suits you.
You can run the relay grounds (85) as you have them, to the battery, or ground to the body, whichever suits you.
Last edited by habanero; Apr 13, 2016 at 04:37 PM.
Apr 13, 2016 | 06:04 PM
#15
Thread Starter
Registered User
Joined: Mar 2012
Posts: 70
Likes: 0
Apr 16, 2016 | 01:46 PM
#16
Thread Starter
Registered User
Joined: Mar 2012
Posts: 70
Likes: 0
Results
ok, the horns arrived today, the only thing I made was a harness for each OEM wire to attach 2 Cadillac horns in each as shown in the attached diagram. Everything was perfect, the sound is spectacular, it does not compare to the factory. Really I recommend this change. Locate the speakers behind the front grille. Tomorrow I will post photos.

 Apr 20, 2016 | 03:33 PM
#19
Thread Starter
Registered User
Joined: Mar 2012
Posts: 70
Likes: 0
Thanks for your input. Well, actually not whether it is right to do so without the relay but so far it is working well, would have to ask someone if there is no problem to assembly the horns without the relay.
Apr 30, 2016 | 05:19 AM
#20
Registered User
Joined: Feb 2007
Posts: 1,262
Likes: 4
From: New Jersey and Sao Paulo
No, the '98 4Runner has a factory horn relay on the reverse of the fuse panel by driver's knee. I can't tell from the schematic if it is separate or built into the integration relay. (I only have the Overall EWD for 1998.) But THAT is what might overload, not the switch contacts. And of course, the stock HORN circuit is fused at 15A.
Last edited by TheDurk; Apr 30, 2016 at 05:21 AM.

Thread
Thread Starter
Forum
Replies
Last Post


