
5vzfe leaky valve covers fixed (56k beware)
 Jun 2, 2010 | 01:42 PM
#21

I just did mine last weekend. You could cover the wires with that ribbed black plastic conduit available from any autoparts store. My plastic harness didn't break into 1 million pieces, but I did wrap the brittle plastic in electrical tape to prevent the shards from going in the valve area. Good luck.
Jun 2, 2010 | 03:28 PM
#22

Registered User
Joined: Jan 2010
Posts: 10
Likes: 0
Jun 9, 2010 | 07:28 AM
#23
Registered User
Joined: Jan 2010
Posts: 10
Likes: 0
Another Issue Solved
This goes back a few months to my original post.
Once I had new spark plug tubes in the valve covers , I decided to change the plugs themselves and the wires.
Once I had the covers in place, and rebuilt the plenum and connected the hoses, I also replaced the temperature senor as I was getting a Check Engine light, using a code reader, I found two sensors had gone bad. One, I discussed before, Idle air control.
Another, the coolant temperature sensor, was really difficult, and I thought my problems were solved.
Everything seemed fine and then the check engine light came on again, and the engine would "chuff" or lope at warm idle.
This time the code read Engine misfire on all cylinders.
I went over everything top to bottom, and it can be anything from bad injectors to bad plugs to (Multiple issues)
I finally gave up and took it to a mechanic who was also puzzled, and thought it might be another 400 dollar sensor.
This was driving me crazy, but I didn't have the time to investigate any further.
Turns out it was a TINY vaccum hose in the air intake chain that has fallen off.
So far still running well.
Mar 21, 2011 | 04:54 AM
#24
Registered User
Joined: Mar 2010
Posts: 227
Likes: 0
From: Fort Worth, TX
THANK YOU for making this guide! It was invaluable when I did my gaskets this weekend. I replaced the PCV valve and grommet while I was at it too, but I wasn't sure I got it seated fully. Does anybody know if it's supposed to sit a little above the valve cover or should it be up tight against it?
Mar 23, 2011 | 04:03 PM
#25
Contributing Member
Joined: Nov 2010
Posts: 5,125
Likes: 4
From: Columbia River Gorge, Oregon...east side
THANK YOU for making this guide! It was invaluable when I did my gaskets this weekend. I replaced the PCV valve and grommet while I was at it too, but I wasn't sure I got it seated fully. Does anybody know if it's supposed to sit a little above the valve cover or should it be up tight against it?
Mar 23, 2011 | 07:57 PM
#26
Registered User
Joined: Feb 2010
Posts: 570
Likes: 0
From: Outer Banks, NC
When I replaced my leaking passenger valve cover including the PCV grommet, I used a little motor oil to push and then eventually seat the new PCV grommet into place. This was much easier than getting the darn thing out.
Mar 29, 2011 | 08:14 AM
#27
Registered User
Joined: Mar 2010
Posts: 227
Likes: 0
From: Fort Worth, TX
Yeah I broke my old one apart removing it. I doubt the previous owner had ever replaced it. I'm unsure about removing the new one now that it's in there though. I haven't had any leaks since doing the work.
Apr 11, 2011 | 12:45 PM
#28
Registered User
Joined: Feb 2010
Posts: 570
Likes: 0
From: Outer Banks, NC
Just adding a couple of pics from my passenger side VC removal...
I had these on a thumb drive from last year; thought they were lost until yesterday.
I found that my major leaks were not coming from the VC gasket itself, but from the old FIPG that was holding the semi circular (half moon) plugs in the cylinder head.
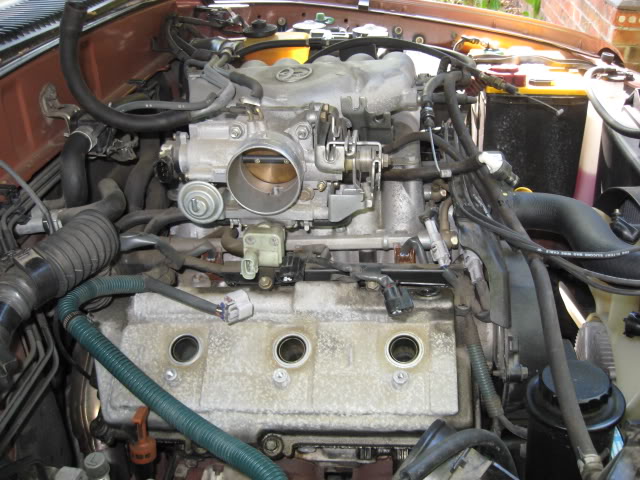
Main wire loom removal. I found that by disconnecting the AC compressor connector and working my way back up to the main trunk line while unconnecting all the connectiong sensors along the way it was easy to get the VC off. My plastic wire loom cover did not break.
VC off and old gasket material cleaned off with Acetone. Not bad at 97,000 miles.
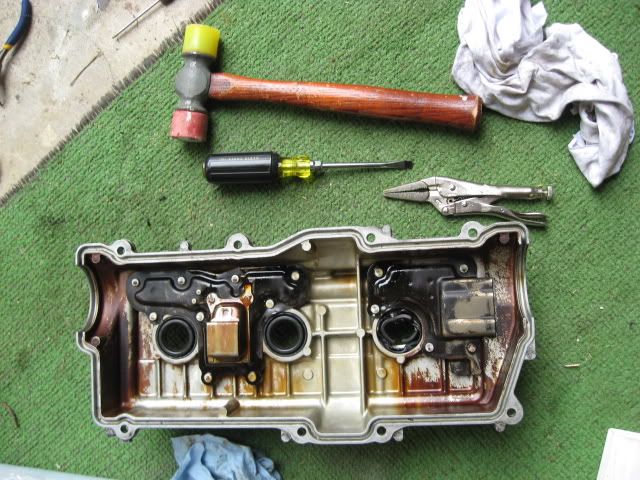
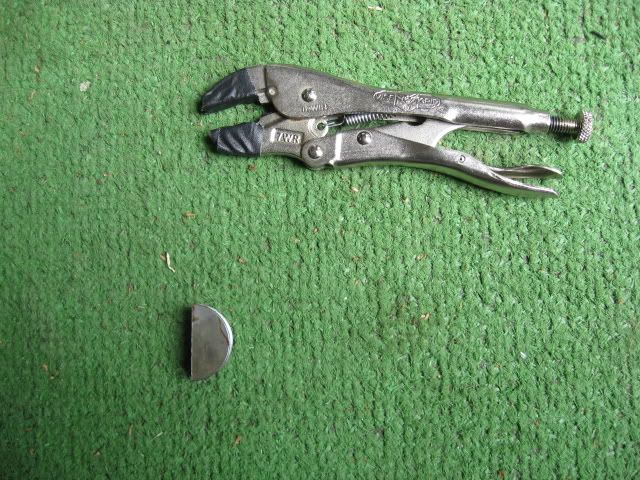
Figuring out how to get the plug tube seal out was the biggest challenge for me. After taking a jewler's flathead screwdriver to bend up the flange, I took a screwdriver with a fine flat head and at a 50 degree angle, hammered out the seal at four different angles. Try not to chip the aluminum VC.
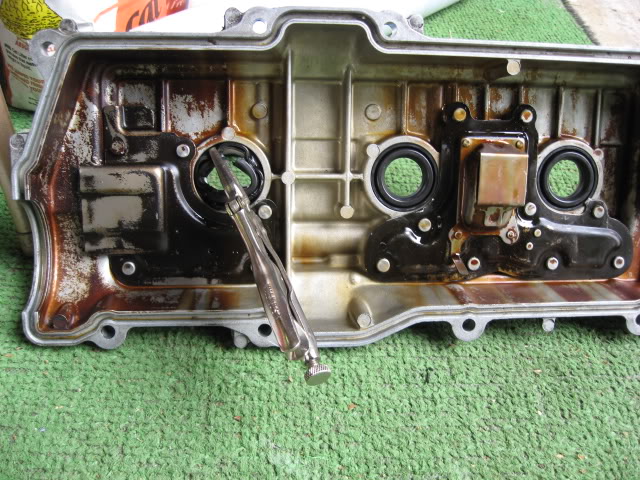
Once the old tube seal was mangled, I was able to use some vice grips and pull the old seal out. One was so stubborn that I had to brace my feet against the VC and pull. Putting the new ones in was easy, just follow the FSM instructions. Make sure to use a 32mm socket to drive them in.
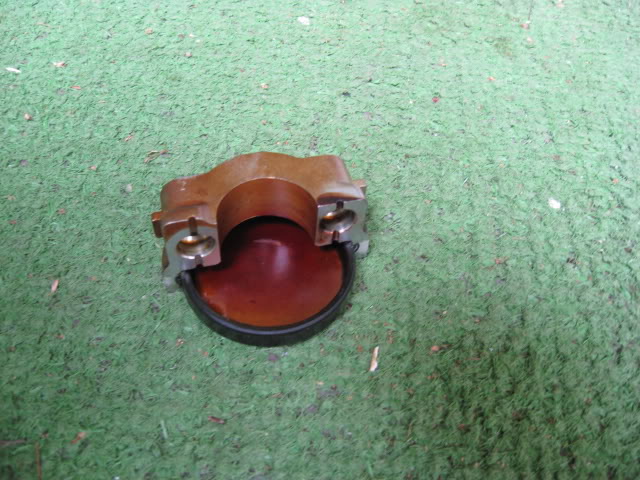
Each cylinder head has two semi circular plugs, one in front and in the rear. I could pull the old FIPG off the semi circular plug and determined this is where my leak(s) originated from. They came out without much force by just pulling them up out of the head. These are reusable.
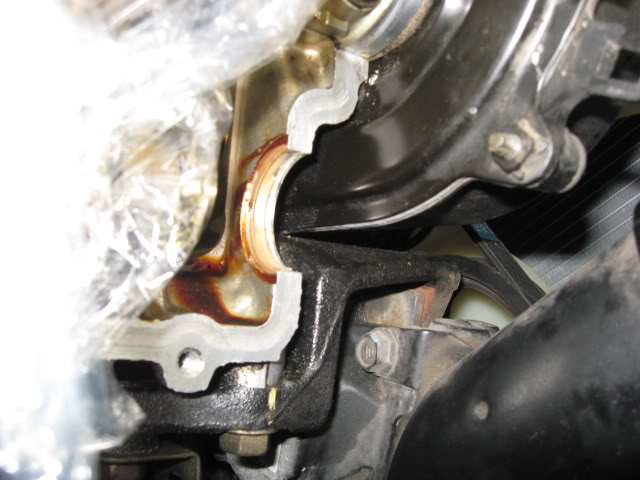
The front semi circular plug removed. Clean off all old FIPG.
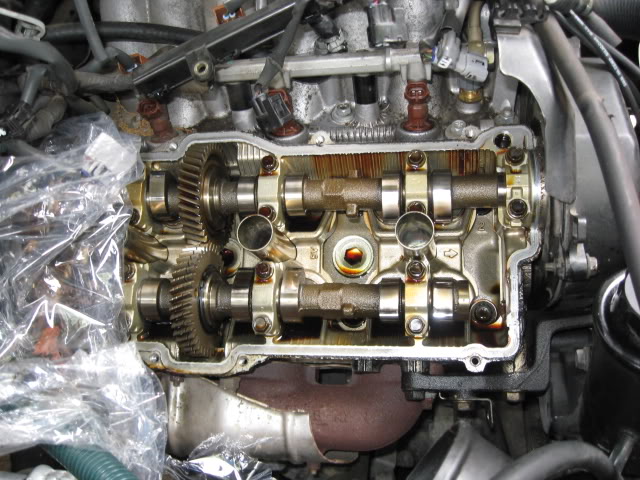
Here both the rear semi circular plug and cam plug are removed. When repacking the semi circular plugs, don't be conservative with the new FIPG. You want to pack enough in there so that when placed back in the head, new FIPG oozes out both sides. Excess can be cleaned up. Inside the cylinder head right behind the cut out for the rear plug there is a little channel that FIPG I think is supposed to be placed in (the old black FIPG is there in the pic). I did not place any new FIPG in there, but if I had to do it again, I would.
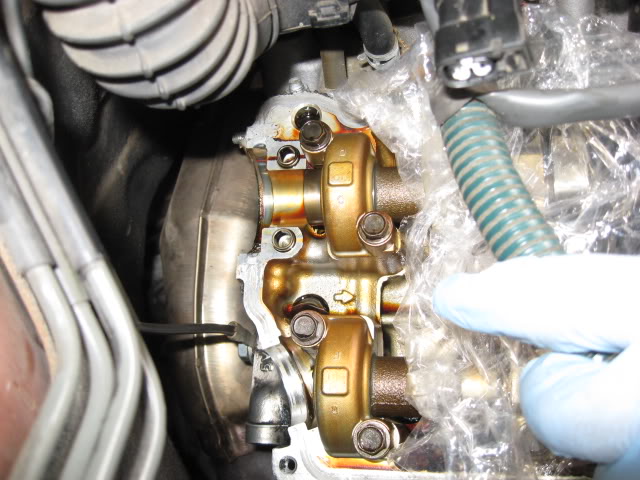
Here is the cam plug. To get to it, one must remove the bracket for the main T for all engine wires. One 10mm nut and one 10mm screw holds it on in the back. Then remove the two bolts that hold in the cam plug seal. Take note of its orientation. The only FIPG is used where the little grey spots are in the picture. Or check the FSM for clarity. Put the new one in, put back together, torque the two bolts to 12ft/lbs that hold the plug in place. The FSM calls for torquing the 10mm nut and screw for the bracket to 71 in/lbs. Good luck getting a torque wrench in there. Always use a new cam plug.
Nine months later and 4,000 miles, no leaks so far. I did not do the driver's side at the time but will have to this summer so I will take more pics if needed. Going rather slow, this was about 3hrs give or take an hour.
I found that my major leaks were not coming from the VC gasket itself, but from the old FIPG that was holding the semi circular (half moon) plugs in the cylinder head.
Main wire loom removal. I found that by disconnecting the AC compressor connector and working my way back up to the main trunk line while unconnecting all the connectiong sensors along the way it was easy to get the VC off. My plastic wire loom cover did not break.
VC off and old gasket material cleaned off with Acetone. Not bad at 97,000 miles.
Figuring out how to get the plug tube seal out was the biggest challenge for me. After taking a jewler's flathead screwdriver to bend up the flange, I took a screwdriver with a fine flat head and at a 50 degree angle, hammered out the seal at four different angles. Try not to chip the aluminum VC.
Once the old tube seal was mangled, I was able to use some vice grips and pull the old seal out. One was so stubborn that I had to brace my feet against the VC and pull. Putting the new ones in was easy, just follow the FSM instructions. Make sure to use a 32mm socket to drive them in.
Each cylinder head has two semi circular plugs, one in front and in the rear. I could pull the old FIPG off the semi circular plug and determined this is where my leak(s) originated from. They came out without much force by just pulling them up out of the head. These are reusable.
The front semi circular plug removed. Clean off all old FIPG.
Here both the rear semi circular plug and cam plug are removed. When repacking the semi circular plugs, don't be conservative with the new FIPG. You want to pack enough in there so that when placed back in the head, new FIPG oozes out both sides. Excess can be cleaned up. Inside the cylinder head right behind the cut out for the rear plug there is a little channel that FIPG I think is supposed to be placed in (the old black FIPG is there in the pic). I did not place any new FIPG in there, but if I had to do it again, I would.
Here is the cam plug. To get to it, one must remove the bracket for the main T for all engine wires. One 10mm nut and one 10mm screw holds it on in the back. Then remove the two bolts that hold in the cam plug seal. Take note of its orientation. The only FIPG is used where the little grey spots are in the picture. Or check the FSM for clarity. Put the new one in, put back together, torque the two bolts to 12ft/lbs that hold the plug in place. The FSM calls for torquing the 10mm nut and screw for the bracket to 71 in/lbs. Good luck getting a torque wrench in there. Always use a new cam plug.
Nine months later and 4,000 miles, no leaks so far. I did not do the driver's side at the time but will have to this summer so I will take more pics if needed. Going rather slow, this was about 3hrs give or take an hour.
Last edited by J2F42C; Apr 11, 2011 at 12:47 PM.


 Jan 28, 2013 | 07:54 AM
#34

Registered User
Joined: Aug 2010
Posts: 11
Likes: 0
From: Fort Worth, Texas
I just completed the valve cover gasket replacement and fuel injector cleaning jobs. Thanks to all who posted before me. It was a great help.
I used cruzinperformance for the injector cleaning/testing. I've used Rich before. He's quick and lower cost than others I've seen.
I was concerned about replacing the spark plug tube seals. I used the method above to deform the gasket and pull out with vise grips. Worked like a charm. However, for reassembly I put some oil on the new gasket and tapped it in evenly with a drift. Worked great.
UPDATE 3/29/13 - I didn't change the Cam plugs in spite of the recommendation above. Not smart. I developed a leak on the driver's side cam plug. So, I had to do the job all over again. Nice. In addition to using the FIPG on the cam plug housing per the FSM, I also used a thin bead of FIPG around the cam plug itself. The passenger side is not leaking so I didn't change that one. Nothing like doing the job twice to reinforce that you've done something stupid. Just completed a 2100 mile run out to the Grand Canyon and no leaks so far....
I thought I would provide a list of part numbers. I have a heck of a time finding part numbers for toyota parts….
Valve cover gaskets - 1121362020 (you need two obviously)
Spark plug tube gaskets - 1119370010 (I got 7 in case I screwed one up)
Valve cover bolt gasket - 9021005007 (16)
Throttle body gasket - 2227162040
Intake (air plenum) gaskets - 1717662040 (you need two - both are the same)
Cam Plug - 11188-62010 (you need two - one for each side)
I changed the PCV valve and gasket:
PCV valve 1220462010
PCV valve grommet - 9048018001
Also changed the plugs and wires:
Plugs 9091901192
Wires 1903762010
Toyota gasket stuff (FIPG)
0029500103
Hope this helps the next guy in line....
Last edited by bimmerjunkie; Mar 31, 2013 at 10:22 AM.
Mar 1, 2013 | 05:10 AM
#35

Registered User
Joined: Mar 2013
Posts: 3
Likes: 0
From: NC
Hey guys... New to the forum... This is actually my 1st post so I hope I'm in the correct place for this question. I'll be replacing my valve covers soon. There is a crack in the driver side cover where someone did not torque the bolt on properly... Dripping oil on the alternator... Not good! I've patched it with Permatex but the time has come for the proper repair.
Thank you for posting this project... Nice to see the pics.
My question is do you all think it is an ok idea to buy a valve cover from an aftermarket source like http://www.partsgeek.com/catalog/199...lve_cover.html or should I stick to OEM? It's about a $100 savings. I've never had to buy engine replacement parts before and don't know how strong/durable/trustworthy the aftermarket valve cover would be.
Thanks!
Last edited by absoluteclint; Mar 1, 2013 at 05:12 AM.
Mar 1, 2013 | 06:03 AM
#36
Registered User
Joined: Aug 2010
Posts: 11
Likes: 0
From: Fort Worth, Texas
I go with OEM as often as I can. Rather than buy new OEM have you looked at pulling the valve cover from a junkyard? I suspect you could find one rather easily. If you can't find one in a yard, have you priced it new from a discount Toyota parts source such as toyotapartsbarn? I'm sure others on here have other OEM discount parts sources.
My reasoning for going OEM is it gives you the most chance of fixing it right the first time. That's been my experience. Most times I've gone non-OEM to save a few bucks, it comes back to haunt me. Again, just my experience. You might be fine with an aftermarket part. If it doesn't work you can always get the OEM part and do the job again.
Best of luck.
Mar 1, 2013 | 06:25 AM
#37
Registered User
Joined: Mar 2013
Posts: 3
Likes: 0
From: NC
I go with OEM as often as I can. Rather than buy new OEM have you looked at pulling the valve cover from a junkyard? I suspect you could find one rather easily. If you can't find one in a yard, have you priced it new from a discount Toyota parts source such as toyotapartsbarn? I'm sure others on here have other OEM discount parts sources.
My reasoning for going OEM is it gives you the most chance of fixing it right the first time. That's been my experience. Most times I've gone non-OEM to save a few bucks, it comes back to haunt me. Again, just my experience. You might be fine with an aftermarket part. If it doesn't work you can always get the OEM part and do the job again.
Best of luck.
My reasoning for going OEM is it gives you the most chance of fixing it right the first time. That's been my experience. Most times I've gone non-OEM to save a few bucks, it comes back to haunt me. Again, just my experience. You might be fine with an aftermarket part. If it doesn't work you can always get the OEM part and do the job again.
Best of luck.
I had a local shop quote me on doing the job yesterday for ~$460... That includes driver side valve cover replacement (new OEM cover from local dealer ~$250), replace gaskets for both sides $60, and ~$150 labor. He also mentioned that his experience with local junkyards and valve covers is that they will typically not take one off of a good engine.

I'll go OEM and see if I can find one from an online source like you've suggested. Next step will be assessing my skills to see if I think I can tackle this job myself or if paying the labor to guarantee it's done right is my better option. I grew up in a body shop family... hanging fenders and prepping for paint are right up my alley but mechanical surgery is still foreign!
Thanks again for tip and response!
Mar 1, 2013 | 07:34 AM
#38
Why not check the marketplace on this site? I've got a couple of valve covers leftover from my engine swap. I could part with one if you needed it.
Like bimmerjunkie said below, pick n' pull yards will let you pull the part yourself. Granted, a lot of them do pull the motors to sell whole, but last time I went to the one near me, they had 2 4Runners with complete engines.
$460 really isn't bad to do that work, but you can do the valve covers, it's really not that hard. Definitely go all OEM, don't even waste your time/money elsewhere.
Last edited by 98SR54RUNNER; Mar 1, 2013 at 08:19 AM.
Mar 1, 2013 | 07:36 AM
#39
Registered User
Joined: Aug 2010
Posts: 11
Likes: 0
From: Fort Worth, Texas
Glad to help. If you are at all interested in learning to do it yourself, I recommend going for it. It really isn't that hard and with this thread you've got most of the info and tips you need. I'm no master mechanic but I was able to get it done and no leaks so far. Biggest pain in the neck for me was wrangling the valve covers out and back in amongst all the wiring and whatnot. A tight fit but it can be done with patience.
I think the mechanic's claim that a yard won't allow you to pull the valve cover is dubious. Maybe on an engine the yard is trying to sell whole. I frequent Pick 'N Pull yards here in TX and you can pull anything you want. I'd recommend checking with some yards.
Good luck.
I think the mechanic's claim that a yard won't allow you to pull the valve cover is dubious. Maybe on an engine the yard is trying to sell whole. I frequent Pick 'N Pull yards here in TX and you can pull anything you want. I'd recommend checking with some yards.
Good luck.
Mar 2, 2013 | 09:36 AM
#40
Registered User
Joined: Mar 2013
Posts: 3
Likes: 0
From: NC
Thanks guys! I checked the site you suggested and found they sell the valve cover for $188... Much better than $250 from the local Toyota dealership. I'll check out the marketplace too.. New on here and haven't found that feature yet. If you an extra you're willing to part with that's in good shape and will fit I'm certainly interested.. Will send a pm next break I get (at work all day).
Also check out this option for decent cheap labor that I just stumbled on.. Apparently the local community college here has a good mechanics program who will do small project work for free!! Buy the class/instructors breakfast for a valve cover replacement sounds fair to me! Going to call the instructors next week to see if they'll take my truck.
I'd love to do the project myself and learn in the process but right I'm a full time student and also work full time.. Might better save the weekend garage tinkering projects for when I have more free time.
Thanks again for the suggestions and responses!


