

 Apr 6, 2016, 07:44 AM
Last edit by: IB Advertising
See related guides and technical advice from our community experts:
Browse all: Toyota 4Runner Lighting Guides
- Toyota 4Runner 1996-2002: Aftermarket Headlight Reviews
Review and comparison of top products.
Browse all: Toyota 4Runner Lighting Guides

1998 4runner headlight retrofit hid projector write up / review
Feb 22, 2012 | 06:01 PM
#1

Thread Starter
Registered User
Joined: Sep 2009
Posts: 205
Likes: 0
From: maine
Hey every one
I’m typing up this write up about retrofitting 98' 4runner headlights with fx-r stage III kit. This kit can be found at The retrofit source inc. For future mods, I probably would try the mini kits just to save some steps and headaches. However, the performance and light output is great! I must be the happiest person in this town haha.
What you see down below is basically a log of every step I took to complete this project. First thing and foremost, be sure to give yourself some time and equipped with proper tools. My project was time consuming being a full time student and part time construction worker, this was too long for me. I spend a few hours every weekend for a month to complete this. This was my first retro and I am very pleased with the results.
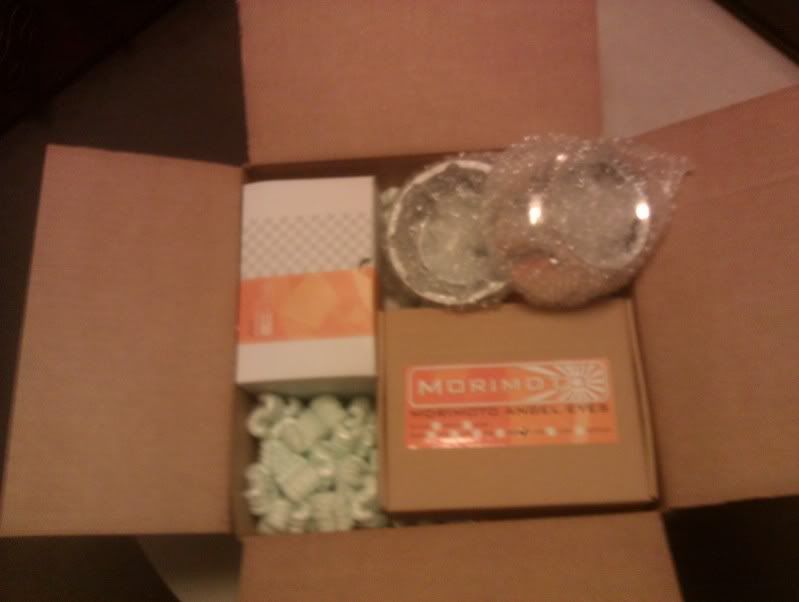
Okay. So first thing I did was order the kit from TRS and a new set of 99’ headlights from ebay. I wanted to keep my stock one for backup also the 99 models has clear glass when the older models are cloudier.
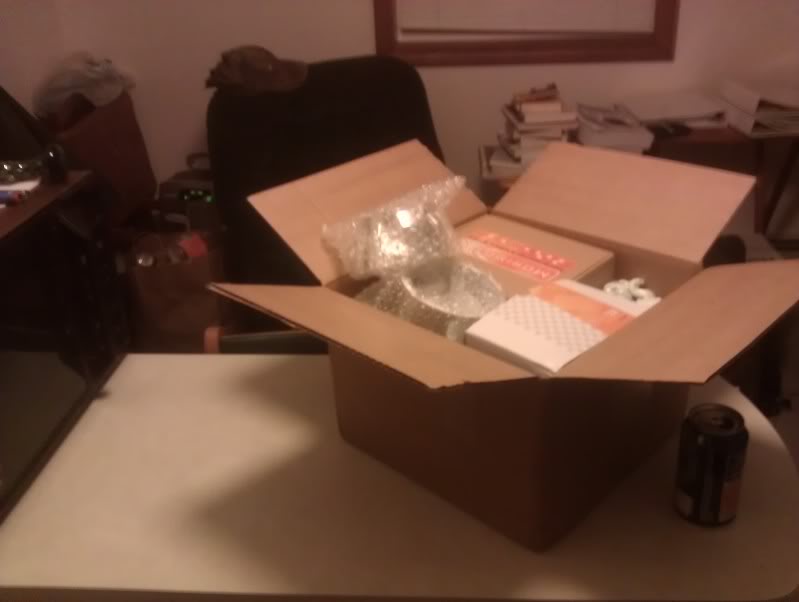
Package arrived:
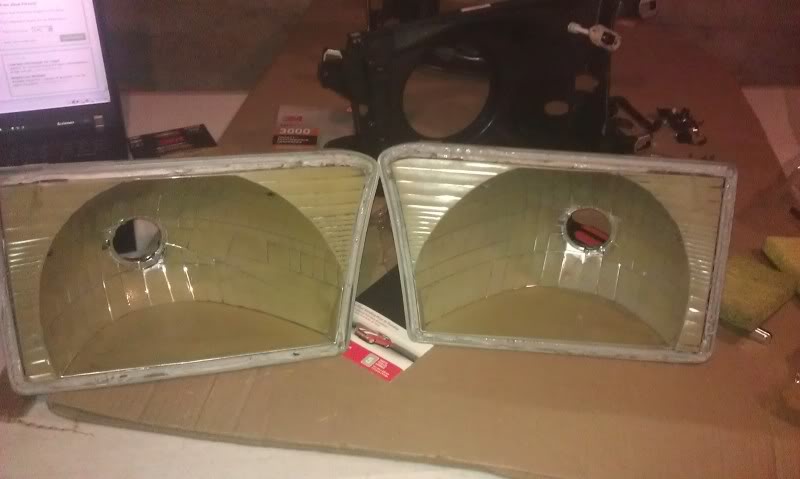
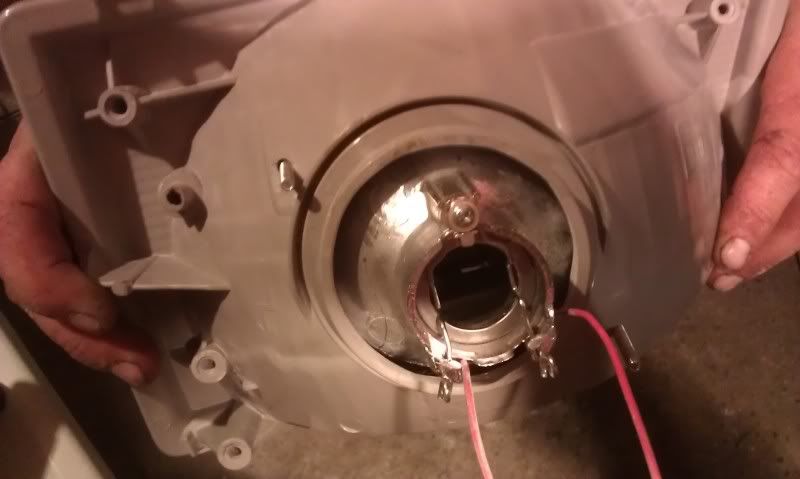
I followed someone's guide on this forum on how to take apart the headlights.
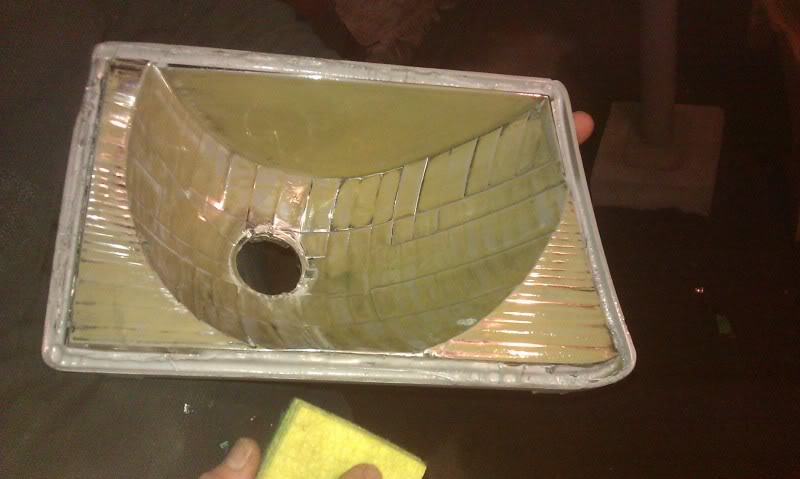
Note: I did paint my reflectors and this process took me a while…. In the cold garage. The outcome was better than what I imagined and I’m very pleased. This step is not required and it’s just for personal preference. Painting the reflectors did not affect the light output, incase if anyone is wondering.
Sanded down the housings
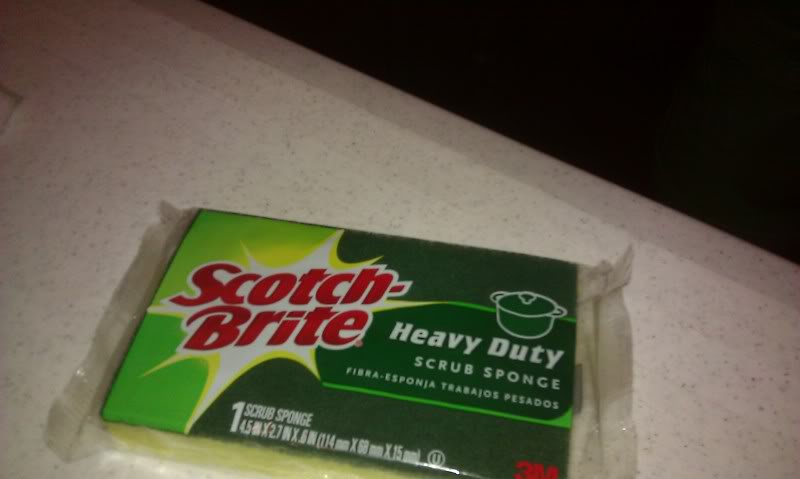
I used a sponge that is used for washing dishes as my sand paper. It had the perfect grit to buff up the chrome and I did sand a lot extra just to be on the safe side.
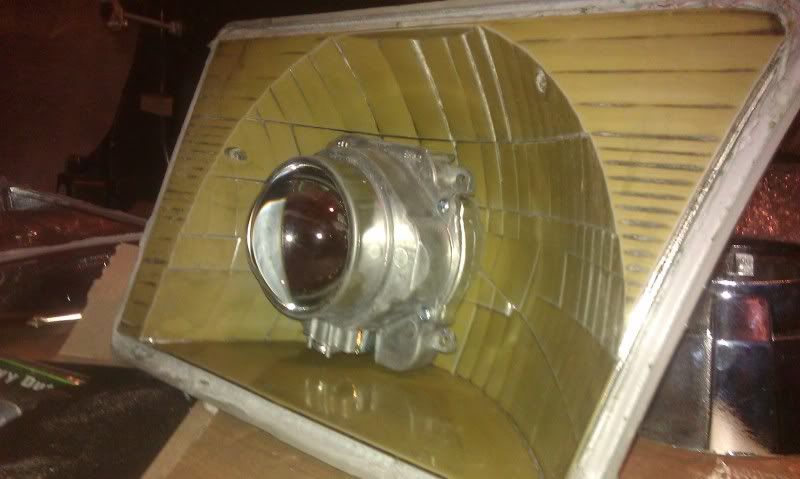
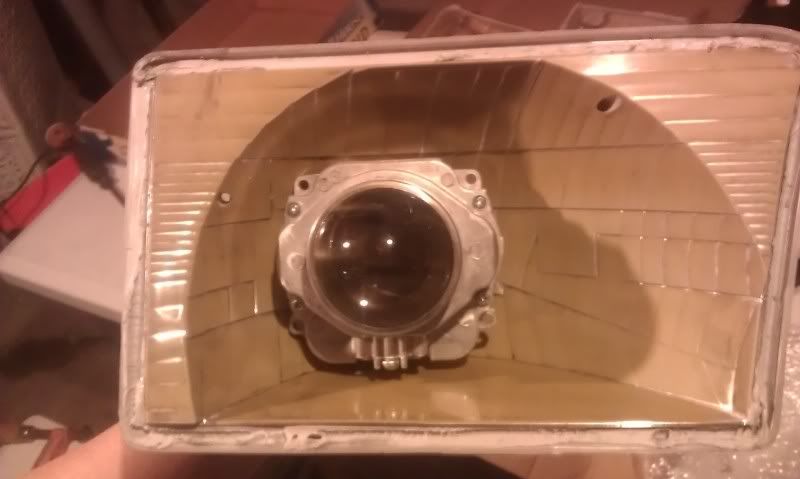
Next step is to drill a hole big enough for the projector to sit in. I had a 2 and � inch drill bit and a dremel kit. First I cut the hole and it didn’t feel like it was big enough. So I used a dremel to make the hole a little bigger and made the circle more shaped like coned in to match the projector's design. The fit is nice and snug. That’s what I’m looking for. Less ex poser is always the best.
How it sits now:

Once the hole was set it was time to drill the holes for the bolts and nuts to hold the projector in the headlight housing.
My suggestion is to drill holes diagonally. Like this. Just to be sure you take your time, be patience and measure, align 10 times before you proceed. I used #8-32x2 zinc screws with matching nuts and washers.
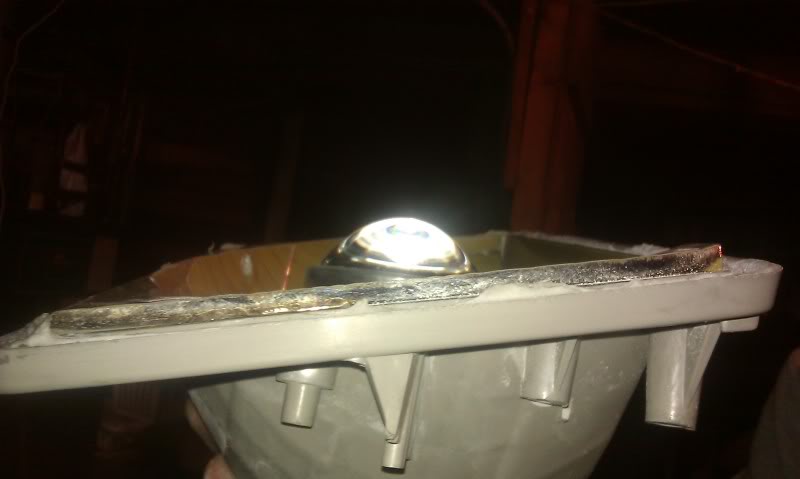
Once I had all 4 bolts I went ahead put on the shroud to have a good idea to see how it sits. NOTE: Be sure to test the clearance between shroud/projector and the glass. If it’s touching the glass, you have to get the projector to sit deeper into the housings.
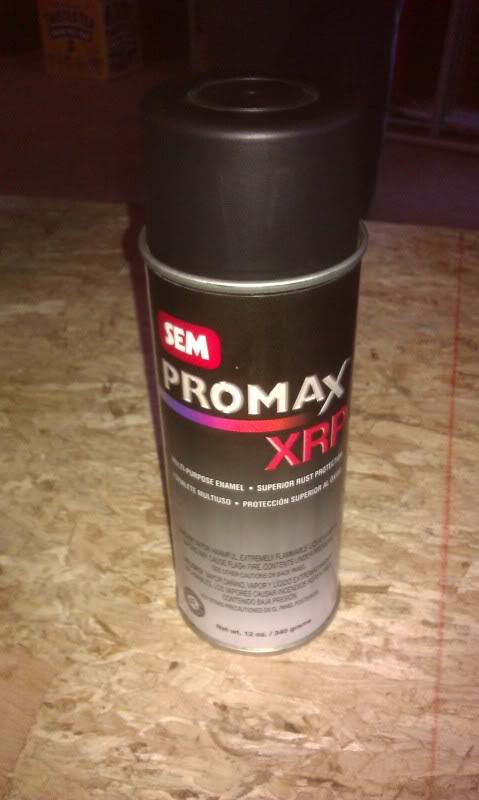
Once I had a good layout with all of the holes drilled and tested with fitting everything on…. It’s time for paint! I did not use primer on this. I used SEM paint. Here’s a picture of the bottle.
Put on the first coat of paint (very lightly)

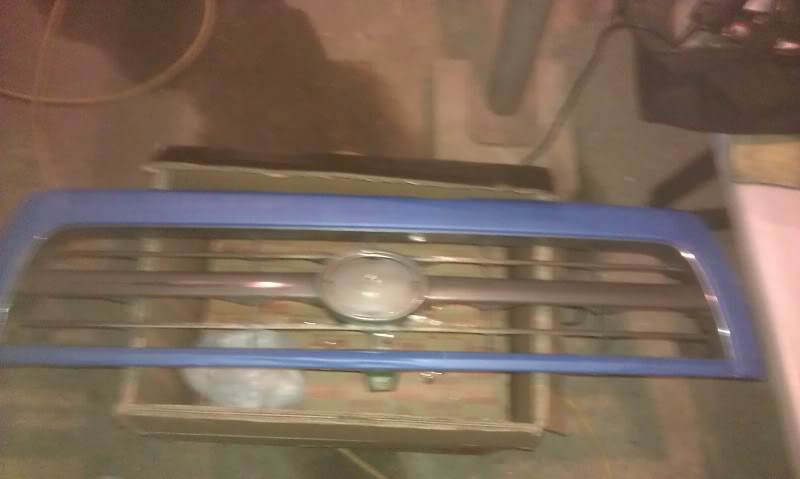
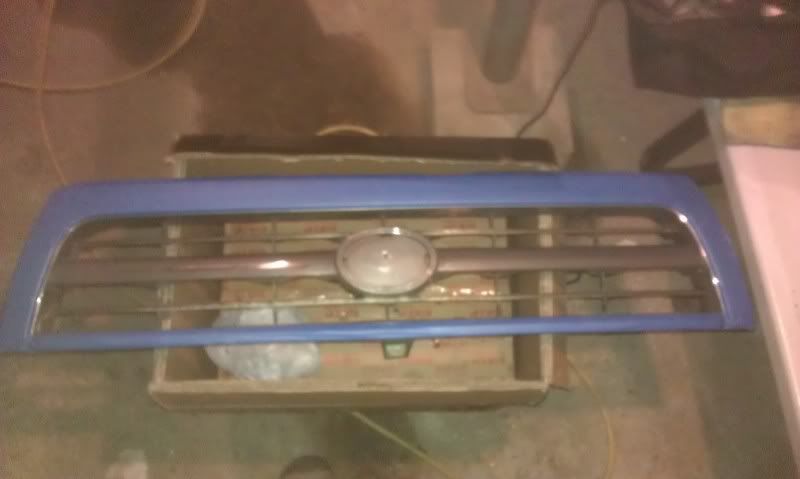
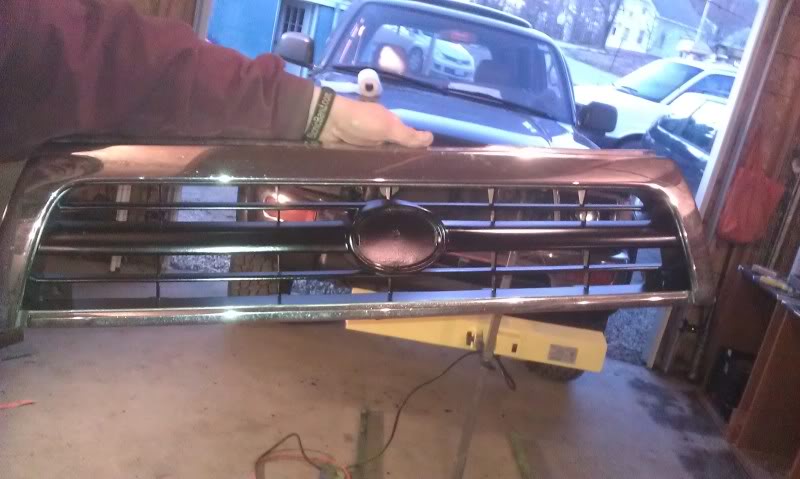
While the headlight was drying, I figured I’d do something about my grill. It was starting to look dull and the original paint was flaking off pretty bad. So I decided to paint the middle part of the grill all black to match with the headlight. First I sanded it down and then taped over the chrome. It’s ready for paint!
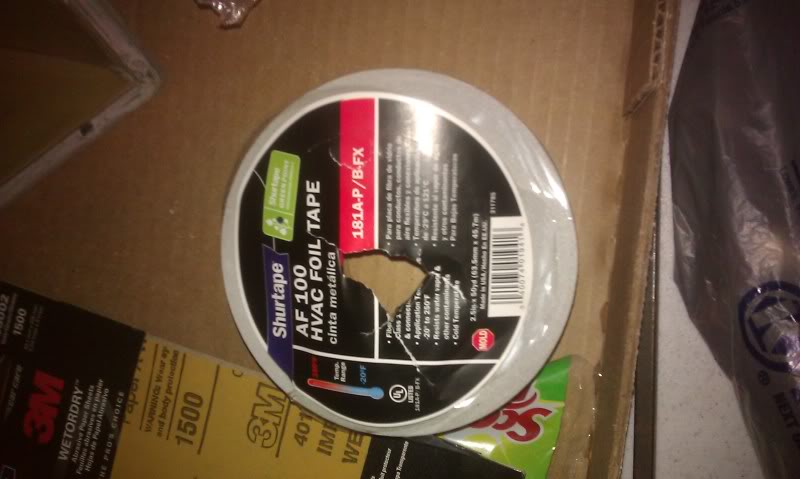
While the paint is drying in the cold garage I went ahead and taped up my projectors with this:
The paint is still wet. I went ahead install the wire harness and the ballast. Word of an advice, do this in a warm garage if you can. It sucks to work with plastics/metal in the cold. Plastic break fairly easy in the cold. So be careful!
PICS COMING SOON.
I used screws and zip ties to hold the wires/ballast/relay in place.
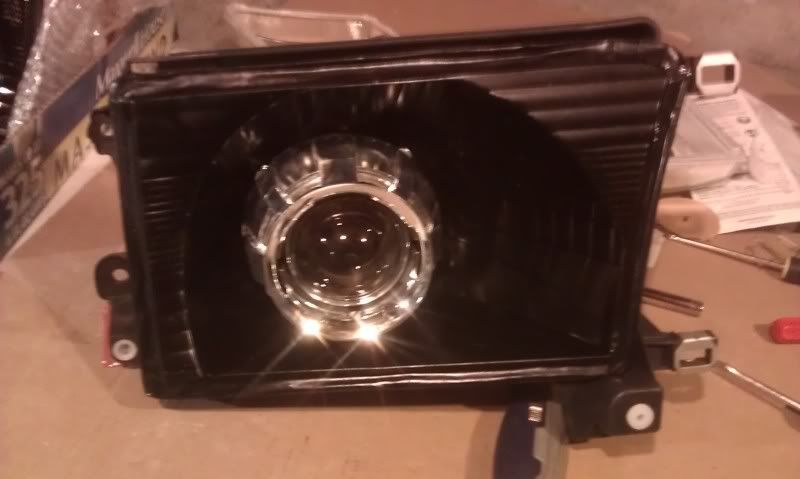
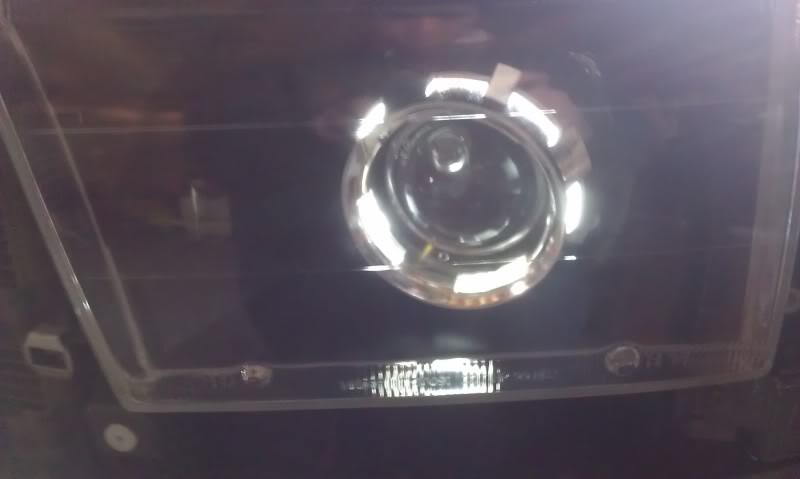
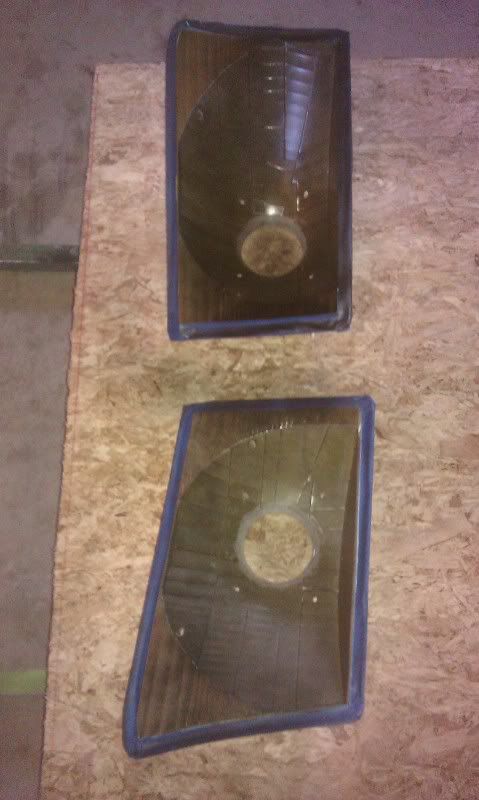
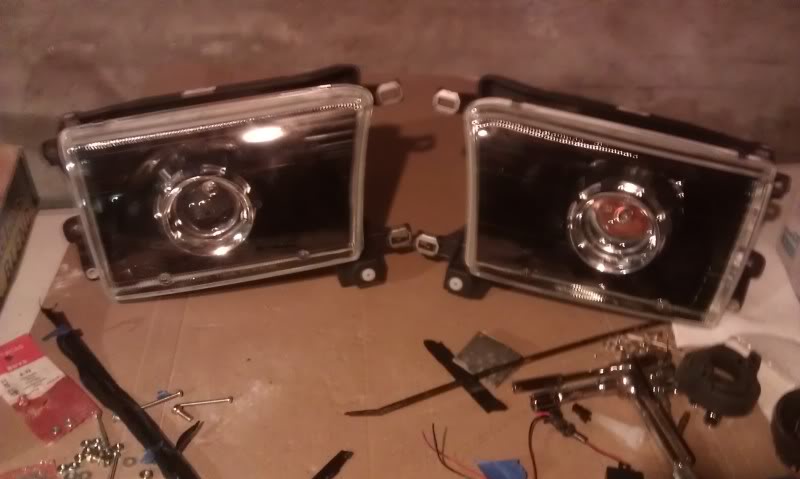
Okay the paint is dry! It’s time to install the projector and bolt it into place.
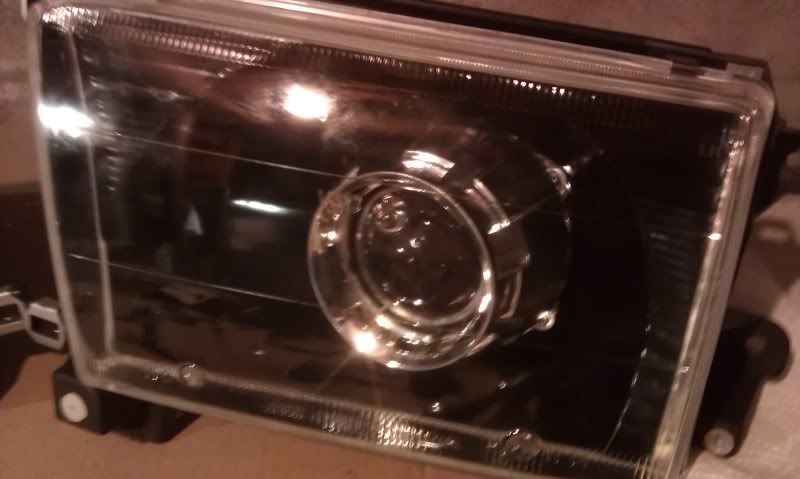
Damn…. This looks sexy.
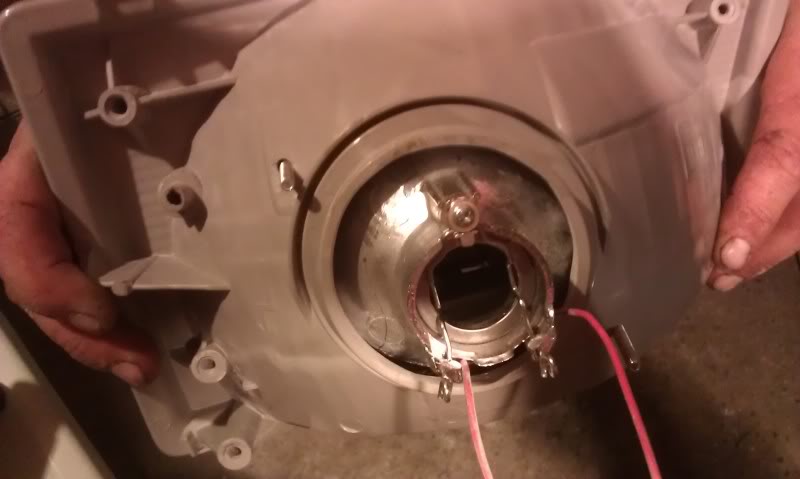
Back side:

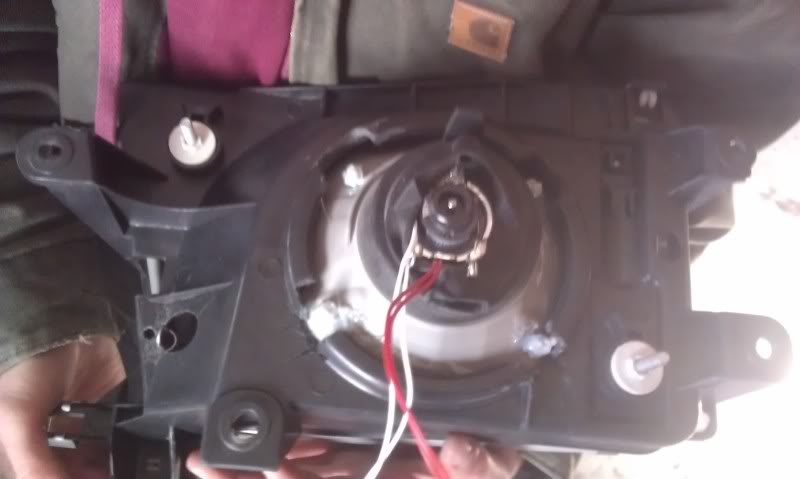
Behind the rubber boot, I used a bunch of epoxy and clear silicone to cover up the holes. Also I used loctie on the nuts and bolts to keep it in place.
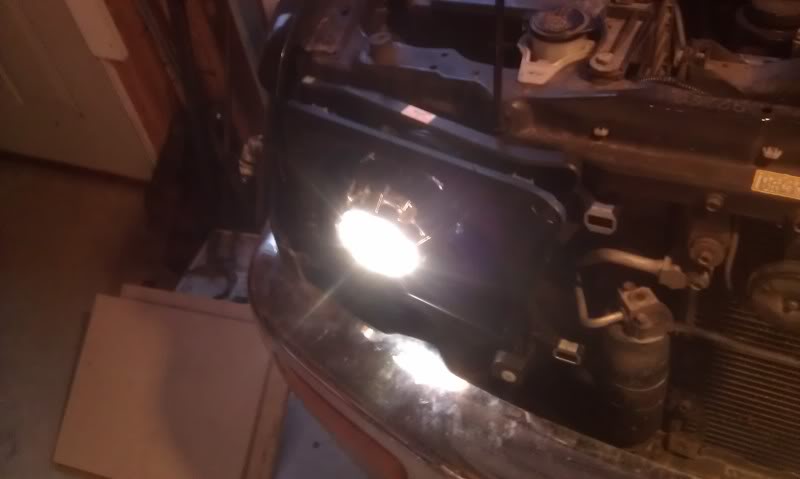
Installed it in and tested to see if it turned on. TADA!!!
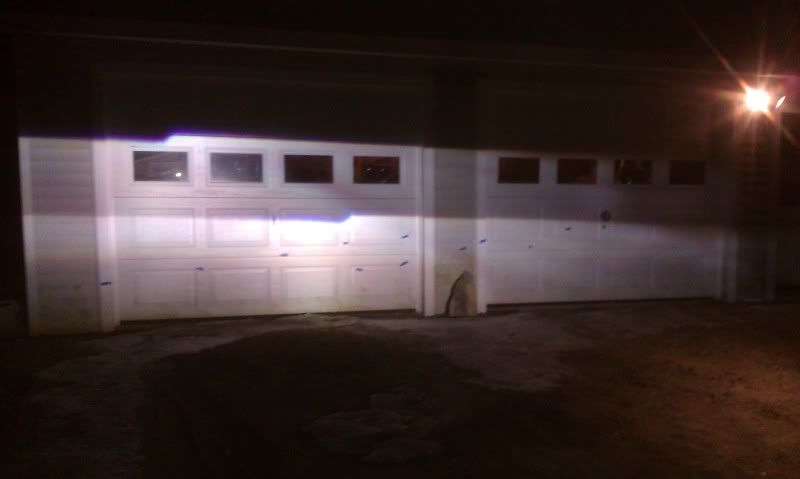
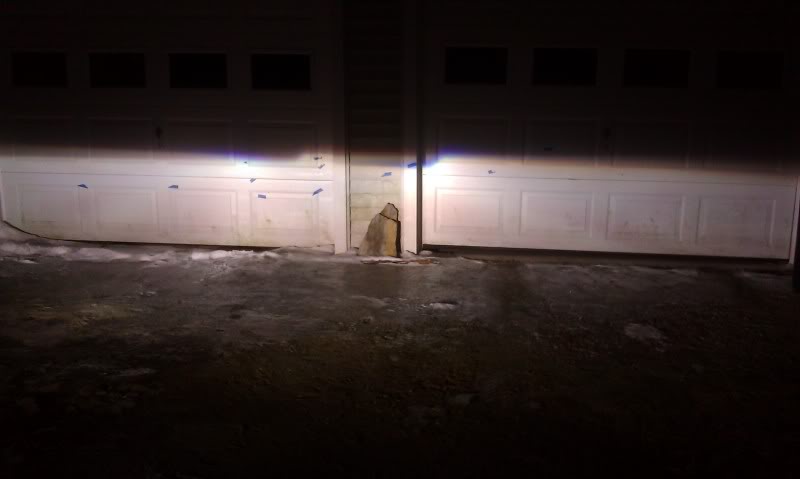
NOTE: Before you install your new headlight, you might want to park your vehicle front of something. Park approx. 25 feet away. Turn your stock headlights on and mark where the beams sit. This should give you good rough idea where your new lights should be aligned at.
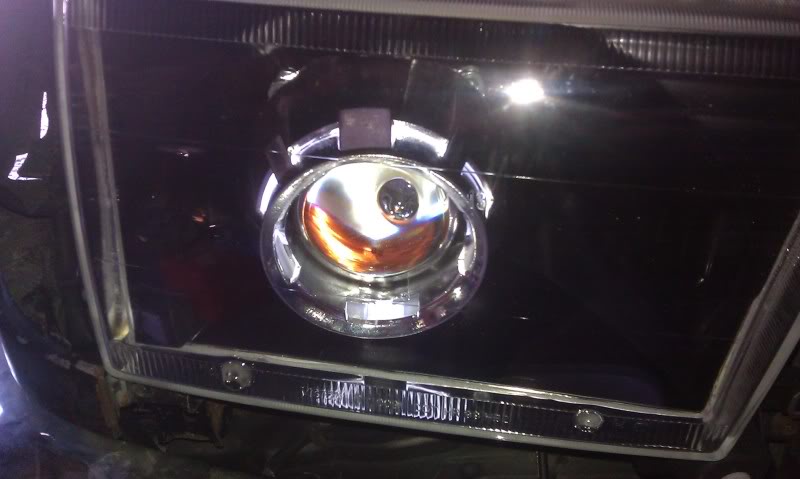
Before the alignments at the power up, it looks awesome!

Time to align the headlight. This step is fairly simple and I will skip explaining this step.
This is how close i got it. It's still titled a little bit but it looks great to me. A few washers behind the bolts for mounting the headlight bucket evened out the tilt a little better and it turned out great the way it is. The way it is on the markings on the garage doors is fine. No one flashed their lights on me yet. It's been a third night driving at night and i have not gotten flashed or pulled over.
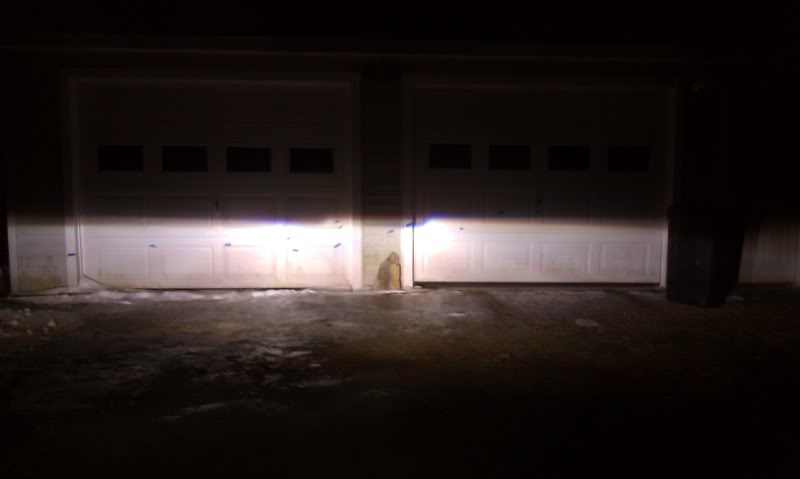
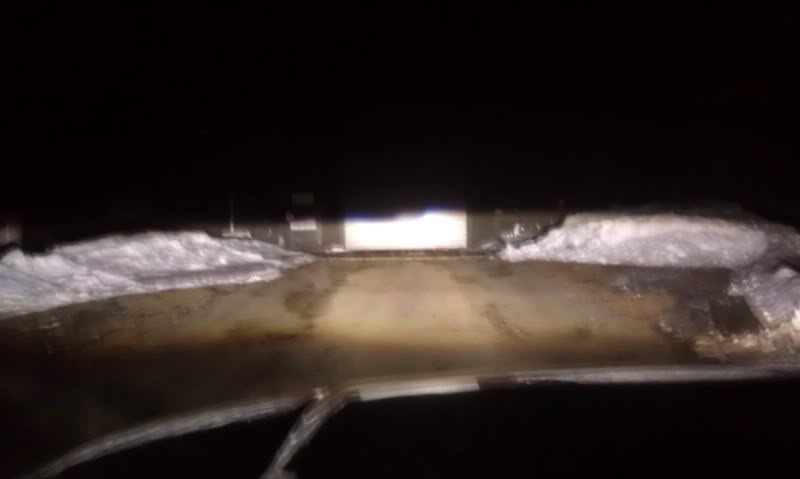
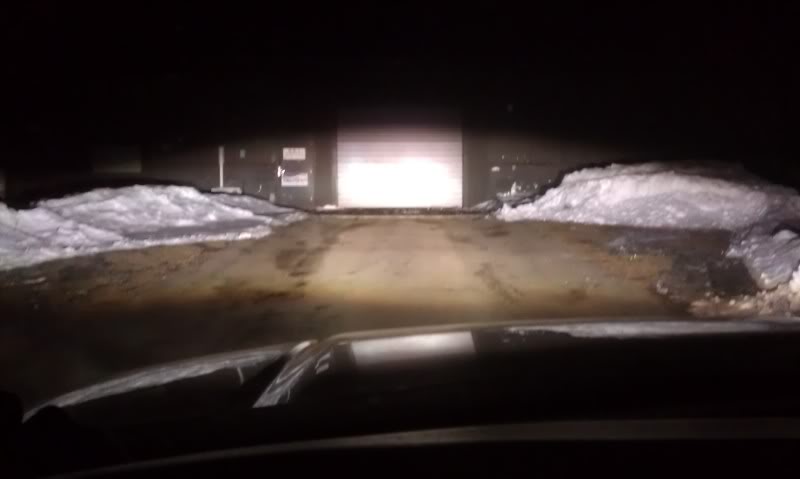
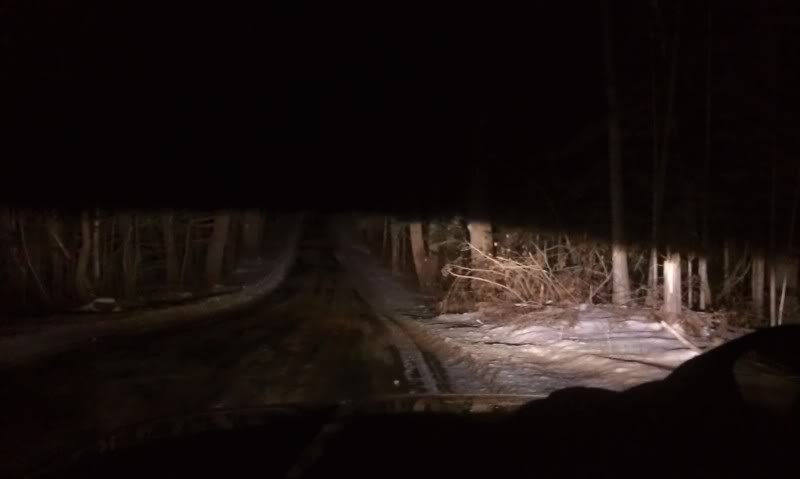
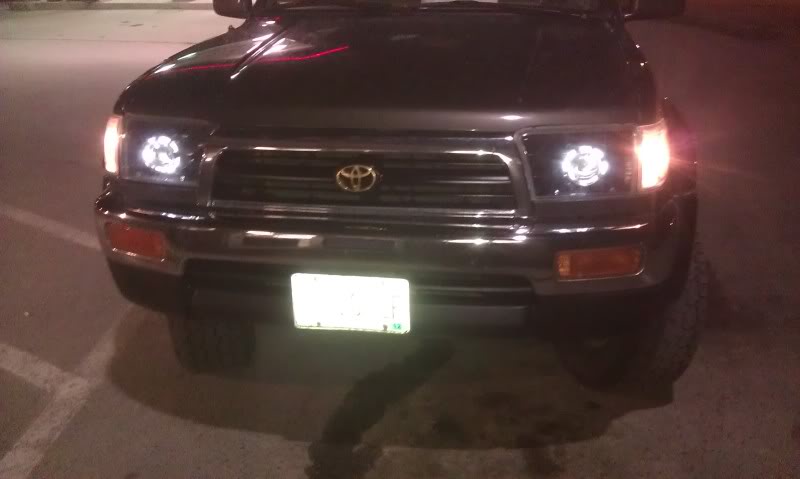
More photos of the light outputs.
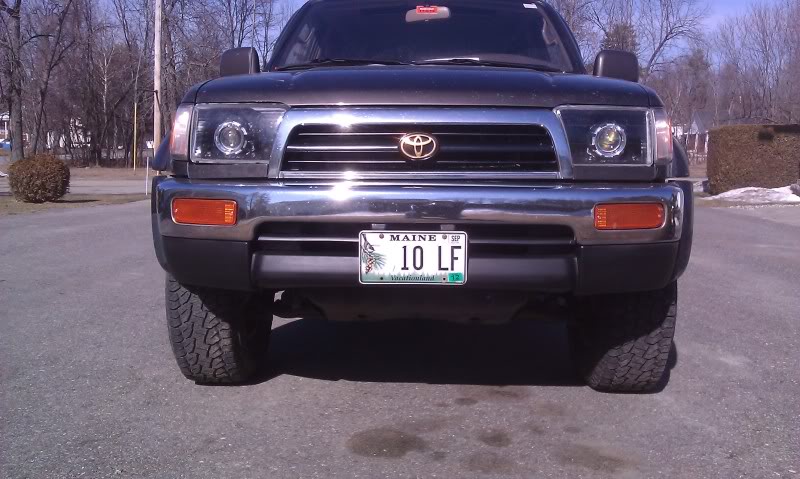
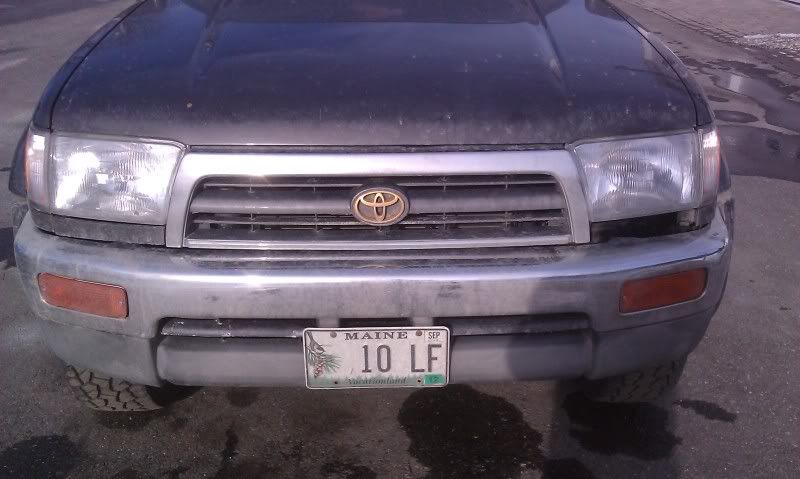
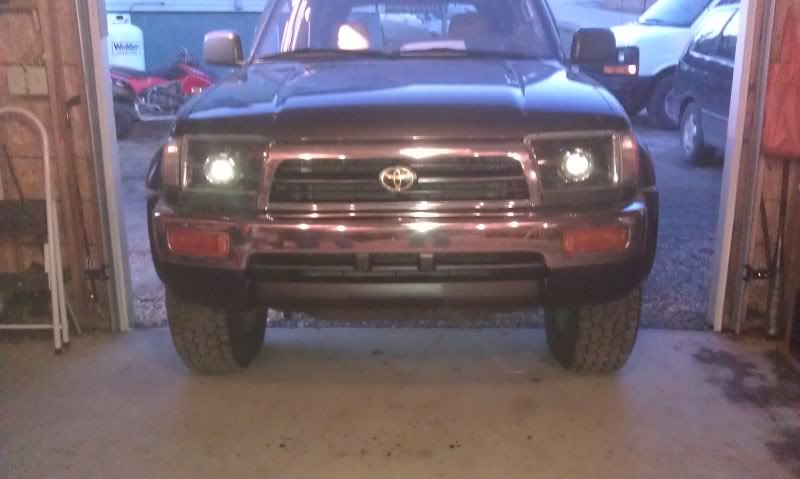
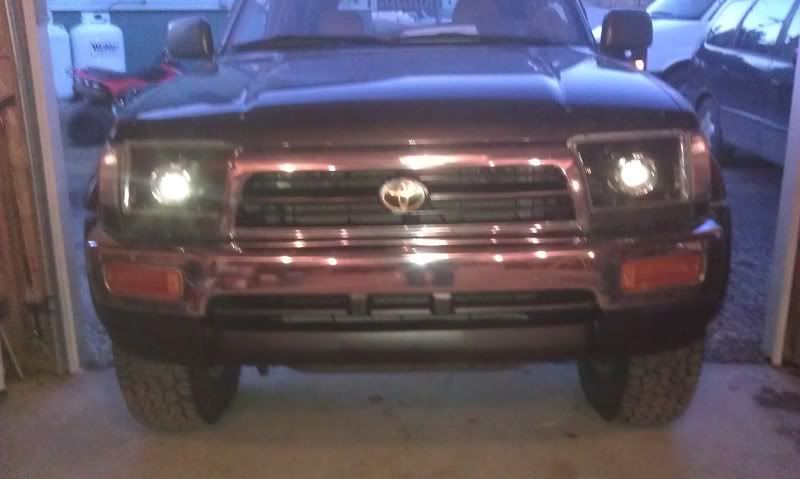
Before and after front views:


Final conclusion:
I am very pleased with the progress and the final results. Now I can drive with daylight in front of me. I recommend this retrofit hid to anyone who wants HID in their vehicle. Please for the love of god, don’t buy the cheap chinese made hid lights that goes in your stock housing. Those will blind oncoming drivers and the light output is incomparable with projectors. Thank you fellow yota members for convincing me to do better route for hid's. This project took me longer to do because I decided to use paint. I think it suits my ride better than having it all chrome.
Thank you for reading my post. I hope you enjoyed what you saw. Please comment and rate!
I’m typing up this write up about retrofitting 98' 4runner headlights with fx-r stage III kit. This kit can be found at The retrofit source inc. For future mods, I probably would try the mini kits just to save some steps and headaches. However, the performance and light output is great! I must be the happiest person in this town haha.
What you see down below is basically a log of every step I took to complete this project. First thing and foremost, be sure to give yourself some time and equipped with proper tools. My project was time consuming being a full time student and part time construction worker, this was too long for me. I spend a few hours every weekend for a month to complete this. This was my first retro and I am very pleased with the results.
Okay. So first thing I did was order the kit from TRS and a new set of 99’ headlights from ebay. I wanted to keep my stock one for backup also the 99 models has clear glass when the older models are cloudier.
Package arrived:
I followed someone's guide on this forum on how to take apart the headlights.
Note: I did paint my reflectors and this process took me a while…. In the cold garage. The outcome was better than what I imagined and I’m very pleased. This step is not required and it’s just for personal preference. Painting the reflectors did not affect the light output, incase if anyone is wondering.
Sanded down the housings
I used a sponge that is used for washing dishes as my sand paper. It had the perfect grit to buff up the chrome and I did sand a lot extra just to be on the safe side.
Next step is to drill a hole big enough for the projector to sit in. I had a 2 and � inch drill bit and a dremel kit. First I cut the hole and it didn’t feel like it was big enough. So I used a dremel to make the hole a little bigger and made the circle more shaped like coned in to match the projector's design. The fit is nice and snug. That’s what I’m looking for. Less ex poser is always the best.
How it sits now:
Once the hole was set it was time to drill the holes for the bolts and nuts to hold the projector in the headlight housing.
My suggestion is to drill holes diagonally. Like this. Just to be sure you take your time, be patience and measure, align 10 times before you proceed. I used #8-32x2 zinc screws with matching nuts and washers.
Once I had all 4 bolts I went ahead put on the shroud to have a good idea to see how it sits. NOTE: Be sure to test the clearance between shroud/projector and the glass. If it’s touching the glass, you have to get the projector to sit deeper into the housings.
Once I had a good layout with all of the holes drilled and tested with fitting everything on…. It’s time for paint! I did not use primer on this. I used SEM paint. Here’s a picture of the bottle.

Put on the first coat of paint (very lightly)
While the headlight was drying, I figured I’d do something about my grill. It was starting to look dull and the original paint was flaking off pretty bad. So I decided to paint the middle part of the grill all black to match with the headlight. First I sanded it down and then taped over the chrome. It’s ready for paint!
While the paint is drying in the cold garage I went ahead and taped up my projectors with this:

The paint is still wet. I went ahead install the wire harness and the ballast. Word of an advice, do this in a warm garage if you can. It sucks to work with plastics/metal in the cold. Plastic break fairly easy in the cold. So be careful!
PICS COMING SOON.
I used screws and zip ties to hold the wires/ballast/relay in place.
Okay the paint is dry! It’s time to install the projector and bolt it into place.
Damn…. This looks sexy.
Back side:
Behind the rubber boot, I used a bunch of epoxy and clear silicone to cover up the holes. Also I used loctie on the nuts and bolts to keep it in place.
Installed it in and tested to see if it turned on. TADA!!!

NOTE: Before you install your new headlight, you might want to park your vehicle front of something. Park approx. 25 feet away. Turn your stock headlights on and mark where the beams sit. This should give you good rough idea where your new lights should be aligned at.
Before the alignments at the power up, it looks awesome!
Time to align the headlight. This step is fairly simple and I will skip explaining this step.
This is how close i got it. It's still titled a little bit but it looks great to me. A few washers behind the bolts for mounting the headlight bucket evened out the tilt a little better and it turned out great the way it is. The way it is on the markings on the garage doors is fine. No one flashed their lights on me yet. It's been a third night driving at night and i have not gotten flashed or pulled over.
More photos of the light outputs.
Before and after front views:
Final conclusion:
I am very pleased with the progress and the final results. Now I can drive with daylight in front of me. I recommend this retrofit hid to anyone who wants HID in their vehicle. Please for the love of god, don’t buy the cheap chinese made hid lights that goes in your stock housing. Those will blind oncoming drivers and the light output is incomparable with projectors. Thank you fellow yota members for convincing me to do better route for hid's. This project took me longer to do because I decided to use paint. I think it suits my ride better than having it all chrome.
Thank you for reading my post. I hope you enjoyed what you saw. Please comment and rate!
Last edited by bvet4dog; Mar 13, 2012 at 08:14 AM.
 Feb 24, 2012 | 10:11 AM
#4
Thread Starter
Registered User
Joined: Sep 2009
Posts: 205
Likes: 0
From: maine
traxxi It does cost a few hundred dollars and definitely worth every pennies. You can find the FX-R stage 3 kits same one i have for sale on trs website for like 300 bucks i think. But then again, i bought another set of headlights and made sure it was the 99 model which was another 50 bucks. Bought paint, screws, nuts, washers, epoxy, sillicone and loctite with spare leftover change. I highly recommend this kit or other mini kits. If i had a lighter color 4runner, i probably would've skipped the painting and if i wanted to save some minor headaches, i would get the mini kits that fits for oem sockets. I'm almost finished with the last part of the project which should be finished tomorrow. I will post more pics and complete the write up. Sorry if it's not quite complete yet. Figured i'd post and get few individuals started with the reading.
Last edited by bvet4dog; Feb 24, 2012 at 11:16 AM.
Mar 9, 2012 | 07:51 PM
#6
Thread Starter
Registered User
Joined: Sep 2009
Posts: 205
Likes: 0
From: maine
Squnit. No you dont. You're better off buying the whole kit from TRS if you want to do this route.
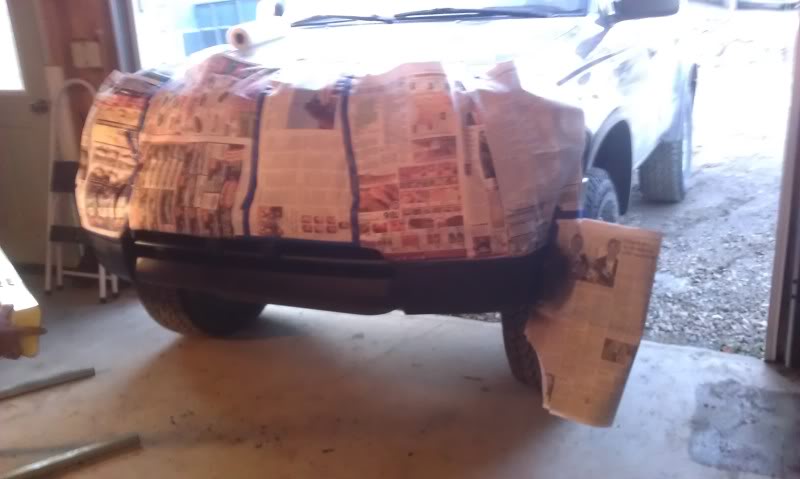
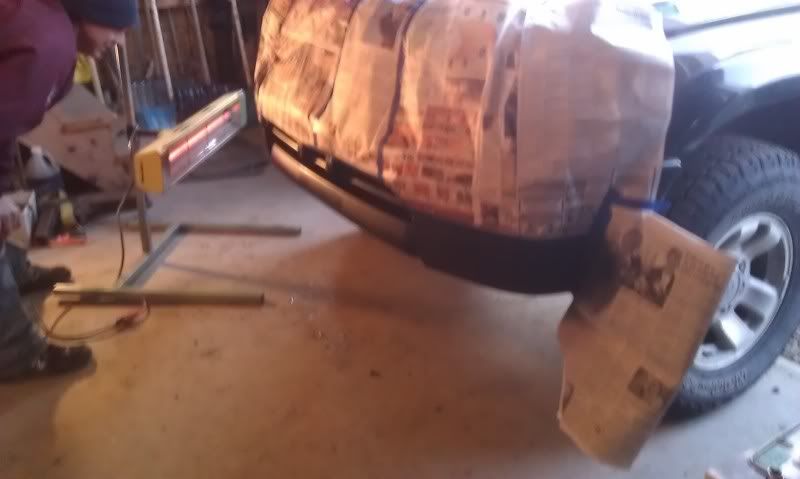
Hey every one, sorry for the delay with pictures and responding. I got busy with school and life got me carried away. I finally got my final results done today. I painted the bumper and the grill. IT came out GREAT but it could've been better if it was warmer out. We finally had a 60 degree day though and i had fun. While the paint was drying i took the toy 450r in background out for a quick run through the town lol. Here's final result photos! Photos dont do justice and i'm just happy lol
The painting process
The finish part
Please RATE and COMMENT
Last edited by bvet4dog; Mar 9, 2012 at 08:31 PM.
Trending Topics
Mar 10, 2012 | 12:53 PM
#10
Registered User
Joined: Mar 2012
Posts: 9
Likes: 0
From: idaho
I have an h4 6000k kit on my truck doesn't look like any of the trs will accept h4 ? Sorry if these seem like dump questions I just love this set up I'm doing it !!! I just would really like to use the kit i allready bout and keep my hi / low beam.
Mar 10, 2012 | 02:46 PM
#11
Thread Starter
Registered User
Joined: Sep 2009
Posts: 205
Likes: 0
From: maine
xXsquintyeyesXx You can order different shrouds. Mine is called gatling gun shroud. There is other shrouds that has different designs and i believe there is one that lets the CCFL angel eyes to be exposed so you can have a solid ring. And YES it does matter which kits you choose. Word for word from Andrew at TRS, they said for my headlight FX-R stage 3 kit or the mini d2s stage 3 kit would work great for 98 4runners. I picked the FX-R and i am very happy. This is not a easy or extremely difficult project, however it is time consuming. Pick the mini ones to save time so you dont have to drill 4 holes in the back. I kind of rushed it a little bit and i ended up having one light titled a little. I dont mind it though.
tysny Yes my kit works. High and low lights worked fine. I believe the pics are up above with hi/low. Also trs has wire harness that will suit the kits with the stock wire housing on your truck. All i did was plug the wire relay into the stock headlight plug. Only issue i had is that the wires were reversed for high/low. All i did was switched the 2 wires on the wire relay and it worked fine. This is common because many vehicles don't have the same wiring layout. Good luck with your installation.
ASk away any questions, if i cant help.... i'll look for answers lol. Hope this helps
 Mar 12, 2012 | 10:00 AM
#13
Thread Starter
Registered User
Joined: Sep 2009
Posts: 205
Likes: 0
From: maine
thanks!
Any suggestions on what i should do about marker lights? They dont match with the angel eyes or the projector and it kind of looks ugly to me. I mean i kind of want to make it all match evenly (LED i think) But i dont think i can eliminate the yellow glass thing on the marker lights. or can i? would it still be legal?
Any suggestions on what i should do about marker lights? They dont match with the angel eyes or the projector and it kind of looks ugly to me. I mean i kind of want to make it all match evenly (LED i think) But i dont think i can eliminate the yellow glass thing on the marker lights. or can i? would it still be legal?
Mar 13, 2012 | 07:34 AM
#14

Registered User
Joined: Nov 2011
Posts: 112
Likes: 0
Great job and good write up. Im not a fan of the outside edge of the headlights though. Too square looking or something. Cant quite put my finger on it. Maybe its the black background making the outline of the headlight look funky? Anyways the light output looks badass.
Mar 14, 2012 | 08:15 AM
#15

Registered User
Joined: Feb 2010
Posts: 17
Likes: 0
From: Stafford, VA
Looks great. I'm thinking about doing the MINI moto kit whenever I get my tax return. I'm going to keep the headlights chrome tho. For everyone else, the site is http://www.theretrofitsource.com/ and if you have any more questions, just google HID retrofit. I've read up on a bunch of writeups and I feel like I have enough information to comfortably go through with this. From my understanding the Minimoto does not require you to drill out a hole in the housing.
Mar 14, 2012 | 08:48 AM
#16
Thread Starter
Registered User
Joined: Sep 2009
Posts: 205
Likes: 0
From: maine
^ that is correct. That's what i was told by MATT at trs. Now a few people want me to do their headlights and i probably will just do the mini kits for a peace of mind. Depending on the headlight housings though.
Thanks enapa. Maybe it's because i did not use glossy black. I figured the extra shiny shine from it being glossy wouldnt look right.
Thanks enapa. Maybe it's because i did not use glossy black. I figured the extra shiny shine from it being glossy wouldnt look right.
Mar 15, 2012 | 10:19 AM
#17
thanks!
Any suggestions on what i should do about marker lights? They dont match with the angel eyes or the projector and it kind of looks ugly to me. I mean i kind of want to make it all match evenly (LED i think) But i dont think i can eliminate the yellow glass thing on the marker lights. or can i? would it still be legal?
Any suggestions on what i should do about marker lights? They dont match with the angel eyes or the projector and it kind of looks ugly to me. I mean i kind of want to make it all match evenly (LED i think) But i dont think i can eliminate the yellow glass thing on the marker lights. or can i? would it still be legal?
FWIW, Jason @ Burtman Ind. sells clear bumper lenses & clear corner lenses:
http://www.burtmanindustries.com/zoo...run_bump_96-98
http://www.burtmanindustries.com/zoo...orn_euro_96-98


