
1998 3RZFE Burnt Exhaust Valves
 Mar 14, 2008 | 10:26 AM
#1
Thread Starter
Registered User
Joined: Sep 2007
Posts: 1,235
Likes: 4
1998 3RZFE Burnt Exhaust Valves
I've been working on a friends 98 Tacoma recently and I thought I would share. Many thanks to mustang67408 over on the Tundra Solutions board for his advice and support. He has really helped me out.
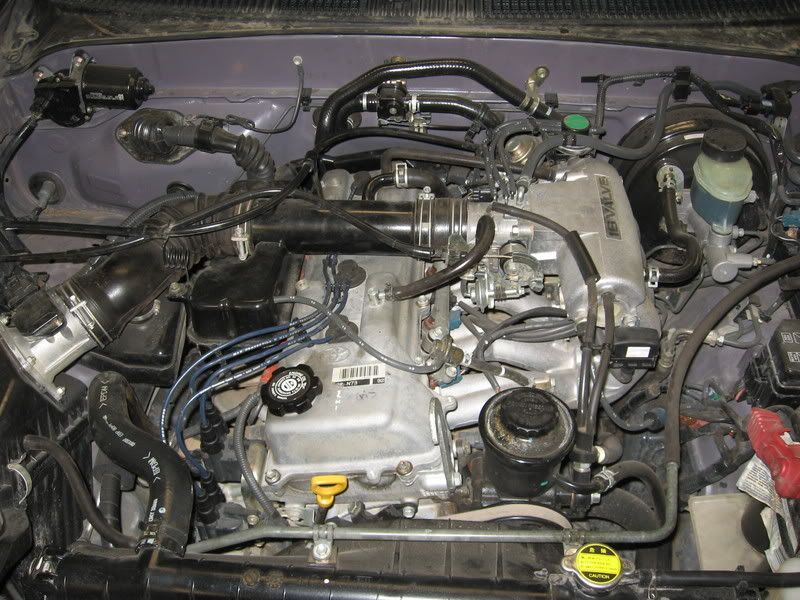
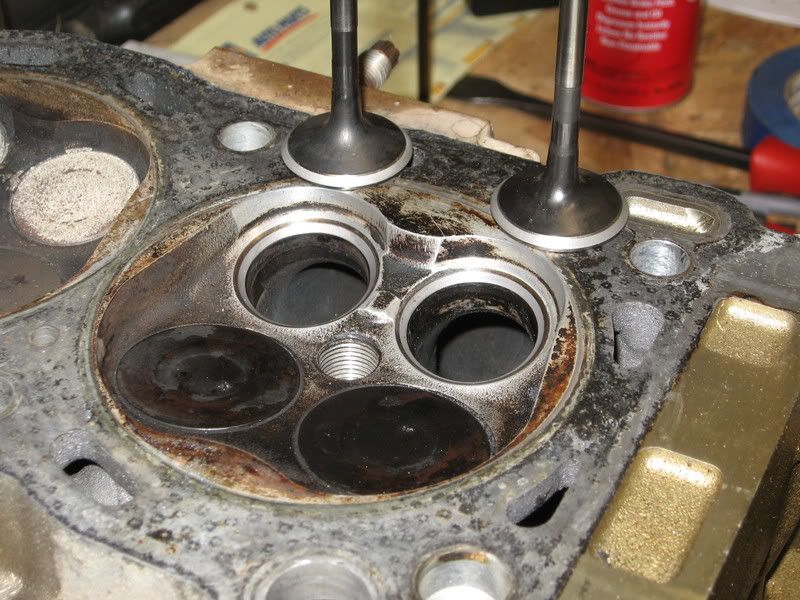
When my friend brought the pickup over to me it was missing pretty bad. After checking the basics, I ran a compression test on it and found the following very low compression on cylinder #1 (like 100 psi lower than the rest of the cylinders). A cylinder leakdown test revealed a leaking exhaust valve (or two).
So I made this:
Look like this:
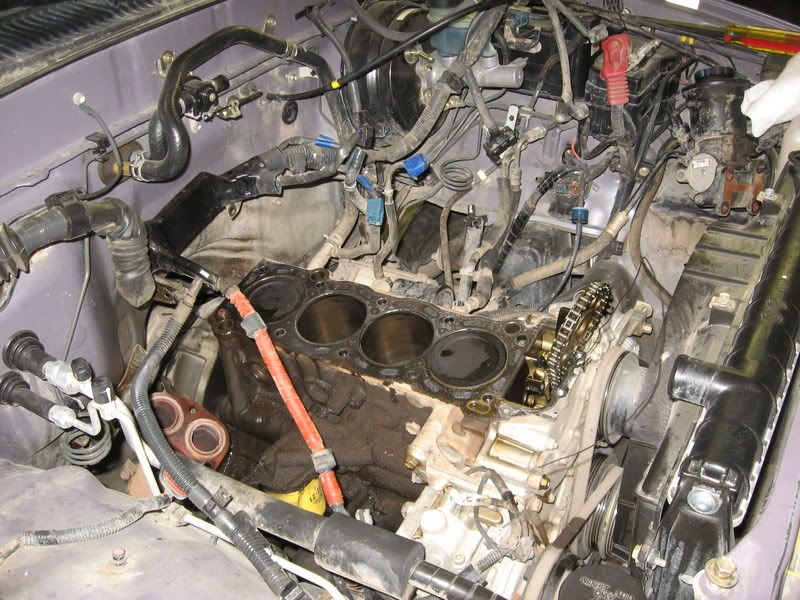
So I could dissassemble this:
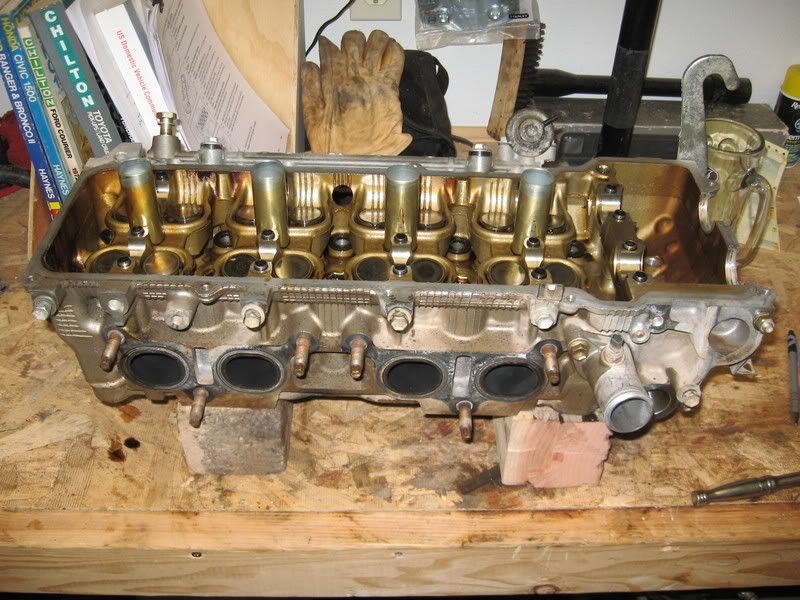
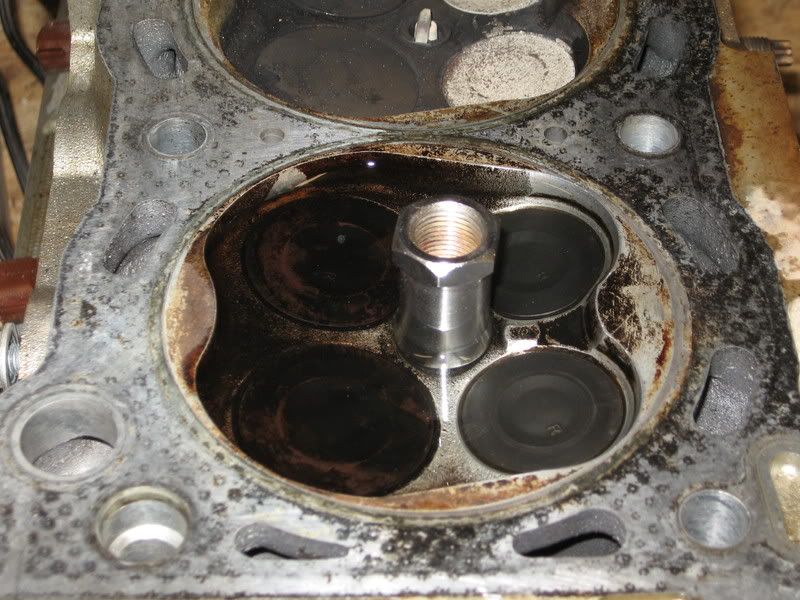
Before teardown I measured and recorded the valve clearances. All of the exhaust valves were too tight. I knew that only #1 had burned though because of the compression test.
Here's what the valves looked like when I got them out:
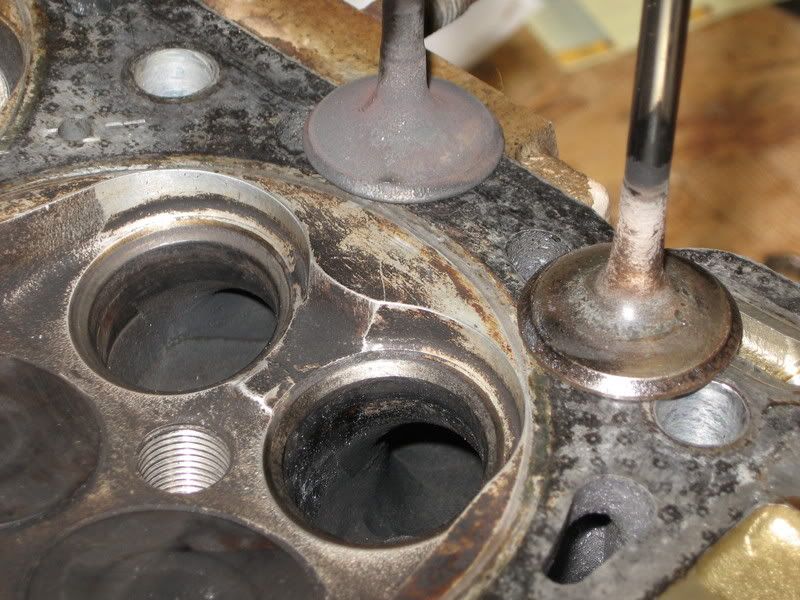
The valve on the left is obviously more burnt than the one on the right, but I am going to replace both valves. I am now in the process of deciding whether I want to have new seats installed or just lap in new valves to the existing seats. My buddy is going to sell this pickup and get one with a 3.4 V6, so he wants to spend as little money as possible for repairs.
Does anyone here have any advice or comments?
When my friend brought the pickup over to me it was missing pretty bad. After checking the basics, I ran a compression test on it and found the following very low compression on cylinder #1 (like 100 psi lower than the rest of the cylinders). A cylinder leakdown test revealed a leaking exhaust valve (or two).
So I made this:
Look like this:
So I could dissassemble this:
Before teardown I measured and recorded the valve clearances. All of the exhaust valves were too tight. I knew that only #1 had burned though because of the compression test.
Here's what the valves looked like when I got them out:
The valve on the left is obviously more burnt than the one on the right, but I am going to replace both valves. I am now in the process of deciding whether I want to have new seats installed or just lap in new valves to the existing seats. My buddy is going to sell this pickup and get one with a 3.4 V6, so he wants to spend as little money as possible for repairs.
Does anyone here have any advice or comments?
Last edited by zlathim; Mar 14, 2008 at 10:28 AM.

 Mar 16, 2008 | 12:28 AM
#5
Thread Starter
Registered User
Joined: Sep 2007
Posts: 1,235
Likes: 4
Yes, that is true. This was a budget project that I wanted to complete this weekend, so I was trying to stay away from the machine shop and related expenses/delays if at all possible.
mustang over on the TS board advised me to try lapping then in good. I gave it a shot, and after a few minutes the seats cleaned up pretty well:
With the new valves and newly lapped seats, I installed the springs. Then I turned the head upside down and filled the combustion chamber with solvent. In the picture you can see my compression tester adapter acting as a plug for the spark plug hole:
After several minutes of that with only very minor seepage, after 10 minutes not even a drop had formed in the exhaust runner,but it was visibly damp. After cleaning th mating surfaces on the block and head, the head went on and then the valves needed to be adjusted. I had read the FSM and measured all valve clearances before disassembly, so it was a simple matter of measuring the existing shims and comparing those two numbers with a chart to get the sizes of shims needed for correct clearances. I had to guess what shim would be appropriate for the two new valves, and I got one of them right and one wrong. I had to make an extra trip to the dealership, but all the valves are perfect now. The shims sit in buckets on top of the valve stem/springs. If you look close, you can see the setup in this picture. The valves on the right have the shims installed, the left side have empty buckets.
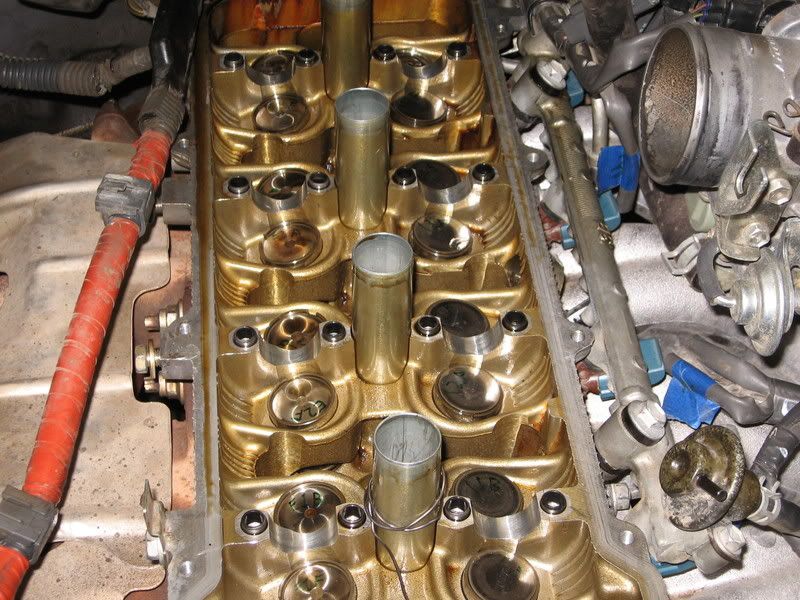
The FSM calls for two SST's for the adjustment proceedure, but they are for swapping shims with the cams in place. You don't need then when the camshafts are removed from the head. In my case, it would have been nice to have them because I ended up removing the exhaust camshaft an extra time in order to reshim the one new valve.
I have the whole thing put back together and full of antifreeze, but I am going to wait until tomorrow to fire it up and check everything out. It is late and my kids are asleep. I will give an update tomorrow after she's purring like a kitten.
mustang over on the TS board advised me to try lapping then in good. I gave it a shot, and after a few minutes the seats cleaned up pretty well:
With the new valves and newly lapped seats, I installed the springs. Then I turned the head upside down and filled the combustion chamber with solvent. In the picture you can see my compression tester adapter acting as a plug for the spark plug hole:
After several minutes of that with only very minor seepage, after 10 minutes not even a drop had formed in the exhaust runner,but it was visibly damp. After cleaning th mating surfaces on the block and head, the head went on and then the valves needed to be adjusted. I had read the FSM and measured all valve clearances before disassembly, so it was a simple matter of measuring the existing shims and comparing those two numbers with a chart to get the sizes of shims needed for correct clearances. I had to guess what shim would be appropriate for the two new valves, and I got one of them right and one wrong. I had to make an extra trip to the dealership, but all the valves are perfect now. The shims sit in buckets on top of the valve stem/springs. If you look close, you can see the setup in this picture. The valves on the right have the shims installed, the left side have empty buckets.
The FSM calls for two SST's for the adjustment proceedure, but they are for swapping shims with the cams in place. You don't need then when the camshafts are removed from the head. In my case, it would have been nice to have them because I ended up removing the exhaust camshaft an extra time in order to reshim the one new valve.
I have the whole thing put back together and full of antifreeze, but I am going to wait until tomorrow to fire it up and check everything out. It is late and my kids are asleep. I will give an update tomorrow after she's purring like a kitten.
Last edited by zlathim; Mar 16, 2008 at 12:33 AM.
Mar 16, 2008 | 01:41 AM
#6
Registered User
Joined: Feb 2008
Posts: 453
Likes: 0
From: Woodinville, Washington
This is really helpful, After having a constant misfire and after replacing every other part that doesnt require dissasembly, i am about to do this myself. I have the tools and the resources, but i am fairly inexperienced with the internals of a motor, this really gave me a preview of what im gunna see, keep it up!
Mar 16, 2008 | 04:41 AM
#7

Registered User
Joined: Apr 2007
Posts: 491
Likes: 1
You da man. You did what I would have done on a budget. Nothing wrong with lapping valves. Tough lesson in overhead cam engines where, in time, the valves will retract into the head and loose their clearances. That is most likely what fried the valves. On the 22re's I have been fairly successful in adjusting the valves and driving it for awhile. Sometimes the valves will seat, sometimes they are too far gone and a lap job is in order. I would have lapped them all but that is time I don't think you have. Smart to have done a compression check before tear down.
Trending Topics
Mar 16, 2008 | 08:44 AM
#8
Thread Starter
Registered User
Joined: Sep 2007
Posts: 1,235
Likes: 4
This is really helpful, After having a constant misfire and after replacing every other part that doesnt require dissasembly, i am about to do this myself. I have the tools and the resources, but i am fairly inexperienced with the internals of a motor, this really gave me a preview of what im gunna see, keep it up!
You da man. You did what I would have done on a budget. Nothing wrong with lapping valves. Tough lesson in overhead cam engines where, in time, the valves will retract into the head and loose their clearances. That is most likely what fried the valves. On the 22re's I have been fairly successful in adjusting the valves and driving it for awhile. Sometimes the valves will seat, sometimes they are too far gone and a lap job is in order. I would have lapped them all but that is time I don't think you have. Smart to have done a compression check before tear down.
Last edited by zlathim; Mar 16, 2008 at 08:49 AM.
Mar 16, 2008 | 10:54 AM
#9
Thread Starter
Registered User
Joined: Sep 2007
Posts: 1,235
Likes: 4
After two cycles of warm up to operating temp and then cooldown, the engine is running as strong as can be expected from a four cylinder and the nagging miss is a thing of the past! I am very happy with how this worked out. I owe a great debt of gratitude to mustang67408 form the TS boards for all of the technical advice and encouragement. He truly knows his shi'ite and was very happy to help me out.
I hope this simple write up helps someone in the future. I spent a total of about 12 hours over the course of 4 days to get this thing done. I would rate the job at about a 7 on a scale of 1-10 for difficulty. It definately wasn't easy,but it is very doable for someone with average mechanic skills. If you need help changing your sparkplugs, this probably isn't a job you want to take on
I hope this simple write up helps someone in the future. I spent a total of about 12 hours over the course of 4 days to get this thing done. I would rate the job at about a 7 on a scale of 1-10 for difficulty. It definately wasn't easy,but it is very doable for someone with average mechanic skills. If you need help changing your sparkplugs, this probably isn't a job you want to take on

Thread
Thread Starter
Forum
Replies
Last Post
Blamalam
86-95 Trucks & 4Runners
22
Mar 12, 2022 07:34 AM
the1998sr5
95.5-2004 Tacomas & 96-2002 4Runners
15
Jul 14, 2020 08:35 PM
Athansinis
Hot Deals - Free Stuff - Craigslist
0
Jul 27, 2015 08:38 AM
the1998sr5
95.5-2004 Tacomas & 96-2002 4Runners
6
Jul 16, 2015 06:20 AM


